One of the components of a harmonious interior is the ceiling. Today, plasterboard structures are often installed in the kitchen, living room or children's room. They look impressive, and the material is easy to process.
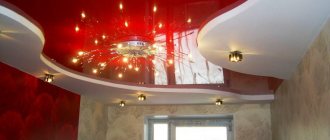
two-level plasterboard ceiling
An original option would be a two-level suspended ceiling in the kitchen or living room. It will make the room more elegant and add charm. Exquisite lighting design will also contribute. Try LED lighting, which will create a special atmosphere in the room. Drywall is a malleable material, so if you wish, you can do it yourself.
Two-level ceiling with an interesting design
What is needed for installation?
Do-it-yourself installation involves preparing materials and tools. Despite the fact that drywall is a simple material, you must act exactly according to the algorithm in order to carry out the installation correctly. You will need the following:
- Drywall sheets. You need to take the required amount in accordance with the dimensions of the room.
- UD is a guide profile that is attached to the ceiling around the perimeter.
- CD is a ceiling profile; it will become the basis of the frame. Sheets of material are placed on it, so you should choose the profile correctly.
- Suspensions. If the difference between tiers is large, spring ones are chosen. If not, ordinary straight lines.
- Soundproofing materials.
- Profile extensions. They will be required in cases where the width of the room exceeds the standard length.
- Wedge-type dowels. Preference is given to metal ones.
- “Crab” fasteners that allow you to connect the transverse guides.
- Self-tapping screws for the profile and box.
- Dowel-nails.
- Finishing materials: primer, putty and finishing materials.
Drywall as a material for a suspended ceiling
Prepare and place tools nearby so as not to delay the process. Buy a hammer drill with the optimal drill diameter, a hydraulic level or laser level, and a screwdriver. Marking tools include a tape measure, a utility knife, and painting thread. You will need a stepladder, an angle grinder and metal scissors. If finishing is planned, additionally purchase rollers, brushes and spatulas. Before starting installation, it is recommended to watch the training video.
Plasterboard on a two-level ceiling
Pre-installation and design selection
Drywall is used to create one or both tiers. Sometimes installation is carried out so that the upper level represents the base ceiling. This is a convenient way for those who want to save money and reduce work to a minimum.
Suspended two-level plasterboard ceiling in the interior
Attention!
In this case, it will not be possible to install thermal insulation, so if additional insulation is important to you, this method will not suit you.
The upper tier of plasterboard will create an interesting interior with an impressive finish. Installation in this case will take longer, but the result will please you.
Flower-shaped ceiling with lighting
Design options:
- The first level is a basic painted or plastered ceiling, the second level is plasterboard. The lamps are mounted on the second level.
- The first level is a basic ceiling with finishing, the second tier is plasterboard with lighting inside. The result will be hidden lighting and soft diffused light.
- The first level is plasterboard, the second tier is also plasterboard. Built-in halogen lamps are used as lighting. Examples are shown in the photo.
Two-level ceiling with an interesting arrangement of light.
Think over the layout of the sheets for each sheet. This will ensure that no problems arise during the installation process. Draw a plan showing each sheet and lighting fixtures on a two-level ceiling.
Photo of the design of a suspended structure in the interior
How to make a two-level asymmetrical plasterboard ceiling
After mounting 1 tier of the frame and underneath it on the load-bearing walls of the guide profile, a curve is immediately made from the entire guide profile. The easiest way to create a curved profile is on a flat surface of the screed. On the screed, the future trajectory of the curve is drawn with crayons, after which, using a small grinder, cuts are made along the entire length of the guide profile in increments of 5-10 cm to the inner base. The profile with cuts is laid on the screed and it is bent, guided by the drawn line.
Next, the curved profile is temporarily fixed at the place of its installation and every 40-50 cm measurements are taken from its internal base to the base of a flat guide profile mounted on the wall. After this, a set of short blanks from the supporting profile is cut. The blanks are placed between a curved and straight supporting profile and are fixed with self-tapping screws. Further assembly of the asymmetrical frame comes down to strengthening the connection of the second tier to the first tier.
Sheathing with plasterboard
[ads-pc-3][ads-mob-3] Sheathing a two-level plasterboard ceiling with your own hands starts from the 1st tier. Drywall sheets are cut strictly to size and mounted to the supporting profile with self-tapping screws every 30-40 cm. When tightening the screws, their flat caps are slightly recessed into the thickness of the gypsum board sheet. After the surface of the first tier is completely covered, the second tier is covered. At the very end, the vertical shelf between the tiers is sheathed with gypsum board. If the shelf has an even trajectory, then it is covered with the same ceiling plasterboard that was used to cover both tiers. However, if the ceiling is asymmetrical and the shelf has a curved trajectory, then flexible plasterboard 6 mm thick is used to cover it.
In order to cut drywall exactly in a straight line, it is laid on a flat surface of the screed and a cutting line is marked on it. Next, an aluminum rule is laid along the line on the gypsum board sheet and the rules are passed along the edge with slight pressure with a stationery knife so that the cardboard is completely cut through and the gypsum structure is shallowly scratched. After this, a wooden block is placed on the edge under the sawn sheet and, applying sharp pressure, the drywall is broken exactly along the line. If it is necessary to cut drywall along a curved radius line, then cutting is done with a small angle grinder with a stone disc.
General algorithm of operation
To create a two-level ceiling in the kitchen, hall or living room, familiarize yourself with the algorithm of work and take a look at the photos of finished ceilings. The procedure is as follows:
- Marking. The height and dimensions of each tier are thought out separately.
- The profile is attached to the wall in accordance with the markings. If necessary, it is bent in accordance with the chosen design.
- Installing and aligning the top rail.
- Creating a structural framework that will guide subsequent work. the box must be made with high quality.
- A sheet of material is attached to the frame, choosing the desired method. Most often it involves the use of self-tapping screws to secure the material.
- Installing and aligning the bottom guide.
- Final finishing - and the two-level ceiling is ready.
Two-level ceiling with lighting
Do-it-yourself two-level plasterboard ceilings with lighting: technology
Before studying the construction of a plasterboard ceiling, go over several important points. Once again, make sure that you are not considering other options for ceiling structures.
Two-level ceilings with lighting look impressive and luxurious
What you need to pay attention to:
- Room height. The design of two levels will reduce it. And if you are the owner of an apartment with low ceilings, even 5-10 cm is a significant loss. In this case, a different finish is recommended.
- Accents . This means that the design of the ceiling should also be practical, that is, the lamps that are built into the lower level can be zoners for the room.
- Humidity in the room. Plasterboard structures are not the best option for a bathroom; deformation of the sheet is more than likely. We'll have to do some repairs.
- Complexity of design. Make diagrams, drawings, use online calculation services, indicate dimensions there, etc. But if you want to do something very complex, even on two levels, but with an original look (and not a simple rectangular one), you may not be able to do it on your own.
Another important point is step-by-step instructions in your head, or better yet, at your fingertips. So that work “doesn’t get stuck in the middle of the road.”
Markup and its features
A two-level ceiling with your own hands involves making precise markings. Do and double-check everything carefully. The marking determines where the second tier will be located. You will also need to measure the level from the floor.
Two-level ceiling in the interior with an unusual light design
To do this, use a hydraulic level or laser level. If you don't have such tools at hand, don't worry. Marking can also be done using a hollow transparent hose 10 m long. If you choose a hydraulic level, this structure must be filled. To do this, its edge is lowered into a container of water and air is removed from the other side of the hose. It is important that there are no bubbles and that the liquid level remains constant throughout the measurement.
Photo of an interior with a plasterboard ceiling
The electrical wiring is taken out in advance to a separate place. This is done at the initial stage so that you don’t have to disassemble each tier separately. Marking involves determining the lowest angle in the room. For this you will need a level. After this, a line is drawn along the perimeter using a tapping cord.
Do-it-yourself frame and installation
Star-shaped ceiling with backlight
The box is the main detail in the process of creating a multi-tiered ceiling structure, allowing you to guide each sheet during installation. If you wish, pay attention to the video, which will tell you how to properly perform the installation when assembling the frame.
https://youtu.be/8C5Y3m_BUCA
First, install the guide profile. Its dimensions are selected individually, but more often they give preference to the standard 27 x 30 mm. The profile is attached to the wall using dowel-nails 6 x 40 or 6 x 60 mm.
Ceiling with lighting and lamps
You need to find the center on the ceiling. The required distance is measured from it in each direction, marking it with marks. The tapping cord will help mark the lines along which the profile is screwed. If the first tier is drywall, self-tapping screws are used for this. If the base level is made of a concrete slab, use a dowel-nail.
Photo of interior design with ceiling structure
If there are curved lines to the structure, cuts are made on the profile using metal scissors. The preferred distance is every 2.5 cm. This makes the profile pliable and it bends easily to take the desired shape. If the algorithm is difficult for you, pay attention to the video. It illustrates how to work correctly with drywall, how to make a box or basic frame structure for a two-level ceiling. This method is optimal, so there is no need to use others.
Plasterboard ceiling in the photo
Next, the frame is created by fastening. Each sheet should be carefully directed and fixed onto the assembled box, moving sequentially along its perimeter. The result should be a finished frame. In this case, semicircular areas where there is a curved profile are not affected and should not be directed.
Two-level plasterboard ceiling in the interior
An important point is the bending of drywall. The material is malleable, but this does not mean that it should be bent or broken. Drywall is carefully moistened by wiping with a damp cloth. Wet cardboard is soft and tears easily, so be careful. This will ensure that the drywall and profile take the same shape.
Curved drywall is secured with self-tapping screws without recessing them inside. This method of creating a frame is the fastest. Drywall tends to unfold, despite the fastenings. To prevent drying out in the wrong position, attach the profile tightly. This results in the material not unfolding. Now the profile is finally secured, covering the lower tier.
Plasterboard ceiling with two levels
If you don't plan to create round or curved shapes, installation is simplified. Smooth drywall does not require any auxiliary actions.
Two-level ceiling and final work
The profile is used to create jumpers. The profile has special grooves where they will be installed. Create 4 rectangles that will be located along the walls. They will allow you to complete the creation of an element such as a box. The jumpers are inserted into the profile and fastened with self-tapping screws.
Two-level ceiling with green LED lighting in the photo
To ensure that the frame is held securely not only at the edges, but also in the center of the room, the box is secured with a hanger. This will also provide a visual bottom level of the structure. Finally, a sheet of drywall is hemmed onto the frame. The material is first cut out to obtain the desired shape.
The finishing is done according to your own preferences. Finishing can be done by painting. You can pay attention to the photos, which will guarantee that the choice will be made correctly.
Photo of an interior in purple shades with a plasterboard ceiling
If you still have any questions about how to do the installation correctly, you should pay attention to the video. It will guide you as you work. You can safely make a two-level ceiling with your own hands, if you act in accordance with the algorithm, there will be no problems. There is one method of creation, but there may be some differences. The first thing you need to do is create a frame, and then attach each sheet of drywall to it. Moreover, there is a need to select the preferred finishing material.
Suspended two-level plasterboard ceiling
If you wish, pay attention to the photo. With their help, you will be able to choose the most harmonious design for a two-level ceiling made of plasterboard material. Each tier can be decorated individually to make the ceiling look interesting. The material must be of high quality, which will guarantee that the fastening method will not be complicated. Pay attention to the video and photo, which will allow you to do everything yourself.
Installation of 2 tiers of a two-level symmetrical plasterboard ceiling
[ads-pc-2][ads-mob-2] For the second tier, as well as for the first tier, the installation of a frame for a two-level plasterboard ceiling begins by tying the guide profile at the same level to the walls. The depth of the vertical shelf between the two ceiling levels directly depends on how far below the first tier the guide profile is mounted on the wall.
At the next stage, blanks are made from the supporting profile with a length equal to the width of the second level of the ceiling. The number of workpieces is calculated so that the step between them is 60 cm. One end of the workpiece is inserted into the lower guide profile and fixed with self-tapping screws. The workpiece itself is leveled and, retreating 20 cm from its second end, the workpiece is fixed to the profile of 1 tier with vertical plumbs.
A second piece of similar length and in the same way, level, is fixed in the opposite corner of the room. After this, a nylon thread is stretched between the workpieces, following which all the supporting short profiles of the second tier are attached. It must be said that if the depth of the shelf between the 1st and 2nd tier is more than 20 cm, then the horizontal supporting profile from the second tier is attached to the profile from the first tier not with plumb lines, but with homemade racks. Such racks are made from trimming the supporting profile. When pruning, it is necessary to cut out the rear base to a depth of 20 mm on both sides.
As mentioned above, the ends of the profile of the 2nd tier by 20 cm were left free. Here, along all these free ends, 1 continuous guide profile is fixed. And from this profile, in increments of 50-60 cm, homemade vertical racks are also mounted to the profile of 1 tier.