If finances are limited, but there is a desire to make the balcony cozy and beautiful, then the question arises - how to arrange a balcony inside in a simple and cheap way? Often, balconies in our apartments serve as a closet - they store unnecessary or seasonal items. But with very little effort this place can turn into a piece of paradise! We will share tips for budget-friendly balcony design, relevant for open, glazed areas, as well as loggias.
Inexpensively equipped but stylish open balcony.
Decluttering and cleaning
First, look at your balcony - what do you see there? Most likely, old equipment is stacked there, a clothesline hangs, skates and rollers, which children have long since outgrown; motorists may still have tires and other parts stored away. If your balcony resembles a small warehouse, upgrading the room should begin with clearing out the rubble. Take a free day, go through all your things and divide them into two groups:
- unnecessary (they need to be distributed to friends / sold / donated to charity / thrown away);
- necessary (they need to be taken out of the balcony and placed in the garage, at the dacha, in the closet).
Most likely, there will be much more unnecessary things than necessary ones. After things are taken out and you begin to contemplate the empty space, it must be thoroughly washed. After these procedures, you can think about further arrangement.
Transformation of a balcony with a small investment.
Locker for the balcony
It’s not difficult to make a cabinet with your own hands, just buy material for the outer wall, shelves and make doors from veneer or plywood. One wall of the cabinet will be the wall of the house, and the top will be the ceiling of the balcony. When assembling a cabinet wall from boards, you can use medium-thick slats, screwing them on the inside with self-tapping screws. These slats will serve as the basis for the shelves. The second row of slats is screwed onto the wall.
Related article: Decorating a balcony using wallpaper: stylish finishing options and tips on choosing material
To fasten the cabinet doors you will need piano hinges or regular hinges - depending on who you like. If such a cabinet should have 2 doors, then a vertical block must also be secured to the wall so that the width of the outer wall and the edge of the block are at the same distance from the end side of the balcony, unless this is an intentional asymmetry.
Video gallery
Photo gallery
Finishing
Finishing work on the balcony consists of decorating the walls, ceiling and floor. The choice of materials will depend on the existing design:
- if it is a brick balcony, you should not spend money on finishing materials; it is better to wash and thoroughly clean the brickwork, maintaining a harmonious combination with the rest of the facade. Afterwards, the surface can be treated with antifungal and other protective (dirt-repellent) compounds that will help maintain a presentable appearance longer;
- if the walls are made of concrete slabs (including plastered), the natural shade of concrete can also be preserved by diluting the interior with decor, or changed by painting with acrylic or latex compounds. First you need to put a primer under them;
- It will be too expensive to redo tiled walls, so it is recommended to simply clean them thoroughly from dirt.
In our material you can find out how to renovate a kitchen on a limited budget.
Tip: when choosing finishing materials in construction stores, ask about discounted products. Usually they come in limited quantities, but this volume should be just enough to decorate a small balcony or loggia.
Some of the cheapest finishing materials are whitewashing, painting and wallpapering. These materials may not be the most practical (especially from the lower price segment) and often require replacement, but they will allow you to improve the interior space of the balcony without much expense.
To finish the floor you can also use one of the options:
- flooring made of wooden boards (slats), for example from old pallets;
Wooden floor on the balcony made of slats.
- carpet (a very simple way to finish the floor, especially if glue-free installation of one solid piece is used);
Budget carpet flooring.
- self-adhesive plastic tiles (tiles can only be glued beautifully onto a perfectly flat floor!).
Floor tiles for balconies.
Important! The wooden temporary coating will need to be treated with a protective agent. However, during precipitation and in the winter (in the case of an open balcony), it will still have to be removed.
Window frame and balustrade
If the balcony is glazed, you might want to think about how to design the window frame.
- If it is a metal-plastic window, it is advisable not to change it in any way. Firstly, it itself looks quite neat and modern. Secondly, painting will cost a hefty sum, which is not suitable for a limited budget.
- If the balcony has a wooden frame, it can be painted with façade paint for wood or varnished. First you need to remove the old coating, clean it well and coat it with a primer.
If the balcony is open, glazing it will not be the best solution due to the high cost.
In the case of an open balcony, it is also worth considering how to decorate the railings. A metal balustrade can be painted with alkyd or epoxy. First you need to carry out preparatory work: remove the old paint with a metal brush and prime it with a special compound for metal surfaces, which prevents rust.
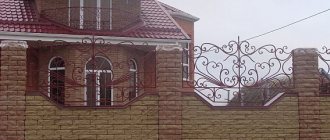
Ideas for decorating railings for an open balcony:
- bamboo mat;
- polymer vine;
- textile drapery.
Bamboo mat for finishing balcony railings.
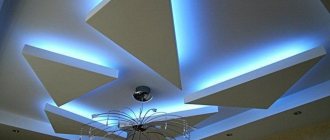
Lighting
You can significantly transform a space, make it more cozy and comfortable with the help of proper lighting. When choosing lighting fixtures, it is worth starting from the type of balcony.
- For open areas you need to choose street lamps and lanterns. These devices are designed for use in conditions of adverse weather conditions, temperature changes and moisture. If there is no wiring on the balcony, it is optimal to choose battery-powered lamps. They can usually last up to 100 hours, and if you choose rechargeable batteries, this device will last you a long time. An additional advantage is the low price of the equipment.
- In closed areas, you can install electricity or use the above option.
Lighting for an open balcony.
Tip: LED garlands look especially romantic and cozy when decorating balconies.
Lanterns and garlands on the balcony will help create a romantic and cozy atmosphere.
What materials can be used to decorate the wall?
The partition separating the loggia from the apartment can be finished:
- plastic panels;
- clapboard;
- drywall;
- decorative plywood.
Sometimes the wall on the balcony is also simply treated with ordinary or decorative plaster. In any case, when choosing a specific material, you should, of course, take into account whether the loggia will be glazed in the future or not. For finishing a closed balcony, for example, plasterboard or lining are perfect. Open loggias are most often plastered or finished with moisture-resistant plastic panels.
Furnishing
Buying new furniture usually has a big impact on the budget, so this option is not suitable if you are looking for ways to decorate the inside of a balcony in a simple and cheap way. To reduce costs, you can make simple furniture yourself.
DIY furniture ideas:
- from pallets;
- from wooden boxes;
- from car tires.
Stylish furniture made from pallets for the balcony.
Tire table with glass top.
Advice: if you are still inclined to buy ready-made options, choose collapsible furniture for your garden - usually its price is less than room furniture, and its dimensions are more compact. If desired, the color of the purchased kit can be changed using alkyd paint.
Inexpensive country furniture for furnishing a balcony.
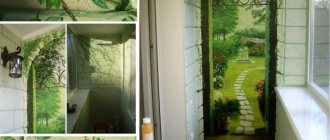
landscaping
Undoubtedly, plants and flowers on the balcony can radically change the appearance of the space. The choice of plants for a balcony or loggia should be based on whether the space is open or glazed.
- Open balcony. Placing flowers and plants on an open balcony can give the space a special charm, atmosphere, and create the feeling of a terrace. In addition, the parapet can be used as a support for installing flowerpots. The disadvantage of open areas is that the time of their use is limited by above-zero temperatures: from April to September, depending on the region. Therefore, you can grow annual plants in an open area, as well as take out your indoor residents for the summer. If the balcony faces north, you can take out ficus, dracaena, cyclamen, and also grow forget-me-nots and marigolds. If the side is sunny, then feel free to take out cacti and succulents, plant petunias and asters.
- Glazed balcony. The beauty of a glazed space is definitely the possibility of year-round growing of flowers, plants and even some vegetables and herbs, especially if the balcony is insulated. What can be grown: hibiscus, fuchsia, ficus Benjamin, as well as greens: basil, parsley, dill.
Low-growing flowers on the railing of an open balcony.
Winter garden on a glazed balcony.
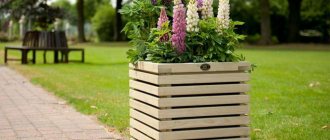
Tip: plants in wooden boxes, galvanized flowerpots, and flowerpots will look original and stylish.
General rules for landscaping:
- in order not to interfere with the normal penetration of light into the room, it is not recommended to place tall plants (trees) with spreading crowns on the balcony;
- if you want to place many plants, use a multi-level system (vertical beds);
- The best option for balconies and loggias are low-growing, neat plants and flowers.
Important! When choosing and placing plants on balconies and loggias, you must take into account the cardinal directions.
Construction stages
Extension of a balcony with your own hands will differ in 2 fundamental ways:
- Attached. It can be made from materials of your choice, as it has load-bearing parts supported on the ground. The 1st floor slab can be erected on a strip foundation, inside which it is convenient to arrange a cellar. Structures of both the 1st and 2nd floors can be supported by columns. In these cases, the load that can be distributed on the balcony floors increases significantly. In the closed version, you get practically a separate room.
- Hanging. Light materials are used because such a protrusion creates additional forces on previously built parts of the house. It consists of beams connected to each other at one end and inserted into the wall. Support slopes are often installed. Used for balconies of 2 floors and above.
Installation on a support
Depending on the height of the building's base, it is better to make a balcony on the 1st floor on an independent basis. Foundation reinforced concrete blocks, solid expanded clay concrete products or red brick are suitable for this purpose. A slight elevation can be filled in in the form of a reinforced tape.
The installation of columnar foundations requires significantly less time and materials. Laying out 2-4 columns yourself or installing piles of steel pipes with subsequent piping along the top is quite possible.
In any case (whether there is a cellar or not), high-quality waterproofing is carried out with an exit above the blind area of at least 0.1 m.
Console location
Construction of a balcony
There is no excavation work in this option, but it is necessary to give an objective assessment of the load-bearing wall for anchoring. If you are planning a large-scale covered extension with a large area of side walls and roof, it is advisable to assess the wind and snow load.
The first step will be to install windows in the apartment and make a doorway. If the balcony is planned to be an open type with railings, then its level should be 0.1 m below the floor of the apartment to prevent water from flowing in in the form of precipitation. For the same purpose, the plane of the screed on top of the slab is made with a slight slope towards the outer cut.
The load-bearing part is assembled from channel 10 and 12, placed on the edge. The step between them does not exceed 2 m. The beams are inserted 20 cm into the knocked-out recesses in the wall. The bottom is connected by welding to a support channel placed close to the wall. The outer beams are reinforced with vertical plates secured with threaded ties to the wall.
Look at the video to see if it is possible to attach a balcony to an apartment:
Floor installation
Installation of the floor on the balcony
The design of the floors is selected according to the owner’s decision:
- Concrete. A reinforcing frame is laid between the load-bearing channels and filled with cement mixture. The cage of rods is knitted with a 10 cm cell. It is important not to forget to release the ends of the reinforcement for welding the fence and install the necessary mortgages. Concrete dries and gains strength within 28 days. Finally, a finishing screed is made.
- Wooden. A beam is sewn onto the metal, on which frame floors are laid (sub-layer, insulation, insulation, floorboard).
- Warm. The lower part is sewn up with galvanized sheets. Warm floors are laid on top using technology.
At a height, the formwork supporting temporary slopes rests against the wall. After final hardening, they are carefully removed.
Vertical elements
The fence can be made of metal or wood. The material will determine the method of performing the work - a welded connection or a bolted connection to the embedded parts. Sandwich panels, metal-plastic bays with glazing, and frame assemblies are installed as walls. An example of do-it-yourself framing is interior lining with clapboard combined with exterior siding.
However, even when installing beautiful glass sliding panels, installing railings on balconies is mandatory.
Roof
Balcony roof sheathing
The roof carries heavy loads, so the supporting frames are made of metal. They are sheathed with wooden beams (lathing) for roofing material. It is advisable to lay a vapor-permeable membrane.
The roof dimension is larger than the outer perimeter of the walls: on the sides 0.2 - 0.3 m, on the front 0.1 - 0.2 m. The slope from the wall to the cut is about 30°.
As a coating, you need to use sheet materials that will not create noise when drops fall and are resistant to sunlight and temperature changes. An example is ondulin.
We recommend watching a video on how to build a balcony in a country house:
Handy decor
The final chord in upgrading the balcony is the placement of decor. It is not necessary to resort to buying expensive things from the store, because coziness can be created from improvised means.
Examples of using textiles on the balcony.
Pay special attention to textiles - they are the ones that set the tone for the entire space. Large knitted blankets, homemade pillows, napkins and vintage-style blankets can easily be found at grandmothers’ markets or made by yourself. Simple patterns (checks, stripes and plant motifs), various textures, soft colors will look warm and cozy at home.
Original and stylish design of the balcony.
Thus, using our photo selection as an example, we showed how in 7 simple steps you can easily and cheaply arrange a balcony inside. The result of a little effort can be a wonderful place to relax, with a simple but stylish design, where the whole family will enjoy spending time!
Video: economical design of a balcony.
Related publications
- Read
Balcony arrangement
- Read
Do-it-yourself glazing of a balcony in Khrushchev
- Read
Do-it-yourself balcony repair - stages of work
- Read
Do-it-yourself interior decoration of the balcony
- Read
Balcony tinting
- Read
Cover the balcony with panels
The main thing is not to choose bright panel colors and specific patterns. For a room facing the street, it is more advisable to choose neutral tones. Even for those who have never covered walls with panels or clapboards, it is quite possible to do the job from start to finish with your own hands. To do this, you will need thin wooden slats for sheathing, a drill (preferably a hammer drill), panels, dowels, self-tapping screws, and a construction stapler with staples.
Related article: Creating modular paintings: master class for beginners (+48 photos)
When covering a room with panels, a vertical arrangement is often used, so the slats must be placed horizontally on the wall. In the corners of the walls you will have to secure bars of the same size as those on which the canopy is supported. The panels are light, there is no point in doing frequent lathing. Enough for 3 slats on the wall, and between the posts of the visor. The wooden parts are attached to the wall with self-tapping screws into dowels. It is simpler and easier to carry out this stage of work with a screwdriver.
A stapler used for upholstery will help attach the panels to the slats. The brackets hold the panels in place perfectly, creating the appearance of a monolithic wall. The same corners will help to decorate the corners of the sheathing; they will hide cuts and small flaws in the “walking” walls.
So, step by step, slowly, thinking through each step of the repair in a week, you can transform the balcony with your own hands.