Decorative plaster - advantages and disadvantages
Finishing with decorative putty is used as a self-sufficient coating for walls or a base for painting. Used alongside wallpaper, this material represents a modern finish. Combining different types of decorative putty produces original effects. One of the advantages is the ability to prepare mixtures yourself. The following series of “advantages” are noted.
- Used as decoration, looks aesthetically pleasing.
- The coatings are unpretentious and can be easily cleaned using the wet method. It is allowed to use detergents. Practicality.
- The finish “breathes”.
- There is no smell, as well as harmful emissions.
- It does not crack, but only strengthens over time.
- The wall does not need to be pre-prepared. Texture and thickness determine the smoothing of irregularities and defects.
- Long service life with proper work and careful operation.
- Masking of defects and irregularities in the presence of textures. In this case, mixtures with cellulose are good.
- Versatile, the coating is suitable for all or many surfaces.
- Resistance to the environment, compliance with environmental standards.
The coatings are free of toxins and many are breathable. Putty can isolate noise. Decorative putty used for walls involves many aesthetic solutions. The room is decorated to your liking. The disadvantages are the high price for some types, as well as the complexity of implementation.
Finishing with decorative putty is used as a self-sufficient coating for walls or a base for painting.
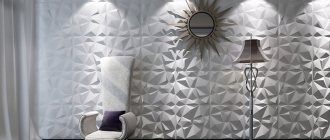
Patterns with a spatula
"Rain" pattern. The material is applied at a certain angle. To do this, the spatula should not be pressed too hard against the surface: the less contact between the wall and the tool, the more unevenness will be obtained. After drying, it is recommended to sand the surface and then paint it. A special feature of this method is a well-painted, even part of the wall, on which small, remaining light-colored dimples will clearly stand out. In this way, decorative plaster can easily be created from ordinary putty. The photo colorfully conveys all the charm of the textured pattern.
Drawing "Fish scales". The plaster is applied to the wall in pieces, without smoothing. After applying it to the wall, literally for a couple of seconds you need to lean the spatula and lightly press it into the coating. Adjusting the pressure will ensure uniformity of drawn details, which can be placed in a checkerboard pattern or shifted by a fixed distance. If you don’t like the resulting pattern in any area, the manipulation can be repeated.
"Cave" pattern. The putty is applied with a spatula and leveled, after which it is necessary to press a collected piece of polyethylene over the entire surface. Or you should apply a covering film to the wall and tear it off after a day.
Features of putty and plaster, the difference between them
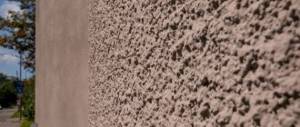
Decorative putty, like plaster, serves the same purpose - to make the surface smooth. The second composition protects the wall from dampness and has thermal insulation properties. It has a coarse-grained structure. In addition, plaster can decorate and perform an auxiliary function. Putty does not have the same degree of viscosity. By smoothing the planes, puttying does not change the volume. The mixture comes in initial and finishing types for quick sealing and smoothing.
Plaster can decorate and perform an auxiliary function.
Venetian plaster
Venetian decorative plaster made from ordinary putty is a moisture-resistant hard coating with a service life of 10-15 years. The process of creating such a drawing, which consists of several stages, is characterized by labor intensity, duration and complexity. To implement the pattern, you need to put a small amount of putty on a spatula and make neat but chaotic strokes on the wall. Thus, you need to apply several more layers (from 2 to 10), allowing each of them to dry before a new operation.
The first layer is the base layer, applied completely and serves as the basis for the decor; subsequent ones are recommended to be adjusted using a flexible spatula. The spots of each new layer should not match the previous ones. It is recommended to apply until the spotting effect becomes barely perceptible.
Before applying again, the dried layer must be cleaned to eliminate unevenness. The surface must be sanded with a mesh or fine-grained sandpaper, erasing only sharp corners.
The dried wall is covered with protective synthetic or beeswax. You can also use colorless varnish, but it is believed that it may darken the surface. A wall plastered using this technology resembles expensive, noble marble.
Decorative plaster from ordinary putty (you can create it with your own hands) is a unique method of revitalizing the interior, giving the home comfort and unique charm.
How to make decorative plaster from ordinary putty with your own hands
A homemade version can be easily obtained from existing ordinary putty. First you need to disassemble the composition. The base is cement, gypsum, clay, acrylic, silicone. Do-it-yourself decorative plaster using ordinary putty is done by adding components. If the base is mineral, add sand and stone chips. Synthetics work well in polymer putties, giving the effect of leather and silk. Viscosity and adhesion are achieved by plasticizers, which impart elasticity.
Homemade mixtures usually include PVA glue. The simplest option can be prepared for interior work. The result largely depends on the application method. For example, the relief is done with strokes. To make the wall expressive, coarse-grained additives are used. Such imitations can be done with your own hands.
To create strength and elasticity, use PVA glue or deeply penetrating primers. They contribute up to 2.5% of the total mass.
A homemade version can be easily obtained from existing ordinary putty.
Types of putty mixtures
Depending on the purpose, putty mixtures for finishing are available in two varieties:
- Starting. It has a gray color and a rough structure. Designed for high-quality leveling of wall surfaces.
- Finish. Characterized by a smooth soft texture. Gives a glossy shine to the surface on which it is applied. Great for wall decoration. Depending on the main component, it can be gypsum, cement, polymer, acrylic, etc.
Decorative plaster made from ordinary putty allows you to decorate a wall in an original way, relying on the boundless flight of your own imagination. It is not difficult to do this work with your own hands. Plus, this is a great option for saving money. Working with a plastic material that can be pliably applied to various substrates (foam concrete, plasterboard, brick) is not difficult even for a person far from construction work.
Crafting Recipes
In the simplest case, to transform plaster into a more stylish coating, you need to add a coloring agent. When making a composition such as decorative putty from ordinary putty, you may encounter a high cost of the result. But there are examples of simple mixtures, the production of which will result in a completely economical option.
In the simplest case, to transform plaster into a more stylish coating, you need to add a coloring agent.
With PVA glue
The polymer-adhesive mixture is prepared with the participation of the following components.
- 800 g PVA glue.
- CMC for wallpaper – 2 kg.
- Laundry soap in the form of a 10% solution.
- 6.5 kg of chalk.
All components need to be combined and mixed. Bring to a paste structure.
All components need to be combined and mixed.
With primer
For example, using textured putty, drying is achieved and the relief is corrected. This composition can be made independently by adding wax or other means. The surface becomes matte or becomes shiny.
Using textured putty, dry it and correct the relief.
Gypsum based
An appropriate putty based on this material is taken. For example, the starting and finishing version is mixed 1:1. Gypsum plaster is also suitable. Everything is poured into a bucket of warm water. Add a little diluted wallpaper glue. The mixture hardens not so quickly, you can work calmly. The composition is mixed with a special mixer. The amount must be spent in 15 minutes. Then the surface is decorated with textures.
The mixture hardens not so quickly, you can work calmly.
With marble chips
A small or large fraction is added to one or another base. Thorough mixing is done with a special tool. Small particles will give an even effect, while large particles will create a noticeable structure.
Small particles will give an even effect, while large particles will create a noticeable structure.
Versailles plaster
The type of finish has a mother-of-pearl tint. A texture is created on the wall, which is then painted and varnished. You need to take finishing gypsum putty. Dry mixtures are available for sale. With a layer of 1 mm, 1 kg will be required for each square. meter. You will need a plastic or metal trowel, a bucket, and a spatula. A uniform layer without smoothness of 2 mm is achieved. Use arched strokes to create a texture until dry (1 hour). Then they paint (acrylic is suitable).
The type of finish has a mother-of-pearl tint.
Drawing with a spatula
A notched spatula, slightly pressed into a soft base that has not had time to dry completely, in the hands of an experienced craftsman will leave original circles, semicircles or stripes (vertical and horizontal). Even an ordinary plastic bag or foam sponge can turn into an effective tool for realizing your intended design. Beginners in the construction business are advised to simply practice using them correctly in order to subsequently be able to create an original finish. After the plaster is applied and traced, you need to let it dry for 24 hours and then sand it with fine-grained sandpaper.
Do-it-yourself decorative plaster from ordinary putty can be applied to walls for painting or in a colored form, providing the surface with a uniform, monochromatic color. The coloring composition is prepared using paint pigments. It should be remembered that the wet solution in a bucket looks much darker than the final result on the wall.
Patterns, embossing, roller textures
The sequence of actions is important. The wall is cleaned, primed and covered with putty. Textures and patterns can create relief. For this or that configuration, imagination is important, not just the tool. For example, using a roller they create a velvet effect. But you need to finish the surface quickly, no longer than 40 minutes. Interesting! Patterned embossing is even made from densely veined tree leaves.
Textures and patterns can create relief.
Homemade finishing tool
To carry out standard puttying work, you need the following set.
- Spatulas.
- Metal ironing board.
- A grater made of wood or plastic.
- Plaster rollers are used.
- Prepare containers for water and solution.
A home craftsman can make devices for creating relief and embossing. For example, these are coatings for rollers. Suitable leatherette, dressed with folds on the instrument. And it will give an interesting structure. The relief is also set with a piece of crumpled polyethylene.
A home craftsman can make devices for creating relief and embossing.
Decorating tools
Do-it-yourself decorative plaster from ordinary putty can be realized using tools such as:
- Roller.
- Ready stencils.
- Trowel.
- Ironing iron.
- Brushes.
- Spatulas.
Decorative plaster made from ordinary putty using a roller can have a texture reminiscent of tousled velor. The stronger the pressure on the tool, the more clearly the drawing will appear on the wall. For greater originality, the roller can be wrapped in textured fabric or leatherette. Excessive fluffiness is corrected with a spatula, while sharp corners are smoothed out.
Special construction stores offer the consumer ready-made stencils that leave a textured imprint when pressed into the base. To obtain a clear stamp on the plane, the stencil base must be constantly washed with water. The cleaning process takes a lot of time, which is the only drawback of this method.
Decorative plaster from ordinary finishing putty can be easily applied using a spatula or brushes. Thanks to these tools, you can create textures reminiscent of suede, natural stone or concrete.
Making a textured wall from putty, paint and decor
Today we’ll look at how to make a beautiful wall using putty and paint. In this case, the wall turns out to be textured, the surface is somewhat reminiscent of slices of cheese, ripples on the water, or the lunar surface with small craters, whichever is more convenient to compare with. For practical reasons, I recommend using this method of decoration to first decorate one wall, for example the kitchen wall, in the dining area.
Related article: How to cement a hole in a wall
The method and material are especially suitable for those who have a gas stove at home and the wallpaper quickly gets dirty due to soot, but want coziness and comfort in the kitchen. It would also be good for a dacha, where the stove is heated with coal or wood. For a country house, when the room has a fireplace. Where the whitewashing and painting of walls has to be done regularly. And for a number of reasons, other materials are not suitable.
This method of decoration has its pros and cons.
pros:
- Perfect replacement for wallpaper. For the next few years, you definitely won’t have to update them every year, which is undoubtedly convenient for those who have tension over time, have a limited budget for repairs, or, for example, find it difficult to glue wallpaper alone.
- In order to update a wall, it is enough to refresh it as needed with a layer of water-emulsion paint, painting it in the same color or any other color.
- Giving a new look is as easy as shelling pears - just remove the old decor from the wall and add new elements.
- Scratches, damage from animal claws, small cracks and cracks can be easily decorated or disguised in just five minutes. It is enough to apply a spot-on new layer of plaster and then paint.
- Putty-paint fits well on lightly washed whitewash, and works great on previously painted walls. You can paint it with enamel, if desired, and then wash the wall with a brush. In the latter case, as an alternative to tiles, if it is not possible to lay them in this place.
- A variety of designs and textures, literally from improvised means, give complete freedom of creativity.
- The method is simple to implement, it is relatively easy to do everything alone, or create together with children.
And minus:
Having covered the entire wall with putty, and even more so all the walls in the room, if you suddenly don’t like the result and decide to return to wallpaper, you can only hang new wallpaper after removing the putty and paint. Partial or complete, depending on the thickness of the layer. Therefore, as I said earlier, I recommend starting with one wall, for example a small area above the table.
*This is not decorative plaster for interior work, which is sold in finishing materials stores, but putty-paint. Although, there are some similarities. That is, it will not shine beautifully with a pearlescent gloss, and it will not be covered with wax, and it is easier to apply. In my example, the wall will have a matte white and blue surface. A budget option for decorative plaster, but it’s up to you.
Materials and tools:
- white putty-paint (a lot, depending on the thickness of the layer and the size of the wall);
- wide construction spatula with a smooth edge or a tool for applying plaster;
- narrow spatula or tablespoon;
- plastic film, scissors, masking tape;
- gloves;
- color scheme;
- water-emulsion paint;
- paint tray, or container for diluting and coloring paint;
- brushes or roller for faster painting.
Optional:
- roller to create a spectacular texture;
- artificial flowers and grass for decoration. You can replace them with natural ones, such as fern leaves (maple leaves, gypsophila with small flowers, spikelets), to create texture on the wall. Gild with paint, glitter;
- PVA glue, for gluing decor to the wall.
1. Preparing the wall . We completely remove the old wallpaper. If the wall was previously painted with a water-based emulsion, or the old whitewash remains on it, walk with a wet rag over the entire surface of the putty. Leave it for a while and let it get wet so that the putty will adhere better. We glue masking tape to the baseboard. To protect the floor from paint splashes, we also lay out plastic film along the wall.
2. Making an invoice
Using a spoon or narrow spatula, spread putty-paint onto a wide spatula. Apply with light short movements, literally barely touching the wall, a thick layer of putty, about 1-1.5 cm, and spread it very slightly over the wall, lightly pressing on the spatula with your hand. We hold the tool almost parallel to the wall, and move it that way, as if removing the top layer.
This movement, without short strokes, leaves a beautiful pimply mark after the first pass.
The thicker the layer of putty, the more beautiful the effect, but the greater the consumption, of course. If you run a spatula over the same place two or more times, or smear the putty on the wall, the entire effect of large burst bubbles will disappear. The most beautiful is obtained on a thick layer, with light hand movements.
Texture on magnification
It didn’t work out beautifully the first time, no problem. We take a small piece of plastic film, about the size of a bread bag, and place it on a layer of putty-paint. Smooth it along the wall with your hands. And very quickly we tear it off the wall. Experiment with tack speed, pressure, and smearing movements of the spatula to get the best effect.
There will be nicks and characteristic ripples on the surface of the putty layer, which is what we need. We repeat the action until the result suits us.
By making circular movements with your hand and patting your palms on the wall, you get the effect of a mud wall. Or you can leave children's handprints as a souvenir. I used a variety of techniques. Basically, with crumpled plastic film (No. 2, 3 in the photo below).
Photo for example. A drawing that is obtained by using various objects.
dry thoroughly . Especially if you need a texture with pointed edges and teeth, in a small hole, like cheese.
For the cheese effect, I decorated this wall with oil-based putty. I applied it with a small spatula, and then, after it had completely dried, I painted it with white enamel (it glares in the photo, the surface is glossy). Such a wall can be washed with a brush and chemicals. Even three years later, the wall is still like new, after repairs, nothing has cracked or fallen off.
During subsequent painting of the putty-paint with water-emulsion, part of the pattern will become wet and smeared, and the holes will be painted over. Therefore, the more prominent the design is initially, and the drier the wall is before the first painting, the better.
Wide spatula and crumpled film, plaster roller
4. We color and paint
Add the selected color to the water-emulsion white paint. Can be painted with ready-made colored paint. I have a soft blue wall color in my kitchen, I used a violet color. Proportions by eye, approximately 1:10 or less. We paint the wall with a slightly wrung-out fur roller, and difficult areas with a brush. Then let the paint dry, this will take about a day. Carefully remove the tape and film from the floor. At this stage you can stop, everything is ready.
Or continue with the decor, in accordance with your idea.
In the photo behind me: the wall after painting. My husband and I celebrate finishing work with an orange.