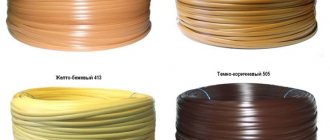
Wooden ceiling in an apartment and a house , pros and cons, what is best to make it from, installation and painting technology. Wooden ceilings in the apartment are represented by hemmed and suspended structures, assembled from profiled molded lumber of good quality, boards 20-25 mm thick or specialized wooden panels. Most often they are installed in residential areas with normal humidity, but with sufficient protection from fungus and steam they can be installed in the kitchen, loggia, corridor and even in the bathroom.
Main nuances
A true decoration
The ceiling should create a feeling of lightness and not clutter up the space. This effect can be achieved by choosing the right color, texture, and shape. Wood is a very flexible material in processing; it can be given any shape that the master wishes. Such solutions have many advantages:
- The natural base is always highly environmentally friendly. You don't have to worry about allergic reactions or unpleasant odors. With the right approach, you can use water-based dyes.
- The durability of wood is difficult to overestimate. If you provide good care and choose hardwood, the ceilings will last so long that they may become boring.
- Compatible with any interior. This type of material is suitable for both antique and modern style finishes.
- Excellent insulating properties. This applies to both sound and heat loss. Wood was the main material for construction in ancient times, because... people were well aware of such positive qualities.
- Creating a unique solution. You can order a ceiling design from an experienced carpenter.
Wooden ceiling in loft style
There are some dangers to consider:
- Favored by pests. If this is a solution made from pure wood, and not from slabs, then it is imperative to ensure good treatment with antiseptic compounds.
- The need for proper storage. If the wood was stored incorrectly, this can lead to the fact that the finished structure begins to crack and lose its appearance.
- Possibility of ignition. It is important to think carefully about this point in order to avoid accidents later.
- Relatively high cost.
Types of wooden ceilings
It will be difficult to list all the possible solutions that exist within one article. There are several basic ones, but this does not mean that fantasy should be limited to any boundaries.
From edged boards
From edged boards. In this case, ordinary inexpensive building material is used. It is given the appearance at the request of the customer. In some cases, the surface is fired with a gas burner, sanded and varnished.
Split log beams
From split logs. It would be more correct to say from the cut one. The basis is taken from rounded parts, which are fixed to the base with the flat side. In this case, the processing involves only removing the bark and sanding, after which the elements are covered with stain or varnish.
Ceiling made of lining
From the lining. At its core, this is the same edged board, but well polished. It also has grooves that provide simplicity and ease of connection to each other.
From eurolining. Equivalent to the previous solution, but the finishing is much better. In addition, the wood has already been given a certain shade. There is also a special recess made on the reverse side, which helps to ventilate the entire structure. The dimensions are exactly as stated. There is no need to apply additional impregnations.
Coffered wooden ceilings
Caisson. The word comes from French. Translated, it means “box”. This solution was often used in ancient times. It was more forced constructive than decorative. This finish was obtained due to the crossing of beams. These days, this type of ceiling has received a new birth.
Block house
Blockhouse ceiling
From the block house. If you combine split logs and lining technology, you will get a block house. On the front side it has a convex semicircular structure that resembles a rounded log. The planks have grooves and tenons that make installation easier. After all the work is completed, the result is a surface that resembles a good old log hut.
Plywood ceiling
Made from plywood. In this case, the ceilings turn out to be quite smooth, but further painting and varnishing will be necessary, because Without such finishing, the appearance will not be attractive enough.
From MDF
Made from MDF panels. The material is very reminiscent of wooden lining, but the front panel has a structure applied to it, as well as a special film that eliminates the possibility of mechanical damage.
From decorative panels. In this case, an individual project is drawn up. Next, panels of the required shape are made. This type of finishing is one of the most expensive. In some cases, an array is used in which patterns are cut out.
From fillets
From fillets. These are wooden cornices of small width. Unique patterns are made on them. They can be arranged in the correct geometric shapes to create a solid appearance.
Wallpaper made of wood on the ceiling
Wooden wallpaper. In fact, veneer is applied to a special base. After gluing such material, the impression of a monolithic ceiling, which is finished with expensive material, is created. In addition, this type will be relevant if the ceiling surface is made in the form of an arch. The thin layer bends easily and takes the shape of the structure.
In other implementation methods, the plane itself can be made of any material, for example, plasterboard, but with wooden beams. In this case, it is possible to reduce costs and get the desired result.
Natural wood requires that the applied varnish or other coating be replaced at least once every 3-5 years. Thanks to this, it will not rot or dry out inside.
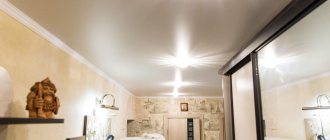
Lining on the ceiling - accents in a modern style
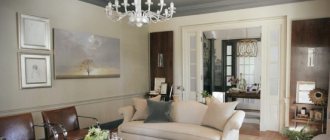
Finishing the ceiling with wood is an excellent alternative to wall cladding, in which you can bring the interior as close to modern as possible. It is better to paint classic lining stiletto or Eurolamellas white, complement them with decorative beams of a contrasting color and play with lighting. Hidden lighting or spotlights will highlight the beauty of the lining ceiling in a modern style and complement the interior.
Wood is an excellent choice not only for classic design; by choosing the right type of lamella, suitable paint shades and decor, you can get a truly modern interior made from natural materials.
5 / 5 ( 1 vote)
Where is a wooden ceiling especially appropriate?
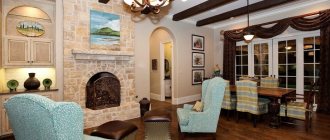
Chalet style interior
There are certain interior or exterior solutions where wooden ceilings are not just desirable, but necessary.
- Chalet. This concept was borrowed from the Swiss. In its original understanding, it was a small rural house or a hunter’s hut. This style is characterized by the presence of a large number of beams.
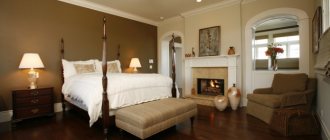
- Country. When we hear this word, most likely, music with the characteristic fiddle sound immediately begins to play in our heads. In the interior design it is expressed in rounded ceiling beams and wooden walls. For such a solution, a block house or rounded log is usually used.
- A house or bathhouse made of logs. In this case, there is no need to say much. The building itself requires just such finishing.
Country style interior
In order for a wooden ceiling to be combined with other modern wall and floor finishing materials, it is worth choosing matching solutions or providing some island wood inserts on these surfaces.
Types of lining
In any other premises, a frame made of wooden beams will be an excellent solution. It can also be combined with many materials. Secondly, the process of installing the lining on a wooden frame is much easier than on a frame made of a metal profile.
Lining - panel
It imitates a regular wooden beam and has a simpler shape. It comes in both wood and plastic.
Eurolining
It has a deeper tongue-and-groove connection and a larger tenon. This technology promotes better ventilation of the room, drainage of moisture and various evaporations. Most often used for facade cladding. For interior decoration it is used more often than Lining-Shtil, since the cost of Eurolining is much cheaper.
Lining – Shtil
The material has a perfectly smooth surface that does not have grooves - recesses on the front part of the board. Used for interior decoration of walls and ceilings.
Floating stretch ceiling
Lining – American
Simulates the laying of boards overlapping, as a result of which the joint between the boards is perfectly protected from various natural influences. Often used for exterior decoration.
Preparatory work
Ceiling waterproofing
- The first step is to calculate how much material will be needed for the surface. To do this, you need to multiply the width of the ceiling by its length and add another 10% to the resulting result. This reserve will be necessary when trimming or damage to one of the workpieces.
- When purchasing, ask the seller to show the conditions in which the storage was carried out, this will avoid problems that may arise after installation.
- Installation work must take place at a temperature not lower than +15°. Also, the board should lie indoors for several days to acquire the internal humidity of the room.
- If required, it is necessary to carry out additional treatment with an antiseptic, as well as a fire-retardant coating.
- All layers of old finish are completely removed to eliminate possible harmful interactions.
- If the surface is concrete, then it is coated with a primer to further strengthen it and prevent crumbling. It would be useful to apply a layer of antiseptic composition.
- Wood is very sensitive to moisture, so it is necessary to stretch the waterproofing. This may be a special membrane that is used in construction. It is secured to the beams using a stapler, and to the concrete base using dowels and screws or umbrellas. There should be an overlap of 10 cm between the individual layers and the seams should be taped.
- At this stage it is also important to check the flatness of the ceiling. This can be done using, for example, a water level. A mark is placed on one of the walls at an arbitrary height. Next, it must be transferred to the remaining planes. To do this, one part of the level is placed on the mark, and the second in the required place, after which you need to wait a little for the liquid inside to level out. From each line you need to measure the distance to the ceiling. Thanks to this, it will be possible to find out the deviations and take them into account when attaching the sheathing bars.
- For greater convenience, you can apply markings under the sheathing in advance.
Manufacturing of sheathing
Lathing for fastening the lining
It is better to make the base for cladding from wood. Using the metal option will be relevant if you have material left over from previous work. You will need a board 25-30 mm thick and 50 mm wide (it won’t be a problem if the width is larger; on the contrary, it will provide a better fit and fixation).
- Installation must begin from the corner where the deviation from the level is the smallest. This way, it will be easier to align the sheathing in a horizontal plane.
- The lines need to be placed perpendicular to the joints of the material that will be attached later.
- The step between individual elements can be within 30 – 50 cm.
- You can simply fix the boards to a wooden surface with self-tapping screws, and to a concrete surface - with dowels and self-tapping screws. At the same time, in places where the connection will be made, it is better to pre-drill a hole slightly smaller than the diameter of the fastening material. This will prevent the block from splitting and will also make twisting easier.
- During installation, it is important to use a building level to ensure it is level.
- To make the work go faster, you can fix two strips in opposite parts of the ceiling, stretch a fishing line between them and it will serve as the required level according to which the remaining strips will be aligned.
- At this stage, all necessary electrical wiring is also laid. It is better if it is hidden in a metal corrugation, then even if a short circuit or other unpleasant situation occurs, the insulation will not cause a fire.
Electrical wiring
It is necessary to ensure that the sheathing boards are not infested with pests. In any case, they should also be treated with an antiseptic, so they will not cause damage to the entire structure.
How to attach a wooden frame
The first step is to mark the future ceiling from the lining. To do this, you need to find the lowest point on your ceiling from which to measure down the wall 6-10 centimeters and put the first mark. It will need to be transferred to all walls using a water or laser level. It is according to these marks that you will check the horizontalness of the mounted frame for the future ceiling.
When using wooden beams or other wood materials, remember that they must be pre-treated against the appearance of various pests, rot and to increase fire safety.
Wooden beams are mounted to the ceiling strictly perpendicular to how the lining itself will be mounted. The step between the bars should not exceed more than 100 centimeters. If the finishing material is PVC panels, then the pitch of the beams should not exceed 60 centimeters.
Plastering the ceiling using beacons: easy instructions
If you decide to make the ceiling not only elegant, but also improved, for example: to lay sound insulation or thermal insulation on the ceiling, then in this case the step between the beams should in any case be no more than 60 centimeters. Since usually the so-called “slabs” of mineral wool or other heat and sound insulating material are also 60 centimeters wide. The bottom edge of all beams should be parallel to your floor and flush with the rest of the beams. Be sure to use a water level.
We fasten two beams along two walls on different sides. The distance from them to the wall should not exceed 15 centimeters. We clearly check the level not only in the middle, but also along the edges of the beams. Next, we continue to install the beams in increments of 60 centimeters, checking our work using a level at different points. In places where the beam lags behind the ceiling due to curvature, it is necessary to place wooden pads, which can be made from the remains of the beam itself. Next, we stretch the fishing line and use it to fasten the entire frame for the ceiling from the lining.
If you are not sure of the reliability of the structure you have made, then you can install additional cross bars, which will also ensure the rigidity of the entire structure. You can strengthen it only at those points where, according to your plan, lamps or other elements will be installed. Be sure to carry out all the necessary wiring before installing the beam. That’s the whole principle of making a wooden frame for lining ceilings.
Installation work
Cladding
Installation of materials such as lining, block house and MDF panels will be very similar in principle.
- The total width is measured and divided by the width of one plank. This way you can find out how many parts it will take. In addition, this will make it possible to determine whether the first and last elements need to be trimmed to maintain symmetry, and to what size this should be done.
- A 10 mm indentation is made from the wall. It will act as a thermal seam. This will give the material room to move as it expands. If this is a house that is built from a log frame, and its complete shrinkage has not yet been completed, then this gap needs to be increased to 20 mm.
- The tenon is cut off on the first plank. With this part, the element is turned towards the wall so that the groove is located along the progress of the finishing.
Fastening the lining
In order to fix it to the sheathing, clamps with teeth are driven into the end, or a self-tapping screw is twisted at an angle. It’s better to bait it first and level it. If this is not done, then all subsequent elements will be offset, which will lead to the joint lines not being parallel to the walls.- The next element is inserted with a tenon into the groove of the previous one. To hammer it down well, use a rubber mallet or a regular hammer. But in the second case, the blows must be made through a wooden lining, so as not to damage the locking mechanism and leave dents.
- The ceiling does not experience the same load as the floor, so the cladding can be placed joint to joint without the need to interlace the seams. But it is better to use a layout - this is a special connecting strip that will hide the shortcomings of the ends.
- As the installation proceeds, the cables that were previously laid are removed.
- After the surface is ready. The wood facing material is again coated with an antiseptic composition. This instruction does not apply to MDF panels.
- Next, a primer is applied. After this, the surface is sanded with fine sandpaper and coated with varnish in 3 layers. One should go along the fibers, the second perpendicularly, the third again along the fibers. After the first two layers, it is also better to go over with fine sandpaper to improve adhesion.
- All gaps that were left to the walls are closed with decorative skirting boards.
The plank covers the joints
The plywood ceiling is laid on the same lathing. Before this, it is necessary to cut the sheets into identical squares and then install them. All joints and places where screws will enter are closed using wood putty. The next step is to cover the entire surface with stain and varnish. This solution will be very useful when it is necessary to level the plane.
The following video shows how to trim a ceiling with clapboard:
Ceiling paneling
Lining made from wood or MDF will be laid on the ceiling in the same way. All boards need to be prepared and cut to the same size as the distance between the walls. It is also necessary to take into account a small gap of 5 millimeters between the lining and the walls in order to protect yourself from thermal expansion. If you are not entirely sure that your walls are even, then it is better to cut each lamella of the lining to a specific location.
If you plan to install the lining on the ceiling using self-tapping screws, be sure to drill holes in advance, otherwise cracks will form from the screws. If you use nails, you must use a hammer so as not to damage the lock and the front part of the board with a hammer.
When your clapboard ceiling is in the process of being installed, you must mark all the places for future lamps and cut holes for the wires. Once the ceiling is ready, cutting holes will be more difficult, as there will be a risk of damage.
Soundproofing the ceiling in an apartment with a suspended ceiling
The last strip of lining is usually installed using wedges. They must be carefully driven between the wall and the last board of the lining and, evenly tamping, drive the board into the lock. If the board is much wider in width than the remaining hole, then you need to cut it along its entire length using a hacksaw or jigsaw. Additionally, there is no need to install the lining with glue, since you will already have a durable and strong structure.
Insulation and sound insulation
Ceiling insulation
If you want to provide additional sound and heat insulation, then for the sheathing you will need to select boards of greater thickness, for example, 5 cm. Expanded polystyrene is cut to fit the space between the sheathing strips. The width should be chosen so that it fits flush. It must be inserted during the installation of the planks in order to immediately fix it. As an option, you can use mineral wool, but in this case, the top will once again need to be covered with oilcloth so that over time its fibers do not begin to fall out through the cracks.
Coffered ceiling
Installation of a coffered ceiling
A project of this type will require sufficient mental effort from you, as well as endurance during installation. Regarding the conditions for its installation, there are restrictions on the height of the ceilings - they must be at least 2.5 m. Otherwise, their level will drop so much that it will be uncomfortable to be inside.
- On a sheet of paper you need to draw a rectangle in proportions that will correspond to the parameters of the ceiling.
- Inside the sketch, a drawing of the desired design is made. All patterns, junction nodes are thought out, and dimensions are applied.
- The surface preparation is carried out in the same way as described above, but the sheathing is not installed. If the level difference is too large, then it is additionally necessary to perform leveling using putty. After complete drying, it must be primed.
- The entire surface is covered with wallpaper. It is better if they are without a pattern, in one tone, a small structure is allowed. To ensure they fit well, you need to smooth them with a plastic spatula from the middle to the edges. If desired, you can provide a crumpled effect. To do this, you do not need to level the canvas too much.
- Using a chokeline and guided by the drawing, mark the future structure.
- False beams are made. They are a wooden gutter. Typically, wood species such as oak, larch, aspen, etc. are used for this. Blanks for them are selected in accordance with the height of the elements you have chosen. Additionally, they can be aged using a special wood brush, and also covered with stain and varnish.
- Next, they are mounted to the ceiling. They can be held, for example, on brackets for metal profiles. They are bent and attached to the wall. The bent ends are placed inside the false beam. Next, fixation is carried out using self-tapping screws. In this case, the head must be recessed flush and then covered with wood putty, which will match the color.
- First, you can fix all the longitudinal elements and then the jumpers.
The whole matter will be simplified if the ceiling already has beams that are part of the structure. Then it is necessary to make jumpers from the same material or using false beams to form squares or rectangles. Next comes the final painting.
You can glue polyurethane plinths or fillets into the inner corners, which will add a special twist to the whole project.
Wooden ceiling in the bathhouse
Fixed wooden ceiling in the bathhouse - pie
Typically, the ceiling in a bathhouse is made using the hemming method. You can use wooden lining or a block house for it. The main difference from the conventional design will be the presence of a barrier not in the form of a membrane, but in the form of a dense construction foil. It should also be attached with an overlap. Such a substrate is made so that the resulting condensate can drain quietly without accumulating and causing wood to rot. It is also advisable to use stone mineral wool for insulation in steam rooms; it tolerates high temperatures well and does not burn.
Wood wallpaper
Veneer
This is a very interesting new design. Such wallpaper can be either profiled or smooth. There are several main types:
- Plates. Solid wood planks are joined together into square or rectangular elements, which are then mounted on the surface. Their thickness, as a rule, does not exceed 2 cm. In appearance, such a product resembles lining, but the planks are much smaller.
- Heat treated. The manufacturing principle is similar to the production of particle board. At the same time, the wallpaper becomes more rigid and resistant to various influences, including moisture.
- Based on cork. They can be produced both in rolls and as individual tiles. They are a layer of cork that is glued to a paper base. On top it is coated with a special varnish that protects them from moisture, absorption of odors and other influences. Their thickness can reach 3 mm.
- Based on veneer. In this case, the thickness of the wallpaper can also reach 3 mm. Thin sheets of wood are applied to a paper base and coated with protective varnishes. Additionally, engraving can be applied.
Using this solution allows you to hide most of the imperfections and irregularities that the ceiling may have. If you plan to use tile material, then it will be fastened in the same way as the lining.
Wooden wallpaper - planks
For cork strips, as well as products in rolls, it is necessary to prepare the ceiling without installing lathing. The following is the sequence of actions:
- Marking and cutting into strips of the required size is carried out.
- After this, they must be left indoors for at least one day to acclimatize.
- When carrying out work, it is advisable to close all doors to avoid drafts and also to prevent direct sunlight.
- The surface of the ceiling is covered with an adhesive composition. It is also used to cover wallpaper. It is better to do this with a roller.
- Next, the pieces are applied to the ceiling and pressed well. This will be easier to do with a second rubber roller, which will remove any remaining air.
- If glue has come through the seam, then it must be removed as quickly as possible with a damp cloth.
Cork boards are also glued to the ceiling. In this case, work needs to start from the middle and move towards the edges, then the main area will be filled with whole parts, and all trimmings will go to the edges.
Now you know how to make a wooden ceiling or its imitation with your own hands. Each of the methods can be combined with each other. For example, you can glue cork tiles inside the niches of a coffered ceiling, which will look very attractive. Good luck in your endeavors!
Types of wooden ceilings
The variety of materials for constructing wood ceiling coverings is impressive. We list the main types of finishes in this category, presented:
| Wooden panels | A variety of slatted and sheet typesetting elements. Luxurious and strict, for any interior and financial capabilities. |
| Lining | A democratic and universal material that is also suitable for simple outbuildings - bathhouses, well houses, firewood sheds and for cozy offices, front doors or living rooms. |
| Cladding slabs | Finished from simple and reliable materials, presented in various designs. |
| Plywood | An affordable coating that opens up wide possibilities for its use in a wide variety of rooms. |
| Wooden wallpaper | Covered with a layer of wood, they retain all its properties. |
Wooden panels
The main advantage of the panels is ease of installation. This work can be done with your own hands. Individual fragments are attached to the sheathing with nails or clamps, or fixed directly to the ceiling with glue. If replacement is necessary, the ceiling elements can be easily removed. There is no need to dismantle the entire coating.
The shape of the products is varied. They are produced in the form of slats, sheets and square typesetting elements. The panels allow you to perfectly disguise electrical wiring. Therefore, all possible lighting scenarios are allowed. There is also no difficulty in installing absolutely any lamps into a plank ceiling.
Based on the production method, there are two main groups of wooden panels. These are the products:
- from an array of valuable rocks. The wood used for production is oak, maple, beech, and alder. To emphasize the natural beauty of natural boards, the panels are treated with special mastics. They make natural fibers brighter and more distinct, thanks to which the natural texture of wood is clearly drawn and becomes more picturesque and impressive;
- from several layers joined together. The upper decorative layer is made of valuable species, and the lower layers are made of coniferous trees.
The ceilings in the living rooms of luxury houses are often decorated with luxurious panels with beautiful embossing and gilded carvings. They are coated with compounds that give an expressive glossy shine and shimmer.
Lining
The most common area of application of the material is the finishing of steam rooms, terraces, balconies, and country houses. But nothing prevents you from making a ceiling covering in your apartment from it - if the designer’s idea requires it. The initially untreated board can be impregnated with stain of the desired color, painted, or simply varnished to preserve the natural pattern of the wood fibers.
There are several categories of lining, depending on its quality:
| "Extra" class | The most expensive wood is selected for their execution. The presence of dark spots and knots on the surface of finished products of this category is not allowed. |
| Class "A" | A small number of knots may be present. The surface of the board should be smooth and even without cracks or gouges. |
| Class "B" | The surface is characterized by the presence of knots, small cracks and depressions, which are eliminated by puttying during the production process. |
| Class "C" | Finished products with minor defects - chipped indentations, cracks and knots. |
To avoid installation problems, it is very important when choosing a lining to carefully inspect the tongue-and-groove joints for integrity.
Cladding slabs
Products are formed by combining crushed wood with an adhesive component.
Product options:
| Chipboard | Plates formed from sawdust and adhesive composition. |
| Fiberboard | It differs from the previous type by the presence of plant fibers in the structure. |
| MDF | The material is made from tiny sawdust combined with lingin. |
Plywood
When deciding on the material for the ceiling covering, it rarely occurs to anyone to use plywood for these purposes. And completely in vain. Using this material you can create a beautiful, and most importantly unusual and exclusive ceiling.
Plywood is a material consisting of several layers of veneer, each of which is applied perpendicular to the previous one. First, the core is made from softwood. Subsequently, maple, birch or alder veneer is glued onto it on both sides. For the elite variety, beech is used.
The material differs in the following indicators:
- the number of layers may vary. They produce three-, five-layer, and multi-layer versions of the material;
- according to manufacturing materials;
- in terms of moisture resistance - standard, with increased protection from moisture, laminated with a high level of resistance;
- type of processing - with a polished surface and untreated.
Unpolished elements are perfect for a country house or outbuilding. If you plan to use plywood to finish the ceiling of a corridor in a private house or the living room of a mansion, you should give preference to polished elite class plates. Picturesque panels with colorful patterns will become a bright and unique decoration of the room.
Wood wallpaper
They help to recreate a special atmosphere of natural comfort at home. There are several types of materials in this category. They are divided into groups depending on the raw material and the method of its processing.
Types of wallpaper with a wooden surface:
- Composite panels made of narrow wooden planks, the thickness of which does not exceed 2 cm. Their cost depends on the value of the wood used;
- Veneered – a thin layer of natural wood 3 mm thick, glued to a paper base. May have a carved and inlaid decorative surface;
- Cork - a coating of crushed cork tree bark is applied to paper. In order to protect the material from odors and exposure to chemicals, the top is covered with a thin layer of wax. Wallpaper is produced in the form of slabs and rolls of 10 m. Roll products are not impregnated and can be painted in any color;
- Materials made from thermally treated wood. The technological process gives the raw materials improved qualities - their resistance to fire, mechanical damage, and moisture increases. TMD wallpaper belongs to the washable category. A variety of tree species are used in their production. Finished products are characterized by marble colors.
Rolled materials on a paper or non-woven backing are a worthy alternative to expensive typesetting elements. They are fixed with glue directly to the ceiling. There is no need to build a sheathing or spend money on additional materials.
The base on which the wallpaper will be pasted must be level, so if there are large differences and deep cracks in the ceiling, they must be eliminated with plaster.
Ceiling fillet
The final “chord” when arranging a wooden ceiling is undoubtedly the fillet. This is the name of the ceiling plinth, which carries several functions at once. He helps:
- hide irregularities and defects at the junction of the main covering with the wall;
- create an elegant frame. The fillet outlines the contour of the ceiling, placing it in a spectacular frame, like a painting, and gives it a complete and expressive look;
- close the cracks, hide the wiring and protruding elements of the sheathing.
For each interior solution, you can choose the appropriate baguettes. For the classics - pompous - gilded, carved, for the modern version - laconic, seasoned, not flashy.
False beams
Wooden hollow beams give the room a special touch. They bring rustic simplicity and the comfort of a country house to city apartments. Thanks to them, it is possible to solve several design problems at once:
- visually “pull back” the ceiling;
- “pull” the room in the direction of the beams;
- zone the room;
- create lines that clearly contrast with the background of the ceiling, harmonizing with the plinth, platbands and other elements of the furnishings;
- place electrical wiring in the cavities, fix lamps and develop a non-trivial lighting scenario.
The varied shapes of the hollow beams make it possible to ideally conceal pipes and cables.
When making false beams from natural wood with your own hands, you should take into account that during the drying process, the seam connecting the individual slats may separate and become noticeable.