Owners of large plots can afford to install large heated and unheated greenhouses. In closed beds you can grow heat-loving vegetables in cold regions or harvest any crops in the first half of summer. For those whose dacha occupies a relatively small area, large structures are not suitable, they have to look for other options. A good solution is the Butterfly greenhouse; it is small, convenient and easy to install, dismantle and move to another place. You can make a mini-greenhouse yourself using ready-made diagrams.
Design characteristics
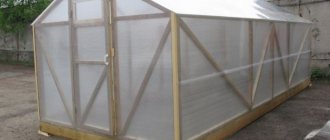
The Butterfly greenhouse is a small, convenient design that allows you to plant garden crops before comfortable conditions for them have been established in the open ground. Such a greenhouse retains warm air well, and the outer covering allows sunlight to pass through. In a greenhouse you can easily create and maintain an optimal microclimate. The service life of the factory product is 10 years (subject to the operating rules).
On a note! The design received this name because of the side windows (slopes), rising when opened, they resemble the open wings of a butterfly. Windows have a straight or arcuate shape.
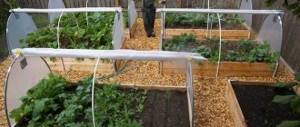
The compact structure is convenient to use, it is easier to handle than a greenhouse, but the functionality is almost the same. The process of caring for planted crops is greatly simplified; there is no need to walk along the beds; you can reach any plant from the very edge. Space inside the structure is saved, since there is no need to create paths between the beds. Types of Butterflies:
- Gable extended greenhouse with solid wooden walls at the bottom and straight windows at the top.
- The trapezoidal greenhouse is similar to the first option, but the lower walls are made of transparent material.
- An extended structure with an arched high roof and solid wooden sides underneath.
- Completely transparent arched design. The base and frame are made of metal.
Collapsible structures usually go on sale with step-by-step assembly instructions. To provide stability, the edges of the frame are equipped with stakes that are driven into the ground. Before buying or building a greenhouse, you need to study the pros and cons of the design.
It is undesirable to rely on advertising, to believe the words of sellers, whose first task is to sell. To give a more detailed, reliable description, we studied reviews from gardeners who already have experience in operating such a structure. Advantages:
- protecting plants from cold;
- wind resistance up to 20 m/s;
- rapid warming up in the sun;
- Possibility of installation in a small area, low design does not create shadows;
- Wide-opening windows provide plants with optimal air exchange;
- easy installation and dismantling. The assembled structure can be easily moved to another place or transported in a passenger car;
- no need to install a foundation;
- crops can be planted in 2 rows;
- long service life of the factory product;
- ease of plant care.
On a note!
The Butterfly greenhouse tolerates snowfall well and is not destroyed if the snow layer does not exceed 10 cm.
Many gardeners note that windows have to be opened and closed frequently. In places where there is at least minimal friction, the paint quickly lags behind or is destroyed. Without a protective shell, the metal will rust. The same thing happens in areas of the frame where there are fasteners or screws. Problem areas must be cleaned and painted immediately. Factory designs have very fragile, weak hinges on doors, awnings on windows, they quickly break off. Manufacturers often leave unclear instructions; in order not to make mistakes during assembly, you need to find them on the forums (for a similar product).
Design Features
If you lift both lids of the greenhouse at the same time, it will look like a butterfly that has spread its wings. When closed, it resembles a small cocoon. Its tightness creates the necessary level of humidity and heat inside.
The Butterfly greenhouse can be disassembled at any time and placed in another place. The doors of the room can open partially or completely. This provides free access to sun and air.
Advice! If a gardener plans to grow crops in cold weather, it is better to immediately plan to install a heating system.
There are different models of “butterflies”. The interior structure of the room can be continuous or divided into several sections. Since the “wings” of the structure can be opened on both sides, access to the plants becomes convenient.
Assembling a greenhouse Butterfly with your own hands
Depending on the needs, the greenhouse can have different sizes and shapes. For most gardeners, a scheme with standard dimensions is suitable - height 1 or 1.5 m, width 2 m, length 4 m. In the case of climbing and tall plants, for example, with indeterminate tomatoes, such a height will not be enough. The height can be adjusted by installing the greenhouse frame on wooden sides.
A foundation is not required, but experts still advise constructing a foundation made of concrete or timber from durable wood (walnut, oak, ash, larch, etc.). This is especially important if the greenhouse is located in windy areas or in lowlands, where moisture constantly accumulates and additional drainage is needed. The foundation will strengthen the greenhouse and make it more stable. When choosing materials, you should consider whether the structure will be collapsible or solid. For the first type of greenhouse, it is better to choose a strong material for the profile and a light one for the covering.
| Material | Peculiarities |
| Metal | Reliable material, but if the finished structure is not painted, it will rust instantly |
| Tree | One of the easiest materials to process. Wood with constant humidity is susceptible to rotting and attack by wood borers. |
| Cellular polycarbonate | Lightweight, durable covering material that is not destroyed by light impacts, easy to install and process |
| Glass | Also suitable for coating, the material is easily accessible, but very fragile and difficult to process |
| Dense polyethylene | The most affordable material, but will last no more than 1–2 seasons |
When making a Butterfly greenhouse yourself, a simplified design is most often used, using wood as a basis (a house-shaped structure). This construction option will not last long, so it is better to spend money once, but build a reliable greenhouse from a metal profile pipe and polycarbonate. We will describe the most common method of installing an arched mini-greenhouse with a width of 1.3 m, a height when dug in of 90 cm, and on a foundation - 1.12 m, a length of 4 m.
Preparation of materials and tools
In order for the greenhouse to perform the main functions of the shelter, you need to choose a strong, durable polycarbonate that maintains temperature and humidity inside any structure. The material must transmit light and at the same time protect plants from ultraviolet radiation. For a 4-meter greenhouse you will need a polycarbonate sheet of 2.1×7 m. The following materials are needed for the frame:
- 2 end arcs and 1 middle;
- 3 cross beams (1260 mm);
- 4 top stringers and 8 side stringers (1978 mm);
- 4 stringers for sashes (1828 mm);
- 6 lugs (450 mm);
- pens;
- stops for sashes;
- 8 door hinges;
- 4 corner brackets and 2 intermediate;
- 32 triangular scarves and 8 square ones;
- 8 turntables;
- 32 corners.
On a note!
During installation, you will need high-quality silicone sealant to treat the polycarbonate joints, as well as an anti-corrosion agent for metal processing.
Individual structural parts should be connected to each other only with fasteners - self-tapping screws (roofing and metal), nuts, screws, washers. The tools you will need are: a marker, scissors or a sharp knife, a tape measure, a circular saw, a hammer, a screwdriver, a manual or mechanical pipe bender and a welding machine. All fittings are selected carefully; they must be strong.
Step-by-step assembly instructions
First you need to prepare the area. The chosen place should be well-lit and level; experienced gardeners advise placing the Butterfly from north to south. It is not advisable to install a mini-greenhouse in a low area so that there is no risk of excess moisture accumulating during rains. Immediately you need to take care of free access to the structure from all sides; such a greenhouse should not be placed too close to the fences. The area needs to be cleared of debris and the top layer of soil removed. Installation:
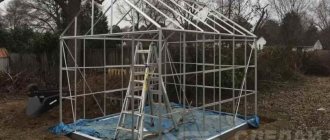
- The frame is assembled by fastening the parts with a welding machine or bolts.
- The sashes are installed on fasteners (on the central beam).
- The metal is treated with an anti-corrosion agent.
- The polycarbonate is cut out, first the side parts are attached, then to the “wings”.
- The frame is sewn up with covering material using self-tapping screws with thermal washers (it is advisable to use fasteners with seals), all seams are treated with sealant.
- Supports (supporting the raised segments) are mounted on the sides of the window frames, and handles are also attached to the bottom of the folding elements.
A greenhouse made by yourself will be no different from a purchased one, but during installation you need to follow several rules. During assembly, make sure that there are no cracks anywhere, much less open walls. When leveling the area, use a water level. Polycarbonate sheets are bent only across the direction of the honeycomb. It is recommended to install the Butterfly greenhouse in early spring.
The assembly process may seem complicated. However, if you have a visual diagram of the finished product in front of you and additionally draw it yourself, adding all the dimensions, it will be easier to cope with the task. If you do not have the skills to work with welding or a pipe bender, it is better to call a specialist. In the case when the construction of a foundation is planned, then this stage is performed immediately after preparing the site.
Advantages of a greenhouse
The main advantage of the butterfly greenhouse is its versatility. There is no need to cover the beds with film, install metal arches, and then disassemble everything. All you need to do is bring a greenhouse, install it in a garden bed and grow plants inside. When it is not needed, it can be easily removed and taken to another bed.
This greenhouse can also be used in the winter season. Models with heating and insulated frame are sold. It is problematic to make heating for such a small structure yourself; it is better to buy a ready-made model.
Another advantage of the “butterfly” is the low cost of materials. There is no need to install a foundation, since the structure is portable. To assemble the frame you will need a plastic or metal-plastic profile and polycarbonate. To save money, you can sew the structure with polyethylene.
A greenhouse allows you to rationally use space, which is an advantage for small areas. Convenient doors provide easy access to plants that can be planted throughout the entire greenhouse area.
Provided high-quality materials and reliable assembly, the greenhouse can withstand bad weather, strong winds, and snowfall. Although it looks fragile, it can withstand wind gusts of up to 20 m/s. Does not require a foundation and can be easily disassembled and reassembled elsewhere. The structure is durable and will last on the site for up to 10 years.
Greenhouse assembly
We invite you to read: Apple and pear trees bloomed in the garden
The main thing you need to do when building a greenhouse is to draw a drawing with the dimensions of all parts. It is necessary to calculate the area of the bed and the height of future plants. Depending on this, choose the type of construction and materials.
A standard “butterfly” occupies an area of 2 x 4 m and reaches a height of 1-1.5 m. It is not necessary to build such a large greenhouse; you can get by with a small structure with an area of 1 x 1.5 m and a height of 70-80 cm. If it contains If you want to grow climbing crops, you need to increase the height.
The shape of the structure can be arched or in the form of a house with a gable roof. The latter can be made from wooden blocks and polyethylene to save money. Both forms are suitable for use in winter, as they are not deformed by snow.
When choosing materials, it is worth considering whether the structure will be collapsible. Then it is better to make it from a metal profile and polycarbonate. To prevent heavy material from bending the lower profiles, they need to be strengthened. The strongest structure is made from a 2 x 2 cm metal profile. With proper care, it will last 10 years.
DIY greenhouse assembly:
- 1. Mark the profile according to the drawings.
- 2.Assemble the structure frame, fastening the parts with bolts. Leave the doors that will open and install them on special fasteners. To fix the sashes in the upper position, you can use gas lifts or prop them up with sticks.
- 3.If necessary, apply an anti-corrosion compound or varnish if wood is used as a frame.
- 4.Sew up the frame with polycarbonate. It is necessary to use fastenings with seals so that the wind from the street does not blow inside.
- 5. Treat all seams with sealant.
The greenhouse is installed on metal pins that are simply inserted into the ground. They need to be buried by 15-20 cm, this will ensure the necessary stability of the structure. When the need for a greenhouse no longer exists, it is pulled out of the ground and moved to another place.
Like any structure, the “butterfly” has a number of advantages and disadvantages. Experienced summer residents note that one of the positive aspects is that its internal space can be used very effectively. There are no passages inside the greenhouse, and frames that open easily allow you to gain the necessary access to the plants. This is especially appreciated by gardeners whose plots are not very large and every meter is very valuable.
The butterfly design is very convenient, as it allows you to easily reach any plant inside. There is no need to put extra effort into this. Another advantage is the simple and quick installation of the structure. It doesn’t matter whether the structure was purchased ready-made or made independently, installing it is completely easy. This task is within the power of any summer resident. No special wisdom or skills are needed here.
The strength and durability of these structures are also considered advantages. If you look at their technical characteristics, you can see that greenhouses can withstand winds of up to 20 meters per second and snow cover of up to 10 centimeters. Moreover, if necessary, it is possible to strengthen the structure using special supports. Another nice thing about such greenhouses is easy maintenance.
The “butterfly” structure has slightly fewer disadvantages, and, as practice shows, they do not interfere with summer residents at all. Among the shortcomings, the most common are imperfections in the edges. However, interfering irregularities can be easily removed using a regular file. Also quite often there are designs with insufficiently reliable hinges on which the frames are held. Of course, if desired, they can be replaced with better and more durable ones.
When purchasing a finished structure, quite often the paint quickly peels off and the attractive appearance is lost. A new can of paint, a brush, a little time and skillful hands will help you cope with this. If the greenhouse is covered with film, it may sag under the influence of weather conditions or time. To prevent this from happening, it is enough to choose a “butterfly” with frames made of durable polycarbonate.
Tips for care and use
Summer residents who have already tried such a greenhouse share additional tips on operation. In order not to break fragile structural elements, the doors are opened and closed only by the handles, as carefully as possible, without slamming or tugging on them. If the greenhouse remains on the site for the winter, several supports are placed inside to help withstand the snow masses.
Attention!
If the greenhouse is not used in winter, it needs to be cleaned, inspected, and, if necessary, repaired and painted in the fall. The product can be stored assembled or disassembled; the room should be spacious with good ventilation.
In the fall, the walls inside the greenhouse must be disinfected, otherwise the microorganisms that have accumulated over the summer will move onto the plants in the next season, and then it will be more difficult to get rid of them. If chips or other damage occurs on the frame, repairs are carried out immediately; corrosion on metal surfaces requires especially rapid treatment. It is better to install the greenhouse on a foundation, so the lower part of the frame will be less susceptible to moisture.
You may be interested in:
Polycarbonate greenhouse on a frame made of plastic pipes Polycarbonate is often used as a covering material for the greenhouse frame. But what exactly to use for...Read more...
Among summer residents, the Butterfly greenhouse is in great demand, as it is a simple, practical and at the same time quite reliable design. Owners of small plots will be able to rationally use the free space. Gardeners from the northern regions will not have to build temporary shelters every year to protect especially heat-loving crops from return frosts. This design deserves attention.
Owners of large plots can afford to install large heated and unheated greenhouses. In closed beds you can grow heat-loving vegetables in cold regions or harvest any crops in the first half of summer. For those whose dacha occupies a relatively small area, large structures are not suitable, they have to look for other options. A good solution is the Butterfly greenhouse; it is small, convenient and easy to install, dismantle and move to another place. You can make a mini-greenhouse yourself using ready-made diagrams.
Design characteristics
The Butterfly greenhouse is a small, convenient design that allows you to plant garden crops before comfortable conditions for them have been established in the open ground. Such a greenhouse retains warm air well, and the outer covering allows sunlight to pass through. In a greenhouse you can easily create and maintain an optimal microclimate. The service life of the factory product is 10 years (subject to the operating rules).
On a note!
The design received this name because of the side windows (slopes), rising when opened, they resemble the open wings of a butterfly. Windows have a straight or arcuate shape.
The compact structure is convenient to use, it is easier to handle than a greenhouse, but the functionality is almost the same. The process of caring for planted crops is greatly simplified; there is no need to walk along the beds; you can reach any plant from the very edge. Space inside the structure is saved, since there is no need to create paths between the beds. Types of Butterflies:
- Gable extended greenhouse with solid wooden walls at the bottom and straight windows at the top.
- The trapezoidal greenhouse is similar to the first option, but the lower walls are made of transparent material.
- An extended structure with an arched high roof and solid wooden sides underneath.
- Completely transparent arched design. The base and frame are made of metal.
Collapsible structures usually go on sale with step-by-step assembly instructions. To provide stability, the edges of the frame are equipped with stakes that are driven into the ground. Before buying or building a greenhouse, you need to study the pros and cons of the design.
It is undesirable to rely on advertising, to believe the words of sellers, whose first task is to sell. To give a more detailed, reliable description, we studied reviews from gardeners who already have experience in operating such a structure. Advantages:
- protecting plants from cold;
- wind resistance up to 20 m/s;
- rapid warming up in the sun;
- Possibility of installation in a small area, low design does not create shadows;
- Wide-opening windows provide plants with optimal air exchange;
- easy installation and dismantling. The assembled structure can be easily moved to another place or transported in a passenger car;
- no need to install a foundation;
- crops can be planted in 2 rows;
- long service life of the factory product;
- ease of plant care.
On a note!
The Butterfly greenhouse tolerates snowfall well and is not destroyed if the snow layer does not exceed 10 cm.
Many gardeners note that windows have to be opened and closed frequently. In places where there is at least minimal friction, the paint quickly lags behind or is destroyed. Without a protective shell, the metal will rust. The same thing happens in areas of the frame where there are fasteners or screws. Problem areas must be cleaned and painted immediately. Factory designs have very fragile, weak hinges on doors, awnings on windows, they quickly break off. Manufacturers often leave unclear instructions; in order not to make mistakes during assembly, you need to find them on the forums (for a similar product).
Assembling a greenhouse Butterfly with your own hands
Depending on the needs, the greenhouse can have different sizes and shapes. For most gardeners, a scheme with standard dimensions is suitable - height 1 or 1.5 m, width 2 m, length 4 m. In the case of climbing and tall plants, for example, with indeterminate tomatoes, such a height will not be enough. The height can be adjusted by installing the greenhouse frame on wooden sides.
A foundation is not required, but experts still advise constructing a foundation made of concrete or timber from durable wood (walnut, oak, ash, larch, etc.). This is especially important if the greenhouse is located in windy areas or in lowlands, where moisture constantly accumulates and additional drainage is needed. The foundation will strengthen the greenhouse and make it more stable. When choosing materials, you should consider whether the structure will be collapsible or solid. For the first type of greenhouse, it is better to choose a strong material for the profile and a light one for the covering.
| Material | Peculiarities |
| Metal | Reliable material, but if the finished structure is not painted, it will rust instantly |
| Tree | One of the easiest materials to process. Wood with constant humidity is susceptible to rotting and attack by wood borers. |
| Cellular polycarbonate | Lightweight, durable covering material that is not destroyed by light impacts, easy to install and process |
| Glass | Also suitable for coating, the material is easily accessible, but very fragile and difficult to process |
| Dense polyethylene | The most affordable material, but will last no more than 1–2 seasons |
When making a Butterfly greenhouse yourself, a simplified design is most often used, using wood as a basis (a house-shaped structure). This construction option will not last long, so it is better to spend money once, but build a reliable greenhouse from a metal profile pipe and polycarbonate. We will describe the most common method of installing an arched mini-greenhouse with a width of 1.3 m, a height when dug in of 90 cm, and on a foundation - 1.12 m, a length of 4 m.
Preparation of materials and tools
In order for the greenhouse to perform the main functions of the shelter, you need to choose a strong, durable polycarbonate that maintains temperature and humidity inside any structure. The material must transmit light and at the same time protect plants from ultraviolet radiation. For a 4-meter greenhouse you will need a polycarbonate sheet of 2.1×7 m. The following materials are needed for the frame:
- 2 end arcs and 1 middle;
- 3 cross beams (1260 mm);
- 4 top stringers and 8 side stringers (1978 mm);
- 4 stringers for sashes (1828 mm);
- 6 lugs (450 mm);
- pens;
- stops for sashes;
- 8 door hinges;
- 4 corner brackets and 2 intermediate;
- 32 triangular scarves and 8 square ones;
- 8 turntables;
- 32 corners.
On a note!
During installation, you will need high-quality silicone sealant to treat the polycarbonate joints, as well as an anti-corrosion agent for metal processing.
Individual structural parts should be connected to each other only with fasteners - self-tapping screws (roofing and metal), nuts, screws, washers. The tools you will need are: a marker, scissors or a sharp knife, a tape measure, a circular saw, a hammer, a screwdriver, a manual or mechanical pipe bender and a welding machine. All fittings are selected carefully; they must be strong.
Step-by-step assembly instructions
First you need to prepare the area. The chosen place should be well-lit and level; experienced gardeners advise placing the Butterfly from north to south. It is not advisable to install a mini-greenhouse in a low area so that there is no risk of excess moisture accumulating during rains. Immediately you need to take care of free access to the structure from all sides; such a greenhouse should not be placed too close to the fences. The area needs to be cleared of debris and the top layer of soil removed. Installation:
- The frame is assembled by fastening the parts with a welding machine or bolts.
- The sashes are installed on fasteners (on the central beam).
- The metal is treated with an anti-corrosion agent.
- The polycarbonate is cut out, first the side parts are attached, then to the “wings”.
- The frame is sewn up with covering material using self-tapping screws with thermal washers (it is advisable to use fasteners with seals), all seams are treated with sealant.
- Supports (supporting the raised segments) are mounted on the sides of the window frames, and handles are also attached to the bottom of the folding elements.
A greenhouse made by yourself will be no different from a purchased one, but during installation you need to follow several rules. During assembly, make sure that there are no cracks anywhere, much less open walls. When leveling the area, use a water level. Polycarbonate sheets are bent only across the direction of the honeycomb. It is recommended to install the Butterfly greenhouse in early spring.
The assembly process may seem complicated. However, if you have a visual diagram of the finished product in front of you and additionally draw it yourself, adding all the dimensions, it will be easier to cope with the task. If you do not have the skills to work with welding or a pipe bender, it is better to call a specialist. In the case when the construction of a foundation is planned, then this stage is performed immediately after preparing the site.
How to do it?
It is not surprising that summer residents like the simple and convenient butterfly design. As a result, many people want to create it themselves. This option allows you to avoid many of the disadvantages that are found in purchased models.
Preparation
The creation of a greenhouse should begin with preparation. It's best to make drawings first. Then you should take care of the necessary materials and tools. You should have a hacksaw, tape measure, hammer, screwdriver, scissors or construction knife on hand, as well as nails, self-tapping screws, metal corners, handles, and canopies. When all of the above is ready, you can choose a place and prepare it for installing a greenhouse.
The place where the structure is planned to be located should be well illuminated by sunlight. Therefore, you should not opt for low-lying areas. Places where groundwater or precipitation accumulates are also not suitable. Otherwise, the plants in the greenhouse will rot and rot. It is desirable that the length of the structure be located in the north-south direction.
To strengthen the walls, it is best to use boards, and put a mixture of manure, rotten leaves and peat on the bottom. You can also use other mixtures that will be loose and generate heat. Soil 20-30 cm high is placed on top of the layer. Large logs are placed on it, which are recommended to be knocked down. The result should be a contour that, in all its parameters, should correspond to the dimensions of the future greenhouse structure.
We invite you to read: Construction of a winter greenhouse with your own hands
Frame
Upon completion of all preparatory work, you should proceed to the assembly of the frame structure. The simplest option is an arched frame. To make it, take beams with a diameter of 0.5 cm; if they are not long enough, they are knocked down. The result should be two slats with a length equal to the length of the structure. The coating will be attached to them.
Installation of sheets
When the frame is ready, you can begin preparing the coating. The simplest option is to make the doors from polycarbonate. To do this, you need to take a regular sheet measuring 210 by 600 cm. Then cut it with a slender knife into 4 parts, 3 of which will be the same size. Now the canvases can be laid out on the frame so that their wide side runs along the bar.
Tips for care and use
Summer residents who have already tried such a greenhouse share additional tips on operation. In order not to break fragile structural elements, the doors are opened and closed only by the handles, as carefully as possible, without slamming or tugging on them. If the greenhouse remains on the site for the winter, several supports are placed inside to help withstand the snow masses.
Attention!
If the greenhouse is not used in winter, it needs to be cleaned, inspected, and, if necessary, repaired and painted in the fall. The product can be stored assembled or disassembled; the room should be spacious with good ventilation.
In the fall, the walls inside the greenhouse must be disinfected, otherwise the microorganisms that have accumulated over the summer will move onto the plants in the next season, and then it will be more difficult to get rid of them. If chips or other damage occurs on the frame, repairs are carried out immediately; corrosion on metal surfaces requires especially rapid treatment. It is better to install the greenhouse on a foundation, so the lower part of the frame will be less susceptible to moisture.
You may be interested in:
Polycarbonate greenhouse on a frame made of plastic pipes Polycarbonate is often used as a covering material for the greenhouse frame. But what exactly to use for...Read more...
Among summer residents, the Butterfly greenhouse is in great demand, as it is a simple, practical and at the same time quite reliable design. Owners of small plots will be able to rationally use the free space. Gardeners from the northern regions will not have to build temporary shelters every year to protect especially heat-loving crops from return frosts. This design deserves attention.
Polycarbonate butterfly greenhouse dimensions
When creating garden structures with your own hands, you can choose the ideal dimensions. Limiting the size of a butterfly greenhouse depends only on the reliability of the materials used. However, a greenhouse 2 m high and 3 m wide will be inconvenient to use - it will be difficult to reach the central area.
Important! The maximum width of the butterfly greenhouse must be calculated based on individual characteristics, so that it is easy to get to all the beds.
Since the main purpose of the structure is to grow seedlings and low-growing crops, it is recommended to make small greenhouses. A mini-greenhouse made of polycarbonate butterfly measuring 2x4 m is the most successful option for small summer cottages and garden plots.
It is recommended to adjust the size of the butterfly to the width of the polycarbonate sheets
The most popular way to cover a frame with your own hands is to use polycarbonate. It is recommended to calculate the choice of greenhouse width in advance to avoid excessive waste of building materials. Most polycarbonate manufacturers produce their product with a width of 2.1 m and a length of 6 m or 12 m, so it is recommended to make the size of the future greenhouse a multiple of 2 m.