What could be more pleasant than to please yourself with fresh vegetables from your garden plot, when the harvest season is not yet coming soon? To do this, summer residents build a simple structure - a greenhouse or greenhouse. These shelters differ from each other only in size and, therefore, in the capacity of vegetable crops.
For a summer residence, a small greenhouse is enough to provide yourself with vegetables for the first time. We’ll talk about choosing a location for the greenhouse, the features of designing and constructing it with your own hands below.
Choosing the most favorable place for a greenhouse
Despite the fact that the greenhouse construction is simple at first glance, it requires compliance with a number of recommendations:
- Place the shelter only on a flat, dry surface;
- It should be warm inside the greenhouse, so choose a place well lit by the sun throughout the day;
- High-lying groundwater can lead to excessive moisture in the soil under the greenhouse; find out its location and provide drainage to avoid flooding of seedlings;
- A greenhouse involves processing plants. Therefore, there should be enough space around it so that you can easily approach, open the greenhouse and perform the necessary actions with the vegetables;
- When choosing the size of the structure, we recommend making it less wide, but longer. This is explained by the convenience of processing plants: it is easier to reach the outermost bed when weeding, rooting, and loosening the soil of the beds.
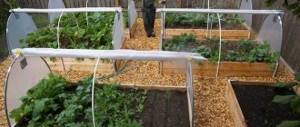
How to build an in-ground greenhouse with your own hands
There is a wide variety of garden greenhouses, of which the in-depth type is the simplest and most reliable. Although the construction of such greenhouses has become unpopular due to the labor intensity of excavation work. But you shouldn’t discount it at all.
What is their advantage? In the properties of the soil, it is able to maintain or compensate for temperature changes, working on the principle of a thermos. And if the air temperature is close to 0°C, then in the soil it is + 10°C. So why not take advantage of this property? Having spent energy on its construction once, use it for the rest of your life.
To arrange the structure you will need:
- Tools required: shovel, saw, hammer.
- From materials: the log can be made from a wooden beam measuring 20-25 centimeters; for making frames, a board measuring 75x40 mm is suitable, also glass or thick transparent film, and manure as biofuel.
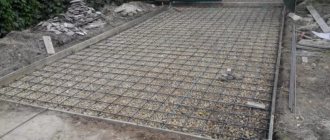
Trench
The basis of the structure is a trench. Its value depends on the volume of planned plantings. As a rule, the length reaches 8 m, the width is 1.5 m and the depth is about 60-80 cm. The walls are made inclined to resist crumbling, narrowing the bottom by 10-20 centimeters.
If you do not tilt, the walls will have to be reinforced with boards. The greenhouse should be located in an unshaded part of the site; it is advisable to set the direction of the trench from west to east.
Paruben
The foundation of the greenhouse, laid around the perimeter, is a log. It is made from timber 20-25 centimeters wide. Frames are attached to it. For waterproofing, roofing material is laid around the perimeter under the box.
To prevent heat loss, it is necessary to make the upper part of the log as flat as possible, thereby ensuring a minimum gap between the frame and the log.
Frames
Since greenhouses are most often made with single slopes, the entire surface of the greenhouse box is covered with frames. Their sizes are also chosen for reasons of convenience. A width of about 80 centimeters is considered optimal.
The frames are glazed with ordinary glass or polycarbonate, or the most budget-friendly method is covered with durable transparent polyethylene film. For ventilation, it is necessary to periodically open the frames, so they are “hung” on well-lubricated hinges.
Biofuel
Manure is not only an organic fertilizer, but also a source of heat for a greenhouse. The best of them is considered to be horse, but other types can also be used, for which it is necessary to mix peat, straw, and sawdust into them - which give looseness.
Regarding horse meat, it is colder, emits less heat and its “burning” time is not so long.
Using a greenhouse
Manure should be laid approximately two, or preferably three weeks before the seedlings are planted in the ground. It is laid out on the bottom with a layer thickness of 31-55 centimeters. Then cover with soil 15, or preferably 20 centimeters thick. Now the fuel is “ignited” by making small round holes in the “pie” every linear meter, and a bucket (eight liters) of boiling water is poured into them.
The temperature in the greenhouse should now change. In a week and a half, it will rise to 45-65 degrees. When the decomposition of the biomass located at the bottom ends in a week, the temperature will drop to the required 36-38 degrees. During this period, you can start sowing and planting any seedlings in the ground.
The operating life of a “bio-stove” usually lasts for 50-100 days and depends on the type of biofuel used. At night, or when the temperature drops to negative values, the greenhouse is closed. It is necessary to ventilate it, but only during the day, in warm and calm weather.
Types of greenhouses: the most common shelter options
Let's look at the types of greenhouses often found in summer cottages in the photo:
Breadbox. The name itself suggests that the whole structure is reminiscent of this kitchen utensil: the lid of such a greenhouse opens conveniently and does not require additional holders.
Arc or arched greenhouse. The most common and simplest type of design, easy to do with your own hands. Along the entire length of the bed, at a certain distance from each other, arcs made of wire or plastic are inserted into the ground and covered with polyethylene or other similar material. This greenhouse is easy to disassemble and assemble.
Thermos. The base of this type of structure is deepened into the ground, and the greenhouse lid is on the surface. This design perfectly retains optimal heat inside the shelter for vegetable crops.
Butterfly. The greenhouse lid is equipped with two doors, which allows you to process plants from both sides. This type of structure can be made manually or purchased in specialized stores.
House (gabled). Another option for building it yourself: the design is the simplest to manufacture - a pair of battens attached to the “ridge” and covered with polyethylene. The downside is that it is extremely unstable, so it is used as a temporary structure.
Preparing the soil for future precipitation
Having decided on the place where the greenhouse will be located, you can start preparing the soil for it. This work can also be done with your own hands. The owner of a summer cottage can choose one of several types of soil mixture:
- peat soil – 5-6 parts, ordinary garden soil – 1 part, humus – 2 parts, sifted river sand – 1 part, lime – 3 kg.
- sawdust – 5 parts, wood ash – 1 part, straw cutting – 1 part, peat soil – 3 parts. Before planting plants in this soil, you will first have to add 20 g of potassium sulfate and 30 grams of superphosphate. Moreover, the specified norm corresponds to an area of 1 square meter.
- peat at the stage of decomposition - 2 parts, horse manure - 1 part, straw cutting - 1 part. In addition to these components, you will have to additionally add 300 g of urea, 2 kg of potassium chloride and 3 kg of superphosphate for each cube of the mixture.
What to make a greenhouse from: choosing the optimal materials
Before you begin the project of your future greenhouse, decide on the material for its frame. He can be:
Metal – durable, weather resistant, strong. Disadvantage: it is prone to corrosion and requires special tools and skills when processing.
Wooden is affordable, easy to process, and stronger than plastic. The downside is that it is less durable and requires a special coating to protect against insects.
Plastic – has the longest service life, flexible. Disadvantage: fragile, easily broken material.
Review of the best projects for building mini-greenhouses with your own hands
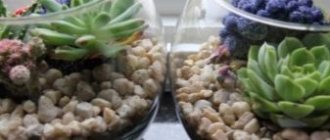
An interesting solution for gardeners is offered by the Eco-plast company. The mini-greenhouses of this company are equipped with a forced ventilation system. They are very good to place on the balcony. Greenhouses under the Sun Tunnel brand will ensure maximum seed germination with the first rays of the spring sun
You can repeat a similar idea with pallets yourself. It is enough to provide the plants with a decent drainage system, organize compartments for planting seeds, and create draft using an ordinary penny fan.
For your information! In such a ventilated, on the one hand, but sufficiently heated, on the other, compartment, the plants not only become active and begin to grow, but are also maximally protected from pests due to the tight fit of the protective cover to the tray.
Very often, an economical mini-greenhouse is installed near the walls of a country house. Firstly, it saves material consumption, and secondly, it simplifies the lighting and heating procedure.
This could be a compact mini-greenhouse made of polycarbonate
Or a full-fledged garden structure for large plants
Mini-greenhouses include variants of the “Butterfly” greenhouse. Especially 2-meter samples. This is an excellent solution for a small area. The design of the greenhouse allows for the most efficient use of the useful area of the greenhouse, while access to all plants is very convenient, both from one and the other side of the greenhouse.
The structure can be assembled not only from metal supports, but also from plastic pipes. The most important thing is to monitor how effectively the hinges and fastenings work. Frequent use of the sashes leads to early wear of the greenhouse fastenings. However, this can be corrected with proper care of the fittings.
Covering material options
Polyethylene is a cheap material, easy to work with, but extremely short-lived.
Polycarbonate is a material recommended by many experts. A greenhouse using polycarbonate is durable, weather-resistant, flexible, equipped with a protective layer against ultraviolet penetration, and retains heat well due to its honeycomb structure.
Glass is a fragile but durable material. Used only for greenhouses with an even frame. Heat losses inside the shelter are greater compared to other materials.
Spunbond is a new product in summer cottages. It is interesting because it allows moisture and air to enter the shelter, but retains heat. Resistant to rain, easy to process.
Brick tandoor - 150 photos and step-by-step instructions on how to make a simple device for cooking over a fire with your own hands
Construction of a cellar for a summer residence: better ideas and options for arranging cellars. Features of the layout and tips on how to quickly make a cellar with your own hands (140 photos)
How to make a gazebo roof: tips for choosing a design and the best ideas for covering the gazebo roof (170 photos)
What should the roof shape be?
Before you make a greenhouse or greenhouse with your own hands, you need to determine its shape; do not forget in any case that you will also need to install a roof, and this is an effective detail in growing plants. The most popular solutions:
- gable roof, greenhouses of this type are in demand, because they are really spacious and comfortable to be in, moreover, both for plants and gardeners. With proper design, installation and choice of material, the room will be illuminated by sunlight throughout the day. Greenhouses of this type are equipped as winter gardens, planting them not so much with vegetables, but with exotic plants. Of course, this option will be realized only when the proper conditions are organized, there are reliable heating systems, lighting and irrigation;
- arched roof, this solution for an arched greenhouse is extremely easy to install when compared with its gable counterpart. The bottom line is that a form covered with polycarbonate, or, alternatively, with plastic film, ideally diffuses sunlight throughout the room, so the plants will receive maximum natural heat. Another important point in this case is that due to the arched shape, no precipitation in the form of snow remains on the roof, that is, it will not be deformed or damaged due to the increased load in the winter season;
- a pitched roof is ideal for greenhouses, which have one wall adjacent to a massive building, for example, a house, or even a large stone fence, always on the south side. You can really save money on the construction of this greenhouse, because one of its sides will be a finished wall, with the base itself attached to it. In addition to all that has been said, it will be extremely easy to carry out communications into the greenhouse. When designing a greenhouse with a pitched roof, you should choose the slope of the slope correctly, this is the only way snow will not lie on the surface of the roof, because the increased load will only damage the coating.
Making a greenhouse from wood and polycarbonate
Before starting construction, prepare the surface and soil. Since the greenhouse will stand in this place permanently, therefore, we lay a foundation under the wooden frame. There are a lot of options here: lay it out of blocks, or dig in asbestos pipes, the simplest is to knock down a wooden box from timber.
The frame is built from wooden blocks with a diameter of 50*50 mm, the roof must be detachable, as we wrote about earlier.
To cover the frame we use polycarbonate, since this is the best option for a stationary greenhouse: there is no need to change it every season, unlike, for example, film. You can see the details of making this type of greenhouse in the photo.
How to arrange your greenhouse, what materials and projects to use – it’s up to you to decide. The main thing is that in the end you get a wonderful harvest!
Photos of do-it-yourself greenhouses
Read here - Do-it-yourself winter chicken coop: design, layout, insulation, heating. 80 photos of warm chicken coops