Garden furniture brings owners of country plots and their guests a lot of joy and comfort, gives peace of mind, and makes it possible to feel complete unity with nature. In the constant bustle of everyday life and the rush of a big city, I want to finally feel harmony and comfort. Therefore, today, at the slightest opportunity, residents of megacities try to get out into nature. And the main place of countryside recreation for many city residents is the dacha.
An essential part of landscape design at any dacha is garden furniture. Modern manufacturers offer a wide range of different products for outdoor use. However, it is garden furniture made with your own hands that will allow any owner of country real estate to show all their creative ideas and skills.
Basic concept
When wondering how to make garden furniture yourself, you need to think through everything carefully. Before starting work, furniture drawings should be developed, which will then be used to calculate the necessary materials, purchase them, and carry out the manufacturing process itself.
Basically, wood, metal or other building materials are used to make garden furniture: chipboard, plywood or fiberboard. It is very important that all materials are safe and of good quality (no knots, cuts, sloppy joints, etc.). Today, the life of garden furniture can be extended by the use of special impregnations, varnishes and paints that protect the surface of products from the negative effects of climatic conditions, from fungi and insects.
You can also use used wooden pallets, remnants of boards, logs and various building materials that were not useful when performing the main work. Elements of garden furniture can be ordinary hemp, which can be used in the form of load-bearing supports or main seats. In order for the stump to serve for a long time, it is pre-impregnated with drying oil or waste oil, and then thoroughly sanded. If a stump is used instead of a stool, like a regular seat, you can place a small pillow on it. Sitting on it will become much more comfortable.
Hardwoods are excellent for the production of garden furniture, but you can also use soft varieties, as long as the wood is thoroughly dried.
To make garden furniture yourself, you need to take care of the availability of components, equipment and tools.
The following must be prepared for the production of garden furniture:
- hammer;
- screwdriver;
- plane;
- saw (preferably a power saw or jigsaw);
- sandpaper of different parameters;
- paint, varnishes and impregnations for outdoor work;
- nails, screws and other components.
What is croaker and where is it used?
One of the most common lumber in construction is edged boards and lining; during their manufacture, a certain amount of “waste” remains - slab. This residue is obtained when cutting a standard wooden log, one side of the lumber is smooth, and the other side is convex, this part of the slab remains covered with bark.
Despite its secondary nature, this type of building material has its own parameters. The main thing is length - width and thickness, as a rule, can fluctuate noticeably. In fact, the quality of an edged slab is practically no different from a board, but its area of application is in a slightly different area.
Due to the low price, you can build from slab:
- fence;
- rough floor;
- outbuildings or temporary buildings;
- "goats" for repair work.
At the same time, the costs are more than compensated by the high quality and durability of this building material. Oversized materials are used for kindling. In the case of using more expensive and visually attractive wood species, for example, Siberian larch, slab is ideal for finishing a house.
Another area of application for edged larch slabs is the arrangement of garden paths. Wood feels excellent at high humidity and is practically resistant to rotting. This is one of the most durable types of wood; if you enhance its natural properties by treating it with special means, its service life will be more than tens of years.
Another area of application for this lumber is the construction of formwork when pouring the foundation of a house, and after removing the frame, the slab can be reused in construction on the site.
Adviсe
To make a simple bench yourself you will need:
- wooden board with a thickness of at least 20 mm and a width of at least 300 mm;
- two wooden posts (hemp) 500-600 mm high.
If the bench does not require a foundation, then it is enough to carefully prepare the board, sand it, sand it and attach it with nails or screws to two bases. For the backrest, you can use any wooden blocks or sawn off tree branches that have the most even shape possible. They also need to be well prepared, protruding parts and small knots trimmed off, and sanded. After fixing the back, the finished product is primed with a protective compound or drying oil, and then covered with tinted varnish or paint.
You can also make round seats from round saw cuts of tree trunks. The basis for such seats can be a metal pipe, which is concreted into the ground. Then a prepared, carefully processed round saw seat is placed on top. In the same way, you can make a table, and around it a bench and several seats.
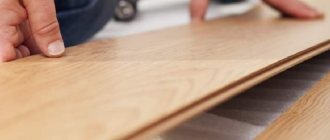
You can make an original, beautiful and perfect bench for garden decoration yourself from sawn pieces of slab logs. The blanks are carefully sanded, the surface is burned with a blowtorch, the top is treated with an antiseptic and coated with a special varnish for external use. After this, the elements will be connected into a product and to supports made from pieces of logs.
How to build a cheap house with your own hands
Most people are increasingly thinking about how to get out of a stuffy and cramped apartment and move into their own, comfortable and cozy home, and how to build a cheap house with their own hands
. These dreams can be made reality; you can build your own home. There are so many offers and opportunities to make this dream come true. But to start construction, you need to think through many options, weighing your financial and physical capabilities.
Firstly, obtain all the permitting documents for building a house, draw up a project, take into account climatic conditions, examine the composition of the soil, where it is planned to build the house (to select a foundation) and, of course, for what purpose the house will be built: country house - for summer living or for permanent residence.
So, any construction begins with a foundation, which must be strong and reliable, because it is the basis of the future home. It is necessary to dig a pit up to 2 meters deep, install formwork, cover it with roofing felt for waterproofing and prevent the foundation from being washed away by groundwater, and fill it with concrete. Concrete should be poured in 2-3 stages, this will prevent cracking of the foundation. Complete drying of such a foundation lasts up to 30 days. After this time, you can begin the main construction. If a house is being built for permanent residence, then it is immediately necessary to think through the water supply and drainage system, and resolve the issue of how and with what the future home will be heated.
2. Selection of building material.
In terms of cost, building a house will be much cheaper if you build it from foam blocks. This is a new, modern and relatively inexpensive material and the construction time will be completed much faster. Choosing foam blocks for construction work will help solve the question of how to build a cheap house with your own hands. The size of one foam block is 300x600. It is necessary to lay a waterproofing layer of roofing felt on the foundation; this is done in order to prevent moisture from entering and the formation of mold on the base of the building. When laying the first layer, it is necessary to use a large layer of concrete, which will eliminate the defects remaining after the construction of the foundation. The first layer is the main one and you need to lay it out evenly.
You need to start by constructing the corners of the building, then proceed to the first row. It is imperative to use a plumb line to ensure the wall being built is level. You need to lay out the foam blocks in a checkerboard pattern, but after every two rows, you need to lay reinforcement to strengthen the wall. The dimensions between foam blocks should be no more than 3 centimeters. No voids are allowed in the solution; the solution must be laid out in a dense layer. The next row must be laid out for up to 15 minutes so that the solution does not have time to “set.” Laying walls made of foam blocks is completely similar in bricklaying technology, only much less time is spent working with them.
3. Installation of windows and doors.
When laying out walls, you must immediately take into account the number and size of windows and doors, leave voids for window and door openings, lay a concrete beam on top and then lay out foam blocks. When planning windows, you need to remember that when building a cheap house with your own hands, a sufficient number of windows provides additional lighting and in the future, this will affect energy savings. When the required height is reached, install the floor slab and, if the project has two floors, build further. Having reached the required height, insulate the attic space. To do this, you can lay out a layer of mineral wool or simply cover the surface with expanded clay. These materials are relatively cheap and their cost also contributes to the price of the question: how to build a cheap house with your own hands.
Sunbed for a summer residence
At any dacha there is a cozy place where you can enjoy a comfortable rest, sunbathe or lie in the shade of spreading trees, listening to the birds. To feel comfortable and relaxed on vacation, it is recommended to build a lounger yourself from available and available materials. The model of the lounger is very simple, and the work on its production will take only a few hours.
Standard sizes of sun loungers:
- height from 30 to 40 cm;
- length – 200-220 cm;
- width – 60-80 cm.
Materials required include boards up to 150 mm wide and up to 35 mm thick, pickets for flooring and self-tapping screws. The boards must first be sanded. First, the frame is assembled in accordance with the selected dimensions, and legs of a certain width are attached to it. The width of the base is selected depending on the place where the sunbed will be placed. It should not be pressed into the ground during operation.
A U-shaped frame is attached to the finished frame from the side of the head. This is a backrest whose slope can be adjusted. The tilt is adjusted by moving the bar in the grooves of the frame. Usually no more than 4 such grooves are made.
Next, picket fences are attached to the frame with self-tapping screws. In the places where screws are screwed in, it is better to first make holes with a thin drill. Before final assembly of the lounger, each picket fence is coated with varnish or paint.
DIY slab house
№10 October 2019
The magazine has been added to your cart.
HOW I BUILT A CHEAP AND CONVENIENT COUNTRY HOUSE
Architect E. SMOLIN.
A few years ago, the magazine “Science and Life” published an article by architect I. Stoyanov on how to build a lightweight, frame garden house. Some readers, based on magazine descriptions and drawings, built similar houses. And the magazine’s employee E. Smolin, an architect by profession, built a frame house on two levels with various design features. The editors introduce readers to this building, offering it not as a standard and a guide to action, but as a possible impetus to include their own imagination and ingenuity in the matter.
Anyone who acquires a plot of land outside the city sooner or later builds his own house on it. People who have the means act on a grand scale, undertaking the construction of a mansion or cottage, using quite expensive materials and also expensive ready-made structural blocks.
Those who are limited in funds - and there are many of them today - can get by with relatively modest costs by installing, for example, a small summer frame house on two levels. I built such a house myself; it occupied only 22 square meters on the plot.
The main room is located on the first level (floor), it contains a dining table, a small refrigerator, a gas stove, a tabletop electric stove, a table for cooking and a double bed.
On the second floor there is a bedroom with two beds and a coffee table. There is also a terrace where you can put a couple of light chairs for relaxation, if, of course, there is time for it during the development of the site. A house can be built by two non-professionals in 1.5-2 months from accessible, simple and relatively cheap structures (Fig. 1).
Now, in order. When planning a site, the main thing is that the future structure does not obscure the garden plantings. Place the house 4-6 meters from the northern border of the site, along the east-west axis, taking into account the placement of beds, flower beds, shrubs and trees (Fig. 2).
Before starting construction, make a triangle with a side of 1000 mm and angles of 45 and 90 degrees from slats with a section of 20 x 50. You will also need a level 50-60 cm long (Fig. 3). A plumb line will be required; Of course, you also need a simple workbench - a work table measuring 0.9 x 2.6 m (Fig. 4), and a stepladder 3.5 m high will also be needed.
Lay out the axes of the underground and foundation pillars using a triangle and a tape measure, driving in pegs exactly at the corners of the underground and in the center of the future foundation piles. Check the accuracy of the breakdown by the equality of the diagonals (Fig. 5).
Start excavation work with an underground pit measuring 2.9 x 3.8 m and a depth of 1.3 m. Carefully cut off the top layer of soil - 25-30 cm - to use for beds. Prepare the formwork on the workbench in advance (Fig. 6). To do this, nail unedged boards of the same thickness to the bars with a cross-section of at least 40 x 50 mm and a length of 1600 mm. Sharpen the ends of the bars. Instead of bars, you can use slabs or cuttings of boards 40 mm thick. Prepare the formwork in the form of panels.
To prevent concrete leakage when constructing basement walls, nail roofing felt to the formwork panels and place them in pairs with the roofing felt side opposite each other according to the markings in the pit. To ensure that each pair of shields stands firmly in a vertical position, forming an internal cavity between them, secure the shields on both sides with stakes made of bars (Fig. 7).
Made of metal
You can also make garden metal furniture yourself. It has some advantages over wooden products, as it is more reliable and durable. To make such furniture, select thick-walled steel or duralumin tubes with a diameter of about 25 mm. By the way, you can use used parts from an old folding bed.
The most difficult and important stage in the manufacture of metal garden furniture is bending the elements. You can use special devices made from a flat disk and a pair of bars. Wooden blocks are fixed on a solid base, leaving a gap between them equal to the thickness of the pipe. The metal tube in front of the flexible one is filled with wet sand and wooden plugs are inserted into the ends. This will allow it not to break at the bend. It is not recommended to use excessive force when bending the pipe. The main thing is to do the work gradually.
The bent tubes are connected to each other by adapter bushings made of wood or metal with bolts and nuts. Tubular structures made of duralumin are polished to a shine with a special paste, and then coated with a colorless waterproof protective varnish. This can be done for your garden with armchairs, sun loungers and folding chairs. The seat of the structure is covered with dense fabric, for example, tarpaulin.
We recommend reading:
- DIY gate drawings;
- DIY gazebo with barbecue (drawings);
- do-it-yourself pond from a bathtub in the country.
DIY wooden slab barn
You can avoid the high costs of building a shed with the help of a wooden slab, and the technology itself is so simple that it will allow you to do absolutely everything yourself without any problems.
First, the place chosen for the foundation must be cleared of debris; it would be a good idea to sprinkle it with fine gravel. Four pillars about 3 m long are dug into the corners to a depth of about 70 cm. It is better to wrap the part that will be in the ground with roofing felt or treat it with a solution to protect it from rotting.
For the lower and upper trim, you can use a 5.5 cm beam. It must run strictly horizontally (you will need a plumb line), the distance from the edge of the pillars is about 10 cm. Then additional strapping will be required exactly in the middle.
The frame is ready, now it can be sheathed with a wooden slab, which is nailed vertically. Don't forget to leave openings for the door and windows. Ordinary timber is also used as roof rafters. Then the procedure is standard - installing the sheathing, laying roofing material and installing gutters for water drainage.