Many people begin landscaping the territory of a private house with paving stones in the yard. It’s easy to get confused in the variety of choices for patio tiles; you need to know which material is better and how to correctly and beautifully lay it on the property.
Paving slabs are very popular among owners of summer cottages and country houses
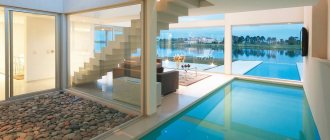
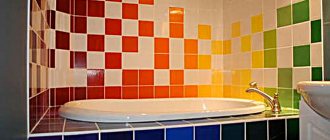
Beautiful examples of finished sidewalks and paths in the photo
Paving slab colors
Modern industrial technologies make it possible to give paving stones any color and shade. To do this, the dye is introduced either into the solution during the manufacture of products, or applied on top of it as a finishing coating. When purchasing, it is better to find out how it was given color, because its price and service life depend on this. The finishing coating quickly wears out in places of constant use; it must be renewed regularly. Tiles that have been colored during mortar production will retain their color longer.
Colors are divided into practical and impractical. Practical ones include “natural”:
- brown;
- brick;
- grey;
- black and others.
That is, those that come out when mixing red and black. These colors are obtained using natural dyes; they do not fade under sunlight.
Blue and green pigments are considered unpractical; they have a short lifespan (no more than one and a half years), as they fade from the sun.
On a note!
When a blue or green color fades, it turns gray and the design in which those colors were used disappears.
“Natural” yellow, sand, and orange pigments are also considered impractical. These pigments do not fade, but quickly become dirty and look untidy.
Laying scheme
Types of installation can be divided into simple and complex. If the work will be done with your own hands, you should immediately consider the first type. In this case, elements of one, maximum two colors are used. A complex option involves using a large number of colors to form a real pattern.
There are a lot of styling options
The layout of paving slabs is:
- Braided. A suitable option for a rectangular area. The classic method involves stacking elements in pairs. Along the perimeter of the site, two tiles are laid sideways. In the next row, two more elements are placed at right angles to those already laid out. Next, pairs of elements alternate.
Network
- Spoon. Track paving option. The elements are laid sideways along their length. In this case, it is necessary to take into account the visual perception that the formed coating will create. If the tiles are placed horizontally, the path will appear wider. When positioned vertically, you can visually lengthen the path.
Spoon
- Christmas tree. The elements are placed at an angle of either 45° or 90°. This option is quite popular when finishing areas with increased operational load.
Herringbone
- Circular pattern. A suitable option for a small area. For implementation, wedge-shaped tiles should be used. With a creative approach, in this way they form a certain area in front of the house or designate a resting place in the garden.
Circular pattern
- Random mix. When creating, tiles of different colors and shapes are used. The elements are arranged randomly, gradually filling the entire surface to be finished. As a rule, the material of the same shade is used. The result is always quite interesting.
Chaotic order
- Chess order. Involves the use of square elements of two colors. The tiles are arranged in a checkerboard pattern. If square products of the required size are not available, you can use rectangular ones, placing them in twos.
Chess
- Diamonds. The option can be implemented in different ways. The canvas formed using tiles of different colors looks quite impressive. The classic option is to use gray, burgundy and white elements. Often a star-shaped pattern is formed in this way.
Diamonds
- Curly template. In this case, the territory is finished in accordance with an individual project. Particular attention is paid to the colors and direction of each element. Thanks to the presence of such elements, the landscape acquires its own zest. Each line is worked out individually and created through the use of textured tiles. Only professionals can handle this option. If you do the work yourself, you should abandon such an idea. Particular attention is paid to the marking stage, on which the final result largely depends.
Curly template
- Combined option. In this case, it is assumed that several options will be used at once. Zones designed using a circular pattern and surrounded by tiles arranged in a random order look very original.
Only a professional can handle the pattern.
Thus, various patterns are formed from paving slabs. When doing the work with your own hands and without experience, it is better to choose a simpler option. In this case, you can achieve a fairly good result by combining several colors. If you have experience and desire, you can make the appearance of paving slabs in the yard a source of pride for the owners and the admiration of people passing by.
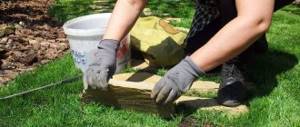
How to lay paving stones with your own hands
First of all, you need tiles and tools. Choosing a tile is not difficult - just decide which pattern seems preferable to all, try on the money and find out from the seller whether the paving stones are able to withstand the conditions for which you are buying it.
So, tiles intended for a car area must be able to withstand a lot of weight, otherwise there will be embarrassment.
The following tools will be needed:
- Master OK.
- Mallet.
- Tamping.
- Pegs.
- Cord.
- Building level.
- Pipe.
- Watering can, rake and broom.
- Cement and sand.
Step one. Creating a Foundation
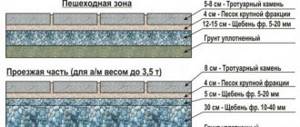
Construction of light-traffic pedestrian paths
- Marking. The edges of future paths or areas are marked with driven pegs connected by a cord at a height of 5 centimeters.
- Site preparation. The top layer of turf is removed from the marked area, debris and stones are removed.
- Tamping. The depth of the base should be 20-30 centimeters, there should be no holes or protrusions on it. If the soil is too soft, you need to level it by adding water.
- Giving a slope. In order for water to drain away, instead of forming puddles, it is necessary to give the site a slope of 5 mm per meter. At the same stage, all communications are laid, and when everything is finished, geotextiles are placed in the base, which will prevent weeds from growing through the cracks in the tiles.
Step two. Pillow
The “cushion” for the tiles is created either from pure sand or from a mixture of cement and sand in a ratio of three to one. The first method is suitable for warm climates, the second - for more difficult soils and frosty regions:
- Mixture. The mixture is laid out on the base and leveled with a rake. After this, it is filled with water (preferably in warm, sunny weather) and after 3-4 hours you can move on to the next step.
- Pipes. First, using pipes, the dried mixture is leveled again so that it fits well. After this, they are laid out like rails, parallel, at a distance of 2-3 meters from each other. The gaps between the pipes are filled with sand or filled with cement.
Step three. Paving stones
When all the preparations have been completed, it’s time for the main task:
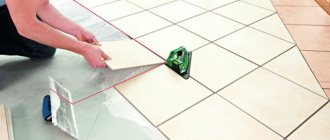
- Cord. First of all, the cord is fixed on the track (or platform).
- Laying. After this, laying begins according to the chosen pattern - from the curb and away from you, so that the tiles lie close to each other.
- Alignment. If the tile does not lie flat, you need to remove it, remove the excess sand with a trowel and lay it back.
- Final alignment. When the area is completely laid out, you should use a level to measure how evenly it is laid, and use a mallet to bring all the tiles into line. The area should be level.
- Seams. After this, the seams between the tiles are filled with sand or a cement-sand mixture.
When everything is finished, the paving stones are swept away from any remaining debris.
It requires minimal maintenance - just sweep it when debris falls on it and periodically add sand to the seams, which will be washed out over time by rainwater.