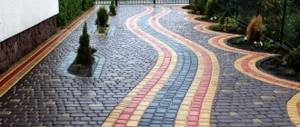
Thought to do DIY paths at the dacha or remake existing ones visits every summer resident. We are talking about solid paths with hard surfaces. Firstly, well-made and well-thought-out paths immediately transform the site, are convenient to use in any weather, easy to maintain, durable and aesthetically pleasing. Secondly, you have taken the first step towards completely transforming your site; read about the next stages of landscape work in other articles by the author.
The article is based on the experience of a famous landscape designer working in the market. The data has been verified and confirmed by many years of practice in Siberian conditions.
- Stages of work
- Track classification
- Why is it important to properly prepare the foundation?
- Layout or transfer of the track design to nature.
- Earthworks - we remove all the fertile soil
- "Pillow" - base for the track
- Sites for inflatable pools and sports areas, decking
- Wood flooring options:
- Installation process:
Stages of work
Paths are the circulatory system of any landscape.
Before you start building paths in your dacha with your own hands, you need to:
- Draw a diagram of the road and path network on the site plan. Mark the main road, secondary roads, their width;
- Transfer the drawing to nature (to the site) using pegs and rope;
- Remove fertile soil to a depth of 0.5 m (depending on the operating conditions of the future path/site);
- Prepare the base for the path;
- Lay the selected coating.
All stages are discussed in detail below.
Types of garden paths made of natural stone
Natural stone goes well with bulk materials. To create an inexpensive, original coating, natural stone and crushed stone are used. The technology for making bulk paths is standard.
Unformatted flat flagstone (sandstone, limestone, slate, dolomite) is popular among owners of country houses. Paved and walking garden paths are made from it. Flagstone can be yellow, gray, brown.
Laying is carried out on mortar, dry mixture or sand. The method depends on the type of paving and how the path is used. A flagstone walking path looks great on the lawn. Stones for it are selected with a thickness of 1 to 7 cm. They are laid with a gap of 4-5 cm.
You may be interested in:
Design of a 6-acre dacha plot: photo, do-it-yourself with beds There are many interesting ways to create an interesting design for a 6-acre dacha plot with beds. Here...Read more...
Track classification
The optimal width of paths convenient for a person ranges from 0.7 - 1.2 m, on average about 90 cm. The width is based on what one person can easily walk through.
- The main roads are wider (large enough for two people to pass each other) and have hard pavement. The road leading to the house is 120-150 cm, maybe more if the porch is wide;
- The driveway is 220-250cm, it can be made from 2 narrow strips;
- The remaining paths are 70-90cm wide, so that a hand wheelbarrow can pass;
- Additional step-by-step paths with a run of 50-60cm;
- Paths between beds in the vegetable garden - minimum width around 40cm
For main roads, it is advisable to use a hard surface (paving stones, paving slabs, flagstone on a concrete base).
Advice! When purchasing tiles from a supplier, look at the fight inside - in cross-section; if there is a lot of black (slag) - this is bad, it will prick when hit with a mallet.
The coating is:
- sandy;
- earthen;
- asphalt;
- herbal;
- from gravel;
- from crushed bark;
- with concrete filling;
- from concrete blocks;
- from paving slabs;
- made of brick;
- from natural stone;
- from wooden end bars;
- from trunk cuts, etc.
Trajectory of tracks. Ideally, any driveway or path from the street entrance to the house should follow the shortest possible line. Sharp diagonals and lines should be excluded. The remaining paths are organized so as to allow you to see the most beautiful corners of the garden and care for the plants.
Usually all tiles for paths are made to order. The order must be completed at least 1-1.5 months in order for the tiles to dry. Therefore, calculate when you need to place an order.
Attention! If the company’s production time for tiles is 10-20 days, do not buy it from this supplier! It will not be completely dried and during installation there will be a lot of fight from the blow of the mallet.
Also, the manufacturing company will help you select tiles and make a schematic laying plan by numbers (if the pattern is complex).
We recommend using the manufacturer’s services for schematic tile layout. They usually do it quickly, efficiently and not expensively.
Alternative materials for garden paths
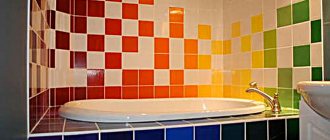
Coverings made of concrete are decorated with various rubbish, which is abundant in the countryside. They use screws, bottle caps, pot lids, broken dishes, old tiles from the bathroom, unwanted coins, and buttons.
They are putting up formwork. Mix the cement mortar and pour it onto the prepared area. All the “good” that was found at the dacha is laid out on top. Carefully press each part into the solution. When it dries, the formwork is removed.
Using plastic stoppers
Multi-colored caps from plastic and glass bottles are used to create beautiful patterns on concrete surfaces. The lids are pre-sorted by size and color. If desired, the motifs of the patterns are made in advance. To make them you need an awl and fishing line.
The awl is heated and holes are made in the side walls of the lids. Using fishing line, multi-colored parts are connected according to the chosen pattern. The garden area is prepared and poured with concrete. The motifs are laid after the concrete surface has set a little, but has not hardened.
How to use broken tiles
Practical summer residents do not throw away old tiles; they use them in arranging their summer cottages. Broken tiles serve as an excellent decoration for garden paths. Small colorful rugs are made from it in different parts of the garden. Mark the boundaries, remove 8-10 cm of soil, level and compact the surface.
Install the formwork. A layer of fine crushed stone is poured, poured with concrete, and leveled with a trowel. When the concrete surface begins to set, the shards are laid, creating a unique pattern. Finish the work by sealing the seams. Use putty or liquid solution. You can quickly and inexpensively make an exclusive garden path from waste tiles.
It is difficult to decide which path to make at the dacha - from wood, concrete or natural stone. Each material has its own advantages. The type of paving must be chosen, taking into account the type of soil, the size of the path, and its practical application.
The level of comfort of country life is higher if the space around the country house is properly organized. Paths play a big role in country life. They should be comfortable, durable and beautiful. You can make them yourself using improvised or purchased materials.
Why is it important to properly prepare the foundation?
Specialists who work with laying paths and foundations for gazebos, parking lots, paths, steps, and other platforms know the problem - over time, all structures, especially round platforms, move apart. This occurs due to freezing and swelling soils. The earth breathes and lives!
Therefore, it is very important to qualitatively and thoroughly prepare the base for laying the coating . But you need to understand that even the most expensive concrete foundation will tear over time.
Concrete work when laying the base is the most expensive!
Therefore, we propose to use a combined approach:
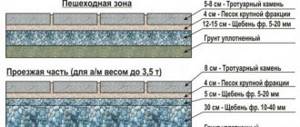
- parking zones on a reinforced concrete base. On top you can put paving stones 8cm high (6cm is fragile). A loaded Kamaz truck and a sewer truck can easily enter such a parking lot. If the dacha is small, then the “cushion” can be sand and gravel (SG) with a depth of up to 30-40 cm (so that a loaded sewer truck can pass), and this base also performs drainage functions well. For a solid and budget-friendly base, we recommend 40x40 tiles cast in the form of bricks; they have proven themselves to be excellent in use.
- In round areas there must be a sidewalk border (curb) and a garden border (a palette of 60 cm, work is per linear meter, if you spent 100 pieces of material, then the cost of work is per 50 linear m). Short curbs are good to use when making turns. To make a circle, you need to cut meter-long curbs with a grinder.
- Under the base of the path there is an ASG cushion of at least 20 cm compacted with a vibrating plate. It is important!
The width of the cushion can be up to 10 cm beyond the track/area.
In the spring, water contributes to the creeping of paths, especially if the site is low, all the water from the neighbors flows onto the site, all structures creep over time, it is necessary to either reinforce everything or make deep cushions. WE PREPARE THE FOUNDATION CAREFULLY!
Layout or transfer of the track design to nature.
So, the design of our paths with main and secondary roads has been drawn, the width has been determined. We begin work directly on the site.
To transfer the drawing of the tracks to the site, we use radii - for more accurate drawing of bends and circles, if any.
To do this, we need a peg (or fittings) and a rope (a bright narrow hose, twine). Using a garden trowel, draw circles. To make the circle perfect, we hit the pegs as often as possible, at least once every half meter.
If suddenly a situation arises where you don’t have any rope, twine, or colored hose at hand, then sand will help out! We make a groove and pour sand into it - the borders of the path are ready!
Earthworks - we remove all the fertile soil
The pegs are hammered in, the ropes are taut - we begin to dig. We dig out all the fertile soil according to the markings to a depth of 25-30 cm - for paths and 30-40 cm for parking lots. We dig behind the pegs, the rope remains outside.
Attention!! We never put anything on fertile soil! Firstly, it can be used for its intended purpose, or to form the geoplasticity of the site. Secondly, everything you do on black soil will “float” over time. We dig down to a solid clay base.
"Pillow" - base for the track
Let's start making the pie base. Layers:
- On infertile soil we place GEOTEXTILE (low density can be used) or darnite (density from 90 to 120 rub/sq.m). Darnit is more expensive. We use Darnit on more heavily used surfaces: on the main road, in parking lots, in playgrounds. On the remaining paths we use geotextiles. This layer is used to prevent the sand that we will fill above from going to the lower layers, and also cushions well.
Important!! We do not use any bags, film, roofing felt, old carpets and rugs, mulching under the road surface, or covering materials!
- CRUSHED. The thickness of the layer depends on the types of platforms and paths, on average 10-15-20-30 cm - compacted crushed stone! 10 cm on those paths where we don’t walk a lot. Crushed stone comes in different fractions. On the bottom layer you can lay crushed stone up to the 12th fraction, for the upper layers we use road crushed stone of the 5-7th fraction. Thus, the paths will perform a drainage function.
Important!! Compact each layer of crushed stone with a vibrating plate. Otherwise, the tracks will sag over time and all the work will have to be redone.
The vibrating plate can be rented.
If there is no vibrating plate, then, as a last resort, you can use the method of washing sand into crushed stone. This method is less effective and we do not recommend it, but it is better than nothing.
- SAND-CEMENT MIXTURE . This layer ranges from 2 to 5 cm. Dry sand (but better screening is the flour that is formed during the production of gravel) mixed with dry cement. Proportions: 3 parts sand 1 part cement. We spread it with a fork or an object like a wooden mop and again go through it with a vibrating plate.
- PAVERS or any covering you choose. We lay paving stones or tiles on the sand-cement mixture, lightly sprinkling it with water. Dry masonry!
Important! There is no need to actively spill the sand-cement layer! Otherwise, it will all go into the lower layers and will not fulfill its function of fastening the coating.
We leave a 1.5-2mm gap between the tiles so that the tiles can breathe and move. Paving stones/tiles are laid in a checkerboard pattern. First we trim the center and the main pattern and at the very end we trim the sides.
Be sure to use a level and tilt it a few degrees from the house or as you move.
You can use up to 3 colors and 3 different sizes of tiles in a path.
- CURB/CURB. You can use two types of borders: concrete and plastic. We place the concrete curb on the PGS and make a concrete footing for it. If the path runs between the lawn, then it is better to make the curb level with the paving stones, so that it is convenient to mow with a lawn mower. If the path is adjacent to a flower bed or hedge, then the border can be made higher.
We recommend a plastic border like the one in the photo, it’s called “Black plastic garden border,” and costs about 250 rubles. per linear meter. It turns out about the same as concrete, but it is easier to install and makes it easy to make soft curves in the path.
TOTALLY we get our “layer cake” - the base:
- geotextile + 20 cm crushed stone + 5 cm sand-cement mixture + tile thickness - in this case, you can sow a lawn between the tiles. To do this, just mix 1 part lawn seed with 3 parts soil and distribute this mixture into the joints between the tiles.
- geotextile + 20 cm crushed stone + 5 cm screenings + mortar + tiles - in this case you cannot plant a lawn and the drainage properties of the path deteriorate sharply.
Advice! If the budget does not allow you to immediately pave a hard surface (tiles or paving stones), then you can only do the preparation, without a layer of ASG. A crushed stone base well compacted with a vibrating plate will serve perfectly as a path until you decide to pave the top layer.
How to make garden paths with your own hands
It’s not enough to know what you can make garden paths from with your own hands. You also need to know how to make them correctly so that it lasts for more than one season or two. Laying different materials may differ slightly, but there are several rules and actions that are repeated in any technology.
First rule : when laying or forming a path covering, it is made with a slight slope. If the material allows, a slope of several centimeters is made on both sides of the center. If, for example, a concrete path is poured, then the slope is formed in one direction - away from the house, if it is nearby. The slope is made towards the lower part of the site if the path is located on a slope.
Section of a garden or country path
Second rule : any coating requires preparation of the base. If you place stones (for example) directly in clay or loam, there will, of course, be benefits - it will definitely be more convenient to walk, but the stones will “silt up” after some time. They will simply trample into clay. When installing a bedding, this will take much more time. And if you add a drainage cushion and a side, water drainage will be even more effective, and everything will look even more beautiful.
A prepared base is required for the coating
Third rule : the level of the path should be a couple of centimeters higher than the adjacent area. Then the water will drain quickly, cleaning will be more convenient, and cleaning will be required less often: the eroded soil will not flow either during rains or during watering of flower beds, which are often done along paths.
Read about how to make beautiful beds here.
Step-by-step instruction
When making garden paths with your own hands, start with markings. In theory, the dimensions and shape should be marked on your site plan, and the markings should be carried out according to the project. But most often everything is done locally. To make the future path more visible, its contours can first be covered with white sand or something similar. If the shape suits you, you can drive in pegs and stretch twine between them, but you can also work on the backfill.
Related article: DIY chess table made of fiberboard
Next, to make a path from stone, flagstone, brick, paving stones, pebbles and other similar materials, the steps are as follows:
- The turf is removed between the two marks. The depth of the ditch should be about 15-25 cm.
- A curb is dug along the edge, if provided.
- The bottom of the ditch is leveled by removing roots, stones, and eliminating significant holes or mounds. The bottom is compacted (tamping in the photo below).
- Pour a layer of crushed stone of large or medium fraction. To save money, you can fill in broken bricks and other large construction waste. If you have a vibrating plate, great, if not, take something similar to the tool in the photo (you can make it from a large log, to which you nail a handle across the cut). Use this tool to level the bottom. If you have filled up with garbage, you need to sprinkle a little crushed stone on top and compact it again.
This is a tamper
- Lay a layer of geotextile on top. Its edges rise flush with the sides or even a little higher. It is better not to skip this layer. It prevents the sand, which is usually poured on top of the crushed stone, from mixing, and prevents the roots of plants from germinating, which destroy the path. A very useful thing.
- Sand is poured onto the geotextile. Its layer should be such that the laid coating is slightly higher than the general level on the site. The sand is first scattered with a shovel, then, evenly distributed, leveled with a rake. Then they are compacted and leveled. To level the sand level, you can use a rule (a construction tool that is often used when pouring a concrete floor) or simply take a large ruler, a building level, or a level lath. Sometimes you have to pour it in, compact it, and level it several times. It is desirable to achieve an ideal surface.
One way to level the sand under the path. But you need to dig in the boards first and level them. Then they make such a blank and level the sand, pulling it along the guides
- Stones, pebbles, flagstones, paving stones, bricks, etc. are placed in the sand. They are placed in the right place, then they are knocked with a rubber mallet: they are driven deep into the sand.
You can place a flower garden or flower bed along a beautiful path. Read how to make them here.
Beautiful DIY pebble path
If with flagstone, paving stones, brick, everything is more or less clear - everyone has already seen more than once how this is done, then how to lay pebbles in patterns is not clear.
Photo instructions for making flagstone paths
Below is a photo report on the process of making a pebble path. It shows the basic techniques: lines are drawn onto leveled sand along which pebbles will be laid out. If these are arcs, they are made using thread and two sticks/nails.
Draw a picture on the sand
When selecting stones, they are laid out on edge close to each other, slightly buried in the sand.
Place the stones close to each other
Place a board on the folded pattern, take a rubber mallet and knock on the board, hammering the pebbles into the sand. This is how they deepen the entire pattern, making sure that the edges of the pebbles are at the same height.
Stones are sunk into the sand
Take a mixture of sand and cement (2 parts sand, 1 part cement) and fill the gaps, leveling the layer with a brush.
Cover the finished pattern with a mixture of sand and cement
A fragment of a pebble path is carefully watered with water so that the backfill does not wash away. Wait several hours for the cement to set a little, then remove the excess with a soft brush.
Excess concrete mortar is removed with a brush
It is important not to miss the moment: the solution should not get dirty, but also become a stone. If you pick at it with your finger, it should crumble. It's time to clean off the excess.
Read about how to grow a green hedge in the article “A hedge fence: how to grow and shape”
Path made of wooden stumps and crushed stone: video
Old logs or trees can be turned into a beautiful path. The wood is cut into logs of the required length, the face cut is sanded, and all the wood is first treated with a bioprotection compound (you can soak it in waste oil). After drying, dip into Kuzbass varnish and dry again. Then paint the desired color on the front parts of the stumps - which will protrude outward. They dry it again and only then put it in the sand.
The process is described in detail in the video. Here we explain step by step how to make garden paths from stumps or logs with your own hands.
Making a concrete path yourself
The process is generally similar to that described at the beginning. There are some differences that we'll talk about.
After the trench is dug and the bottom is leveled, formwork is installed along it on both sides. These are boards with a thickness of 25 mm (thicker is possible, thinner is not advisable, you can use plywood 16-18 mm thick, chipboard). Their height is the height of the track. If you are shaping the slope, the boards should be aligned taking it into account - one side is slightly higher, the other is slightly lower.
The formwork is leveled - the concrete will be leveled against it
To make formwork, pegs are driven into the ground at intervals of no more than 60 cm. Boards are nailed to them. It is better to smear the inner surface of the formwork with mining or other oil: so that it can be removed easily. Next, crushed stone is poured onto the bottom and compacted. But compaction must be done carefully: if you walk along the bottom, no traces should be visible.
Next, to prevent the path from cracking, a metal reinforcing mesh is laid on the crushed stone. The thickness of the rod is 4-6 mm, pitch is 5-10 cm. It is sold in pieces, they need to be tied together with steel wire.
Reinforcing mesh (note that the formwork is made of slate, it will not be removed)
Then, to compensate for expansion in winter, you need to install wooden planks 1.5-2 cm thick. They are placed across the path, set so that the height of the planks is level with the formwork boards. Compensation strips are installed at least every 2 meters. More often it is possible, less often it is not. Why do it more often? For beauty. Squares look better than long rectangles.
A concrete solution of a grade no lower than M-250 is poured into the finished frame (read about the grades of concrete and its preparation here). For it, take 1 part cement, 3 parts sand, 4 parts crushed stone. Everything is mixed into a solution of medium fluidity (thick sour cream) and poured into the formwork. When pouring, you need to make sure that there are no air bubbles left. To remove them, pierce the solution with a pin, shaking it slightly - bayonet it. It is ideal if you have a surface vibrator for concrete - it quickly compacts the solution, creating a perfectly flat surface. If it is not there, you will have to level it using the rule, using the edges of the formwork as beacons.
Approximate consistency of concrete
A few hours later, after the concrete has set, you can treat the surface. You can leave it as is, you can brush it with a stiff brush, making transverse stripes, and finally, you can lay pebbles, stones, flagstone, etc. into the not completely hardened solution. It's not very economical, but it's reliable. After a couple of days, the formwork can be removed, and you can already walk along the path.
What kinds of fences there are and how to make them is written here.
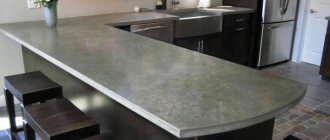
Sites for inflatable pools and sports areas, decking
Platforms for inflatable pools should be raised by 20 centimeters.
The platform can be made of wood. There are two options: on posts or laying timber. This is done so that the area is ventilated and dried. We make the base for the platform in the same way as for the parking lot. You can make a wooden flooring around it for convenience; accordingly, we calculate the base for the platform taking into account the flooring.
There may be a rubber tile coating (described in detail below).
Wood flooring options:
- Decking is a composite material (50 years of operation, does not rot, does not heat up, all shades, does not slip) Suitable for platforms, terraces, places for sun loungers.
- Larch or pine (board). If larch does not lie directly in water during operation, then its service life is the same as that of pine. So feel free to choose pine!
Advice! “If you want it perfect, then decking,” this is the advice from professionals who unanimously recommend using decking as the most durable, aesthetic and stylish option for wood-look coverings.
Options for inexpensive garden paths
You need to start landscaping your summer cottage with a drawing. The plan must indicate:
- house;
- all outbuildings (garage, parking, toilet, shed, bathhouse, well);
- recreation areas (terrace, gazebo, barbecue area, swimming pool);
- garden;
- garden.
First, draw paths between the house and outbuildings. They will be in charge. The secondary category includes garden paths, paths to recreation areas, flower gardens, and greenhouses. After the movement paths are plotted on the diagram, you can select materials and paving methods. Photos of paths made from scrap materials made at the dacha with your own hands will help you make a choice.
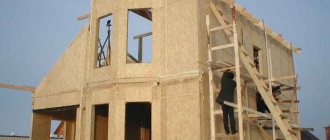
With the help of visual examples, it is easier to imagine the shape of the future path and understand the manufacturing technology. Saving on materials is difficult, but possible. Some of the secondary communication routes can be made from scrap materials:
- bricks left after building a house;
- brick pallets;
- used boards;
- felled old trees.
If you have the energy and time, then you can save a decent amount on the services of a company and design all the paths in the garden yourself.
Rubber tiles for playgrounds
Rubber tiles, a fairly popular material, are nothing more than recycled tires.
Cons: The material is not environmentally friendly, it gets very hot in the heat (you can’t walk without shoes) and can emit an odor. We do not recommend making huge playgrounds for them, but you can pave a small corner in your dacha.
Pros: Service life is unlimited, absorbs well.
The process of preparing the base and laying it is identical to the paths (geotextile + crushed stone + ASG). Dry masonry, only wetting the tiles with water.
There are rubber borders , but we strongly do not recommend - they have proven themselves poorly during operation on sites, they fly off and do not hold the frame well. For these purposes, it is better to take a regular garden gray border (3.5 - 5 cm).
If you have chosen a puzzle/lock tile form for installation. In this case, after laying, the locks on the edges are cut off and the trimmings are inserted into the recesses at the other end, glued with special glue. In our practice, we have encountered craftsmen who left protruding locks at the edges of the site. It doesn’t look beautiful at the very least, it’s not neat and spoils the impression of the entire site.