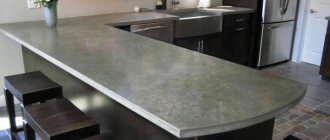
A countertop is to the kitchen what a sofa is to the living room.
It is stupid to underestimate the role of the countertop, as every experienced housewife will say. And she will be right, because you often have to cook using this convenient invention of mankind.
Almost all dishes begin to be “born” here, and the countertop becomes the main assistant and multifunctional highlight of your kitchen.
By using ceramic tiles for tiling, you will soon experience the benefits of your kitchen table. Well, at a minimum, the costs for such a countertop will be much less than for a similar one, but made of natural stone (there are countertops and window sills made of granite). As a work surface for the kitchen, this will be what you need. You can quickly and easily wipe, place hot food stands on top of the tiles, and enjoy the beautiful colors you chose. You have the opportunity to use different options (it could be rectangular or square or some other shape).
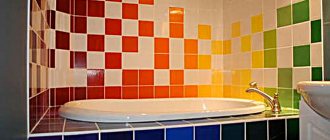
A product tiled with tiles will “revive” your kitchen; you can also highlight the beauty of your countertop by tiling, for example, a window sill. However, if other surfaces that are located far from water (in the room, and not in the kitchen or bathroom) will serve you for a long time, then if there is constant moisture on the kitchen countertop, you will be provided with the harmful effects of water (if the tiles are often covered with water). Chemical reagents, like high temperatures, will also not please your countertop. But even despite such disadvantages, it will serve you for a long time and, believe me, not even 5 or 10 years.
Many owners of such kitchen decor simply adore a tile countertop and do not replace it with any other. It is the tiled option that is chosen for your favorite kitchen in private homes or luxury apartments. The ceramic tiles in the dining room really look quite original. Well, housewives unanimously claim that it is not only convenient to wash, but also, in principle, quite difficult to damage. We have already talked about design and coloring, and the ability to create compositions to suit your taste is also one of the main advantages.
Grouting seams and ends
Active use of the countertop for its intended purpose requires special attention to the grout. Professionals and amateurs have their own preferences, but in general they give the following recommendations:
Installation of tile countertops
- based on epoxy resin: more tolerant of all associated factors, such as fat, temperature changes;
- price affects quality;
- You will need rubber spatulas.
- Almost all types of grout lose their properties after half an hour - prepare a minimum amount.
- Residues can be easily removed with a damp sponge.
Attention! Make sure the grout you choose is suitable for food contact.
The ends are the most noticeable element of the future surface. You can purchase a ready-made frieze. A variety of ready-made cornices and borders will greatly simplify the work, because it is the end lining that will require cutting tiles, which must be done with pinpoint precision. Therefore, choosing a smaller working material (7x7) and sufficient surface thickness can simplify the task, as well as mosaic design.
Disadvantages and features - everyone needs to know!
When purchasing any material from which your countertop will be made, you should know not only its advantages, but also the disadvantages of the future product. To make it easier to understand the features, you need to take advantage of the experience and advice of specialists.
- Ceramic countertops have some cleaning issues (the grout between the tiles is not as easy to clean). At the same time, we eliminate the shortcoming. Numerous seams are filled with a special resin (epoxy), and then solving the problem of washing a ceramic countertop becomes much easier.
- Do not buy the most ordinary and cheap tiles for the kitchen. It is for the dining room that it is advisable to choose impact-resistant and fairly wide tiles that will last you a long time.
- Find out from the seller what characteristics your tile has (they vary).
- Do not attempt to use a knife or meat tenderizer directly on the surface of the tile. Be sure to use a board.
- Cleaning should be done without using metal sponges; it is better to use foam sponges.
DIY ceramic tile countertop
Those who don't want to call a professional can try making their own countertops from ceramic tiles. The cost of a countertop lined with ceramic tiles can vary greatly - it will be cheaper if the tile is domestic, and more expensive if it is foreign - for example, Italian or Spanish.
So, a do-it-yourself tile kitchen countertop is a reality in our time. And it's not difficult to do. The main thing is to correctly calculate the distance for laying, have a special putty for the seams, and measure the corners. You should also choose the right ceramic tiles, which can be wall or tabletop. It is best to purchase porcelain tiles. It is both durable and thicker.
You can also buy clinker or terracotta tiles for cladding. The choice in this case is entirely yours. You will need to tile built-in furniture with ready-made structures made of chipboard or plasterboard. It is convenient to use a ceramic countertop if it is located next to the hob or sink.
Well, there’s one more big plus for those who value originality - using ceramic tiles to cover your countertops, you can quite easily use them to cover your walls, tables, etc. You can also experiment, using the indispensable construction tape measure, with mosaics. In this case, different color schemes of the tiles can create a unique pattern.
Ceramic tile work surface
As an alternative to store-bought countertops, you can make your own work surface.
Work surface as a functional element of the kitchen
The work surface, tabletop, can be a separate element of the kitchen. It can, on its own, independently, regardless of the presence of other furniture, fully fulfill its purpose.
The tabletop can also be presented as the top part of furniture cabinets. Most often in practice we come across the second option - these are our traditional kitchens in which the top of the cabinets is also a work surface.
Characteristics of working surfaces made of ceramic tiles
The decision to make a work surface from ceramic tiles can be made for various reasons:
-design solution;
- the sizes of standard countertops do not fit;
-the need to use existing building materials;
-opportunity to realize your creative abilities.
The result is an individual product that will fully comply with the wishes of the owner.
Countertops with a ceramic tile surface have the following qualities:
- durable, wear- and moisture-resistant;
-easy to care for, easy to clean;
- easy to choose the color and pattern that suits your design;
- affordable cost;
-durability;
-the ability to use non-format or cut tiles to create a mosaic.
The tiled work surface can be given the desired shapes and sizes, which can easily fit even into non-standard or small rooms.
Ergonomics - work surface height
When choosing a kitchen, the question arises what the height of the kitchen countertop should be.
The height of the working surface is an important point for creating comfortable conditions
The comfort and well-being of the housewife who will be working in the kitchen depends on the height of its placement. A kitchen is not only an object of design, but also an object of application of ergonomics, because... it can be considered as a workplace.
For different types of work in the kitchen: washing dishes, cutting food, kneading dough, cooking, it turns out that different heights of the working surface are needed. This is important so that work in the kitchen is less tiring and does not bring discomfort, because the greatest load and fatigue for a person occurs when working while standing. And in order to make cooking and table setting as comfortable as possible, you need to take care of the correct height of the working surface.
The appropriate height of the table top can be determined by the following method: while standing, bend your arm at the elbow, the comfortable zone for working will be within 15 centimeters below elbow level
Brief recommendations for choosing the height of the tabletop
In the area where the sink is located, the height should be greatest. The optimal height is 85-95 cm; for tall people, 100 cm is possible. This height of the sink promotes correct body position, helps to work with a straight back and keep your arms bent at the elbows at a right angle. In this position it is much more comfortable to work and not get tired. And washing food and dishes, if there is no dishwasher, takes up almost half the time spent in the kitchen. For cooking and frying, a stove height of 80-85 cm is suitable.
General recommendations for the height of the tabletop are as follows: if your height is up to 168cm, the height should be 85cm; with a height of 168 - 178cm - 89cm; with a height of 178-186 cm - 91 cm. It is recommended to make the height of the washing area 10-12 cm higher.
Installation of tile countertops - step-by-step system
So, you need to approach the installation of a kitchen countertop made of ordinary material (chipboard or MDF) wisely. And then even the most ordinary board will turn into the highlight of your kitchen and a real work of art. We propose to consider a high-quality and affordable option for everyone - to diversify our countertops with tiles. As we have already mentioned, it will not allow moisture to pass through, will not absorb odors, and is quite easy to clean and install. So, we buy tiles and prepare the surface.
Installing a tile countertop - a step-by-step system
Step 1: Buy tiles
This means that we ourselves can select any tile options (either buy new ones or use those left over from renovation) and work with them, for example, in a mosaic manner. The main thing is that all materials that will be used match each other in thickness. Using a square and a ruler, we clearly calculate the configuration of our product and adjust it to the size. It is recommended to use a tile cutter, and porcelain stoneware as the tile itself; its strength is on par with natural stone and can only be broken with a hammer. By the way, you can choose embossed or polished tiles.
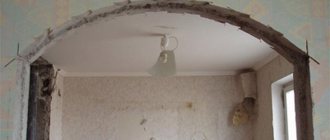
Step 2: Prepare the surface
By sanding the base, we achieve a smooth surface and wash away dust and dirt. Prepare a moisture-proof impregnation for the wood. The base itself should seem to hang over the kitchen set. The wooden board is attached using stainless steel screws. By setting a level on the wall, you can fix the base (directly into the wall). Two layers of plywood are used.
Step 3: Applying Glue
Glue is applied to the sanded base (preferably evenly over the entire area). It will be enough to buy glue for wood and tiles and apply it with a trowel and spatula of a configuration convenient for you. Carpenter's glue or PVA will firmly fix the tiles. Before applying glue, do not forget to fasten the second layer of plywood with self-tapping screws and treat it with a moisture-proof solution. Your tile adhesive will take at least 12 hours to dry.
Step 4: Bringing the work to completion
Silicone sealant and epoxy tile grout will keep your artwork looking great. Just don’t forget that the joints between the tiles should be well sealed (you can use a rubber spatula), and before laying the tiles, the entire area of the countertop should be marked out (so as not to glue “by eye”). It is better to remove the grout itself after a day. That's all, your unique tabletop is ready!
- Author: Mikhail Malofeev
Rate this article:
- 5
- 4
- 3
- 2
- 1
(0 votes, average: 0 out of 5)
Share with your friends!
How to make a tile countertop: step-by-step instructions
The best and easiest option is to replace the tabletop with a set that you already have. Before you start work, you need to calculate the number of briquettes, including for the end and apron, if this is intended. This is not difficult to do if you know their sizes. Add another 10-15%, the reserve is needed in case of damage or chips. Be careful: you won’t be able to cut porcelain tiles if they don’t fit completely on the surface without a special tile cutter. Even with a glass cutter, it only copes with tiles. If the tiles have already been purchased and there is no way to replace them, it is better to rent a professional tool.
It is better to avoid heavy dark curtains if the room is small. Light light tulle will add air and volume.
To work you will need:
- Epoxy tile adhesive, notched trowel
- Grout, rubber spatula
- Water-repellent transparent primer
- Stainless steel screws
- Electric drill, jigsaw, grinder, tile cutter
- Chipboard or plywood sheets
Kerama Marazzi
Preparing the base
- As a base, you can take waterproof plywood - type FSF or FB with a thickness of at least 10 - 15 mm, it is laid in two layers. A simpler option is moisture-resistant chipboard with a thickness of 22 mm to 38 mm, then a layer of one sheet is enough.
- When calculating the dimensions of the tabletop, keep in mind that it should extend beyond the edges of the cabinets: 1 cm on the front side and 2 cm on the sides. Its standard width is 60 cm.
- It is very important to estimate the final height of the set, especially if the stove is not a hob, but stands separately. Is the height of its legs adjustable? Is it possible to align them?
- Next, the space for the sink and the panel, if any, is calculated. The holes are carefully cut with a jigsaw.
- Before assembly, all wood materials are additionally impregnated with a waterproofing compound and dried. The cutouts are processed more carefully, several times.
- If you are dealing with plywood, the first layer is attached to the cabinets with stainless steel screws, the optimal length of which is 38 mm. The caps must be completely submerged and treated with putty. The second sheet is glued to the first using wood glue or moisture-resistant PVA. Along the edges, the layers are fastened with self-tapping screws at a distance of 15 - 20 cm.
- In the case where the length of the plywood sheets is not enough for the entire set, try to overlap them so that the joints do not coincide. The halves are fastened together with side ties.
- The frame made of chipboard is fastened with self-tapping screws in increments of 10 - 15 cm.