The material presented in this article talks about how to lay laminate flooring after pouring concrete - what material to use as a substrate, what criteria should the surface intended for coating meet, and what to do if it is far from ideal.
For example, a common problem is the unevenness of the floor, which does not allow laying the outer covering without violating technological requirements. If this is done without leveling, the consequences can be very disastrous, including failure of the laminate and the need to replace it.
How and what is the best way to level the floor? How does the choice of material and method depend on the amount of surface unevenness? – You will learn about all this by reading the article to the end. And also about which material is best used under certain conditions as a substrate for sound, heat and moisture insulation. Here you will find instructions on how to do it correctly to achieve the desired result. Read about all the intricacies of selecting the material for the substrate, preparing the floor and covering it with laminate in this article.
Laying laminate flooring on a concrete floor with a backing: laying on a screed
Building from scratch » Floor repair
Laying laminate flooring on a concrete floor is not a difficult job in itself. Much more difficult is the preparation for this work. Let's consider what measures have to be taken to obtain a high-quality base for a laminate board.
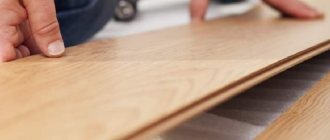
The laminate floor is laid on top of the underlay, which in turn is laid on a concrete slab or screed. The main feature of a laminated floor is that it is assembled from individual board elements.
These elements are connected to each other using a tongue-and-groove system. If the base surface contains even minor defects, then during the operation of the floor, the grooves with ridges begin to break, and the laminated splendor gradually turns into a set of unrelated boards.
Laying laminate flooring on an uneven concrete base is only possible after careful leveling!
The permissible level difference is 2 mm per meter.
About methods of leveling floors under laminate
There are three ways to level a subfloor. The first of them is used if the height differences do not exceed 2 cm. It is based on the use of a self-leveling mixture (leveling mass).
For more pronounced unevenness (from 2 to 5 cm), the same leveling mixture is poured over the leveling concrete or cement screed. A concrete floor screed is also necessary in situations where it is necessary to raise the floor by 5-10 cm.
Leveling the floor with plywood or chipboard is used if the floor level needs to be raised to a height of more than 10 cm.
Practical aspects of floor leveling
- Before pouring the leveling compound, the surface of the slab or screed is thoroughly primed.
- The leveling mixture is prepared in small portions.
- The portions are connected to each other using a needle roller.
- To prepare the leveling mixture, use cement of at least 400 grade.
- The concrete screed is poured using pre-set beacons.
- The finishing layer is laid after the solution has gained the required strength.
- A dry screed is built on top of a waterproofed base.
- The dry screed method requires the construction of a floor system on joists.
Finally, we note that a backing for the laminate must be used - laying the laminate on a concrete floor with a backing allows you to get a truly reliable and high-quality floor.
Calculations
Before laying laminate flooring on a concrete floor, you need to decide on its quantity, choose a substrate and buy the tools necessary for the job.
This stage is very important, since the right tools and the presence of a substrate can extend the life of the coating, because they help to do the installation correctly. In order to calculate the quantity, you need to follow these steps:
- Calculation of the floor area of the room. This is done by simple mathematical calculations: multiply the width by the length.
- To the resulting figure you need to add 7% if you lay the covering perpendicular to the windows, and 15% if diagonally.
- We divide the resulting figure by the square meters indicated on the laminate packaging: the result obtained is the number of coating packages that need to be purchased.
Laying laminate flooring on cork
How to lay laminate flooring on a concrete floor
How to lay laminate flooring on a clean concrete floor, are there any nuances and disadvantages?
How successful the installation of laminate flooring on a concrete floor will be depends on the preparation of the base. In this case, it must be perfectly smooth, dry, clean and protected from moisture. Even a small amount of sand or unevenness will subsequently cause an unpleasant creaking underfoot and deformation of the panels.
Preparing the subfloor
The first and main requirement for a concrete floor under laminate is that it must be level, with height differences of no more than 2 mm per 1 square meter. m of surface.
- If there are minor areas of damage, cracks or depressions, partial repairs are limited. Unstable fragments are cleaned, primed and leveled. For work, use a special dry repair mixture, sand-cement mortar or good tile adhesive with three parts of sand.
- If there are significant differences in height, large areas with crumbled concrete, then you cannot do without organizing a new foundation. But this in turn will lead to raising the floor and reducing the overall height, which must be taken into account.
- There is a practice of repairing a concrete base with plywood, chipboard or OSB. True, this option is only possible in rooms where you can sacrifice a little ceiling height. In addition to the fact that the slabs take up 1.5-2 mm of height, they are also laid on a flat surface.
Laying the flooring begins after the base has completely dried. Specialists have special instruments to test moisture, but you can get by with regular plastic film. It is covered on the surface and pressed along the perimeter. Laminate cannot be laid while condensation remains on the film overnight. If there is a "warm floor" system, it is necessary to carefully check it several times before starting installation.
Underlay for laminate flooring laid on a concrete base
First you should think about waterproofing. The easiest way to ensure this is to lay ordinary polyethylene film on a concrete base, which is laid in a single sheet or overlapped by 20 centimeters, all joints are glued with tape.
The underlay under the laminate is designed to provide heat and sound insulation, and is also a shock absorber that will smooth out the load on individual panels and minor unevenness of the main floor.
A wide range of materials can be used for the substrate. The simplest is foamed polyethylene or extruded polystyrene foam. More expensive, reliable and also environmentally friendly is a cork substrate or composite materials based on cork chips. It is also convenient to use multilayer substrates, which can be foil-coated or have a layer of polyethylene film.
The underlay is not attached to the main floor; it is laid end-to-end on top, and its individual elements are glued together with construction tape. The underlay is placed in the direction of the laminate panels.
Advice! Waterproofing material can also be laid under plywood if it was used to level the floor, and a laminate underlay is laid on top of the plywood.
Before installing the panels, the material is unpacked and left in the room where the repair work will take place for at least two days. Temperature and humidity conditions should be within 15-30°C and 40-70%.
In addition to the laminate itself, you need to stock up on special pegs; they provide a damping seam between the laminate and the wall of 1.5-2 cm. The same distance is maintained between the laminate and the batteries, protrusions, or any other elements that need to be bypassed.
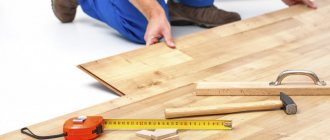
The panels begin to be laid from the most visible corner from the door. From the short side, the next board is attached to the first and so on until the end of the room. For a tighter fit of the lock, the boards are tapped through a wooden block or trimmed panel. The end board is usually cut off.
It is better to shorten it with an electric or regular jigsaw so that there are no nicks left on the material. The next parallel row can be started with the trimmed remainder of the board, if it is at least 30 cm. Having completely assembled the second row, it is assembled with the lock of the first and brought to a click.
The same is done with subsequent rows. In the latter, the boards will most likely have to be cut at width and it is important that they be more than 5 cm.
If you need to cut a hole for pipes with a jigsaw, then they should be about 1 cm larger than the diameter of the pipe. There is no need to worry about the gap; it will later close with a decorative insert.
How to lay laminate flooring on a concrete floor
Laminate flooring has been in great consumer demand lately. This is quite natural, because such a floor is very beautiful in appearance, does not pose a threat to human health, and is pleasant to walk on. In addition, the cost of such coverage allows it to be purchased even by families with low incomes.
Installing laminate flooring yourself is not particularly difficult, since it is equipped with locks. In this article with photos we will tell you how to properly lay laminate flooring on a concrete floor so that the coating lasts as long as possible.
Preparation for installation
As already mentioned, laminated flooring comes on sale with ready-made locking mechanisms, so laying laminate flooring on a concrete floor with your own hands is not difficult.
Working with a concrete base:
- An assessment of the condition of the concrete screed and the degree of its readiness for further work is carried out first of all.
- It is necessary to find out how smooth this screed is. This can be done using a building level. Minor deviations within 5-10 mm are normal and do not require additional work. If significant differences in level relative to the horizon are detected, the surface should be corrected.
- If irregularities are only partially detected, alternatively they can be corrected locally. However, most often it is better to pour a new screed or organize a self-leveling coating over the entire surface of the floor.
- Before laying laminate flooring on a concrete floor, at least 28 days must pass from the moment the screed was poured. This is necessary so that it dries properly and reaches the acceptable humidity level.
- Quite often in construction, self-leveling, quick-drying mixtures are used, which are a good alternative to concrete mortar. To be reliable, the layer of such screed should be at least 3 cm. You can move on this coating after just a few hours, and begin further work on the floor after 3-4 days.
It is worth noting that before laying laminate flooring on a concrete floor, you need to perfect not only the base, but also the walls so that the angle is clearly 90 degrees.
Selection and laying of the substrate
The coating works best if the laminate is laid on a concrete floor with a backing. This layer between concrete and laminated panels serves as sound and heat insulation, and also compensates for noise when walking on the surface, and prevents the laminate from moving relative to the concrete base.
Materials such as plywood, fiberboard, rolled polyethylene or cork chips with the addition of bitumen have proven themselves to be good substrates.
The optimal and most common backing option is foamed polyethylene film - it is available and inexpensive.
This roll material is good to use only on a perfectly flat concrete base.
Advantages of a film substrate:
- does not deteriorate during prolonged contact with a concrete base;
- perfectly absorbs sounds;
- not subject to destruction by rodents or insects.
The only drawback of such a subfloor is its thickness, which is not able to smooth out floor unevenness of more than 2-3 mm. This factor should be taken into account before laying laminate flooring on a concrete floor on such a substrate.
To make the foam film substrate more dense and give it additional heat and sound insulation properties, it can be laid in 2 or 3 layers. In this case, the panels should be overlapped by 10-15 cm, and the resulting seams should be sealed with tape.
Preparing the base
Before laying the laminate, the concrete base is first leveled. This is done using a self-leveling liquid floor. This procedure must be completed, since any concrete screed contains microscopic irregularities. In the future, they cause the main damage to the laminate flooring. All existing bumps and holes should be removed. In this case, the floor will last much longer.
The technology of laying laminate flooring on a concrete floor involves the use of a special substrate between the concrete base and the laminated panels. Additionally, a vapor barrier made of polyethylene film is installed. It is recommended not to neglect this type of work and be sure to lay the film on the prepared concrete base.
The strips should overlap each other by about 15-20 cm and extend onto the walls by 2-3 cm. The joints are fixed with tape. This prevents condensation formed on the concrete surface from entering the floors.
Substrate made of natural material
The main function of the substrate is to level and completely eliminate microscopic irregularities in the base. They contribute to soft cushioning of the panels and create additional sound insulation. The substrate enhances thermal insulation and protects against moisture. For these purposes, it is recommended to use material with a thickness of 1-3 mm. Many manufacturers' instructions prohibit the use of a substrate whose thickness exceeds 3 mm.
There are dozens of varieties on the underlay market that are installed under laminate flooring mounted on a concrete base. They are made from natural and artificial components.
A typical representative of the first option is cork substrate, produced in sheets or rolls. Its thickness is in the range of 2-4 mm. It is recommended to use this material together with laminated panels that include a cork layer in the design. Due to this, thermal and sound insulation in the room is significantly improved.
Technology for laying laminate flooring on a concrete base
DIY laminate installation
If you are allergic to wool or synthetic coverings, then you should avoid using carpets. In this case, you need to lay laminate flooring on a concrete floor. It is environmentally friendly and practically does not emit dust and volatile substances.
Laminate flooring is very easy and quick to install. It is available in a wide range of colors and is shock and abrasion resistant. Unlike parquet, it does not need to be sanded or varnished.
The service life of laminate flooring from well-known global manufacturers reaches 20 years. Cheaper coatings will last from 3 to 5 years.
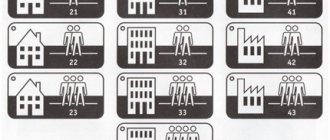
Depending on the room in which the laminate will be used, its selection is made. For the hallway, you can use a laminate that is more resistant to abrasion. Small abrasive particles (sand, dirt from shoes) can leave scratches on the coating
Laminate with class 23 has these properties. This class is also perfect for the kitchen. Class 21 laminate flooring can be installed in bedrooms, libraries, and offices.
In such rooms, as a rule, there is a low load on the coating. Children's rooms and living rooms will require class 22 coverage.
Laying the underlay on the floor
As noted above, laying laminate flooring can be done with your own hands. To do this, you need to calculate the material, purchase it and assemble a set of tools for the job.
Material calculation
Laminate flooring is easy to calculate. To do this, multiply the length of the room by its width and get the area that needs to be covered. Laminate flooring is sold by the square meter at any building materials store.
Important to remember! Having calculated how many square meters of laminate are needed, add to this number 10% (when laying using the traditional method) or 20% (when laying using the diagonal method).
A base will be required for installation. It is made of foamed polypropylene and serves as a shock absorber and sound insulation. Its thickness is from 2mm to 4mm. The most ideal material for laminate flooring is balsa wood.
Cork under the laminate 3mm thick is a very good insulation and sound insulator. True, it costs more than polypropylene. Now you know what to put under the laminate and the choice is yours.
Joining the second laminate plate
The baseboard is calculated according to the length of the perimeter of the room. If there are no protruding pelasters and bay windows, then you will need 4 internal corners and two plugs (they are placed on the baseboard near the door frame).
Tools
To complete the work you will need:
- jigsaw;
- measuring angle;
- measuring tape;
- pencil or marker.
- hammer;
- electric drill and concrete drill with a diameter of 6mm.
Below are step-by-step instructions for installing laminate flooring using the traditional method. Once you familiarize yourself with it, you will easily complete this work.
Step 1
The screed must be perfectly level. The permissible difference is 1 mm per 2 linear meters. Leveling a concrete floor under a laminate can be done using self-leveling mixtures.
Before laying laminate flooring, it is necessary to prepare the base. The floor is cleaned dry with a spatula, and the protruding parts of the cement-sand screed are removed. If necessary, they can be knocked down with a hammer and chisel.
After this, the base of the floor is thoroughly swept. It is best to do a wet cleaning after cleaning the debris and let the floor dry.
Traditional laminate flooring layout
Laying laminate flooring requires careful preparation of the subfloor. Next, you will learn how to lay underlay under laminate flooring.
Step 2
Regardless of the installation method (traditional rectangular or diagonal), it is necessary to lay a substrate before performing work.
The backing for the laminate is made from foamed polypropylene and acts as a shock absorber for the load on the coating, as well as sound insulation. It is laid along the wall. The strips are laid without overlap and joined together with adhesive tape (wide tape or masking tape).
The diagonal laying method is used if it is necessary to visually expand the room. In our example, we will look at the traditional (rectangular) method of laying laminate flooring.
The first strip is laid along the long wall. Before work, be sure to prepare wooden dies from plywood or pieces of laminate approximately 15 mm thick.
We cut the baseboard at an angle of 46 degrees using a miter box
They are inserted between the laminate strips of the first strip and the wall. The installation step of the dies is 1 meter. This gap is necessary to compensate for the linear expansion of the coating when it is heated. If it is not there, the laminate may deform when heated.
In the future, a gap of 15 mm between the walls and the laminate should be around the entire perimeter of the laid coating. After installation, it will be covered with a plinth. The preparation of the concrete floor for laminate flooring is complete.
Step 3
It is important to know! Laminate sheets are always laid parallel to the light source. Open the package with the laminate, take out the first plate and place it in the right corner of the room opposite from the exit.
The laminate plates are joined by end and longitudinal locks (tongue and tongue joint) located on the plate itself. The first strip is joined only at the end locks. Insert a wooden block between the wall and the plate to provide a gap.
The second and subsequent strips are laid in staggered intervals. To put it simply, laying the plates should resemble brickwork. In this case, the coating will last a long time and will be very durable at the joints.
When you get to the wall, you will need to trim the plate. The required size is marked using a tape measure and a marker (pencil) and cut with a jigsaw. Laminate cuts very quickly and evenly. The main thing is that the surface does not need to be sanded.
Corners - templates for plinths
The second strip is laid starting from the pre-cut plate. Next, joining is carried out using end and longitudinal locks. To do this, first join the end lock, and then, slightly lifting the joined plate, insert it into the longitudinal lock in front of the plate lying in front.
Sometimes impregnation for laminate flooring is used to improve moisture resistance. It is filled into the locks and seals the joints. However, over time, impregnation can seep through the seams and dirt sticks to it.
For a better connection, the plate can be tapped along the longitudinal end with a hammer. First, place a board or piece of laminate at the impact site. When the plate is seated in the lock, a click occurs.
Scheme for laying laminate flooring in the traditional way
When using the diagonal laying method, the technology remains virtually unchanged. However, there is greater material consumption caused by trimming the plates.
When performing work, as noted earlier, it is necessary to maintain a gap between the coating and the walls of approximately 15 mm. However, when approaching the doorway, in the places where the door trims (cashing) join, it is necessary to trim the plate so that the gap between the laminate and the wall remains approximately 3 mm. Otherwise the platband will not block it.
After the last laminate plate has been laid, installation of the baseboard begins. To do this, you need to take one plinth and cut it using a miter box at an angle of 45 degrees. The plinth is placed in the guide groove and cut at an angle of 45 degrees using a hacksaw.
Installing skirting boards on laminate can be done in different ways. In our version, we previously prepared a plinth with a groove for a dowel-shaped lock. Therefore, we drilled holes in the wall with a concrete drill with a diameter of 6 mm along the perimeter of the floor to a height equal to half the baseboard in increments of 0.5 meters.
Apply the template for the holes. By inserting plastic dowels into the grooves of the plinth strips and distributing them among the holes, you just need to press them firmly against the wall. You can use a wooden block to tap the baseboard with a hammer.
To decorate the corners, use decorative internal and external corners for the plinth (they are included with the plinth at the customer’s request). Before installing the corners, lubricate them with glue at the joints with the baseboard slats. After installing the baseboard, laying the laminate is completed.
Coating care
Once the laminate flooring is finished, the question arises, how to care for it? Caring for laminate flooring in an apartment is very simple. The surface can be wiped with a damp cloth.
Dowel inserted into the groove for the baseboard
You can use special detergents for laminate flooring. Their use does not leave streaks and adds shine to the coating. What should I use to polish laminate flooring? Like furniture, the coating can be rubbed with a special polish. After this, the coating will become more slippery.
It is important to know! When cleaning laminate flooring wet, do not pour water on it. The rag should wring out well. A large amount of moisture will cause deformation of the coating. A vacuum cleaner is ideal for wet cleaning of laminate flooring.