Making a jewelry box out of popsicle sticks
- ice cream sticks
1. Make the base of the box.
— To do this, you need to arrange 10 sticks in one row.
- Glue one stick on the right and left to secure the base.
2. Raise the walls. Glue the sticks as shown in the image to form the sides of the box. Choose the height of the box yourself.
3. Making the lid. To do this, you just need to repeat step 1 (you can add 2 more sticks across those that hold the lid together).
4. You can decorate the lid to your taste - for example, glue a picture, photograph, sticker, or simply paint it with gouache, making several patterns.
5. To attach the lid to the box, prepare 2 pieces of tape of the same size and glue one end to the lid and the other to the box (see image).
DIY box from a box
- a simple small box
1. Prepare several sheets of paper (preferably thin) and start rolling them into tubes. You need to make a lot of tubes.
2. Prepare any box - this will be the basis of your box. Turn it upside down and draw a rectangle on the bottom.
3. Start gluing paper tubes around the perimeter of the drawn rectangle (see image). Leave a distance of 5 cm between the tubes.
4. To make the bottom of the box even, you need to cut a rectangle out of cardboard. Its size is equal to the size of the bottom of the box. Glue this rectangle to the bottom of the box to cover the glued ends of the tubes.
5. Now begin to carefully weave paper tubes around the base. It is worth noting that the tubes must fit tightly to each other. It is advisable to secure each tube with glue.
6. Use a similar method to make a lid for the box. Using strings, you can attach the lid to the box by making small stitches.
Luxurious box
This decoration option will add a touch of chic, luxury and burlesque to your dressing table.
You will need materials that are in the arsenal of any needlewoman. Our base will be made from plastic bottles, namely from the bottom. You will also need lace braid, black and red fabric, cardboard, beads, satin ribbons and glue.
You can get started, cut out a 2.5 liter bottle with a height of 9-10 cm. And use a gypsy needle to make holes around the entire circumference.
Article on the topic: Magazine “Sabrina” No. 8 2019
Cut out two circles of different diameters from thicker paper or cardboard. The large one will serve as the lid (11.5 cm), the smaller one will serve as the bottom (8.5 cm).
We wrap a large circle with the main fabric. Its diameter should be approximately 5 cm from the diameter of the circle.
Now we make our box more stable. Using hot glue, glue the previously cut cardboard circle to the bottom of the bottle.
From the same main fabric, cut out a circle with a diameter of about 26 cm. Sew light stitches around the circumference, place the box inside and tighten the notes. See detailed photos below.
We fix the clothes of the box with a needle and thread, sewing the fabric to the bottle into pre-made holes at the base. See below for how to do it.
We bend the protruding upper part of the fabric inward and stitch it again.
Now you can leave the box alone and start filling it. Take a piece of red fabric and the same circle. Sew them together and put them inside the box.
Cover the edges with lace braid and that’s it, your box is ready.
Decorate it with a flower on top.
Instructions on how to make a box from improvised materials with your own hands
This article will be useful to those who are interested in a master class in making a box with their own hands. How to make a jewelry box at home from improvised materials: cardboard with a lid, paper, fabric. Ideas for beautiful drawer designs.
Every woman and girl has a personal box in which she stores jewelry, cosmetics or other things.
In every home there are a thousand little things that can be given a second life. Such things will be not only functional, but quite attractive if you approach the work process with all seriousness. This is a very convenient box that is useful for storing jewelry, memorabilia, threads and needles and other small items. Making a box with your own hands is quick and easy; to do this, stock up on the necessary materials, think about how to decorate the box and follow certain algorithms of action.
You can buy a box in a store or create a unique item with your own hands.
What can you use to make a simple DIY jewelry box?
The box performs two functions:
- You can store various jewelry, jewelry and hair accessories in it.
- It is a stylish element in the interior.
A beautiful jewelry box always attracts the attention of girls, women and even little girls. It’s hard to argue with the fact that women really love this kind of cute little things. Although you can’t say that the box is a necessary thing in a woman’s room, rather an unusual and beautiful box, in addition to being practical, plays an aesthetic role.
A lot of hairpins, rings, bracelets and other jewelry, without which many girls and women cannot imagine their lives, can be carefully stored in a box. You can buy a ready-made jewelry box, but we suggest making it yourself. A handmade box has many advantages:
- Low cost of materials.
- Unique design.
- Handmade, which is always appreciated.
- You can determine the optimal size and shape of the box yourself.
To make a box with your own hands, you don’t need to buy any materials. You can make a beautiful thing from the materials you have at home. For example:
- Paper
- Cardboard
- Old shoe box
- Tetrapack for milk or juice
- Plastic bucket for mayonnaise or other products
- Egg container
If you have beads, buttons, colored paper, leftover fabric, ribbons and other decorative elements, you can decorate the box beautifully. It is not necessary to do everything as in the photo; you can add something of your own when decorating the box. This will make your box unique.
You can make handmade boxes not only for yourself, but also as a gift. This cute little thing will not leave indifferent the majority of women and girls of different ages. You can create handmade boxes to earn extra income. If you like to fantasize, craft, and create something beautiful and aesthetic, then you will like this activity. We have collected many ideas on how to make and decorate a handmade box.
Handmade box
Choosing a box shape
The choice of casket shape depends on:
- from personal preferences;
- what they plan to store in it;
- what available means do they have?
You can make a storage box:
- simple rectangular shape;
- round;
- in the shape of a heart.
The main thing is to choose the most suitable decoration method.
To work on creating a box from improvised materials at home, prepare the following materials:
- thick cardboard;
- soft dense fabric;
- glue;
- materials for decoration;
- scotch;
- scissors;
- paper;
- stationery knife;
- pencil;
- ruler.
Simple rectangular or square box
A product of this shape is made of high-density cardboard.
Additional Information! This is necessary to ensure that the final product holds its chosen shape well.
As a base, choose a shoebox. Next, tubes are formed from paper. To do this, take a regular A4 sheet.
You can decorate the boxes with anything.
After the tubes are twisted, they begin to be glued along the perimeter of the base at a distance of 3-4 cm from each other. Do it vertically.
Round box
The dense part of a roll of tape is used as the basis for a round casket. It may be different in diameter, but in any case it can be beautifully decorated and decorated.
To begin, take thick cardboard and draw 3 circles on it along the outer edge of the roll of tape and 2 along the outer edge. Those that turn out to be smaller in diameter are glued together. This creates the bottom of the box.
The box is a wonderful thing in which you can store various little things.
Those circles that are larger in diameter are also glued together. Cut a strip 4-5 cm wide and a length equal to the diameter of the large circle. This strip along the inner edge is glued to the circle, having first made a small cut along the perimeter. The lid is ready.
Important! This is necessary to ensure that the strip does not deform during the gluing process.
The finished layout is decorated to your liking. This version of a do-it-yourself box for a girl will be a wonderful present.
Not only is it functional, but it also brings a certain charm to the design of your room.
Homemade boxes
Making boxes with your own hands is fun and easy. Such crafts can be made from fabric, napkins and cardboard, wood, old postcards, shoe boxes, candy, juice, dairy products or thread. These boxes are used for jewelry (costume jewelry, jewelry) or other necessary little things. Often homemade items created with one’s own hands are given as gifts, because such boxes often look interesting and unusual.
From candy cardboard packaging
Using a leftover pastry box, you can create a beautiful box in a short time. Both small homemade products and quite capacious, voluminous ones are made from candy packaging that what you assembled with your own hands can be called a chest (when the candy box is very large). To assemble such a homemade product based on the remaining candy box, you will need the following tools and materials:
- box;
- acrylic paints;
- scissors;
- glue "Moment";
- plain paper;
- decorative paper (wrapping paper).
The entire base is covered with paper, and a certain margin is allowed along the edges of the glued sheets. Uncut paper is used for the lid and base. To make the corners beautiful, the side zones are first attached, and the corners are cut and folded inward. They work very carefully on the inside of the lid, making sure there is enough paper and a supply left.
Attention!
The width of the paper along the walls must be 3 cm larger than the box.
The inner covering is made so that the cut strips along the perimeter during pasting touch the bottom by at least 2 cm. After pasting the candy box with sheets of wrapping paper, rectangles are made from single-color paper. These elements should cover the material of the box inside and the junction with the wrapping paper. Glue the sheets so that the wicker creates a 1-2 cm margin from the edges of the lid. The bottom is completely covered with plain paper sheets. Then they leave the craft to dry, after which you can somehow decorate the finished product.
From matchboxes
You can assemble a jewelry box with your own hands from ordinary match boxes. After production, the homemade product looks more like an interesting organizer with many compartments in which you can keep various small things. It is possible to take any number of matchboxes - it depends on how many such drawers are needed. To make such a craft, you need the following materials:
- matchboxes, 10 pcs.;
- thick cardboard;
- materials for decorating the finished box;
- glue, preferably “Moment”.
First, a square is cut out of a compacted cardboard sheet, and then the boxes are glued to one another - 5 pieces each. in a row or 2 pcs. This unique chest of drawers made from glued boxes is then glued to a cardboard base. Cardboard must completely cover the boxes. Afterwards, the resulting product is decorated; instead of handles, rhinestones, beads or decorative hooks can be glued onto the boxes.
Corrugated cardboard
This method is for a product without a lid; if one is needed, then it is made later, by analogy. But, when subsequently making a cover for a homemade product from corrugated cardboard, its smaller height must be taken into account. An exception is if you plan to make a high lid. To make crafts from corrugated cardboard packaging, you will need the following tools and materials:
- corrugated cardboard;
- stationery knife;
- scissors;
- glue "Moment";
- pencil or marker for marking.
First, they make a drawing of the future product, and also mark out the necessary details - a square and a couple of rectangles. One of them must be 2 times smaller than the other. Then these figures are cut out with scissors or a sharp blade, their total number is 25 pieces. With a large entrance, 5 pieces are cut out, with a pair - 5 pieces, with 3 inputs - 10 pieces, without inputs - 5 pieces. Then these components are glued together. The base is 5 sheets without inputs, and then it is attached with cut out templates without inputs. Then the already connected parts are glued to those sheets with 3 inputs. Afterwards, the resulting parts are fastened together and decorated with colored paper or other materials.
Attention!
It is advisable to leave the connected parts under pressure for 12 hours so that they stick together accurately.
From a shoe box
One of the easiest ways to assemble a neat box with your own hands. The base of the product is a shoe box. As a result, the product is quite voluminous and, if you need a more compact box for small items, it is better to take a different base (from candy, juice, milk, etc.) or make it yourself according to your own parameters. To assemble a box from a shoe box, in addition to the box itself, you will need the following tools and materials:
- glue, preferably “Moment” or similar;
- pencil, marker suitable;
- ruler;
- stationery knife, scissors.
A shoe box is actually a ready-made box, you just need to fasten the lid and base (if they are separate) with a satin ribbon; you can also use artificial or natural leather. The final stage is decoration. This can be done by covering the box with colored or wrapping paper, fabric, lace or leatherette (leather) and making a kind of chest for important things with your own hands.
Cardboard with separate compartments
A version of a homemade box with several separate compartments. Before starting work, you need to complete a drawing of the future craft so as not to make a mistake. This is a rather complex version of the craft, which is more like an organizer for all sorts of small things, since such a homemade product has several compartments.
May be interesting Eggshells as a fertilizerWhat to feed indoor plantsHydrogen peroxide as one of the best fertilizers: how to use
To work you will need the following tools and materials:
- compacted cardboard;
- glue "Moment";
- paper;
- elements for decoration;
- transparent tape;
- scissors or stationery knife;
- pencil and ruler.
After the drawing is ready, make a pattern and cut it out.
All elements of the craft are assembled and fixed using transparent wide tape, which will give the structure stability and rigidity. When the main box is ready and the drawers are also assembled, we begin to decorate it. It is permissible to cover the walls with colored paper or wrapping paper, decorating them with lace and other decorative elements.
On a note!
As handles for drawers, you can use beautiful buttons, large beads or beautiful hooks (sold in hardware stores).
Tetrapack for milk or juice
This small box is a good solution for storing small items. Moreover, working with tetrapack is quite simple. The main thing is to rinse it well before use so that there are no residues of juice or dairy products left in it. To create such an original homemade product from a milk or juice carton, in addition to it, you will need the following tools and materials:
- textile;
- ruler;
- ribbon;
- stationery knife;
- scissors;
- Double-sided tape.
The tetra pack is divided into a pair of identical parts, which will be the compartments of the box. They are connected to each other with double-sided tape and the resulting workpiece is covered with fabric. The bottom needs to be thoroughly worked on. We also cut out a rectangle from a juice or dairy packaging - it will be the lid.
Heart shaped box
This handmade box will be a wonderful gift for any occasion.
To begin with, draw a heart on thick cardboard; this will be the bottom of the box. Then a strip 10-15 cm wide is cut out of the same material.
You don't have to go to the store and buy the right box.
Additional Information! The width of the strip should be determined by the size of the bottom of the product.
On each side of the strip, cuts are made or equal triangles of 3-5 mm are cut out. And glue it to the base. Also come with another strip. Since the shape of the product is not even, wait 10-15 minutes for it to dry before starting to decorate. Then they select the decor of the box and get to work.
You can make it yourself from available materials.
Options for making boxes
From a candy box
To work on a box out of a box with your own hands you will need:
- candy box;
- beautiful wrapping paper;
- plain paper;
- acrylic paint;
- glue;
- scissors.
This DIY jewelry box will be a great addition to your home.
The first step is to seal the entire perimeter of the base with paper, where the edges leave a small margin. For the bottom and lid I use uncut paper. To create beautiful corners, first of all, glue the sides, cut the corners and bend them inward.
Pay special attention to the inside of the lid, making sure that there is enough cut paper to spare.
Important! The width of the cut fabric on the sides should be 3 cm greater than the width of the box.
The inner part is pasted over so that the cut strips along the entire perimeter, when pasted, extend to the bottom by 2 cm.
You don't need special tools or expensive materials.
After the casket is covered with wrapping paper, cut out rectangles from plain paper. Their size should cover the inside of the box and its junction with the wrapping paper. Glue the paper so that there are margins of 1-2 cm left from the wrapping paper on the lid. The bottom is completely sealed with a plain cloth.
Then let the cardboard box dry.
From ordinary matchboxes
To make a box with your own hands you will need:
- 10 matchboxes;
- thick cardboard;
- glue;
- materials for decoration.
The first thing you need to do is draw drawings.
First, a square shape is cut out of cardboard, then the boxes are glued together in groups of 5 or 2 pieces.
Note! You can take any number of matchboxes, they will eventually serve as small boxes.
The resulting chest of drawers is glued to the base so that it is completely covered with cardboard.
Then the casket and its retractable elements are covered with beautiful paper.
Decorate the casket. Beads, rhinestones, and decorative hooks are used as drawer handles.
Corrugated cardboard
It is worth noting that this version of the product is made without a lid. To work you will need:
- corrugated cardboard;
- glue;
- scissors or knife;
- pencil.
To begin with, they make drawings and diagrams for assembling the box.
To do this, draw two rectangles and a square on cardboard using a ruler. Choose the size that suits you, but keep in mind that one rectangle should be half the size of the other.
Then, using scissors or a knife, carefully cut out the shapes. They need to be cut out in a volume of 20 pieces. In this case, 5 pieces are made with a large entrance, 5 pieces with 2 inputs, 10 pieces with 3 inputs, and 5 pieces without inputs.
Having all the components on hand, it is easy to combine them into one beautiful box.
First, the base of the organizer is glued together - these are 5 sheets without inputs, then they are glued with a large input, then with 2 inputs and finally with 3. Then the parts are glued together, decorated with paper or decorated and left under pressure overnight.
Jewelry box made from a shoe box
To work you will need:
- shoe box;
- paper or fabric;
- glue;
- scissors;
- thick cardboard;
- decor
To start working on a shoe box, step by step paste the box with the selected material. Sometimes they decorate a jewelry box with their own hands from under a shoe box with paper on the outside and fabric on the inside.
Quite a simple and economical option.
Cut out 3 strips from cardboard 1 cm longer than the length of the base, and one strip 1-2 cm wider than the length of the box. These will be the sections for decorations.
Depilation in the 19th century: arms and under arms
I already touched on the issue of depilation in the 19th century (read more here).
But there is a question that still regularly arises every now and then. Armpits. Did they remove hair there or not? Like, okay, the legs are hidden by stockings and long skirts. But weren’t they really depilated their armpits? Really, the airy ballgowns of that time did not include smooth skin not only of the hands themselves, but also under them?..
Let's try to figure it out.
- In care and beauty guides of that time (as well as advertisements), if depilation is mentioned, it is only about the face or hands. Very rarely - on the legs. Believe me, I read a lot of them, in Russian and English. I have not come across any mention of armpits in this context. For now.
- However! Sometimes there is a meaningful “ etc.
“For example, one of the advertisements in the magazine “La Belle Assemblee” of the early 19th century advertises a certain depilatory product, and says that “
extra hair is one of the greatest drawbacks that harms the delicacy and beauty of a woman’s face, hands, etc.
“Well, or in the advertisement of one popular depilatory powder, in the middle of the century, it is said that “
it removes hair from any part of the body
.” And interpret it as you wish.
- Which is logical! Issues of physicality in that era are generally a very delicate area. There is what is mentioned and there is what is not mentioned. Sometimes you can do it, but you can’t say it.
- However, even a smooth body - whether in a photograph or in a painting - is not necessarily an example to follow if you are a modest lady. It’s not enough that there are all sorts of Venuses and women of the demimonde!
- By the way, in photographs of that era depicting not very dressed women, hair in this area is found every now and then.
- In general, women did not show their armpits very often. Some particularly open models of evening dresses appeared only in the last third of the century. And even then their mistresses usually did not raise their hands high.
- It is believed that the first advertisements, which spoke about the need for hair removal in this area, appeared only in 1915!
- In one interesting American study from the early 1980s, the author, Christine Hope, looked at advertisements from the early 1900s to the 1940s. And since 1915, 72% of them have focused on their armpits. That is, only since the beginning of the 20th century, smooth armpits are what is expected of women without fail. They are encouraged to do this. They call.
- But before that, no. Which, naturally, does not exclude the possibility that some women could remove hair there even in the 19th century. They could, yes. But this was not a mass phenomenon, and was not mandatory. This was achieved gradually.
PS Subscribe to my channel on the history of fashion and costume! And... the more likes and shares, the more articles!
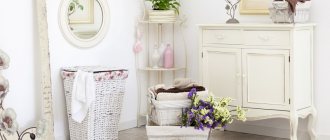
DIY box: master classes and creative ideas
In store windows you can find a large number of jewelry boxes of the most unusual shapes. Their decor amazes with its beauty, however, despite such “decoration”, the desire to make a jewelry box with your own hands does not disappear among needlewomen.
Making crafts with your own hands is not only a tribute to talent, but also a desire to show skill, to create an original thing that no one else has.
DIY baguette box
A box made of baguette looks chic and elegant. Baguette is a special material used to create picture frames. On sale you can find material made of wood or plastic.
To create boxes, it is recommended to use a plastic baguette. It is softer than wood, easier to cut and looks no worse than natural material.
Before purchasing a baguette in art stores, you need to decide on the amount of material that will be needed for the box. You can make a miniature square box or make an elegant craft with sides up to 15 cm. Having decided on the parameters, cut two strips of equal length from the main block. Process the ends of the workpieces with a knife to create an angle of 45 degrees.
Before final gluing the baguette blanks, try them on to each other, make sure there are no gaps. If you find any mismatches, sand the edges with sandpaper. Glue the joints of the side panels with construction or wood glue.
Thick cardboard, cut to a size slightly larger than the box, is used as the bottom and lid of the box. The bottom is glued to the box with Moment glue. You will have to tinker with the lid. To secure it, pieces of a piano hinge and pieces of thick fabric are used to connect the lid and the box. Regardless of how the cover is glued, the joints must be hidden or carefully processed.
A baguette box requires virtually no decoration, but this does not prevent you from decorating it using the decoupage technique, varnishing it, covering the lid and bottom with velvet fabric or leather.
DIY heart-shaped cardboard box
Many girls will like the original shape of the box; besides, you can make such a craft yourself. All you need is thick cardboard, glue and decoration material.
Cut out 2 cardboard bases into a heart shape. Also prepare the sides of the box, the height of which you will determine yourself, based on the purpose of the craft. Cut the bottom edge of the sides as shown in the photo and glue them to the base using Moment glue.
You can connect the lid and the box using pieces of thick fabric, which are fixed with glue.
Cover the inside of the box with decorative paper, and decorate the top with lace, decoupage designs, ready-made flowers made of fabric or paper, and beads.
Creating crafts with your own hands and contemplating the results of the work brings great joy to needlewomen. Caskets created independently are unique objects that have absorbed the hard work and creative abilities of their creator. These items will be a wonderful decoration for your home or can serve as a great gift idea.
Bamboo napkin box: detailed master class
A bamboo box can be found in every home. Moreover, you can rarely find monochromatic options; most of them are decorated with original patterns. To create a voluminous box from a thick napkin, you need to sew decorative thick fabric to its edges on both sides.
Your task is to secure the sides as tightly as possible so that they do not become frayed while using the item. Finish the edges of the napkin with beautiful thick threads, which will strengthen the structure and make it neater. Cut 2 round blanks from fabric; they will serve as the sides of the box.
You can reinforce it with cardboard or plastic inserts. You can connect the fabric and bamboo napkin using Moment glue or threads. Only 3 sides of the fabric blank are connected, the remaining upper part is processed with a beautiful seam or decorated in another way.
Use the original button and eyelet as a fastener. Ready-made fastener options can be found in hardware stores.
The finished box is coated with acrylic varnish. This way it will get dirty less and look neat longer.
Bamboo napkin box
For such a DIY box you will need:
- thread and needle;
- magnetic clasp;
- bamboo napkin for jewelry box;
- scissors;
- cardboard;
- any fabric for finishing.
We cut out the side parts for the box from cardboard with our own hands. The shape can be any. We fold the napkin so that your sides are in the right place (i.e. on the sides of the box). A bamboo napkin can be sewn or glued to the sides.
The decor of such a jewelry box can include various butterflies and flowers, beads, buttons and fabric.
The fabric is glued to the sides, but if you want the box to look different, use velvet or patterned fabric.
We make the rivet from a magnetic fastener, but you can also use a button or just a loop.
To protect it from dirt, it is advisable to varnish the box yourself.
Jewelry box made from a bottle
It’s nice to store not only jewelry in such a box, but also simply use it as interior decor. The royal jewelry box will become an indispensable luxury item on your dressing table.
For a DIY box made from a plastic bottle we need:
- 2.5 liter bottle;
- cardboard;
- glue gun;
- two types of fabric;
- thread and needle.
We cut off the neck of the bottle (up to 10 cm) and, using a thin knitting needle heated in the heat, make holes around the circumference.
Then we need to cut out two circles from cardboard. One diameter is 11.5 cm (for the lid), the second is 8.5 cm (for the bottom). If the cardboard is not thick, then glue 2 circles together.
From the fabric we cut out a circle with a diameter of 20 cm and another circle with a diameter of 26 cm.
Using a glue gun, glue a cardboard circle to the bottom of the bottle, and assemble the fabric circle into an assembly like a bag using a needle thread.
We insert the base of the box into a kind of bag and tighten the threads. Having distributed the folds evenly, we sew the fabric to the bottle.
Now let's move on to the lid, we also cover it with fabric and start lining the jewelry box.
For the lining, a contrasting color to the outer color of the box is suitable. We place the lining in the box and sew it on, securing it with lace on the outside to hide the seams.
Next, you can decorate the lace with beads, which is what we do.
To hide the hole under the lid of the box, cut out a circle and also sew it with lace and decorate it with beads.
You can attach an original flower or anything of your choice to the lid of the box.
Jewelry Storage Ideas
How to store jewelry in an unusual way:
- on a clothes hanger;
- on a decorative tree;
- You can store decorations on stands;
- in a picture frame;
- on a grater.
The idea for storing jewelry on a hanger is very interesting. If you hang it on the wall, you can create a special atmosphere.
Storing decorations on a decorative tree is convenient and easy. Always at the right moment, everything is at hand, clearly visible and easy to reach.
The stands resemble a clothing and accessories store, everything there is hung neatly and on shelves.
Decorations in frames with threads stretched inside look especially creative. This is an equally convenient way to store jewelry.
But a painted grater looks much more creative.
Store your jewelry and you will always get ready with comfort and good mood!
Jewelry box made from a shoe box
Cardboard boxes are an excellent basis for creating boxes, especially since modern girls have no shortage of this material. Shoe boxes, gift packaging and much more can become material for a future box.
We no longer need to create a box from scratch, so most of the time will be spent decorating the box and creating connections between the lid and the base.
First of all, we clean the box from the film layer. This will ensure easy decoration of the box, application of paint or varnish.
We make 2 cuts in the corners of the lid and align the folded edge on one longitudinal side. Using PVA glue, glue it to the side of the box. Try to make the connections as even as possible, and if necessary, reinforce it with tape.
If desired, you can remove the folded edge from all sides, leaving perfectly straight edges. The finished box is decorated with fabric, under which a thin layer of foam rubber is placed. A box decorated with velvet or non-woven fabric looks luxurious.
DIY jewelry box from a box
Beautiful things should surround any woman. Jewelry is a mandatory decoration for girls, because with its help you can focus attention on yourself and attract a man. But where should we put all this beauty?
To do this, we recommend that you make the box yourself.
For it you will need the following materials:
- two cardboard boxes (can be used for shoes);
- PVA glue;
- crepe-satin 1.2 x 0.6 m;
- velvet flap 1.4 x 0.6 m;
- super glue 2 pcs;
- braid;
- foam rubber or regular dish sponges;
- non-woven fabric 1 x 1 m for a DIY box;
- available materials (scissors, pen, iron, etc.).
You need to take one box as a basis and clear it of a thin layer of film in order to better glue the boxes. We make 2 cuts across the width of the lid, straighten the folded edge and apply it to the side of the box.
We level the surface, glue the contacting parts together and wrap it with tape on top.
We make the same cuts in the box so that it opens like a box. Remove the seals from the top edges.
Now we need to make two inserts from the second box. We will make one from the bottom, the other from the lid.
We peel the folded edge of the lid and cut off the excess to make them thin.
Let's start finishing the interior decoration of the jewelry box. To do this, we need to cover the cardboard and make the box beautiful from the inside.
We take measurements of the box and make a pattern on tracing paper or newspaper. It will turn out like this:
We bend the pattern along the lines marked when constructing the pattern; if it corresponds to the dimensions of the box, then you can transfer it to non-woven fabric and velvet. Using an iron, we glue the interlining and velvet cutout together and remove the excess interlining.
This type of upholstery for the box must be secured with PVA glue from the inside of the box.
After everything is done, the frame of the box is ready and you can start attaching it for storing jewelry. For those who don’t bother too much, you can simply put the jewelry in the box, but for convenience it’s worth making special compartments.
For the compartments in the box, you need to glue the foam rubber into one of the trays with PVA glue. We cut the sponges or foam rubber into as many pieces as you need for jewelry, but do not press the sponge very tightly to the glue when gluing.
For the rings we will make an accordion. This is done simply, you need to cut the cardboard the width and twice as long as the box and cover it with velvet, secured with non-woven fabric. When the strip dries, fold it into an accordion.
You can measure a couple of pieces of braid, make cuts in the velvet and pour glue into it, insert the braid. You can attach bobby pins and clips to the braid.
Exterior finish may vary. It is worth making it according to the same pattern as we did for the inside.
Glue the outer fabric to the box, you can use super glue - it's still faster than PVA.
You can decorate your jewelry box in any way you like. Beads, rhinestones, sequins, etc. will only add life and creativity.