Choosing a finishing option for kitchen walls can take many hours - you need to carefully calculate everything and make the final choice. Many people in such a situation come to the decision that ordinary wallpaper would be the ideal wall covering for the kitchen.
No experience is required to work with them, and the result is almost always pleasing to the eye. However, most people have a question about where to start gluing wallpaper in the kitchen so that everything looks as attractive as possible. You should understand it, like many others, even before gluing begins.
Choosing a Starting Point: Why It's So Important
The first page is the most important. It is from this that you will have to glue all the other parts of the roll, going in a circle. If it was not possible to glue it evenly, then when glued end-to-end, the other stripes will be just as crooked.
And when gluing with an overlap, there will be a 100% chance that the last joint will not converge with the first line and will become very noticeable. As a result, the kitchen will look untidy. Especially in cases where the wallpaper is not plain, but decorated with patterns or has a textured surface.
Wallpaper for the kitchen, photo for the apartment: what the pros advise
You entered the store and, at first, your eyes widen. Then you can run around the whole city and argue that there is nothing suitable. But kitchen design is an important thing, so choose carefully. And to make your wall pasting successful, don’t ignore the following tips.
Tips for choosing wallpaper for the kitchen:
- Wallpaper made of paper is definitely not a kitchen option, even imitation wallpaper (like tiles, brick and wood), if it’s paper, you shouldn’t glue it, you’ll have to change it quickly;
- Acrylic wallpaper is also not the best choice; if you risk covering your kitchen with it, you will soon see how the protruding patterns are deformed - even from friction and touching, such wallpaper quickly deteriorates;
- The wallpaper must be resistant to fading, only such wallpaper should be glued, otherwise the faded pictures will annoy you until the next renovation, and sticking special decorative stickers is not the best option for covering up faded wallpaper;
- Wallpaper must be resistant to moisture and temperature;
- Wallpaper should not absorb odors, this is the main requirement.
If the wallpaper is, for example, non-woven, it can be repainted. And quite practical, paint is cheaper than new wallpaper, and the repair process will not take much effort.
Where to start wallpapering a room
You can start gluing wallpaper from several points. You should make your choice in advance so that you can accurately plan the future process. There are several popular options for starting gluing, from which you should choose one.
From the window
This gluing method became popular many decades ago. It is very convenient, and eliminates the problem of the impossibility of wallpaper joining in a visible place, since it will be located behind the curtains. You can start gluing immediately on both sides of the window.
From the door
This option helps to maintain the vertical as clearly as possible. The doorway will successfully set the correct straight line. You need to start gluing from the jamb, gradually moving further.
From the corner
You can start gluing strips from the corner only if it is perfectly level. Most often this is not the case, which is why the method cannot be applied. In other cases, wallpaper, starting from the corner, must be carefully glued over all walls.
From any major landmark
Any large landmark (arch, kitchen apron, etc.) can also serve as the starting point. It is desirable that it be the largest available.
From several lines
Pasting can begin in several places at once. This is true for cases where there are many windows or doors in the kitchen. Then all joints should be placed above them.
Important ! If during the gluing process it is discovered that the wallpaper is crooked, you can carefully remove it, but reusing the same strip is highly not recommended.
How to choose and apply wallpaper for the kitchen
If you live in a corner apartment, the walls of which are often damp, then they must be treated with an antiseptic;
- Surely many people are familiar with the basics of wallpapering, but only a few know how to do it correctly. Having prepared the surface, you can safely proceed to the main stage. It begins with diluting the adhesive solution and cutting the blades. How to prepare the glue is described in detail on the packaging, so there is no point in dwelling on this.
- The only thing you shouldn’t forget is that the denser the material, the less liquid you need to use for glue;
- To properly cut the roll into strips, roll it out with the pattern facing up. It should be cut so that the segment is 10 cm longer than the height of the kitchen. In order for the strips to be thoroughly saturated with the adhesive solution, they should be folded in half, and then rolled into a roll and left in this state for about five minutes;
- You should start pasting from the window. The first strip should be level as shown in the photo. The glued canvas is thoroughly smoothed until all existing bubbles are removed. Using a cutter, the excess edge is removed. And so canvas after canvas.
Let's sum it up
If you don’t have the opportunity to radically change the interior, but your soul asks for something new, then new wallpaper is what you need. Change the design of your kitchen with their help, and you will see how your mood and the mood of your family will rise.
What wallpaper to put in the kitchen to make it beautiful and practical
Perhaps one of the most difficult questions that arises during renovation is what wallpaper to put in the kitchen and whether it is worth doing it at all. After all, this is a rather aggressive environment for such a delicate material: high temperature, soot, humidity.
All surfaces get dirty quite quickly even with a very careful housewife.
The answer to this question is definitely positive, provided you choose wallpaper that can be washed or at least wiped with a damp sponge. Fortunately, this is not a problem now.
What else to pay attention to when wallpapering in the kitchen
The process of wallpapering is very labor-intensive and complex. All actions must be performed as carefully as possible to prevent damage to the material or its bending. How to wallpaper in the kitchen:
- Remove the old coating without damaging the wall and apply plaster.
- Cut the wallpaper according to the required dimensions.
- Prepare the adhesive mixture and coat the strips and walls with it.
- Apply wallpaper to the walls in a herringbone pattern, starting from the selected area. At the same time, they need to be aligned and excess glue removed.
Removing paint from walls can be difficult. There really isn't much point in this. If you try to figure out how to put wallpaper on paint in the kitchen, it will become clear that it’s easier not to remove it at all.
The fact is that the process of gluing wallpaper on a clean surface and on paint is absolutely the same. The only difference is the need to get rid of uneven areas of paint and increased pressure during gluing.
To properly wallpaper your kitchen, you also need to consider several important points:
- places for sockets must be cut out after gluing;
- before work, it is advisable to remove the covers from switches and sockets, turning off the power to the apartment;
- areas above doors and windows should be taped at the very end;
- You need to cut the strips with a kitchen knife, and a stationery knife is suitable for alignment;
- hanging parts need to be trimmed only after 24 hours;
- Do not open windows, as a draft will harm the tenacity of the material.
Deciding whether to wallpaper behind a kitchen unit should be based on the likelihood that it will be moved in the future. If there is one, then it is best to glue it there too to avoid possible difficulties.
The secret of proper pasting
Wallpaper is glued only to the treated surface. All differences and cracks are covered with putty, and the surface behind the battery is especially carefully prepared. It is important that the first thing to do is treat the areas affected by the fungus, then prepare the glue and wallpaper.
For your information, thick wallpaper can only withstand thick compositions; they are applied especially intensively to the area behind the radiator.
- To ensure that the glue is evenly saturated, the coated coating is left wrapped for 5 minutes.
- Work begins from the window, paying special attention to the area behind the radiator.
- Clear alignment to the mark with a paint cord will help ensure that the wallpaper is perfectly vertical.
- The glued base is carefully smoothed, expelling air bubbles. The area behind the battery is treated especially carefully, because even a slight increase in temperature will lead to peeling of the fabric.
A kitchen updated with fresh wallpaper will be filled with new colors and will lift the spirits of everyone present. Easy repair and good colors!
How to mark a straight vertical line on a wall using available objects
If you need to mark a vertical line in order to stick the first strip evenly, but there are no suitable tools, you can use the means at hand. What should be done:
- Find a long rope that reaches from the ceiling to the floor.
- Tie a loop on one side and hang a weight on the other.
- Treat the rope with paint or chalk.
- Hammer a nail into the ceiling and tie a rope to it with a loop.
- Pull the rope down by the weight, pressing it close to the wall.
- The result will be a mark of paint or chalk on the wall, reflecting an even vertical line from ceiling to floor.
Maintaining verticality in uneven corners
It will be difficult to wallpaper the kitchen fairly evenly if its corners are crooked. This point is very important for wallpaper with geometric patterns, since they need to be connected evenly.
The problem can be solved as follows: when the last strip has reached the corner, it should be placed 2 cm further, going onto the other wall, and the same should be done with the second side.
This will create the most neat look possible, but the method is only applicable for thin material. If it is dense (non-woven or vinyl), then the edge of the last strip should be cut off at the very junction in the corner, creating the most even line of connection with the other part.
Reference ! If it was not possible to achieve a beautiful joint in the corner, it can be hidden using a special finish or covered with furniture.
Types and methods of combination
To determine how to hang two types of wallpaper in the kitchen, you need to understand how to combine them.
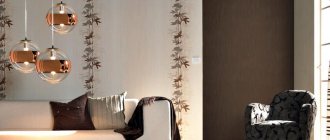
First of all, the coating must be harmonious in color. One color gives the room a feeling of peace and tranquility, two shades, on the contrary, give dynamics and brightness. In order not to make a mistake with your choice, you should use special tables that indicate harmonizing shades. We looked at the combination of colors
A great opportunity to transform the space is to cover the kitchen with two types of wallpaper.
It is important to combine the texture of the material, for example, the use of paper and vinyl, textile and photo wallpaper, embossed and silk.
It’s worth thinking about the future style in advance - the best way to combine it, which will make the room bright and original. The most interesting combination options include:
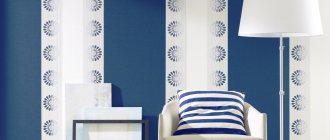
| Vertical | We take coatings with the same texture and width, but different in color. Accordingly, during gluing the stripes will alternate. At your discretion, you can decide the width of the stripes and which color will become dominant. By color: monochrome “related” shades or contrast in brightness. It is possible to use a drawing or pattern. Edges can be trimmed, zigzag or wave |
| Horizontal | The most common way. It allows you to use different textured wallpapers. There is a specific gluing pattern here. To begin with, separate the joint area. The upper strips are glued first, leaving the lower part unglued. Lower tents remain with the top part untaped. After drying, the excess is cut off, making an even joint. Such a seemingly complex manipulation is necessary, since the material can sag, which leads to separation of the joints. When removing excess material, you should be especially careful so as not to spoil the overall appearance. |
By combining, you can visually enlarge the room and add emphasis
| Wallpaper inserts | This method can also be used to update old coverage. Future “pictures” of various shapes are cut out and glued on top of the finished layer. Then the inserts are framed with slats or borders. Inserts with significant ornamentation are very popular, but they will only be appropriate with a plain neutral bottom layer |
| Volumetric inserts | This method can also be used to update old coverage. Future “pictures” of various shapes are cut out and glued on top of the finished layer. Then the inserts are framed with slats or borders. Inserts with significant ornamentation are very popular, but they will only be appropriate with a plain neutral bottom layer |
| Patchwork | Wallpaper is taken in different colors, but with an identical pattern. A large number of scraps are cut out, which are glued end-to-end, as well as overlapping |
| Framing niches, columns | The emphasis is on interesting elements of the kitchen, emphasizing them. You can use contrasting colors or bright patterns |
Regardless of the chosen method of combination, the wallpaper must be applied efficiently and accurately. It is imperative to prepare the surface, which will allow them to hold firmly.
Attention! Each type has its own gluing characteristics. There are no general rules for all types (textile, paper, liquid). To ensure the work is done correctly and reliably, you should read the detailed instructions for each type.
Options for wallpapering the kitchen
There are many options for wallpapering in the kitchen. You need to decide which one will be used before purchasing the material, so as not to be faced with the need to buy anything else.
What kind of pasting can be:
- Standard - ordinary wallpaper, you can choose colors and patterns, they fit into any style and look great in the kitchen interior.
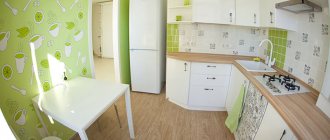
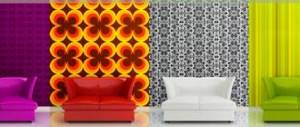
- Accent wall – All walls are kept simple, but one wall is decorated with wallpaper with bright colors, designs or photographs.
- Vertical combination - several types of wallpaper are used, each of which has similar stripes that differ in color; they alternate during gluing.
- Horizontal companion wallpaper - 2 types of wallpaper are used - regular or with stripes, and the second has a pattern or many patterns, each of them occupies one entire wall.
- Patchwork – bright wallpaper of 4 types with different patterns and images is cut into squares and pasted in a chaotic order, but respecting vertical lines.
- Photo wallpaper - regular wallpaper is pasted throughout the kitchen, and stripes are applied to one of the walls, making up one large photograph.
- Combined - wallpaper of any type is glued to the walls, combined with tiles, bricks, panels, mosaics or other types of finishes.
When using several types of wallpaper, keep in mind that they must have similar thickness and gloss. If you use materials of different types and qualities, the final picture is unlikely to please you.
Washable wallpaper for the kitchen
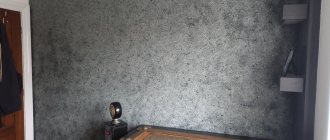
The main condition: wallpaper for the kitchen must be washable , so the best choice is vinyl (non-woven backed, compact vinyl) wallpaper or fiberglass wallpaper .
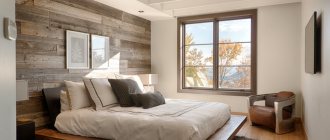
Washable wallpaper for a brown kitchen
Delicate warm wallpaper color that will never tire your eyes
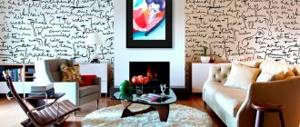
Bright glass wallpaper in an eclectic style kitchen
How to calculate how much wallpaper you will need
Calculating exactly how much wallpaper you need to buy is not so difficult. It is enough to measure the perimeter and height of all kitchen walls that are planned to be covered and perform simple mathematical operations:
- Divide the perimeter by the width of the selected wallpaper - the result will be the number of stripes required.
- Divide the length of the roll by the height of the kitchen - you get the number of pieces that can be obtained from one roll.
- Divide the value of the required strips by their number in one roll - the result will show the number of rolls required to obtain entire strips of the required volume.
- If there are small unaccounted areas of the walls that need to be covered with wallpaper, they must also be calculated and added to the final result.
When calculating, you should take into account rapport and offset - these indicators indicate the step with which the pattern on the wallpaper is repeated. It is different in each model. This may require a little more material as some of it will be cut off.
Important ! The quantity of wallpaper purchased should be 20% more than required - this will avoid a shortage of material when gluing and provide the opportunity to glue the walls in the future if necessary.
How to paste walls - step-by-step instructions
So, how to hang wallpaper correctly? The walls are already completely prepared - the old coatings were removed, and the surface was puttied and primed. After the primer has dried, we select options for applying glue (depending on the type of material used):
- In the case of paper-based vinyl wallpaper, the canvas is coated;
- To glue non-woven wallpaper, glue is applied to the walls.
It is recommended to apply wallpaper both to the wall and to the canvas - this ensures better adhesion of the surfaces, in addition, joining the pattern and aligning the canvases will be easier.
If you need to apply glue to the canvases and not to the wall, then prepare a clean place for them in advance.
The glue is applied in an even layer to the wallpaper without gaps, after which the canvases are folded in half and left for several minutes. Particular attention should be paid to the wall - in the place where the wallpaper will be joined (after all, modern materials are glued end-to-end, not overlapping). Work should begin from the center of the room if it has 2 windows or from the corner of the wall where the window opening is located.
The first canvas is glued just in the corner - so that it overlaps the adjacent wall by 5-6 cm. Before gluing the first canvas, be sure to mark a vertical line along a building plumb line or level - this line is drawn with a pencil along the wall, as shown in the photo above. Start gluing the wallpaper on top, aligning the canvas exactly along the vertical line. First, the top and edge of the material are exposed, and only a rag or brush is used for pressing, but not a roller. After the upper part of the canvas is glued, open the lower part and also carefully level it to the plinth.
After the canvas is aligned and fixed, it is pressed in a herringbone pattern, first in the center, and then to the side, moving from top to bottom.
If a micro-gap forms between the panels at the joints, they can be easily moved. It will be easier to do this if the canvas is coated with the wall. At the final stage, you need to additionally coat the joints and go over them with a short rubber roller to fix them.
Then follows the quality control of gluing - the wallpaper should fit tightly to the wall without air bubbles. After the entire room has been pasted over and the canvas has dried a little, you can trim off the excess that has formed at the top and bottom. Here it is important to use a sharp knife so that there are no burrs left at the cut site, or cut evenly with scissors at the bend, as shown in the next photo.
How to glue the last piece? Measure the width of the area of the wall that has not yet been pasted over and add 1.5 - 2 cm to it (photo 1). Cut the canvas to the desired width. Now join this fabric with the adjacent fabric, glue and iron the seam, and then in the corner vertically smooth the resulting overlap with a rag or brush (photo 2).
Carefully trim off the excess at the corner, top and bottom. Wipe off any remaining glue with a sponge. Keep in mind that the resulting pattern may not line up perfectly, but it won't be too noticeable in the corner.