- On high legs so that you can place something under the shelf.
With a shelf above the microwave for more efficient use of space above the device.
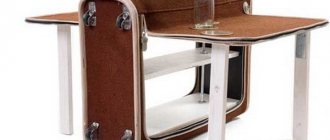
Microwave table stands - for more efficient use of space
Racks or shelving - if you have space in the kitchen
As you can see, you can place a microwave not only on a table or windowsill. There are different options and you can find a solution for different cases. By the way, floor shelves for microwaves can be made not only of metal. They are also made from furniture chipboard and MDF. In most cases, an open compartment is allocated for microwave installation, while the rest either store smaller equipment or are used for storing dishes/supplies, etc.
What types of brackets are there for a microwave oven?
The main advantage of brackets for installing a microwave oven is that they are practically invisible when the device is installed on them. The downside is that the device may fly off in a side impact. If the chosen place is “impassable”, it’s not a big deal. Otherwise, it is better to choose a shelf with side edges or come up with some kind of stops for fixing the device.
One of the options is on brackets
When choosing a bracket for a microwave, pay attention to the weight they are designed for. It is also worth thinking about the load-bearing capacity of the wall on which you are going to hang the microwave. To distribute it evenly, you need to choose models in which the part of the bracket that is screwed to the wall is long. And holes for fasteners are distributed along the entire length.
Another good option is a horizontal jumper. It is mounted on the wall, and there are L-shaped supports for the microwave oven. This way the load is also distributed over a larger surface.
Microwave bracket for wall. Its “load capacity” should cover the weight of the stove
What else can you say about microwave oven brackets? They can be telescopic with the ability to adjust the length to which the stops extend. There may be plastic pads on the stops. Thanks to them, the device slips less. You can choose brackets by color. This is usually painted metal. More often they take it either in the color with the microwave oven, or in the color with the kitchen furniture.
Types of shelves for microwave ovens
The easiest way to mount the microwave on the wall is to place it on a shelf. If, when designing kitchen furniture, an open special shelf was not provided, you will need to find a place to install an additional one. There are the most common shelves - two or three brackets on which the shelf itself is fixed. These are so easy to make yourself. There are more complex multi-tiered models.
To prevent the device from overheating, you need to leave 5-7 cm gaps on the sides
Microwave shelves are made from different materials:
- Metal - stainless steel, nickel-plated steel, galvanized, painted.
- Made of wood. Under varnish or paint.
- Made from laminated furniture chipboard.
A wall-mounted microwave shelf can be single-tiered, double-tiered or multi-tiered. You can choose depending on your need. Single-tier ones are good if you are going to install the device in the space between the countertop and wall cabinets. The space under the shelf can also be used.
The microwave shelf can be corner
Often the microwave oven is placed in the corner. In this case, you can make or buy a corner shelf. This option fits especially well under a cabinet with a corner door.
An interesting option: a shelf for a microwave and an electric kettle with outlets
There are also shelves for a microwave oven with a base. This is when there are not just brackets and a shelf, but also a back wall. These options are good, but you need to make sure that the shelf is deep. Not all microwave models can be built-in. In conventional ones there should be an air gap to the wall. By the way, you need to pay attention to this in ordinary shelves. But there the sides are usually not closed, which improves ventilation.
Metal
If your kitchen has metal trim, a metal microwave shelf on the wall will look good. They are also single-tiered or multi-level. You can find different designs - with rounded or rectangular sides, with handrails of greater or lesser height, with shelves on the lower level for small utensils.
Metal Wall Shelf Options
The most common color is metallic. If desired, you can find them painted in a variety of colors. The color is usually matched to the microwave, but it can also be painted to match the furniture or the wall.
In the kitchen cabinet.
When the microwave is rarely used, it is useless to keep it on the work surface; it will only take up space. It is better to place it in the kitchen cabinet, so that if necessary it is accessible and convenient for use. It is better if the closet has electrical outlets and a removable shelf. Moreover, while in the closet, it will not become covered with dust and dirt.
Microwave on the countertop
Rules for placing a microwave oven
To begin with, it is worth noting that there are a huge number of options for how to place a microwave oven in the kitchen. But even if you leave this device on the table or kitchen cabinet, you will have to take care of some installation nuances.
So, a few rules for placing a microwave:
- The first thing to consider is the height of the device. All family members (except small children) should be able to easily reach the microwave;
- The device should not be located close to the wall or the walls of cabinets, refrigerators, etc. It is necessary to leave at least a couple of centimeters of free space to allow air access to the ventilation holes;
- A microwave above the refrigerator is not the best option, even if the latter is short in height. The heating surface of the oven can lead to malfunctions of the freezer;
- To prevent washing your microwave oven from becoming a regular activity, you should not place it near the stove. In addition, being located next to a sink can cause a short circuit;
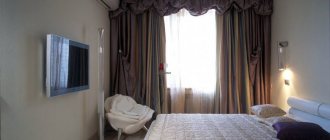
- A window sill can be an excellent place for a microwave, but a problem can arise in winter due to the temperature difference between the device and the cold window - condensation easily forms on it;
- Another important condition is that the microwave oven should be placed at a distance of at least two meters from electronically controlled appliances;
- If you have indoor plants in a certain place in the kitchen, the oven should be placed away from them to avoid the influence of harmful, in this case, microwave radiation.
In general, you need to choose a location for the microwave in which all family members will have free access to it, and at the same time the device will not interfere with the opening and closing of the unit doors, passage and use of other devices.
Microwave oven built into the kitchen unit
Placing a microwave in a closet is the most convenient and neat option, since built-in household appliances will be hidden in the closet and will not visually take up space in a small kitchen. How to integrate a microwave into a kitchen set? You just need to find a cabinet, shelf or drawer that is suitable for its size, where the microwave oven will be placed most successfully - access to it will not be difficult. Many kitchen sets are designed to accommodate a microwave and have a special niche for it with ventilation holes. If your kitchen set does not have space for household appliances, you can place the microwave oven in a cabinet above the oven, under a countertop or in a corner cabinet.
Microwave in kitchen cabinet
Choosing to place a microwave in a small kitchen is a responsible task for the owners, which will determine the comfort of its use, as well as the longevity of the appliance.
How to hang a microwave on the wall
The most ergonomic and safest option for placing a microwave oven is to hang it on the wall. This method is chosen by families with small children and residents of small apartments. But in order for the design to be durable and beautiful, you need to take into account many nuances.
Preparation
The first thing you need to do before installing the microwave on the bracket is to prepare the place where it will be mounted.
Attention! Since the bracket and the device placed on it have significant weight, it is worth making sure that the wall on which the structure will be attached is strong. It is preferable that the wall be concrete or brick - drywall does not always guarantee complete safety of the fastenings.
The second thing you need to do is measure the dimensions of the device, select suitable brackets for them, calculate the distance between the holes for fastenings, and check the building level.
In order not to make a mistake with the location of the wall-mounted microwave oven, it is worth consulting several times with all family members on this issue. Moving the bracket will be problematic, and there will be traces of the fastenings on the wall, so it’s better to immediately think about all the possible nuances.
Required tools and materials
Many manufacturing companies install microwave ovens on brackets. But such a service costs a lot, and therefore many householders decide to implement this idea on their own.
In order to hang a microwave oven on the wall, you will need the following set of tools:
- electric drill or hammer drill;
- screwdriver;
- building level;
- roulette;
- pencil for marks.
Apart from this, you will need some materials. Namely:
- fasteners for your type of wall (anchor bolts, dowels, etc.);
- construction tape;
- the brackets themselves;
- corner shelf (if the device is placed in the corner of the room).
Advice! When purchasing brackets and fasteners, you should make sure that all elements fit together. Manufacturers usually provide detailed information about various fastening methods on the product packaging.
Bracket selection
A microwave bracket is a structure consisting of a crossbar and L-shaped holders attached to it perpendicularly. You need to choose a stand for this device only from those models that are designed specifically for microwave ovens.
There are several parameters that you need to pay attention to when choosing a suitable bracket:
- maximum permissible weight - you should add a few kilograms to the weight of the device to account for the food heated in it and choose a bracket with a good margin of safety;
- the size of the bracket must correspond to the dimensions of the microwave oven;
- retractable supports are preferable to stationary models, since in the future it will be possible to install another microwave model on the same shelf, in addition, the ability to move the device can be a big plus when operating and washing the device;
- The presence of rubberized inserts will help secure the microwave to the bracket more securely; with them, the risk of “dropping” the stove is minimized.
In addition, you should pay attention to the color of the bracket. Standard models come in white, black, silver and golden shades - matching the common colors of various household appliances and kitchen design elements.
Fastening stages
A properly mounted bracket on the wall is the key to safe use of the stand and microwave. That is why it is important to follow a certain procedure.
To attach the bracket to the wall, you must:
- Measure the distance between the two crossbars of the bracket, corresponding to the length of the microwave, mark the mounting points on the wall with a pencil;
- Check the levelness of the marks using a building level;
- To avoid scattering construction waste throughout the room, stick construction tape under the marks;
- Drill the required number of holes with a drill or hammer drill in accordance with the markings;
- Drive dowels into the resulting holes;
- Attach each of the corners in turn with the holes to the dowels, insert self-tapping screws into them and tighten tightly.
At the end, you can check the horizon again using a level, and, if necessary, redo the holes. Special plugs are installed on all open parts of the fasteners.
Placing a microwave on a kitchen cabinet
A kitchen floor cabinet for a microwave is a convenient and functional placement option. Such cabinets are specially designed for placing and storing large kitchen appliances, household appliances or dishes. The depth of the cabinet is at least 60 cm; the microwave can be placed at the very top of the cabinet or placed on the middle shelf. This arrangement of the device allows you to save space in a small kitchen.
Advice! A cabinet can be purchased at an affordable price, and if you have the skills to make and assemble furniture, you can make it yourself.
Microwave on brackets
Advice from professionals
As you can see from the instructions, fixing the bracket to the wall with your own hands is not so difficult. To ensure a high-quality result, you should pay attention to the advice of professionals:
- Before starting work, be sure to check the strength of the wall;
- use only a high-quality tape measure or a centimeter with clear divisions;
- check the building level more often;
- use only durable materials of certified quality - this applies to both the suspension itself and the fastening elements;
- It’s better to check the mark several times and screw the bracket one by one rather than re-drill the holes several times;
- Be sure to follow safety precautions when choosing a place to place a hanging microwave.
This arrangement of the microwave oven will significantly save space, help fit this piece of equipment into any interior and add a stylish twist to your kitchen.
Microwave on the wall - advantages
The advantages of wall-mounted microwave ovens are obvious:
- Free space on countertops. We use a variety of appliances in the kitchen every day: toasters, mixers, coffee makers, blenders and many others. Therefore, a free working surface is worth its weight in gold.
- Safety. The suspended stove is inaccessible to children, does not come into contact with other household appliances, and is well ventilated.
- Comfort. By attaching the microwave at eye level, you will provide easy access to the door, without the need to bend over or reach on tiptoe with a plate.
If these points convince you that the decision is correct, let's look at installation options.
Place on the countertop
This option is the most functional, as you can install the microwave anywhere on the work surface where it is convenient for you. This method will be the easiest, just extend your hand.
This method is not suitable for small kitchens, as it can deprive the hostess of a work space on the countertop.
Installation options:
- Brackets are metal wall mounts on which the microwave is placed. Available in different sizes, some are adjustable.
The color can be matched to the tone of your stove: white, black, metallic shades (silver, bronze), red and others.
- Shelf. This could be a shelf in a kitchen unit rack, a matching wall shelf or a corner. In any case, this is a stable, harmonious, comfortable option.
You don’t have to buy it; you can make a shelf yourself.
- Stand. It can be hung or installed on a tabletop.
You can choose any stand design and number of legs. The free space of the table under the stand can be used to store dishes or frequently used spices.
5 recommendations for selection and installation:
- When choosing a hanger for household appliances, check the contents and integrity of the materials. Metal, plastic, wood must be free of cracks, chips, and other defects. And the number of fasteners (bolts, screws) corresponds to the number of holes.
- Pay attention to the color of the appliances and the dominant shade in the kitchen to find the right tone.
- Carefully secure the rubber elements - they prevent slipping during vibration during operation.
- Measure your microwave oven before purchasing a holder - it should fit correctly. This will allow the case to be secured firmly and reliably.
- When choosing a corner modification, pay attention to which side the ventilation holes are on the MVP, so as not to put them in a corner or obscure them with a wall. The stove may overheat, fail, or cause a fire or explosion.
How to Attach Brackets
The classic bracket looks like the letter “L” and can withstand up to 70 kg of load. Having chosen the appropriate model and durable fasteners, you can get to work.
Installation steps:
- Decide on a location. The MVP should be located away from the gas (electric) stove, refrigerator, sink, TV and closer to a grounded outlet.
- Mark the distance between the fasteners on the wall. Measure slowly, carefully and accurately, with a tape measure and level, so that you don’t have to redo it.
- Drill holes with a drill. This video will help you:
- Special plastic elements are inserted into the holes into which self-tapping screws will fit.
- Now you can attach the L-shaped beams.
- Apply all the bumpers and anti-slip pads.
- Install the oven.
Ready! You installed the microwave yourself. Congratulations on a successful installation!