Quilling is the art of making beautiful crafts, even real masterpieces, by hand from narrow strips of paper. This ancient art can be a great hobby for almost the whole family. Quilling for beginners is often taught in craft classes in elementary school, so that children develop various skills and master the skills of working with paper. It’s quite easy to learn quilling on your own by studying the step-by-step master classes on the Internet and on the pages of printed publications on handmade crafts.
History of quilling
The term “quilling” comes from the English “quill” - “bird feather”, since in the 14th-15th centuries the medieval monks and nuns involved in it wound thin gilded paper onto the tips of feathers, creating medallions and frames for icons. The finished structure seemed to be made entirely of gold, although it was not.
A little later, in the 18th century, the art of paper rolling spread throughout all European countries, but only in the most financially secure strata of society, because high-quality, colored paper suitable for making crafts was an expensive pleasure. Princess Elizabeth also became interested in quilling, which immediately became a popular hobby among the female population. By the beginning of the 20th century, the art of paper filigree was practically forgotten for a while, only to be revived again in the 21st.
For those who have never encountered quilling, it seems that anything made from paper, even the thickest one, will be fragile, literally “disposable.” This is not at all true: on a stand made using the rolling paper technique, you can put a couple of teas, put a couple of books and it won’t even be deformed. The quilling vase for pencils, sweets, and sewing supplies has been used for its intended purpose for a long time without becoming unusable.
In modern times, there are two main quilling schools: European and South Korean. The eastern direction is replete with many intricate details, difficult elements, representing jewelry masterpieces from a huge number of parts, slowly created over weeks and months. The Western one is simpler, stricter, more concise, and is carried out much faster, since in Europe it is always customary to rush. It is the latter option that is best suited for those who are just starting to get acquainted with paper plastic.
Quilling secrets
Each master has his own secrets for making elements, patterns and figures. Some needlewomen use a comb to weave strips together to form a multi-layered flower or butterfly wing. Or, needles are stuck into the foam according to a pattern and braided with strips, creating interesting curves and patterns. This way you can create “zigzag” leaves like those of a rose, grape, or maple.
You can make unusual quilling paintings from simple petals of different colors. Using a pencil, draw the boundaries of the grass, trunk, crown and fill the sheet with “petals”, “curls”, “eyes”, “leaves”.
If you combine several colors in one element, you can create a brighter design. Mixing shades allows you to make the picture more realistic. To ensure that the elements keep their shape, they can be covered with a strip around the edge. This technique allows you to fix the desired bend. Many craftsmen make butterflies and oak leaves this way.
Lush flowers can be obtained from elements made of paper-plastic. For example, a wide strip is wound onto a “tight roll”, one edge of which is cut into thin petals. The end is glued, the blank is removed, and the petals are straightened.
Tools, materials to get started
In order to start creating crafts using the quilling technique, you will need some simple materials and tools available in almost every home:
- narrow strips of paper;
- paper or cardboard for the base of the product;
- sticks-knitting needles for winding;
- glue stick and PVA;
- sharp scissors;
- tweezers;
- cork board;
- crimper;
- templates;
- combs;
- modeling mat.
If any material or tool is missing, it can be easily purchased at the nearest stationery or hand-made store.
About the paper
Paper strips are the main material for work. They are cut from not the thinnest paper, preferably colored on both sides. The width ranges from one to two mm to one and a half to two cm, the most commonly used is four to seven mm. They are cut by hand with sharp scissors or bought in whole sets at handicraft stores. The most commonly used material is Korean-made, sold through online stores.
The most important properties of quilling paper:
- color – plain, with gradient tints, small patterns, gold, silver tints, etc.;
- width - in purchased sets there are strips of 1-15 mm, less often - wider ones intended for leaves;
- density – paper with a density of 120-140 g is most convenient to use. per square meter. If the density indicator is less, the product will be easily deformable; if it is more, the paper will delaminate at the first attempt at curling;
- The length of the strips depends on the size of the workpiece you plan to make. The most convenient options are about 30 cm long, but in some cases longer ones are required - 50-60 cm;
- price - the cheapest option is to buy plain colored paper and cut it yourself, but not everyone can make even strips, so it is better to use purchased sets, the cost of which depends on the quantity, width of the strips, colors offered, and the reputation of the manufacturer.
You will also need a paper or any other base - everything that is twisted from strips will later be glued to a dense base, selected depending on the purpose of the product that is planned to be made. It can be not just a flat sheet, but a box, a box, a jar. Tip: in specialized stores you can buy ready-made paper rolling kits, which include not only strips, but also all the tools necessary for the job.
Tools
A tool such as a twisting stick is the main one. You can do it yourself by cutting off the tip of a toothpick, the refill of a ballpoint (but not gel) pen, a cotton swab, splitting the base in the middle, or buying a special metal awl with a fork at the end from a specialized store.
Glue is also necessary - for different purposes you will need a glue stick or PVA. You will need small but very sharp scissors with thin tips; among other things, they are used to cut fringe. Tweezers are suitable for medical, cosmetic, used for working with radio components, etc. It is not necessary to have one, but when handling small parts, tweezers make the work much easier.
A special ruler stencil with circles, ovals, hearts, and droplets of different diameters will also come in handy, especially if it has at least two elements of the same size. To create large-scale compositions, you will need safety pins with multi-colored heads. A cork or foam mat will prevent the finished elements from sticking to the table, since they can be secured to it with pins. A crimper is a tool for corrugating paper, which is needed when creating large-scale works.
A long-toothed comb is perfect for looping paper. If you decide to cut the strips yourself, you will need a breadboard knife, a ruler, and a special checkered cutting mat. All kinds of decor are used as additional elements - colored threads, yarn, ribbons, wire, rhinestones, plastic eyes, noses, etc.
To cut fringe, a special tool is sometimes used, which simultaneously cuts and advances the quilling strip.
What is needed for a creative flight?
For quilling we will need:
- strips of paper (you can buy them ready-made, or you can cut future blanks yourself with a width of 3 mm, 5 mm, 7 mm, 10 mm);
- a hook (either a purchased version or made by yourself: break off a piece of the eye of a thick needle, and you get a thin “fork”);
- PVA glue (for many years, a better material for working with paper has not yet been invented);
- ruler with stencils of round holes of different sizes;
- safety pins (useful when creating large paintings where you need to hold many elements so as not to confuse their order);
- a cork mat or a sheet of foam plastic (on such a substrate the workpieces will not stick together);
- stationery scissors (for creating fringe);
- tweezers (for picking up small parts).
Types of quilling
Technically, all types of paper rolling are divided into:
- contour or graphic - in this technique, paper strips are glued along a pre-drawn contour or cut out silhouette. These can be letters, geometric shapes, etc.;
- volumetric - mainly corrugated paper and corrugated cardboard are used for it. Products come out three-dimensional, usually these are vases, napkin stands, toys, etc.;
- The hasting or looping technique allows you to create more elegant, but very fragile products. A beginner will not be able to do this, as it will require certain skills and great patience;
- bihive or “bee hive” allows you to create large and small spaces using not solid strips, but small sections of them.
Paper quilling frog
A cute green frog sat on a pebble and is waiting to be made using the quilling technique. And this is not at all difficult to do!
Each part of the body will consist of a specific element in a given needlework technique: a tight or loose roll, an eye, a drop, etc.
Necessary materials:
- paper strips in blue, green, white and dark brown;
- tool for twisting strips;
- stencil ruler;
- scissors;
- glue.
It is simply impossible to create a frog using the quilling technique without green stripes! Therefore, first of all, we take one strip and begin to wind it on a special tool in the form of a handle, where there is a forked end in the upper part.
Carefully remove the resulting roll from the tool and place it in a stencil ruler in the slot with the number 15. Let it unwind a little and secure the tip with glue. Place the finished free roll to the side. In this way we will make the second roll.
We pinch the second basic shape with our fingers on both sides to get an element in the form of an eye.
We connect the two parts together to get the head and body of the frog.
Then we create the eyes. They will have three colors. For this purpose, cut off a small part of the brown strip. We begin to wind on the tool.
Glue a white strip to the tip. We continue to roll the roll.
Cut off a small part of the green strip. Attach its end to the white part of the roll with glue.
We continue to wind the tight roll and get one eye for the frog.
Place it on a stencil ruler and determine the size. Create an identical element. We secure the ends with glue.
Glue the finished eyes to the top of the head.
We create the paws of the animal. To do this, divide the green strip into two equal parts. We wind each part of the strip on the tool and place it in a stencil, where the cell number will be 14.
We take it out and fix the edges with glue.
Next, you need to take two strips, which will be slightly shorter in length than the previous ones. We wind them and get from them free rolls with size 12.
We fix the edges with glue. Using our fingers, we deform one side of each circle and get droplets.
We glue two large elements in the form of drops to the body. Then at the bottom we attach elements in the form of drops of slightly smaller size. We get ready-made frog legs.
We create a base for the craft in the form of a sea pebble. To do this, take a blue stripe. We wind it on a quilling tool.
Place the resulting roll in cell number 16 in the stencil ruler.
We fix the free blue roll with glue and press it at both ends. Glue the frogs to the legs.
Now the frog using the quilling technique is ready. Glue it to a thick base and admire it, or you can place it on a postcard, money envelope or photo frame.
Basic shapes used for quilling
Various forms are used in paper rolling:
- spirals or rolls;
- drops, leaves;
- “eyes”, ovals;
- hearts, crescents;
- triangles, rhombuses, squares;
- circles, semicircles, ovals;
- “wings”, “legs”;
- “tulips”, stars, arrows, etc.
Quilling paintings: master class on lilacs
The three-dimensional image will attract attention at first glance. Volumetric works can be created from scrap materials using several layers. Let's get acquainted with a master class on making lilacs.
Use lilac paper to make petals into the “eye” element. Glue some of them into flowers of three and four parts. The other half is suitable for plot correction. Use several shades of lilac and decorate the middle with yellow beads. This will make the flower more colorful.
Draw small and large lilac leaves on cardboard. Make crescents (“bend the eye” on both sides into a semicircle). Place the elements on the template and connect them together. Cover the edges of the leaf with a strip that goes into the trunk.
Mark the location of the lilac branches. Glue skewers or wire. Work on the bottom layer first, and then design the foreground. If you want to create a composition, then draw a background or glue a vase. Try to make the flowers small, then the lilac will look like a real one.
Using color prints, “natural” quilling paintings are created. You can see a photo of the completed master class below.
Master classes for beginners
Beginner girls, boys, and adults are recommended to use high-quality paper and tools for paper crafts - this way they will quickly learn this art by mastering its basics. Children will be most interested in making something that they understand - figurines of animals, birds, fish, doll furniture, New Year's decorations, a postcard for mom or dad.
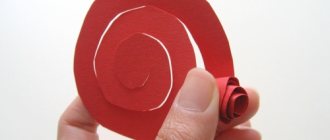
The main basic figure is a spiral. To create such a dense roll, a quilling strip is tightly wound onto a stick and then fixed with glue. The free spiral is also wound onto a stick, but is then given the opportunity to unwind slightly, after which it is manually given a suitable shape and glued to the right place.
Quilling flowers
Using the quilling technique it is easy to make almost any type of flowers - dandelions, daisies, gerberas, roses, tulips, sunflowers and many others. To make the simplest flower, you will need a square of colored paper with a side of 12-15 cm. Inside the square, starting from the center, draw a spiral with a pencil, which is wound onto a stick and fixed with glue. The result was something similar to a rose.
More complex flowers are formed from several strips rolled into rolls using stencils with circles. A small fringe should be cut along one edge of the strips. For the center of the flower, take a pink, red or yellow strip measuring one by 30 cm, for a bud - a light green one, one by 10 cm. First, twist the middle tightly, fix it with a drop of glue, then attach a strip on top to form the bud. The fringe should be carefully fluffed out.
Making snowflakes
New Year's snowflakes are performed in stages as follows:
- seven “loose” rolls are rolled, the ends of which are secured. One will become the core, the rest will become the “rays” of the snowflake. The rays must first be manually shaped into droplets;
- Then six more rolls are made, which are flattened in the form of an eye. They are glued between the parts of the previous row;
- then make six heart-shaped spirals, which are glued with a notch onto the “rays” of the previous row;
- A thin thread is threaded into the finished product - it can be hung on a Christmas tree.
Quilling for children - ladybug
The ladybug is made from strips of red and black paper - for the shell you will need nine red stripes one cm wide, other details - a black oval for the muzzle, four to five circles for the spots on the back, six legs in the shape of corners, two antennae, a red arc mouth, two white circles with dots in the middle - for the eyes.
First, a symmetrical snowflake is glued together from red stripes, and a black circle is glued into the center of it. Afterwards, the opposite edges of the strips are assembled so as to form a ball, the bottom of which is pressed down, forming a plane. From a black oval, glued to the lower part with a protrusion on one side, you get an abdomen and muzzle. Afterwards the remaining spots, antennae, and eyes are attached.
Using a similar scheme, you can make figures of a spider, ant, and bee.
Making a butterfly
To make a butterfly you will need:
- strips of paper in yellow and black colors;
- cork board;
- sharp scissors;
- curly templates;
- screw rod;
- PVA glue;
- six safety pins;
- diagram with a drawn outline of the product;
- acrylic lacquer.
Progress:
- take four yellow strips, one by five cm, six – one by 10 cm in size;
- the strips are twisted into a spiral, adjusted to certain sizes, after which a bend is created on one side;
- the finished parts are laid out in accordance with the diagram, glued together - large ones in the middle, small ones - closer to the edges;
- the contours of the wings are decorated with black frames in two layers;
- the body of a butterfly will emerge from a short strip bent in half - the wings are glued to it in the middle, the upper part is formed with twisted antennae. To prevent the butterfly from falling apart, the parts are glued together and secured with pins to the mat;
- at the final stage, for strength, the structure is coated with transparent varnish.
To make the butterfly more beautiful, use a larger number of multi-colored stripes.
Improve your skill
After mastering simple flowers, you can try to make more complex lilies. In nature there are many species of this flower and their colors are different.
To create a lily, in addition to the standard quilling kit, you will also need a gel pen to apply dots, like a living flower.
You need to make three large petals. The photo shows its diagram, and the numbers indicate the diameter of the free rolls, which need to be bent as in the diagram.
Related article: Bouquet of soft toys: photo of the product step by step in a master class with video
Glue the elements together.
Wrap a common border around the elements several times.
You need to make three such petals.
Next, as shown in the diagram, smaller petals are made.
They are made according to the same principle as the previous petals. You also need to make three of them.
Next, the finished petals need to be painted with gel pens, imitating the color of a real lily.
Make a tight roll and shape it into a funnel. Glue the smaller petals to the center at the same distance from each other.
Glue larger petals in a checkerboard pattern higher in the tier. The middle should be empty so that the stamens can be glued to the center.
For the stamens, you need to form small moon-shaped elements from burgundy rolls. Then cut a strip of paper lengthwise into three strips, measure the length of the stamens, glue some edges together, and fold the other edges. Glue burgundy moons to these folded edges. The stamens are ready.
Glue the stamens into the center of the flower.
Now you need to make a pestle. Three small light green dense rolls are glued onto the strip.
Glue in the pestle. Lily is done.
So, gradually complicating the task, you can learn how to make incredible flowers.
Orchids on a branch look great. These very unusual flowers are distinguished by their unique shape and color. Their petals are made either like those of a lily, or from concave dense rolls. Orchids are suitable for both paintings and panels. A tabletop arrangement in a quilling flower pot will also look great.
Quilling ideas
Using the quilling technique, three-dimensional cards, vases, gift wrapping, toys, individual flowers, bouquets and much more are made. These can be hearts decorated with ribbons for a declaration of love, framing photographs from snow-white curls for a wedding, Christmas wreaths on the wall, colorful panels with a nature theme, jewelry in the form of animals, birds, interior design for a children's room.
Interior quilling decor is selected for a specific design. For baroque it would be appropriate to abundantly decorate mirrors and picture frames with voluminous flowers, birds; oriental style would be suitable for cherry blossoms made of paper, located on an empty plain wall. The country style will be decorated with many small flowers, fragments with rustic motifs - fences, roosters, sunflowers. Sharp broken shapes and stylized bricks are suitable for a loft.
Paper products should not be used in damp rooms - even if coated with varnish, they will quickly deform and become unusable.
Decorative wall panel using quilling technique
To make a colorful quilling panel, take an A3 landscape sheet, on which a simple schematic still life with a jug and draperies in the background is drawn in gouache or watercolor. It is important that the entire surface is covered with paint and that there are no gaps at all. Next, curls are formed from colored paper strips, and from them all kinds of flowers on intricate stems are formed. When the product is ready, it is placed in a cardboard or wooden frame.
Postcard design
On cards intended for birthdays and memorable dates, floral motifs are most often placed; hearts are suitable for Valentine's Day; snowmen and snowflakes are suitable for Christmas and New Year. If the card is intended for a woman, it is made in soft pink, red, yellow-orange tones; for a gift to a man, blue, gray, protective green, and light brown are suitable.
We create unusual jewelry
To make earrings, you will need two special metal earrings that will cling to your ears, and two flat rhinestones-pearls. To make a pentagonal design, ten rolls are twisted for each earring, which are flattened in the form of eyes and glued in pairs. Each pair is framed with a separate contrasting strip, all five parts are assembled into a “star”, framed with a common frame, a pearl is glued to the center, and a metal blank is attached to the top. Approximately the same design, only larger, is used as a neck pendant or keychain.
The necklace is made of simple circles, fastened together with small metal links. It will be more original if you take yellow and orange paper, twist the yellow into rolls, flatten them in the form of orange slices, edge the parts a little with orange paper, fasten them with iron brackets, and attach a special fastener.
New Year's decorations for the Christmas tree
New Year's decor can be done by the whole family. Several white rolls will make a fantasy tree, which is placed in a two-layer circle; the Christmas tree is made from green rolls flattened in the form of droplets, glued on all sides to a paper tube. From five red eyes, decorated with a dense edging, a star will come out, and from three simple but dense spirals of different sizes - a snowman.
Finished products for the Christmas tree are varnished with glitter, made of silver paper, hung with thread, and decorated with rhinestones and sequins.
Easter decor
One of the main symbols of Easter is the egg. To complete this you will need an empty chicken shell or a Kinder Surprise package. Next, many small rolls are rolled up, which tightly cover the surface of the egg. On one side there is a voluminous flower made of stripes with fringe. For an Easter panel, the outline of a chicken and several eggs is drawn on a sheet of cardboard, then the figures are filled with rolls adjusted to the shape. The chicken has legs made of a spiral bent in the form of a three-fingered paw, an acute-angled wing, a forked beak, and a flat puppet eye. At the bottom of the picture there are curlicues in the form of green grass or yellow-beige hay.
Stylish design of candlesticks
To make an original water lily candlestick, a metal base is taken that will protect the paper from burning when the candle is lit. Next, large spirals with a contrasting edging are twisted, a total of 20-30 of them are made, depending on the size of the structure, a droplet is formed from each. After that, exactly half of the drop rolls are taken, the wide side is glued to the bottom of the candlestick - flush with its bottom. The second layer of rolls is attached a little higher, but at an angle of about 70 degrees relative to the bottom row. The finished product is decorated with pearls and transparent beads symbolizing droplets of water.
To make the water lily more realistic, several leaves of a believable shape are cut out of green paper.
We design photo frames, clocks, mirrors
The original photo frame is made on a rectangular, oval, round, or other suitable cardboard base, which is pre-painted. Then the space is filled with round rolls of various sizes, chaotically located spirals, triangles, eyes, droplets.
It is preferable to design the watch symmetrically; for this purpose, the base is cut out, five to nine cm larger than the watch on each side. The space is filled with rolls in the shape of hearts, crescents, and pre-made flowers. On the surface of a large mirror, usually in one or two of its corners, quilling flowers, butterflies, and curls are also glued - a product designed in this way resembles a window with frosty patterns.
Seasons
Wonderful bright paintings are made on an autumn theme. Autumn is characterized by bright, warm colors. Landscapes, bouquets of yellow, orange leaves and red berries of viburnum and rowan - all this looks incredibly colorful, as can be seen in the photo below.
In order to create such enchanting canvases, you need to learn how to make beautiful carved maple leaves.
Related article: Original short pullover knitted
Winter in quilling paintings looks no less attractive. Frosty patterns, snowflakes, snow-covered nature look simply fabulous. Paper ribbons seem to be created for making winter lace and decorating frames with monograms.
The New Year occupies a special place in the winter theme. A festive painting will be a wonderful gift and will complement the New Year's decor of the premises. Beautiful cards with beautiful openwork Christmas trees, Santa Claus, Christmas tree balls will delight you with beauty and create a festive mood.
It will not be difficult to complete these paintings, since most of the elements for creating them are the same as for making flowers. To make beautiful patterns, you can first draw them with a pencil or print out the finished pattern. Then carefully glue the side of the paper tapes to the outline of the drawn pattern.
Other crafts made from twisted strips
The napkin stand is made of two vertical walls and a bottom. For the sides, two flowers are made from flattened rolls, with several leaves on both sides. Contrasting edging in two layers is necessary for the structure to be durable. The bottom is assembled from about ten large rolls with edging and glued between the walls. The finished product is varnished. If a napkin holder is made for a children's room, its sides are made in the form of nesting dolls - each consists of two large rolls with eyes and handles, around there will be curls or smaller nesting dolls.
The easiest way to make a vase is to use a base around which the product will be formed. First, a sufficient number of elements of various shapes are formed, after which they are glued to each other, framing the base. Green paper will make a leaf vase, and brown rolls will make a stump-shaped vase. More complex products are made from many voluminous corrugated parts, assembled like a puzzle.
The box consists of a box in which you can put something and a lid, which is made a little larger so that the product can be closed freely. The bottom is made from simple round spirals, and the walls are made from any figured ones. The lid is first made simple, and the top is decorated, for example, in the form of a cake - green kiwi slices, orange tangerines, red raspberries, purple grapes.
Using the quilling technique, it is easy to decorate ready-made boxes for various small items - both match boxes and shoe boxes, glass, plastic shaped bottles, and tin cans.
We create paintings from quilling
Applied arts such as quilling are now gaining momentum in popularity due to their colorfulness and fun. It is suitable for both adults and children, provided they are assisted by adults. Using the quilling technique, paintings of various themes can be created.
This could be a painting whose style reflects the themes:
- Nature;
- Season of the year;
- Animals, etc.
First, let's look at what quilling is: it is one of the types of handicrafts, which involves creating pictures from thin strips of paper by twisting and giving paper circles different shapes.
You can make quilling paintings of any size
Many people call quilling paper filigree, because such paintings look no less beautiful than classic filigree in jewelry.
This art is quite old. The first mentions of it range from the 14th to the 15th centuries, and it was widespread in monastic circles at various monasteries. The monks created ornate paper decorations. All this was explained by the fact that ordinary people could not afford such expensive material at that time as paper, which is now available to almost everyone.
Paintings in the quilling style are popular due to their delicate beauty, which is more reminiscent of the finest lace, but has a pleasant volume than the usual classic lace made of threads. There are a wide variety of training videos. Any such video master class will help people who are starting to master quilling to become familiar with all the basic techniques, any subtleties of this manual labor, and also, famous quilling masters often share their secrets, which will help in subsequent independent work with paper strips.