Quilling. The flower is simple.
Let's start with the simplest flower.
1.
Prepare a square sheet of colored paper. Its dimensions should be approximately 10x10cm.
2.
Draw a spiral inside the square.
3.
Using scissors, cut a spiral along the drawn line.
4.
Using a special quilling tool (which can be replaced with an awl, needle or toothpick), twist the paper into a spiral.
You should end up with a rose like this. By making several of these flowers, you can come up with a beautiful composition.
Rose using quilling technique (video 1)
Rose using quilling technique (video 2)
Quilling for beginners - what you need to prepare
For those who have never engaged in such creativity, it is better to start with simple crafts. It can be:
- postcards;
- snowflakes;
- flowers;
- panel;
- Pictures.
They will tell you how to make a craft using the quilling technique for beginners. Below are the main figures that are used to create real works of fine art. First you need to prepare everything you need for this type of creativity.
If you have the opportunity to buy a quilling kit, buy it. The basic kit includes:
- strips of colored paper;
- a template with a coordinate grid, radii, and guides applied to it;
- a device with a forked metal tip, with which paper tapes are twisted;
- glue;
- small scissors;
- tweezers.
Larger quilling kits are also available for sale.
There is a ruler with round holes for making twisting elements of the required size; pins for rough fastening of parts. Ready-made kits are also sold, which contain a diagram, blanks for making flowers, a butterfly, a picture, and so on. If you can't buy a ready-made kit, that shouldn't stop those who want to create. The following can be turned into quilling tools for twisting ribbon:
- nail scissors with straight ends;
- awl;
- kernel;
- gypsy needle;
- toothpick
Cut off the sharp part of the toothpick, and bifurcate the resulting top using a stationery knife. You will place the edge of the paper tape into this hole and twist it.
When using nail scissors, paper strips are placed between the two blades. Next, the tape is wrapped around this tool and a spiral of the desired size is obtained.
When using an awl and a gypsy needle, the edge of the strip is placed on the metal part, held with two fingers of the free hand and twisted. They also work with a rod, but in this case the core of the workpiece may turn out to be larger than necessary, then any of the four tools listed above is used.
Strips of quilling paper can also be replaced. To do this, cut them out of white or colored double-sided paper.
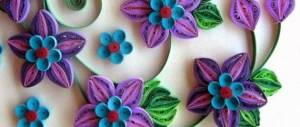
Quilling flowers. Schemes of delicate flowers.
To make such delicate flowers, you need to create several blanks.
1.
To make the middle, cut the fringe. This example uses 11 large flowers and 4 buds.
2.
To make the centers of a large flower, prepare a paper strip of peach color (1cm wide and 30cm long) and green (1cm wide and 10cm long).
* To make buds, the width of the paper strips should be left and the length should be halved.
3.
Start curling the fringed centers of the flowers. Glue a green stripe to the first peach stripe.
4.
Prepare 3 orange elements and make a leaf shape out of them. These blanks need to be glued at the base - use just a drop of PVA glue.
* Do not glue the petals together; they need to be fixed only at the bottom.
5.
Prepare 4 peach-colored paper blanks and make a “drop” shape out of them. Next you need to glue 2 “droplets” into the gaps that you will find between the orange “petals”. The remaining 2 “drops” need to be glued on top - you will need to step back from the edge of the base by about 5mm.
6.
Now you need to cover the top of the petal with an orange border (all elements have the same width - 3mm). In total there will be 5 of them for one flower. The same number for buds but smaller in size.
7.
To collect flowers, use a heat gun.
8.
Making leaves. Prepare 4 strips approximately 3mm wide and 30cm long. These strips need to be twisted into a tight roll, and then the roll is rolled between the thumb and forefinger so that it takes the shape of a cone.
You need to prepare 4 cones and grease each one with glue to glue the petals of the buds and centers into it.
9.
We collect a leaf. Prepare 5 blanks and give them the shape of “eyes”. Next, you need to glue all these blanks together, applying glue only at the base.
10.
Insert 4 more blanks between the leaves. On top you need to add 3 more elongated blanks. Squeeze the paper at the sides.
You can use several shades of green.
The more greenery you use, the more beautiful the composition will look.
Fringed flowers using quilling technique (master class)
For these colors you will need strips 10mm and 5mm wide, and no more than 25cm long.
1.
Start cutting the fringe. Its size is 2/3 of the width of a 10mm strip. It is worth noting that the thinner the fringe, the fluffier your flower will be.
You can cut fringe into several strips at the same time.
2.
Glue one strip of paper 10mm wide and one 5mm wide and start winding the spiral, starting with a narrow strip.
Continue twisting even when you reach the fringe strip. At the end, simply secure the tail with glue.
3.
After the glue has dried, the fringe can be folded back.
This is what you get if you only twist the fringed strip. Yellow flowers can act as dandelions, pink ones as daisies, and green centers as flowers.
You can safely change the length and color of the fringed strips by gluing them together in advance.
Volumetric flower using quilling technique
First you need to choose the color of your product. If you want a two-color flower, you can choose two similar shades.
For one petal, choose a strip 65cm long. You need to prepare 22 of these strips by gluing several small strips into one long one.
1.
Roll all the prepared strips into tight rolls.
2.
Unroll each roll to a diameter of 2cm.
3.
Next, alternately make a quilling element from the circle such as a rhombus. To make a diamond out of a circle, you need to flatten the element on 2 opposite sides and then stretch it out.
From the resulting elements you can create many beautiful, yet not very complicated flowers.
You can complicate the task by slightly improving each diamond using a knitting needle, awl, toothpick or a special quilling tool. Just twist the corner of each element a little.
4.
Cooking the middle. To do this, you need to tightly twist a strip 10.5 cm long. If you want to make the middle two-color, glue two strips of different colors together.
5.
Prepare a wider paper strip. You can also make it two-color by gluing two strips together.
6.
Make several small cuts on the new strip.
7.
Now you need to wrap a wide strip around the middle and glue it.
8.
Making the base of the flower.
The base will be in the shape of a cone. Go here to learn how to make a cone
.
Here are simple instructions for the base: cut out a circle with a diameter of approximately 3cm. Draw a radius with a pencil and cut along the radius line. You can now make a cone from the circle - use glue to attach it.
9.
Glue 2 rows of petals into the cone along with the center.
10.
You can make 10 leaves using the same instructions as the petals and glue them to the back of the cone.
Quilling schemes
A detailed description of the manufacture of various elements of this needlework will help you create real masterpieces over time.
The main elements of quilling are:
- tight and loose spiral;
- curl;
- drop and curved drop;
- semicircle;
- eye;
- arrow;
- sheet;
- heart;
- triangle;
- crescent;
- square;
- paw;
- horns.
Almost all work begins with the manufacture of a “tight spiral”. Take a strip of quilling paper. If there is no such material, then place a horizontal sheet of A4 paper in front of you, move the scissors from bottom to top, cut a strip equal in width to 3–5 mm. Secure its tip between the blades of nail scissors, in the slot of a toothpick or a special quilling tool.
You need to hold the paper tape with your left hand and the tool with your right. If you have a double-sided strip, then its wrong side should face the direction of the rod. Rotate the tool clockwise, and with the fingers of your left hand, hold the spiral that is beginning to form from above and below so that the curls are even and at the same level.
When the tape runs out, drop a little glue onto its free end and attach it to the spiral so that it does not unwind and the workpiece looks neat. So you have made one of the main quilling figures. Many others are based precisely on this element. Those who are better with their left hand need to carry out this process in a mirror image.
The next element is called a “free spiral”; make it from the figure you just obtained. To do this, remove the spiral from the needle and let it unwind a little. You can do it differently - do not let go of the fingers of your left hand, but rotate them a little in the center of this quilling element, and the spiral will weaken.
To make a “curl”, you do not need to glue the free end of the twisted tape to the spiral. To make a “drop,” you need to squeeze the “free spiral” on one side with your fingers for a few seconds. A “curved drop” will be created if you bend the corner of the “drop”.
The element called “eye” is also easy to make. To do this, the “free spiral” needs to be slightly pulled to the sides and clamped on two opposite sides, then released. The “leaf” shape will be obtained if you bend the corners of the “eye”, one to the right, the other to the left. To make a “semicircle”, take a loose spiral, press it so that the top side becomes rounded and the bottom is flat.
Visually shows how elements are made using the quilling photo technique. Looking at it, you will understand how to create an “arrow”. To do this, press your fingers on 3 sides of the spiral to form a triangle, now press its two corners together, leave the third as it was.
To make a greeting card using the quilling technique, you can decorate it with an element called “horns”. To do this, you need to take a long piece of paper, bend it in half, twist the right side in a spiral clockwise, and the left side counterclockwise.
The “heart” shape is made in the same way, only the right half of the ribbon is wound counterclockwise, and the left half clockwise. The junction of these two elements must be pressed with your fingers to form the corner of the heart.
The “crescent” is made from an “eye”, its 2 opposite corners are bent in the shape of the letter “C”. A “triangle” will be obtained when the “free spiral” is compressed in three places, but to make a “square” this must be done from 4 sides.
For the “foot” you need to make a “triangle” shape, and then bend its two opposite sides with your finger towards the center.
Quilling paper flowers. Carnations.
1.
Make vertical cuts on a wide strip of red color.
2.
Wrap the toothpick in green paper and secure with glue.
3.
Glue the beginning of the strip to the stem and begin to wind it. At the end, secure it with glue.
4.
After you have completely wound the paper tape, begin to straighten the flower.
5.
Make petals from strips of green paper and glue them to the stems.
If you make not vertical, but diagonal cuts on the strip. You will get this version of the flower.
Schemes with a medium level of complexity
These are stencils and templates with thinner outlines and smaller details. A good option for those who have already got their hands on it.
Here you can clearly follow the lines, or come up with your own version and fill the outline with other modules.
Matryoshka, in terms of complexity, is slightly higher than other works.
The heart is a drawing from a coloring book, but you can show your imagination.
This is a snowflake stencil, which can be used to create not only an applique, but also a three-dimensional figure.
Owls in the heart. The stencil is suitable for decorating a postcard for Valentine's Day.
More mid-level schemes can be found here .
DIY quilling flowers. Asters.
Prepare double-sided colored paper, scissors, rhinestones, quilling tools, and glue.
1.
Prepare a strip of paper 30 cm long and 2.5 - 4 cm wide and fold it in half lengthwise.
2.
Make several small cuts on the strip.
3.
Using a quilling tool (as already mentioned, it can be replaced with a toothpick, awl, needle, etc.) twist the strip.
4.
After you have rolled the roll, carefully begin to unscrew the fringe from the outside.
You should end up with a flower like this.
For different flower sizes, vary the strip sizes.
Quilling Basics for Beginners
The production of paper products begins with a drawing. In this type of art, a drawing is a diagram according to which in the future an unusual craft will be made, which can bring a bit of brightness and unforgettableness to your interior. First, let's look at how simple diagrams are drawn and which magical crafts come out of them using the example of making a snowflake.
A wonderful DIY gift
We will need:
- Pencil.
- Colored paper.
- Scissors.
Now take A4 paper and fold the sheet so that you get a right triangle. Cut off the unnecessary excess part and fold it three times. Then we draw patterns on it and cut them out.
When we have mastered the initial and simple technique of making crafts, which we discussed above, we move on to more complex ones. Let's learn how to make rolls. It is the main element in the quilling technique.
A mouth-watering work of art
We will need:
- Colored paper.
- Pencil.
- PVA glue.
- Scissors.
Rod for creating rolls
At the very beginning, you need to outline the future composition with a pencil on the blank for the greeting card or the place where this product will be located upon completion. The next thing we need is to make a roll. To do this, we need to take a thin and long strip of paper and wind it onto a specially prepared rod.
After this is done, we must let the roll unravel. The end of the roll must be carefully glued to the resulting spiral. Now you can give the roll any shape, be it a drop, a heart or a month.
Will decorate any home
Tip To avoid getting smeared with glue, you need to apply it to the parts of the product quite a bit. This can be done using a toothpick.
Special paper for quilling is sold. It's better to use it.
And now we come to the main elements of quilling.
How to make flowers using the quilling technique. Dandelions.
Prepare strips of yellow thick paper in two shades (for flowers), green paper strips (for leaves), crumpled paper (for stems and buds), scissors, tweezers, glue.
The width of each strip should be 3.5 cm. Two strips as long as an A4 sheet are enough for one flower.
1.
Prepare 3 strips to cut into petals. Fold each strip in half lengthwise and fold it towards each other as shown in the picture. Next you need to cut the petals to about 0.5mm in size.
2.
Using a quilling tool, twist one yellow strip and secure the tip with glue. Next, wrap two orange strips on top of the yellow strip, having previously glued them into one long strip.
* You can fix the flower from below with glue.
* Gently straighten the petals.
3.
Making leaves.
Prepare a small green rectangle of paper. Fold it in half and cut out a leaf shape.
4.
Squeeze the leaf into an accordion to make it more realistic.
5.
Making a bud.
Prepare 1/3 of a paper strip and cut the petals. Roll the strip into a roll and secure with glue.
Cut a strip 1.5 - 2 cm wide from crumpled paper. Glue its edge, place a bud on it and wrap the paper. Just twist the rest of the stem.
6.
If you want to make a beautiful composition of flowers and buds, prepare a base of thick paper or cardboard.
Glue all the elements to the base. The first thing you need to glue is the flowers, and then the rest, smaller details.
How to make flowers using the quilling technique. Roses.
As always, you will need quilling paper, a ruler, glue, as well as wax paper and pins.
1.
Make a “droplet” shape from a pre-prepared element. This will be your bud.
2.
Glue 5 petals together to make a flower.
3.
Now make another similar flower for the second layer of paper rose, but make the petals smaller. To achieve this, simply do not unwind the workpiece too much.
4.
Prepare a strip of yellow or green paper and fold it like an accordion as shown in the picture. You will get stems.
5.
Glue the stems to the paper.
6.
Fold a small strip of paper in half and, using a quilling tool, twist the right end to the right and the left end to the left.
7. All that remains is to fold everything on paper and glue it into one bouquet.
Complex shapes in quilling
The complex element “horns” is created from two “free spirals” twisted in different directions.
For this, take a long strip of paper and break it in half. The right part is screwed in one direction, the left - in the opposite direction. This element can be attached to a fun greeting card.
Underwater theme - will decorate a house near the sea
The next shape will be a “heart”.
It is done in exactly the same way as the “horns”. Only the directions in which the spirals are wound change. And the connection point is clamped with your fingers. This type of product is ideal for decorating a gift for your beloved girlfriend or wife.
The next most difficult one would be the “crescent moon”.
It is made from a simple “eye” shape, only the opposite corners are bent upward. It turns out something similar to the letter “C”. For the shape that in psychology denotes a leader, namely for a triangle, a “free spiral” is taken. Then it is compressed into three parts with your fingers and held for a while.
The next element is obtained from the triangle shape.
To do this, you need to bend two opposite sides into the center. And we will get “paws”. To make a “square” shape, I take a “free spiral”. Then I squeeze it into four parts to make a square.
Suitable for decorating a nursery
So we got acquainted with the main forms of quilling products. And now we know what tools we need for this type of creativity. And we have some basis that will allow us to move on to creating more complex products.
Quilling flowers
Such flowers will serve as a kind of transition from simple to complex for a beginning quilling master. In fact, this is not yet the most complex product, but it contains many simple elements that complicate the manufacture of the product. Thus, the novice creator receives invaluable experience and beauty in his home, made with his own hands.
To create such flowers you need to make a “drop” from a “free spiral”. And so that the flower petals have different colors, you will need colored paper.
As you can see, the core of the flower is created from a “free spiral”. Next, the core of the flower is the first to be glued to the card or the surface that you plan to decorate. Around this figure I glue the “drops” that I have already made in advance.
“Drops” are a kind of petals. They can be made in one color, or in different colors.
The more different colors in a product, the more beautiful and brighter it will look. The main thing is not to overdo it with color.
You can also decorate the card with a “heart” or “eye” shape. It will be a very nice gift for the eighth of March for your loved one.
So we learned how to make more complex products. Now let's go back to the snowflakes again. Only this time I'll make it harder.
Quilling - snowflake
Here we are again back to the topic of making snowflakes. This time we will make a quilling snowflake. It differs from a simple one in a more complex shape and patterns. Depending on your taste and color, such snowflakes can be either multi-colored, white, or mixed with a blue tint.
To make these New Year's snowflakes we will need:
- Quilling paper.
- Pins.
- Stencil.
- Glue.
- Kernel.
Christmas decoration
At the very beginning, you need to draw a template according to which they will be made. It is necessary to divide the strips of paper in half. There should be three of them. Then I twist the first spiral. Then I insert it into the hole of the stencil. It is necessary to make the remaining spirals the same size. So I find out that the hole is one centimeter, which means the other four spirals will be the same size.
In order not to damage the workpiece, I carefully pull it out with a toothpick, and then let it unwind a little. And only after that I glue the tip to the spiral. Then I place these blanks in the center of the pre-drawn layout.
For beginners, it is advisable to use pins to attach the spirals to the layout. And then they can be glued together.
The next model I make is the “eye”. Then I place several “eyes” around one spiral. And then I glue it together. Then I make a tight spiral. I described the principle of its creation above, so I will not repeat it. And I glue it to the tops of the snowflakes. This will be the final element. You can see the result in the picture above.
Tip For beginners, it can be difficult to make “loose spiral” patterns that won’t unwind. Therefore, it is necessary to move the center of the spiral to the edge and press it. You can even apply a little glue.
When the snowflake is ready, you can hang it on the Christmas tree or attach it to the window. Such products will always give you warmth and joy. And making such things with your own hands will give you confidence in your abilities and a feeling of increased strength and mood.
A more complex version of the snowflake
Now we have learned how to make complex snowflakes. The next stage will be the production of decorative jewelry in the form of lovely ladies' earrings. They are ideal for a birthday gift for your girlfriend.
Making women's earrings
To create this kind of jewelry, which is very beloved by our women, we will need:
- Colored paper. I will have blue and white colors.
- Scissors.
- Quilling rod.
- Quilling board.
- PVA glue.
- Pencil.
At the very beginning, in order for such jewelry to turn out symmetrical, I will have to imagine what the earrings will look like and draw a diagram on paper. This diagram will serve as a template for gluing the various parts together.
Please your loved one
Step-by-step instruction
- I cut six strips of blue paper, one centimeter wide, and glue them together.
- I made three strips of white paper and glued them to the end of the resulting ribbon of blue stripes. And I add three strips of blue paper glued together. I do this twice to make two long strips.
- Then, I use a rod to turn them into a tight spiral shape. We discussed the creation of this form at the very beginning.
- I make the same strips again, only I cut the strips by two. That is, instead of six strips, I cut out four from blue paper, I also leave three from white paper and glue them together, adding two strips and blue paper at the end.
- I also use the rod to turn this ribbon into a "tight spiral". Only now it turned out to be smaller than the first one. And I create another similar spiral.
A nice gift for Valentine's Day
Take your time, this technique does not like to be rushed.
Step-by-step instruction
- And the third time I do the same with the paper as the first two times, only I reduce the number of strips of the first blue ribbons to two.
- Again, I turn the created ribbon into a “tight spiral”. Just like the first time, I will need two such spirals. You probably already guessed why I needed paired quilling forms. Of course, there should be two ladies’ earrings! Now I lay out the prepared forms on the previously created template and glue them together.
- Lastly, I cut out a few more strips of blue paper, glue them together and roll them with a dowel. But now I turn the shape not into a “tight spiral”, but into a “loose spiral” and pinch it along the edges with my fingers and slightly stretch it to form an “eye” shape.
- I make four of these types of figures. Two for each earring and glued according to the template.
- The final step is to thread the clasp ring through the eye-shaped holes. The picture below shows how excellent my beauty turned out.
Any woman will like it
So we learned how to create complex and beautiful ladies' jewelry. Let's now try to make an unusual quilling flower.
Making an unusual flower
Now we come to more serious things. I will tell you and show you how to make a volumetric quilling flower. To do this, you need to purchase or get tools already prepared in advance, namely:
- White paper A4.
- Scissors: regular and curly.
- Yellow ink and red paint.
- Sponge, knife, pencil.
- Glue, pipette, quilling rod.
Flower of hearts
Step-by-step instruction
- I take a sheet of white paper and divide it into strips three centimeters wide. Then I cut them and glue the strips one by one along the length. The result is one long ribbon.
- Now we need to paint it. Using a pipette, apply paint to the sponge. Apply yellow ink to one half of the sponge and red paint to the other half.
- Then, using a sponge, we paint our prepared long ribbon of white paper. And after the paint has dried on the paper tape, use curly scissors to cut out the pattern. What should happen can be seen in the picture.
- Now let's move on to creating the petals for our flower. They need to be cut so that both the petals and the corners sticking out between them. In this case, you need to leave four millimeters at the edge uncut so that the tape does not tear. As shown in the picture below.
- Then I make the core for the flower. To do this, I twist a strip of quilling paper into a tight spiral. The diameter of the roll should match the diameter of the pencil.
If the diameter is smaller, then you can easily add another tape.
A more complex, voluminous craft
Apply glue only to the uncut edge!
Step-by-step instruction
- The next step in creating a flower is to apply glue to the painted tape on the paint application side.
- Then I glue the flower petals to the core, as shown in the picture.
- After the flower is twisted, you need to glue its bottom with PVA glue to make sure that it will not come apart in the future.
- Now I remove the flower from the stem and straighten its edges with my fingers. In the end, it turned out to be such a miracle.
- Of course, at your discretion - you can straighten the edges or not. I straightened them out in order to insert the “pistle” there, thereby making the flower more like a real one.
- I cut off part of the sharpened pencil, coat the cut part with glue and insert it into the center of the flower. This is what we can do!
Bright composition
Any of these products can decorate cards for the first school day of the year and delight a child with its beauty and unusualness.
Previously, we looked at quilling techniques for adults. But you can also involve children in this needlework. Thus, they will develop breadth and originality of thinking.
Flowers in quilling style. Bouquet on the wall.
Such a bouquet can become a decoration for both a postcard and a room. It can be glued to the wall, and it will decorate the interior, or glued to a postcard made by yourself. You can choose colors to suit your taste.
First you need to prepare 2 sheets of pink paper, 2 sheets of purple, a toothpick (quilling tool), scissors, PVA glue and beads (for decoration).
1.
Prepare paper strips 0.3 cm thick and roll it into rolls.
2.
Making the first flower.
- Glue one pink and two purple strips and roll them into a roll.
— Unravel the spiral so that its diameter is approximately 1.5 cm (in principle, you can choose the size yourself).
- Make an eye shape by squeezing the roll on both sides. This will be the petal of your flower.
— We need to make 5 more of these petals.
— For the center of the flower, twist a pink strip into a tight roll.
- Glue six finished petals to the middle. You can glue a bead on top of the middle.
*You can make a few more of these flowers for the composition.
3.
Making the second flower.
— Depending on the chosen color, glue two strips and roll them into a roll. You only need to make 6 of these rolls.
* You can prepare 4 rolls of one color and 2 of another for one flower (in this example, 4 purple and 2 pink).
* The diameter of the roll is slightly smaller than the diameter of the rolls used in the first flower.
- Give the roll a heart shape.
— For the middle, roll up a tight roll and glue the petals to it.
*Make several flowers of different sizes. To further use them in the composition.
*You can vary the number of petals. For example, one small flower may have 3 petals.
* You can decorate some centers with beads.
4.
Hanging leaves.
Making such leaves is very simple - prepare several rolls and make a teardrop shape out of them. Then just glue all the “droplets” to one strip.
5.
The entire composition can be glued to a plastic lid or to the cut bottom of a plastic glass. Then you can hang the composition on the wall, for example.
Quilling for children
According to psychologists and children's pediatricians, modern children now have poorly developed motor skills of their hands and fingers. It is difficult for them to hold a pen or pencil in their hand correctly and firmly enough.
Therefore, it is difficult for them to learn standard skills and simple self-service in life. Quilling for children promotes the development of this type of motor skills. At the same time, it raises the level of logical thinking.
Easy for a child to do
The development of fine motor skills helps to increase attention and memory in a child. He will absolutely need all this in his future life, and the quilling technique can help a lot with this.
It also helps to cultivate perseverance, accuracy, and aesthetic taste in a child. Of course, you need to start with simple things.
Master class for children - ladybug
To create a ladybug we will need the following materials:
- Sheet of cardboard.
- Colored paper.
- Screw rod.
- PVA glue.
- Scissors.
Ladybug
Step-by-step instruction
- At the very beginning, I cut out the body of a ladybug from cardboard - a semicircular oval. Then, from a sheet of red colored paper, I make an oval in the shape of the body and cut off the lower part as shown in the figure.
- Now I prepare the bottom part from a light yellow sheet and glue it onto the cardboard. Then I take and cut out a long black strip and glue it down the center of the cardboard.
- When the body oval for the “ladybug” is ready, you can begin “paper rolling”. Black dots on the ladybug’s body will consist of “loose spirals”. Then I glue these created shapes to the cardboard.
This simple craft can be done by a six-year-old child. After making simple forms, you can move on to more complex ones.
Butterfly
To create a butterfly we will need the following materials:
- Colored paper.
- Sewing needles.
- Scissors.
- PVA glue.
- Quilling board.
Now let's start creating.
The shades of paper colors should be combined.
Step-by-step instruction
- Let's make wings for the butterfly. To do this, I will cut three strips of long ribbons of paper, but not the same in size. And of course I will make them from sheets of different colors.
- Then I glue the strips together. And since I cut them in different lengths, I start with the short one and end with the long one.
Create your own decoration
Step-by-step instruction
- Then I carefully roll them up. It is necessary that the shortest strip remains inside. And I glue the remaining free tip from the outside.
- I insert the resulting spirals into the holes of the quilling board, where they unwind freely and take the desired shape.
- Then I press the center of the spiral to one side and glue all the strips to that same side. I create the body from two spirals. I turn one spiral into an “eye” shape and leave the other in a “free spiral” shape. The “eye” will serve as the body, and the “free spiral” will serve as the head of the butterfly.
- Now I glue one end of the “eye” shape to the “free spiral” shape, and then glue the wings, the creation of which we discussed a little higher, to the resulting body.
It can decorate the interior of a living room or a children's room.
Now, to make her truly indistinguishable from the real one, I need to attach a mustache to her.
To do this, I take two strips of paper and create a “swirl” shape with them. And I glue butterflies to my head. This is such a beautiful butterfly we got.