The kitchen renovation is in full swing: the ceiling is ready, the window has been replaced, and the floor has been done. It's time to start decorating the walls. They can be finished in different ways: covered with modern wallpaper, tiled, plastered with a special compound, or simply painted. In recent years, painting walls in the kitchen has become incredibly popular, as they say, simple, cheap and beautiful. However, it must be borne in mind that kitchen walls are a place that gets dirty easily and quickly, because the process of cooking is never complete without flying splashes of fat, the release of soot and steam formation. Consequently, they need to be coated with special paints, which could later be easily cleaned of unwanted dirt deposits, and this should be done without compromising the aesthetic appearance of the surface. Let's figure out what distinguishes the process of painting kitchen walls from similar work in other rooms.
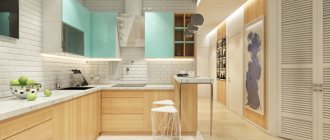
The accent wall in the kitchen is painted turquoise.
The main difference lies, of course, in the choice of coloring composition, which has special requirements. Paint for such work must have increased durability, because it will have to be in unstable temperature and microclimatic conditions, be exposed to steam and condensation, be subjected to frequent washing, and sometimes even harsh cleaning. The cost of such high-strength paint will, for obvious reasons, be higher than that of “residential” compositions, but this is not a reason to abandon your idea of kitchen decor.
Painting walls in the kitchen and its benefits
beige walls in the kitchen interior
The paint is great for the design of modern kitchen interiors. With its help, a magnificent, uniform and smooth surface is created, which acquires a beautiful gradation in the light rays. The main advantages of kitchen paints are:
- Water resistance. This is the main parameter for compositions planned for use in harsh kitchen conditions.
- Possibility of tinting.
- Environmentally friendly.
- Easy to apply.
- No irritating odor.
- Fire safety.
- Breathability. This condition also applies to mandatory indicators. Pathogenic microorganisms will never settle under layers of such paint.
- High-quality adhesion. The paint should adhere well to the surface, not crack or peel.
- Almost instant drying.
- Durability.
- Correct price compared to the cost of other finishing works and materials.
How to prepare a wall for painting
To make painting walls easy and the end result to please you with its appearance, you need to perform several mandatory operations.
First of all, you need to rid the walls of a layer of old paint or wallpaper, if any. They are pre-moistened with water, as already described above, and then removed.
If the old coating is made with water-based emulsion, which is in good condition, then it can be left. In this case, new paint is applied on top.
Old paint (oil or alkyd enamel) must be scraped off. This work is easier to do with a spatula and a hair dryer. Using a hot stream of air from a hair dryer, the old paint softens and swells. This then gives a good opportunity to remove it relatively easily with a spatula.
Related article: See how easy it is to divide a room into zones
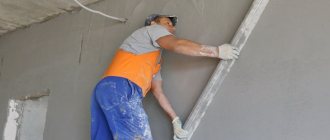
After such work, the wall surface needs to be given an almost perfectly smooth appearance. This will require putty. To remove relatively large defects, use a starting putty; for small irregularities and finishing work, use a finishing putty.
After the putty has dried, it can be treated with a fine-grained abrasive painting mesh. With its help you can achieve a perfectly smooth surface.
A small detail that will be useful for improving the quality of the repair: before applying putty, it is advisable to treat the wall surface with a deep penetration primer. The same primer, the brand of which will depend on the type of paint chosen, should be applied to putty walls. The primer improves adhesion to the surface to be painted and thereby extends the service life of the coating. After application, the primer must dry, then you can proceed directly to painting.
Types of paints for the kitchen
light olive wall color combined with purple furniture
Painting the walls in the kitchen can be done:
- Water-based paint.
- Acrylic paint.
- Alkyd paint.
- Water-dispersion mixture.
- Silicate paint.
- Latex paint.
- Silicone mixtures.
The most popular paints for kitchen decoration are latex and acrylic based. They impress with their excellent performance characteristics. They have significantly replaced oil paints, which also belong to the washable class, since the latter are toxic, fire hazardous and retain a pungent odor for a long time.
Acrylic paint
acrylic paints are odorless and dry quickly
“The composition completely devoid of any unpleasant odor, so everyone, even children, can take part painting the walls in the kitchen.
These compositions, due to the presence of resins of the same name in them, have a good level of elasticity. This paint is ideal for decorating wooden walls. It perfectly masks minor surface defects, so for finishing country houses, temporary buildings and summer kitchens it is better to purchase acrylic paint.
The composition is completely devoid of any unpleasant odor, so everyone, even children, can take part in painting the walls in the kitchen. The resulting coating can, if necessary, be cleaned with a damp cloth and even occasionally washed with a non-aggressive detergent. The acrylic surface will not lose its appearance even after several thousand wet cleaning cycles. The disadvantages of the material include its high cost.
Latex paint
latex paint is ideal for painting walls and work areas
This type of paint is significantly superior to acrylic mixtures in its wear resistance, so it is always chosen for decorating high-load areas. The list doesn't just include the kitchen and bathroom. This paint is used to decorate school corridors, stairwells, medical institutions, in general, anywhere where there is a need for regular cleaning with disinfection and the use of detergents of different classes.
This suggests that when painting the walls in the kitchen with latex paint, you can safely clean off dirt not only with a sponge or soft cloth, but also with a brush with soft bristles, because this coating is incredibly resistant to abrasion. Latex surfaces are “breathable”, so they are not afraid of the thickest kitchen steam. You won’t have to deal with such a problem as walls “blooming” with fungus. In terms of price category, latex compounds are higher than acrylic ones, which is understandable.
Alkyd paints
purple color in the kitchen helps reduce appetite, so it is preferable for people trying to lose weight
They are not particularly popular, but you can find them in kitchen interiors. They are chosen exclusively for:
- Wear resistance, which is higher than that of acrylic and latex compounds;
- Immunity to temperature changes;
- Indifference to humidity levels.
Such surfaces are difficult to damage. You will have to try hard to make a scratch on them. Alkyd compositions are always colorful. They are easy to apply to the surface. They are economical. Painting the walls in the kitchen
will take place with minimal consumption of material, because during drying there is practically no process of shrinkage of the layers
. Alkyd paint would be an ideal solution for the kitchen, if this “honey barrel” did not have one, but very bitter “fly in the ointment”. The fact is that the basis of this type of paint is a solvent, which means there is no need to talk about the environmental friendliness of the material, as well as fire safety.
Silicone paints
silicone paints are the best choice for finishing walls in the kitchen
But this is truly the best solution for the kitchen interior. Silicone compounds have all the best qualities of the materials mentioned above. Moreover, they can be applied to almost freshly plastered, that is, completely undried surfaces, which greatly speeds up repair work. And everything would be fine, but the sky-high price scares off the average buyer and this is the only reason why silicone paints have not yet become sales leaders.
All washable paints are divided according to their gloss level. Painting the walls in the kitchen with them will allow you to get matte, glossy and semi-matte surfaces. In this case, the choice is dictated solely by the preferences of the owners of the premises. Preferences are preferences, but you still can’t do without taking into account one nuance. If, when cleaning the kitchen, you are ready to diligently clean only certain areas of the wall surface, say, above the dining table or behind the stove, and not wash all the walls entirely, then it is better to forget about matte paint. With frequent treatment, the cleaning areas will be “polished” and will be noticeable with their smoothness and shine.
Features of kitchen paints
dark green wall color in the kitchen interior
In order for the finishing of global surfaces to retain its high quality and aesthetic appearance for as long as possible, you need to look for washable paint that will create the desired color background in the interior.
Painting the walls in the
kitchen will not complicate or delay the renovation process . The material will easily replace the usual wallpaper and will look even more luxurious. Painted walls will eliminate the need for frequent cosmetic repairs. Housewives with children growing up in their families will be especially pleased with this interior solution in surface design. Their craving for creativity, shown on the expanses of the kitchen walls, will not cause visible damage to the environment: what is drawn can be washed, what is scratched can be painted over. Please note that you don’t have to “straighten” the entire wall, as is the case when replacing wallpaper. The main thing is to keep the label with the number and name of the paint used, and even better, leave some of the composition for such an “emergency” case.
Correctly applied paint will have a smooth and abrasion-resistant surface.
Washable paints can be applied not only to plastered surfaces. They can be used to paint walls covered with structural wallpaper in the kitchen. In general, the paint easily applies to brick, concrete, drywall, wood, in general, to any porous material.
Benefits of washable paint
The painting technology itself depends on what material is chosen in a particular case. In the kitchen, surfaces are semi-matte or matte, glossy. It is important to consider the location of window openings relative to the sun and its rays. Here are some recommendations:
- There will be less natural light in rooms where windows face north and northwest. In this case, acrylic paint, which creates glossy surfaces, will be relevant.
- But in the south and southeast, on the contrary, there is a lot of sunlight. Even on cloudy days you shouldn’t expect scattered light. A matte, semi-matte surface will then be the ideal solution. A washable type of paint is also used for this.
Related article: Features and scope of application of acrylic paint for wood
When using glossy paints for walls in the kitchen, further decorative processing becomes more complicated. This generally applies to the application of any images and additional decorations. The best option is matte washable paint.
Washable paints for kitchen walls are an effective and optimal choice. But now we can choose almost any composition that meets operating conditions.
Surface preparation
washable paints should be selected for kitchen walls
The walls must be prepared for painting, and the better this stage of work is completed, the better the final result will be. So what needs to be done and in what order?
- The kitchen walls should be cleaned of dirt. You need to be especially careful when dealing with traces of fat. The old finish is removed, along with the crumbling plaster.
- Browse the space that opens. There should be no signs of mold or mildew. If there are any, then these areas are cleaned mechanically to a clean surface, and then covered with an antibacterial composition. The resulting potholes are filled with gypsum or, less commonly, cement mixtures.
- Painting the walls in the kitchen will be ideal if the layers lie on a completely smooth surface. Such a surface can be achieved using acrylic putty. Spread it evenly over the wall, let it dry and sand it well.
- To improve adhesion to the paint, the puttied wall is treated with a primer and left to stand for the time recommended in the instructions. Now the wall is completely ready for finishing work.
Process description
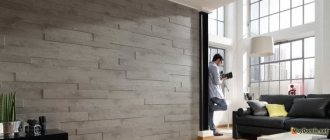
Let's look directly at the painting process itself. Let's pay attention to how to paint the walls in the kitchen correctly to ensure long service life and a pleasant appearance.
First of all, you need to decide on the choice of tools. These can be brushes or rollers. Brushes can be taken in different widths, with natural or artificial bristles. The main thing in choosing a brush is the ease of working with it and the quality of paint application. It is not recommended to immerse the brush completely in the paint can, but only halfway. Otherwise, the paint will drip from the brush and form streaks on the wall. Excess must be shaken off.
Rollers also come in different sizes: small, medium and large. The pile on the rollers can be made of natural or artificial fur. The length of this pile, which determines the appearance of the coating and its roughness, also varies. For rollers, you will need a tray or tray, with which the paint is evenly distributed over its entire surface.
It is advisable to cover the floor in the kitchen with film or cover it with old newspapers. This will make your subsequent cleaning easier.
Related article: Blast furnace and its use in the production of cast iron
The baseboards and ceiling at the border with the walls must be covered with paper masking tape. It will prevent you from accidentally applying coating where you shouldn't.
If you are doing your own repairs, you need to know that to ensure even coverage, you need to apply at least two coats.
Each layer is applied perpendicular to each other, for example, the first vertically, then the second horizontally. This technology is applicable for both brush and roller work. Those places where it is impossible to reach with a roller are pre-treated with a brush, for example, corners and walls behind heating radiators.
Each type of paint may have its own technological features, which are indicated in the instructions for use. For example, the need to wait until the previous layer has completely dried before applying the next one.
It is customary to start painting from the top, from the ceiling, and cover the entire wall at one time. This will ensure even coverage.
Painting technology
painting the walls in the kitchen in ivory color perfectly harmonizes with the color of the kitchen furniture
Paint for kitchen work is sold in finished form. It is securely packaged, so it can be transported by any type of transport and stored in rooms with positive temperatures, although the composition will not lose its qualities even if it is not frozen for a long time. If this happens to your paint, let it sit at room temperature for at least one day.
The paint in the opened jar is thoroughly mixed. If required by technology, water is added to it to make the first layer less saturated. Secondary painting of the walls in the kitchen is carried out with undiluted paint.
You can only paint the walls if the kitchen is warm. Temperature range from 5 to 30 degrees Celsius. If it is cooler, the drying period for the paint will be longer. Although modern paints are environmentally friendly, the room must still be well ventilated when working with them.
If the store doesn’t have the paint tone you need, take white. You can always make it into a colored one using tint. It is better to add the latter to the mixture in a special center where there is a tinting machine. This is especially true when work requires several buckets of paint of the same tone.
yellow color in the kitchen interior will create a warm and cozy atmosphere
Even if you purchased the material of the desired color and in the required quantity, keep in mind that the same type of paint from different batches may differ in shade nuances, so it makes sense before starting work on painting the walls in the kitchen, mix the contents of all purchased cans in one container. This way you are guaranteed to get walls of a uniform color. What else you need to know when choosing a shade of the composition is that after drying, the original color will somewhat lose its brightness.
To obtain a dense and rich tone, three layers of paint may be required. Average consumption figures will help you roughly calculate the required volume. Typically this is 200 grams of paint per square. The hiding power of bright colors is somewhat lower, so it is rational to apply a lighter base layer and then roll two colored layers of paint over it.
The final color of the walls may differ noticeably from the original one, since it will be directly influenced by the roughness of the surface on which the paint was applied, its absorption capacity, as well as the specific lighting of the room.
monochrome light kitchen design
Painting the walls in the kitchen is done with a roller or spray gun, less often with a paint brush. The “clothing” of the roller can be made of foam rubber, fur or velor. The most even way to distribute paint over the surface is by spraying. The first layer of paint takes about an hour and a half to dry, but if you wait three to four hours, this will have an extremely positive effect on the final result. Keep in mind that with high humidity and low temperatures, the paint needs more time to dry.
A paint bath will help to avoid paint drips when working with a roller. Pour a minimal amount of liquid into it and do not forget to walk along its ribbed surfaces several times, squeezing out excess paint from the roller coat.
The process of painting walls in the kitchen begins with painting the window. The base layer is applied in a horizontal direction, and the subsequent ones in a vertical direction. This way, every millimeter of the wall will be painted and you won’t have to suffer with annoying omissions.
The red color of the walls goes well with white furniture
Hard-to-reach places (corners, joints) are passed with a brush.
Each subsequent layer of coloring composition is applied only to the dried previous one.
After drying, the working surfaces of the walls can be additionally protected with a glass apron. It will turn out original, and it will be easier to care for the wall.
Painting on the wall
“Lighting in
painting walls in the kitchen is interpreted as an important point, but in the case of artistic painting, its importance increases significantly”
Painting walls is not an easy task. Here you definitely need to have a talent for drawing. Ideally, they invite a real artist. The painting work is painstaking and takes more than one day, but the result is always amazing. The kitchen instantly takes on an exclusive look.
Everything happens according to this plan. First, the artist draws a sketch of the future masterpiece directly on the plaster with a pencil, so in this case there is no need to pre-paint the walls in the kitchen. After agreeing on the contents with the owners, painting begins with water-based or water-dispersion paints.
painting an accent wall in the kitchen interior as a central decorative element
If the picture needs to be given volume, then the background is usually made somewhat hazy, even blurry. In painting they use not only colored paint, but also decorative plaster. It adds realism to stone structures and other natural elements.
The work is completed by tinting the painting with acrylic and coating it with varnish.
The wall for painting should be prepared just perfectly. Unevenness and roughness are unacceptable. High-quality work will delight you with its beauty for at least ten years.
Lighting in painting walls in the kitchen is interpreted as an important point, but in the case of artistic painting, its importance increases significantly. So that the master can choose the right color nuances, lighting fixtures in the kitchen must be installed in advance. There should be no sockets, ventilation grilles, or switches on the wall to be painted. All this will be out of place there. If you can’t do without them, decorate them to match the painting.
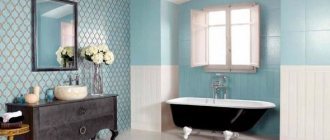
wall decoration in soft blue
Which paint is suitable for the kitchen and why
How to paint the walls in the kitchen? The choice of paint is a responsible matter, since in the kitchen the air temperature and humidity often change.
Therefore, kitchen paint must meet certain requirements:
- resistance to steam and elevated temperatures;
- simple cleansing of dirt (grease, stains from splashes of wine, tea, coffee, fruit juice);
- environmental friendliness;
- no pungent odor;
- availability of various colors and shades.
Paints that meet these requirements are divided into:
- water-dispersed;
- alkyd;
- silicate.
The first place in the popularity ranking is occupied by water-dispersion emulsions. They are actively used in the interior because they do not have a strong odor, dry quickly and are safe for health. This type includes water-based, acrylic, latex and silicone types.
For kitchen areas with high humidity, a water-dispersion emulsion containing latex or silicone is suitable. This paint can fill small cracks and holes in the wall worse than plaster.
Remember that washing walls with a water-based coating is often not recommended - the paint wears off quickly, and unsightly stains and stripes remain on the surfaces.
The glossy surface created with oil paints (alkyd enamel) is not afraid of wet cleaning. However, after using this paint, ventilate the room well: an unpleasant odor can remain in the kitchen for two months. This is because it contains alkyd varnish, and drying oil or turpentine acts as a diluent.
Oil paints are universal and can be applied to any surface, but dry from 12 hours to three days.
Silicate paints are a type of paint and varnish materials made from liquid glass. They provide excellent adhesion to the surface even without priming. This paint does not fade in the sun and is resistant to moisture and temperature changes.
For reference . If you decide to prime the surface before applying this paint, use a silicate primer. Silicate paints also do not interact well with plastic and stone.
Safety precautions when working with paint
Modern coloring compositions belong to the category of environmentally friendly products.
They are fireproof and do not explode. However, this does not mean that they can be worked without protective equipment, namely gloves and respirators. Paint that gets on the skin is immediately removed with water and soap. Any remaining paint should not be disposed of down the drain. During subsequent repairs, do not try to scrape the walls. You can safely work on the existing surface. Repainting is allowed within 20 layers.