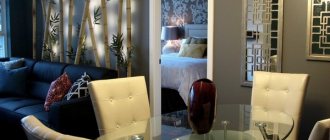
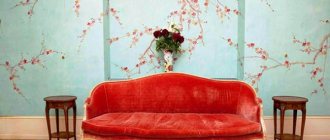
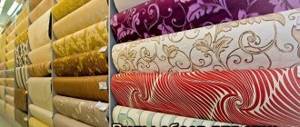
There are many materials for wall decoration. The combination of vinyl and non-woven fabric is one of the most popular types. They look good in residential areas and offices. Modern coatings are made in different textures and colors. Everyone will choose a good option for themselves. Before gluing vinyl wallpaper on a non-woven backing, it is worth understanding the characteristics of the material.
Advantages and disadvantages
Wallpaper is a relatively new raw material. It was developed relatively recently.
They have many advantages, the main ones of which are:
- attractiveness;
- high density of the product, which helps hide minor surface defects;
- strength;
- elasticity;
- wear resistance;
- durability;
- the material absorbs extraneous noise well;
- The adhesive composition is applied only to the surface of the wall.
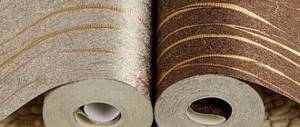
The finishing material has a two-layer structure. Due to this, it is endowed with unique qualities. The wall covering consists of:
- Facial layer. It determines the appearance, ensures the strength and moisture resistance of the material. The layer is made from vinyl.
- Base. Non-woven fabric is used here. It refers to sheets formed from the interweaving of fabric fibers and cellulose, to which special dyes are added. The main properties of the wallpaper directly depend on the type of non-woven material.
Many people still do not know how practical and durable this material is in life, and how to glue it correctly.
Wallpapers have the following strengths:
- provide ease of gluing the material to the surface;
- do not deform after applying glue;
- do not become flimsy;
- eliminate the risk of rupture of the canvas coated with glue during finishing work;
- extend the service life of the material;
- increase the level of heat and sound insulation.
Non-woven fabric and vinyl create an excellent tandem. The first is available in a small variety of colors and shades, but is highly durable, ensuring the stability of the canvas shape. The front layer is responsible for its attractive appearance, guarantees moisture resistance and ease of care. Each type perfectly complements each other's properties. Therefore, the finishing material is of better quality than other types of wallpaper.
Like every finishing material, vinyl and non-woven fabric have their drawbacks. The composition of the paintings contains a small amount of chemical compounds that can be harmful to health. Therefore, they are not recommended for use in bedrooms and children's playrooms. This type does not allow air to pass through well, which is why the room must be constantly ventilated to remove condensation and prevent the formation of fungus.
How to glue meter-long wallpaper - pros and cons
If you decide to update the wallpaper in the room, then, first of all, try to approach the choice of new home design as responsibly as possible. Of course, there are now a huge number of retail outlets, but it would be better to go somewhere where you will have the opportunity to examine the banner at a special stand, unfolded and from a great distance. It’s no secret that on a roll and on the wall, as they say in Odessa, these are two big differences!
By the way, remember that vertical stripes will visually increase the height of your room, and horizontal stripes will seem to push the walls apart . Therefore, attentiveness and attentiveness again! It’s better to weigh and count everything again before purchasing this or that type of wallpaper.
If we talk about the positive aspects of wide rolls, the main one is a significant reduction in the number of seams, which creates the so-called “seamless” effect. How is it achieved, you ask? The answer is simple: if the mentioned 18-meter room required 30 or so standard half-meter canvases, then the wide ones will need half as many - there will also be fewer joints, which means they will not be so conspicuous.
It is probably unnecessary to say that applying glue to 15-16 tapes will take significantly less time than the same operation with three dozen. And in terms of physical effort, it is incomparable. And the procedure for pasting walls with such panels is generally no different. And, by the way, many who decide to make repairs will probably be attracted by the fact that meter-long wallpaper, as it turned out, can save money on your budget. The fact is that in most cases, one wide roll is still cheaper than two standard 50-centimeter rolls. In addition, non-woven wallpaper will also be the most durable.
It would be dishonest to you, having talked about the advantages, to remain silent about the difficulties of working with meter-long canvases. But they still exist. So, wide wallpapers assume that they are glued to perfectly flat surfaces, since any flaws or unevenness will not allow you to achieve a perfect fit between adjacent panels. Let me remind you that this is their main “seamless” advantage. But in principle, this can be solved, since there are more than enough options for preparing and processing walls for pasting.
The large width of the roll is fraught with another danger - you may not have enough of the last full tape, just a couple of centimeters wide. Collecting a fragment from pieces? This is hardly a solution. You'll have to buy a whole roll. With standard rolls it is easier to adjust the number of panels to the width of the walls. Well, and one more point, which, however, can only be called a minus with a stretch. It’s quite difficult to hang meter-long wallpaper alone. You will definitely need an assistant. I don’t know about you, but for our family this is not a question - we even glued Soviet standard wallpaper with four hands, so we have worked out this point.
Types of wallpaper with vinyl coating
Before you start gluing the walls, you need to fully study the finishing material. This will allow you to learn about its strengths and weaknesses, which will lead to better results.
Vinyl wallpapers differ in the type of base:
- Paper. This is a cheaper option for wall hangings. Therefore, many choose it to decorate the living rooms of an apartment;
- Non-woven.
The non-woven base has the following advantages:
- Strength;
- Elasticity;
- Sustainability;
- Good adhesion to different finishing materials of walls and ceilings.
The combination of vinyl and non-woven fabric is used in apartments or offices. The main thing is to be able to properly glue the materials so that the room looks organic after renovation.
Materials and tools
There are several important tools you need to hang wallpaper.
These include:
- adhesive composition;
- dishes in which the glue will be mixed;
- several spatulas of different sizes. It is best if at least one of them is rubber;
- roller for working with wallpaper and a wide brush;
- metal ruler. It is desirable that it be long enough;
- scissors;
- regular or stationery knife. The main thing is to sharpen it well before starting work;
- rags or unnecessary towels.
To make it easier to reach the ceiling or section of the wall above the window and door while finishing the room, you need to get a stepladder.
Many people use a regular table for these purposes, but for safety it is better to carry out all work using a ladder.
Surface preparation
To maintain the impeccable appearance of the wall paintings, you need to properly prepare the walls for non-woven wallpaper.
This is done according to the following scheme:
- Removing old coating. If it doesn’t come off well, you should try to wet the material with water from a spray bottle. After this procedure, even tightly stuck wallpaper can be quickly removed with a spatula.
- Puttying surfaces. Thanks to this, all cracks, unevenness and other defects of the walls or ceiling, which are very noticeable after finishing, will disappear. After applying the putty, you need to go over all surfaces with fine sandpaper, which will make them smooth.
- Primer. All moisture-intensive materials, which include concrete, plaster and drywall, are coated with a special compound. If there is no primer, then it can be replaced with an adhesive composition used for further work. Subsequent work can be started only after the surface has completely dried.
In order for vinyl in combination with non-woven fabric to look perfect in the room, you need to make sure that the chosen type of finishing material is not transparent. To do this, you need to turn on the light, attach the canvas to the wall and see from the side whether it is visible or not.
If wall defects, remnants of old finishing, or putty areas appear through the sheet, then the surface needs more thorough preparatory measures.
How to properly glue non-woven wallpaper with your own hands
The master class presented in this chapter will tell you how to properly glue non-woven wallpaper with your own hands. The only distinctive feature is the use of glue, which is produced specifically for this type of wall covering.
Preparing walls for gluing
Preparing the surface for gluing non-woven wallpaper should begin with leveling it. Although the linens can hide small dimples, they will not correct serious imperfections. First, the surface must be puttied and sanded.
When gluing wallpaper on a non-woven basis, you should not pay too much attention to sanding - the material lays out as a fairly dense, even canvas that can hide small pits. It will be more important to remove all serious bulges - especially if you decide to use wallpaper with a geometric pattern. The differences will be very visible.
Before gluing, the putty and all other layers must dry - otherwise, the coating will begin to fall off after gluing.
Pasting a room: main steps
The procedure is quite simple. It includes following the following sequence of actions:
- Remove all switches and sockets in the room. The process of pasting the walls will be much easier and faster.
- Prepare the floor. For complete cutting and cutting of sheets in an apartment or house, only this surface is suitable. It is washed thoroughly so that the wall paintings do not get dirty and maintain an impeccable appearance.
- Pasting. Wallpaper of this type does not undergo additional treatment with an adhesive composition. This protects against getting wet, which eliminates the risk of deformation or tearing of the canvas.
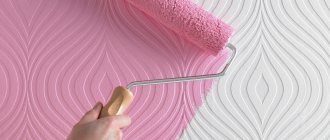
It is better to glue wide wallpaper on a non-woven backing using a rubber roller, and a brush for treating the corners of the room and areas near the baseboards. It is important to ensure that the composition is applied evenly and that the stripes run without visible gaps.
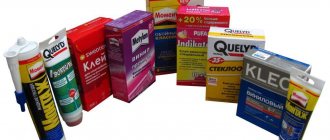
How to choose glue
Many people consider the adhesive compositions displayed in hardware stores for different types of wallpaper to be a carefully thought-out marketing ploy. But this is a very serious mistake, which leads to damage to wall paintings or poor quality repairs. Choosing the right glue is one of the main links in competent finishing work.
Non-woven vinyl wallpaper is heavier than paper wallpaper. Therefore, they are glued to walls or ceilings only using special glue.
Preparation of glue
Detailed instructions for mixing the optimal adhesive composition are indicated on the manufacturer's packaging.
Most often it is prepared as follows:
- Clean water is poured into a separate container, basin or bucket. Its quantity is taken based on the volume of work.
- Stirring the liquid with one hand until a funnel forms, slowly and carefully pour in the glue with the other.
- Constantly stirring the composition, wait until the powder is completely dissolved.
- The mixture is left for 20-30 minutes to swell thoroughly.
Immediately before gluing the wallpaper to the walls or ceiling, the adhesive composition is mixed again. The main thing is not to violate the strict proportions of powder and liquid at the very beginning of mixing the glue. This will lead to a violation of the correct consistency of the composition, due to which it will lose its adhesive properties.
Marking walls and cutting wallpaper
The technology for gluing vinyl wallpaper on a non-woven base is practically no different from working with conventional canvases.
The difference is that glue does not have to be applied to the canvas, with the exception of finishing the ceiling or repair work carried out on a hot summer day.
To make gluing the material easier, you need to mark the walls and cut the wallpaper in advance. This is done as follows:
- Determine the direction of the stripes. This is done in accordance with the angle of light falling on the wall.
- If the wallpaper has an ornament, then it is cut to match the pattern. The pattern should be continuously repeated over the entire surface.
- To make the canvases look organic, it is better to glue them using the butt method. The wallpaper is quite thick. The overlaps will immediately catch the eye, attracting attention.
- It is better to start installing wallpaper from the corner of the room, which is in plain sight. Due to this, you can hide unwanted joints of the canvases from prying eyes.
- A control line is drawn on the wall using a plumb line or building level. It should be applied to the wall 1.5-2 cm narrower than the width of the roll. According to this line, further fixation of the sheet will be carried out, the edge of which is turned at an angle.
- Apply a layer of adhesive evenly and carefully onto the wall with a roller. The main thing is not to leave a single centimeter untreated. For corners and under the ceiling it is better to use a brush.
- Each canvas begins to smooth out from the center to the edges. This will make the surface smooth and expel all the air between the wallpaper and the wall or ceiling. Excess glue should be removed with a rag or clean towel.
- If the canvas lays unevenly on the wall or ceiling the first time, you can carefully peel it off to correct it, and then return it to its place.
- It is better to cut the sheets so that a little excess material remains. Usually a margin of 2-3 cm is taken. After gluing and smoothing the canvas, it is carefully trimmed with a sharp knife.
Do not open windows or doors during work. After wallpapering, drafts should not be allowed. This will cause the heavy material to peel off.
Pasting in corners
Installing wallpaper on flat walls will not be difficult for anyone. The difficulty begins when working with corners.
To make the task easier, you need to remember a few simple rules:
- Wall canvases are glued to a corner that is in plain view using the butt method. One sheet is launched onto the wall at a distance of 1.5-2 cm, and the second is brought to it without overlap. The main thing is to prepare the surfaces well in advance so that they are smooth.
- For uneven walls, it is better to use a small overlap of a couple of millimeters.
In order to properly and effectively hang wallpaper, it is recommended that you familiarize yourself with different installation methods. One effective way is to trim the corner. The canvases are carefully compacted into the corner and joined with an overlap of 3 to 5 cm. Then a long metal ruler is taken and applied to the center of the corner. A straight line is drawn along it with a sharp knife. All that remains is to carefully remove the remnants of the wallpaper, and grease the edges of the canvases with glue and press with a roller. This results in an even angle that visually looks easy and perfect.
Wall decoration in hard-to-reach places
In addition to the corners, there are several more difficult areas in the room for wallpapering. Typically these include niches, arches, window and door openings. They are pasted over as the very last of the remaining fragments. Plain wallpaper is much easier to glue than finishing material with a pronounced pattern. In this case, the picture is selected immediately. It is important to measure everything so that the ornament matches perfectly. Each room has sockets and switches. During finishing work, the canvases are glued in these areas in the usual way. The main thing is to mark on the sheet the location of the electrical device. When the strip is fixed, an incision is made with sharp scissors or a knife. The edges of the wallpaper are folded inward. After the glue has completely dried and the wallpaper on the non-woven fabric is securely adhered to the wall, all switches and sockets are installed in their places.
How to care for non-woven wallpaper?
The method of care depends on the specific wallpaper material chosen. Care depends on the waterproofness of the fabric; this is indicated on the packaging in the form of waves or droplets of water.
- Paper should be cared for like regular wallpaper - despite its water resistance, cellulose quickly absorbs water. For them, the best solution is dry cleaning with a soft brush. If your fabrics are highly waterproof, you can use a wet cloth.
- Non-woven wallpaper can be easily washed with water, then wiped with a dry cloth, and you can also use low-aggressive substances - for example, soap. They are completely waterproof.
- Textile fabric requires both protection from mechanical and chemical influences. Depending on the type of textile, you must follow the recommendations for its care. Waterproof textiles are best cleaned with water and a soft sponge. It is better not to clean textiles made from water-permeable fibers - they will lose their appearance.
Painting
Vinyl wallpaper is used as a base for painting.
The main thing to consider is a few simple features:
- You can only buy paint of the type approved by the wallpaper manufacturer. This data must be in the instructions or written on the packaging of the material;
- paint is used only that which is suitable for interior work;
- the entire volume is tinted at once, so that in the future there will be no differences in tones on the walls;
- the resulting coloring composition must be thoroughly mixed before starting work;
- It is recommended to apply paint with a roller, squeezing it out first.
High-quality vinyl combined with non-woven fabric can be repainted about 10 times. But with each new image, the level of vapor permeability decreases. Therefore, manufacturers recommend changing the color of the paintings in the room no more than 3 times.
Ceiling finishing
For a beginner, the work seems too difficult. With some skill and a little experience, finishing will not take much effort and time. It is better if 2 people are engaged in repairs at the same time.
This type of wallpaper is quite heavy. Therefore, before purchasing, you need to pay attention to their weight. The recommended value should not exceed 110 g/m2.
The ceiling is finished following the following steps:
- Marking. For gluing, the first sheet is applied parallel to the solar flow so that the joints are not visible during the daytime. To apply markings from the 2 ends of the room, the width of the roll is set aside, which for this wallpaper is 1.06 or 0.53 cm, minus 2 cm. A straight line is drawn along this point.
- Cutting cloths. Each sheet is left with a margin of 8 to 10 cm. If a single pattern is visible on the surface, then they are cut according to the fit of the image. In order not to confuse the correct sequence of gluing the canvases, they can be numbered.
- Finishing. Pre-prepared glue is applied first to the canvas, which is folded in half for better impregnation, and then to the ceiling. The sheet is applied to the surface according to the marked lines. Using a roller, the material is smoothed from the center to the edges. All excess glue is carefully removed with a clean towel. At the end, the excess is trimmed off.
If 1 or more lighting fixtures are attached to the ceiling, then small cuts are made in these places, after which the wires are brought out. In order for the canvas to reliably adhere to the surface, without the formation of air bubbles, you should not open windows or create a draft in the room.
Vinyl wallpaper is a high-quality and durable material. The main thing is to follow the manufacturer's instructions indicated on the product packaging. This will allow you to achieve an ideal surface that pleases the eye and becomes the decoration of the room.
How to glue meter-long non-woven wallpaper - step-by-step diagram
Step 1: Surface Preparation
However, we note that non-woven fabric, thanks to its characteristics (thickness and softness), can still hide the smallest irregularities. Old wallpaper, even from perfect walls, needs to be removed; if it doesn’t give in, then wet it and the paper will give in. If after treatment the wall is rough, this is even good - the connection between the wall, glue and canvas will be better.
Step 2: Eliminate drafts
Remember that when covering walls with any wallpaper, the temperature regime is important, and the absence of drafts before complete drying is a guarantee that the joints will not separate, the canvases will not “bubble” and will not “sag”. This may take a day, or it may take three.
Step 3: Turn off the lights, remove everything unnecessary
Before starting work, do not forget to turn off the electricity in the room being repaired and remove the top covers of sockets and switches. When the wallpaper is dry, you will cut the canvas in the right places crosswise and return the covers to their original places. You should also temporarily remove all fasteners, screws, nails, and dowels from the walls.
Step 4: Prepare the glue
Let's start preparing the glue, which, as you remember, must correspond to the type of wallpaper you have chosen. Pour water into the vessel in which you are going to dilute it and, shaking in a circle, pour out the glue in a thin stream. After thoroughly mixing the mixture, let it brew - the required time and other features will be indicated on the packaging. Usually it's 15 minutes.
Step 5: Marking the Wall
As with any wallpaper, experts recommend starting to cover the walls from the window. Although in the case of meter rolls and non-woven ones, in particular, due to the fact that they are glued end-to-end, you can start from where it will be more convenient and economical for you in terms of material consumption. To glue the first fragment evenly, using a plumb line, a ruler and a pencil, draw a perfectly vertical line, from which you will begin gluing.
Step 6: Cutting the canvas
Are you ready to cut the required length of web from the roll? Leave a reserve on the ceiling and floor sides - 10 cm is enough. When the wallpaper is dry, you can cut off any excess with a sharp utility knife. And when pasting, if it suddenly turns out that you need to move the canvas up or down, you will have this opportunity, since non-woven wallpaper allows you to do this within 10 minutes.
Step 7: Let's start gluing
If all the preparatory stages have been completed, let’s get started! Mix the glue thoroughly again and apply it with a wide brush to the part of the wall where, according to the markings, the first tape will go. As you know, non-woven fabrics are not smeared with glue, so together with your partner, carefully apply the dry wallpaper to the right place and begin smoothing the fabric. This work is traditionally done from top to bottom and from the center to the edges. It is convenient to use a special roller for this, and pick up excess glue around the edges with a damp cloth. We glue the second canvas as close as possible and attach it with an edge. If necessary, we connect the drawing. Repeat this operation the required number of times, and the job will be done.
Step 8: Taping off awkward areas
Particular attention should be paid to pasting the so-called inconvenient places.
We're talking about corners, openings and behind radiators. There is nothing complicated, it just takes a little more time. The canvas is glued so that it rests slightly on the corner wall. On the other wall, do the same with the second tape. Then, using a ruler and a sharp knife, a vertical cut is made through these sheets. Having raised the edges, remove the excess parts of the wallpaper, and, having coated the joint with additional glue, put the sheets back. To paste the areas behind the battery, you will have to cut convenient small pieces. By the way, don’t forget that when covering the walls of a room with new wallpaper, you can show your imagination. Moreover, we can talk about experiments with both color and shapes. Original wallpapering will definitely make your home completely unique.
- Author: Mikhail Malofeev
Rate this article:
- 5
- 4
- 3
- 2
- 1
(3 votes, average: 4.3 out of 5)
Share with your friends!