How to correctly install sills on plastic windows, types of sills and their advantages, installation diagrams, expert advice - find out on our website!
Open the window! > Installation > Installation of sills on plastic windows: how it happens and what you need to know
Greetings!
I always try to keep in touch and answer questions from my own readers.
One of you was interested in how to correctly install sills on plastic windows.
The installation of the window was done by his amateur friend, but he did not bother about the external drainage of water from the window.
You can read what ebb tides are and at what angle to install them in this post.
I especially recommend reading to all those who practice self-installation of window structures.
How to install a window sill. Installation of window sill and ebb.
We hang the opening sashes and adjust them in height and tightness. The tightness of the tilt and turn sashes depends on the time of year and customer preferences.
We fix the double-glazed windows using PVC glazing beads, previously installing the previously removed linings under the double-glazed windows. The glazing beads are hammered in using a wooden mallet, carefully so as not to scratch the glass unit.
How to install a window sill
When installing a window, wood wedges are placed next to the dowels where the PVC window is attached to the wall opening. This is necessary to fix the PVC structure and protect it from sagging during the process of attracting it to the wall.
The bars, without knots, should be placed with grain perpendicular to the window block.
This is necessary to install the lower heat-insulating seam and install the ebb with a slope.
We fasten the PVC window to the wall using anchor dowels, either using anchor plates on the dowels or using self-tapping screws.
When choosing fasteners and their dimensions, taking into account the load-bearing capacity, be guided by GOST 30971-2002 Appendix B Requirements for fasteners and their installation.
We hang the opening sashes and adjust them in height and tightness.
The tightness of the tilt and turn sashes depends on the time of year and customer preferences.
We fix the double-glazed windows using PVC glazing beads, previously installing the previously removed linings under the double-glazed windows.
The glazing beads are hammered in using a wooden mallet, carefully so as not to scratch the glass unit.
Filling the installation gap with foam heat insulator should be done with the window block fully assembled and completely secured, while at the same time the completeness and degree of filling of the installation gap should be kept under control.
Before work, you should conduct a trial test for the primary expansion of the foam material in the environmental conditions of the installation area and, during work, do not allow excess foam to escape beyond the inner plane of the window block frame profile.
Cutting off excess foam heat insulation is allowed only from the inside of the installation seam, provided that a continuous vapor barrier layer is installed with vapor barrier tape.
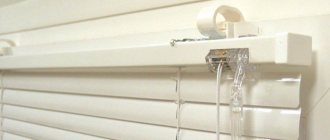
Installation and installation of flashings
Window sills not only provide waterproofing, protective and decorative functions, but are also used as external window sills that decorate the facades of buildings.
In order for the ebb tides to perform their functions perfectly, you need to worry about their timely installation. It is best to install ebb tides on the same day that new windows are being installed or glazing of balconies and loggias is being carried out.
By installing ebb tides at another time, you may incur additional expenses, and if you postpone their installation for a long time, you should think in advance about the likely repair of the building’s façade.
The process of installing ebb tides itself is complex and requires compliance with certain criteria. The ends of the window sills should be inserted into the wall, and their edges should be bent into a shape that resembles a “c”.
The ebb is placed on a special “bed” of mortar. In some cases, all connections and points of contact between the ebb and the wall are covered with mastic, which increases waterproofing and secures the connection.
The installation of ebb tides should be carried out by specialists, because if you install them yourself there is a risk of choosing the wrong slope. Although the error may be small, it is not always possible to correct the situation, and the consequences can be quite severe.
When installing flashings, special attention should be paid to the choice of waterproofing material.
If it is chosen incorrectly, then the density will be rather poor, which is justified by the fact that, for example, a copper or zinc-coated ebb will not fit tightly enough to the bottom of the frame.
When the ebb needs to be attached to a PVC profile, then it is necessary to use the presence of a groove, which is left by manufacturers specifically for this purpose.
When installing flashings below the level of the frame of plastic windows, it is necessary to use stand profiles that increase the waterproofing.
The joint between the sill and the window frame must be sealed, otherwise the window sill will not perform its functions as it should, and the façade and window structure will not be protected from excess humidity and water penetration.
How is the tide installed?
Changing tides occurs in several steps:
- The window opening is frozen
- An ebb of suitable size is made and delivered to the site
- A waterproofing tape is installed under the tide
- The seam between the frame and the ebb is filled with polyurethane foam
- The ebb is screwed to the stand profile so that it does not wobble in the wind
- The joint between the ebb and the wall is sealed using cement mortar or sealant
The ebb should go under the window; on plastic windows there is a special profile at the bottom to which the ebb is attached; wooden windows have a special quarter. Fastened with self-tapping screws or rivets.
The area under the ebb should be covered with foam; this will, firstly, provide thermal insulation, secondly, reliable fastening of the ebb, and thirdly, it will muffle the noise from raindrops.
To prevent the mounting foam from raising the ebb, the ebb must be fixed and pressed down while it dries.
The next important point is the approach to the external slopes, the ebb must certainly enter the wall under the slopes with side bends, this guarantees that water from the slopes, just like from the window, will fall onto the ebb, plus this will serve as an additional fastening on the sides.
To ensure this condition, it is best to install the flashing before finishing the external slopes.
It remains to add that from time to time (with huge and wide ebbs) it is necessary to make additional fastenings on the wall, on which the external window sill is placed.
How to install low tide
To ensure the drainage of water from the windows from the outside, special window sills are installed. Ultimately, rainwater is prevented from entering the window frame area. There are upper and lower tides. In most cases, installation of lower tides is created.
1. Low tides
can be made from a wide variety of materials. In most cases, zinc-coated steel is used for this purpose. Each of them has its own characteristics, pros and cons. It is best to create the installation of ebb tides immediately after installing the window.
This will extend the service life of the window frame. When installing the drip tide, it is not recommended to block the drainage holes that are located on the outside of the window frame. It is best to install the ebb under the window, and not butt against it.
2. During installation, it is imperative to take care of sealing the connection with the window frame. For this purpose, polymer or compression tapes are used. Silicone sealant is also often used.
Various sealants can be used. This depends on where the drip lining will be installed.
Installing balcony sills is not as simple as it seems. This case has its own pitfalls. For example, if the ebb width or length exceeds the dimensions of the balcony, then water will certainly get into the glazing.
3. Increased attention needs to be paid to the material. When selecting materials, it is best to use the help of professionals. This way you can avoid countless mistakes. There is no need to spare money on materials.
Focus on quality and brand. Well-known companies always value their own reputation, which is why their materials are usually of high quality. Consult with people who have already installed ebb tides.
They will tell you what to choose and how best to create the installation. Only high-quality casting can last for many years. Beware of fakes.
Tips for measuring windows tide, sealing, frame width
Never forget that a drain should be installed on the outside of the lower side of the window to drain rainwater. Therefore, the lower edge of the box should not be lower than the outer edge of the opening (regardless of the method of installing the drip).
In general, it is better to install the ebb tide under the window to eliminate any possibility of water leakage at the junction of the frame and the opening.
After deciding on the dimensions of the future window, compare them with the internal dimensions of the window opening.
This comparison allows you to quickly find a mechanical error in previous calculations, find out how thick the layer of plaster should be, which will have to be applied to the internal slopes in order to level them with the edge of the window, and whether you will have to bite into the slopes to get your window into place.
In any case, we should strive to ensure that there is much less of this kind of stupid work.
To seal a window, in other words, to fill the joint between the window frame and the wall, the most commonly used material is polymer foam.
The advantages of this option: good thermal insulation and sealing, the ability to absorb and moderately distribute mechanical stress and wind loads, indifference to the unevenness of the sealed surfaces, ease of use and relative cheapness.
Indeed, there is no more technologically advanced method today. But its general and thoughtless use is fraught with very nasty complications.
Firstly, the foam is destroyed by sunlight and atmospheric influences, so it must be protected.
But it is enough to look at the newly built facades of new buildings to be convinced of the sad fact that in fact no one even bothers to trim off its excess, which hangs from the canopies and joints and acquires a yellowish color over time.
Secondly, dried foam is capable of changing its own volume under the influence of temperature by more than 5%. As a result of these repeated retractions and protrusions, with a joint thickness of 8-12 cm, the window frame moves by 4-6 mm.
This, on the one hand, leads to the destruction of the layer of plaster adjacent to the window,
and on the other hand, to disruption of the operation of the locking devices of the fittings.
And the window either does not lock or open depending on the season.
Strive to ensure that the width of the joint between the wall and the window frame does not exceed 3-5 cm, especially with large window sizes.
Moreover, this is very easy to do - all manufacturers of window profiles, in addition to the main set needed to actually produce a window, certainly create an additional set of profiles that allow you to increase the width of the window frame in increments of 2 cm with constant glazing sizes.
These profiles are specially designed and created for such cases. Therefore, you should not be afraid that the window will become bad. On the contrary, I do not recommend saving on such extenders.
Materials for making castings
Today, ebb tides are made from two materials, each of them has its own pros and cons.
| Materials | Description |
Sheet steel | Most often used. The cheapest option is galvanized steel, the more expensive is the zinc coating is additionally painted with multi-colored polymer paints. A wide selection of colors makes it possible to solve design problems. Metal sills have no restrictions on their use; they are installed on plastic and wooden windows. Houses can be wooden, brick or block. The service life of high-quality metal castings is at least fifty years. Metal castings are technologically advanced; during installation there is no need to use complex tools. If you wish, you can make them yourself. |
Plastic | Modern ebb tides are most often used in conjunction with plastic windows. Made from modified sun-resistant plastic. Modern brands of plastics increase their resistance to the negative effects of hard ultraviolet radiation. Although stability is increasing, destruction still occurs slowly. Intermolecular bonds are broken, the material loses its plasticity and becomes brittle, and under dynamic loads through cracks may appear. In addition, the formation of microcracks is inevitable; dust accumulates in them over time, and mosses and lichens begin to grow. Despite the promises of manufacturers, the actual service life rarely exceeds thirty years. |
The advantages of metal castings are durability, versatility and a wide selection of colors. The disadvantage is low mechanical strength; it is undesirable to walk on them, especially if the base is not prepared correctly.
Low tide steel
Plastic ebbs can withstand relatively large static loads, but are used only in conjunction with metal-plastic windows. The metal ones are a little cheaper.
Plastic cast - photo
Timely installation of ebb and flow sills is the key to the longevity of your window.
To complete the harmonious appearance of the windows and protect the facade from precipitation, you need to select and order the installation of window sills.
There is one installation design for all tides, and it does not matter what material they are made of. It is necessary to understand one fundamental point: the tides must be installed immediately with the windows, otherwise the windows
, and the façade of the building.
Low tide as a window protective element
Low tides
installed on the outside of the window, with the condition that the lower edge of the window frame should not be lower than the outer edge of the window opening.
This must be done in order to prevent the blocking of special holes that are located on the outside of the box and drain water.
It is better to install ebb tides under the window, in order to exclude any possibility of water penetration at the junction.
Window ebbs are installed at a slope of at least 10 degrees perpendicular to each other. They are placed in a mortar mass. From such low tides, rainwater, condensation and snow flow down unhindered.
It is imperative to seal the joint between the sill and the window frame, as well as the sill and the wall.
The seam is glued using a special film or caulking.
Poorly performed work or failure to carry it out can lead to the destruction of the facade and windows by moisture, since the main function of the ebb is not to allow water to pass through.
If the ebb length exceeds 1.5 meters, its ends are provided with expansion joints, the width of which should be 0.5 centimeters, which are then filled with mastic.
The ideal installation of a window must include the correct installation and sealing of the flashing, which ensures high-quality drainage of water beyond the boundaries of the wall.
After completing the installation of the window structure in the wall, as well as sealing the areas adjacent to the thermal insulation using polymer foam, it is also necessary to perform another important function - anti-moisture insulation, which is performed both outside and inside:
Master Class. How to correctly install slopes and ebbs on windows
How to correctly install slopes and ebbs
about
windows
from this master class. Below you can look...
Installation of window sills
How to bend ebb tides
on the slope and their installation. My affiliate https://join.air.io/Doktor_Khlus.
- On the inside, directly under the ebb, insulation is made from a vapor-proof film by gluing it to the window frame and wall. The installation of the drip itself directly depends on the material from which it was made, but, in fact, any type of drip can be glued to the wall using mounting adhesive.
- From the outside, sealing of the junction of the frame to the wall is carried out using a vapor-permeable tape, gluing it in such a way as to ensure tightness in the corners. In addition, the edge of the ebb is inserted into a special recess at the junction of the latter with the window frame.
In places adjacent to the wall or insulation layer, the side edges of the ebb should be protected with an elastic expanding tape, ensuring a higher and constant connection density.
When installing a plastic sill, a seam connection method can be used between it and the window frame. But, such a connection should not be made in the area where the drainage holes are located in the frame.
This connection must be sealed with silicone and very carefully insulated under PVC sheathing.
A correctly installed ebb should fit under the window; for this purpose, on plastic windows there is a special profile at the bottom, to which the ebb is attached. As for wooden windows, their design provides for a special quarter.
Fastening is carried out using self-tapping screws or rivets.
The installation of iron flashings is done along the lower edge of the frame from the outside of the window in such a way that one edge of the flashing is inserted under the lower part of the frame into a special groove, then secured with screws on the stand profile.
For iron castings, you should use special window sill linings that have soundproofing properties.
Also, the ends of the iron ebbs are embedded in the wall, while bending the edges of the ebbs in a C-shape.
When using ebbs made of ceramics or stone, the places where they abut the walls are sealed with mastics.
Installation of ebb sills on windows, balconies and loggias allows you to protect the façade of the building from the adverse effects of precipitation, and will also provide waterproofing of the installation gap between the window opening and the wall.
Installing a window without ebb will result in the structure being evenly destroyed under the influence of water, so installing windows without ebb is a waste of money.
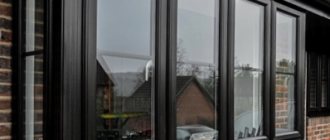
Low tide as a decorative window element
In addition to its specific main purpose, modern tides usually also serve a decorative function.
When choosing window sills, you need to take into account the color of the window, the design of the facade of the building, while the window sills should look quite neat and not provocative.
Indeed, a high-quality flashing assumes, despite all other criteria, that it should be installed painfully simply, without creating any additional difficulties.
Thanks to modern technologies, manufacturers can now offer their customers shimmers of various colors. It's no secret that the right type of ebb can improve the appearance of a window opening.
The ebb configuration contains:
- main part located at an angle to the plane;
- bends into which fastening is made;
- drippers that drain water.
The capabilities of modern equipment for the production of castings allow them to withstand a fairly wide range of sizes and configurations.
The flashing is made according to the configuration of the window; however, the width of the flashing must meet the requirement that this product protrudes from the wall by 3-5 cm.
Most manufacturers of window sills produce standard models of sills that are adapted to different windows, but this does not mean that for unusual projects it is impossible to find your own type of sill.
Now window companies are working to expand the range of products and services that allow you to select a specific type of material. Basically, the types of window sills differ only in their overall dimensions, texture and color scheme.
Therefore, in the first case, even the most difficult situation can be solved by cutting off the required amount of material and then installing it.
Thanks to the abundance of textures and colors (designs), the tides fit perfectly into any image and façade of the house
.
All this ceases to be a problem due to the widespread development of production capabilities, as well as the properties of the material used for work. As a result, the client receives exactly what he planned to create in his home.
When choosing personal configurations of window sills, as well as ordinary ones. the manufacturer provides all the necessary information that allows you to get a general idea of the usefulness and quality of these structures.
Installation and material of flashings depend on climate
When choosing a low tide for your window, you also need to take into account the climate zone in which you live.
If the tides are to serve in severe weather conditions, then you need to pay close attention to the ability of the material from which they are made to withstand sudden temperature changes.
If you ignore this nuance, then the window sills, and the windows themselves, will not last as long as we would like.
In the conditions of the rather formidable climate of the Russian Federation, it is imperative to focus attention when selecting and installing ebb tides to increase their endurance.
Advice from the experts
Those who are faced with the issue of installing drip tides now need to know a few more subtleties that will ultimately allow them to obtain a high-quality and neat product, and also save time and money during construction and installation work.
- For high-quality installation of ebbs, it is necessary to take into account that the window sill does not have a counter-slope, which is a common drawback in the work of facades; otherwise, moisture will not drain, but accumulate on the surface of the ebb.
- It is recommended to select a quick-drying sealant; silicone-based compounds are also good. If additional sealing of seams is necessary, polymer compression tapes are also used along with silicone sealants.
- To prevent the polyurethane foam from raising the window sill, it must be fixed while it dries by pressing down on the sill.
- It is unacceptable to screw the sill onto the window frame using screws or nail it, which is a fairly common practice.
- Window sills should protrude beyond the boundaries of the window, balcony or loggia, both in width and length, so as not to allow water to seep inside.
- When installing the ebb, you should definitely make sure that it fits into the wall (under the slopes) with its side bends, which guarantees that water will get from the slopes and from the window onto the ebb, while at the same time this will be an additional fastening on the sides. To ensure this condition, it is normal to install the drip lining before finishing the external slopes.
- In the case of huge and wide ebbs, you need to make additional fastenings on the wall, on which the so-called external window sill will be placed.
- Before installing the drip tray, there is no need for plastering work, since it is laid on polyurethane foam or an adhesive base.
- Installation of ebb tides is done with a slope of 10 0 from the plane of the window.
- High-quality installation of ebb tides can only be done in good, clear weather.
The last touch
A correctly installed ebb sill completely prevents water from getting onto the wall under the window, removes this water and must be firmly fixed so as not to create noise in windy weather and to suppress the noise from raindrops to the maximum.
It should be kept in mind that poor installation of ebb and flow will allow water to seep through the lower mounting seam, which is why over time the mounting foam (sealant) will become damp and the window, balcony or loggia will depressurize, and unnecessary moisture will begin to get inside the room.
As experience suggests, high-quality installation of flashings can be obtained by turning to the services of window companies that are also capable of creating this work in inaccessible places using industrial climbing.
You can also install a drip sill when installing a window, but this point needs to be discussed in the contract with the window company. Finishing the slopes can also be discussed in the contract, but if the apartment is already being renovated, you can save money on this type of work if the slopes are plastered by your own workers.
Window tinting, at first glance, is an insignificant detail, but it can make a window truly high-quality, complete and aesthetically pleasing.
Moreover, this truth is true for any type of window, be it plastic, aluminum, or wood.
Now, outdated tin window sills have been replaced by more convenient and durable materials, such as aluminum, zinc-coated steel (including with different coatings), stone, plastic, ceramics, copper and others.
But still, the basic rule that must be followed when choosing a window sill is: a sill made of a material that can perfectly demonstrate waterproofing capabilities in all weather conditions should be considered impeccable.
In addition to ebb tides, to operate a plastic window for a full period of time, you need to install visors and side plastic plugs on it, which will protect it from water and other precipitation.
General requirements for installation of ebb and flow sills
The designs have one unpleasant feature - the consequences of improper installation are discovered late, and their elimination will take quite a lot of time. Sometimes it is necessary to repair the finishing coating of facade walls. To prevent this from happening, you should follow a few simple rules.
Take maximum possible measures to seal all joints; special attention should be paid to the junctions with the window frame and side slopes.
All joints must be insulated
Important. Sealants should be used as an additional method of sealing, and not the main one; their service life is limited to several years. Subsequently, the sealants peel off and water penetrates into the cracks. Peeling occurs due to unfavorable operating conditions. The main measures to eliminate leaks are construction technologies. We will indicate which ones in the step-by-step installation instructions.
The ebb should be at least two centimeters wider than the slope. Water from the glass should not immediately fall onto the wall.
Low tides wider than slopes
Achieve the most even horizontal position of the ebb tide. If it is installed at an angle or has an uneven surface, then water drips will accumulate in one place and marks will form on the wall. When it rains, drops of water should drip evenly along the entire length of the tide. This will reduce the degree of wetting and the wall will dry much faster.
The ebb should be installed strictly horizontally
Make a strong and level cement-sand base at low tide. Now it is fashionable to use polyurethane foam: the ebb is set in several places with wedges, the free space is foamed. It's fast, cheap, but wrong. Windows in any building must be washed from the outside periodically. Often at low tide they become their feet, and no foam can withstand such loads. If you see that hired craftsmen are doing hack work, force them to redo the work.
There must be a solid foundation under the tide
The side edges of the ebb must necessarily be located under the finishing of the slopes. If the slopes are made of plaster, you need to cut into it about a centimeter. Don't expect to avoid leaks by using sealant. We have already mentioned that its service life in such difficult conditions is very short. We will explain how to make the insert later in the installation instructions.
The side edges of the ebb are located under the slopes
It is difficult to install sills on windows of the second and higher floors; you need to assemble scaffolding or completely remove the window sashes. Do the work in such a way that you don’t have to eliminate defects later, don’t rush, carry out all construction operations.
How to install window sills?
The process of installing plastic windows is considered complete only when the window sills are installed.
No matter what they say, all plastic windows must be equipped with external tides. The main task of ebb tides is to drain water falling on the window, specifically rain and snow that flows down the glass.
This is where the function of ebb tides manifests itself, as protecting the wall from high humidity. In addition, low tides are also a decorative element, with which the window has a complete look, and the facade of the house looks more attractive.
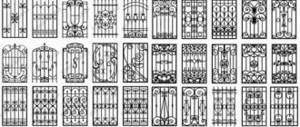
Types of ebb tides and their advantages
There is a huge abundance of external tides.
For their production they use aluminum, polyester and plastisyl coating, zinc-coated sheet, all ordinary plastic, as well as such non-traditional materials that require more resources, such as copper and titanium.
The most common and cheapest casting is a zinc-coated sheet, which does not have additional coatings.
This type of ebb is used more often. Much less often they prefer castings made of aluminum and plastic.
Plastic ebbs have such advantages as noise absorption during rain, and a nice appearance that harmonizes perfectly with the plastic window profile.
It's painfully easy to make duralumin casts - just 1-mm strips of aluminum, bent and painted in a suitable color using powder coating.
For the production of polyester casts, already painted strips of zinc-coated steel are used. Coating with polyester-based paint allows the ebb to retain its original appearance for a long time and not lose color.
Polyester drips are much cheaper than aluminum drips.
The ebbs for which plastisol coating is used are distinguished by a discreet and unstained appearance, and also increased resistance to temperature changes and heavy rainfall.
Also, the ebb tides must have side and bottom bends to allow water to drain.
The ebb should protrude from the wall by 3-5 cm; this distance must be taken into account when calculating the width of the ebb. The ebb must necessarily have an outward slope for free drainage of water.
Scheme for installing drip tides on plastic windows
When installing sills on PVC windows, it is necessary that the sill fits under the window structure.
The presence of a special profile for plastic windows allows you to attach the ebb to it and firmly fix it with rivets and self-tapping screws.
The place that is created under the ebb should definitely be filled with polyurethane foam in order to protect the room from heat loss, absorb rain noise, and also so that the ebb is firmly fixed and does not fly off during a strong gust of wind.
To avoid the ebb being raised by the mounting foam while it hardens, the ebb should be pressed down well and secured.
Slopes are also an important detail that you should pay attention to when installing ebbs. In order for water from the window and slopes to reach the ebb, it must enter the wall, under the slopes, using side bends.
That’s why we recommend installing the drip lining before finishing the external window slopes.
A canopy is a sill installed above the window. Typically, this design is used in gardens, loggias and other places.
Step-by-step instructions for installing metal flashing
You can order a metal cast or make it yourself. We will tell you how to make the structure yourself below, and for example we will use a custom-made element. We will take the following indicators as the initial data: sheet steel casting, brick house with cement-sand plaster. The ebb tide is installed on plastered slopes.
To work, you will need metal scissors; if you don’t have them, you can use a grinder. In addition, you need to have a square, a marker (a pencil draws very poorly on metal), a tape measure, a screwdriver and self-tapping screws. If you need to prepare a cement-sand base, then prepare construction tools.
Step 1. Check the condition of the lower outer slope. If it does not meet the above conditions, then it will have to be plastered. Use ordinary cement-sand mortar or ceramic tile adhesive. Glue can only be used to level out small irregularities, and plaster mortar is used if the place is not prepared at all. During operation, ensure that the slope is within 10°.
How to make a slope?
- Apply a layer of mortar, about 1 cm thicker than needed. Before plastering, do not forget to wet the surfaces of the bricks.
- Using a level on fresh plaster, make indentations at the desired angle. Press it into the mass, watch the scale readings. Grooves should be made along the edges and in the middle of the slope.
- Gradually remove excess mass as an even rule, and control the position of the tool along the grooves made.
- Use a trowel to completely level the surfaces. Continue installing the drip lining after the mixture has hardened.
Step 2. Take the drip dimensions to place your order. It should be several centimeters longer and wider than the slope.
Taking measurements
Width measurement
Step 3. Measure the parameters of the slope and transfer them to low tide.
Slope measurement
Next, there are two options for carrying out the work.
- Bend the ebb according to the marked marks. Trim the kinks a little with metal scissors or a grinder. The height of the side folds is approximately a centimeter. Make sure that the edges are smooth and fit as tightly as possible to the side slopes. We have already mentioned that we do not recommend installing flashings using this method; the risks of leaks appearing at the junction points are too great. There is a more reliable option.
Low tide trimming
Bend the edge of the tide
Edge bend
- Using a grinder with a diamond blade, cut even grooves up to a centimeter deep in the plaster at the bottom of the slopes. The cut should be smooth and located at the level of the low tide. The groove in the corner between the window frame and the slope will have to be hollowed out manually; the disc will not fit into this place.
- Make the length of the ebb about two centimeters greater than the width of the lower outer slope. There is no need to bend anything on the sides.
- Insert the molding into one groove as far as it will go, bend it slightly and carefully insert the other end into the opposite groove. Move horizontally so that both ends of the ebb are located in the groove.
- Use a small putty knife to seal the groove. Pack the mixture tightly. Using a slightly damp sponge, trim the edges, making the transition smooth and imperceptible.
Unfortunately, plastic flashings cannot be installed in such a reliable way. They are mounted end-to-end, the contact area is sealed with sealant. The ends are jammed with special inserts.
Step 4. Fix the bend of the ebb to the window frame with self-tapping screws. There are special recesses on the frames; make sure that the edges of the bend do not extend beyond them; the bend of the ebb should be located in the groove.
Remove the film from the low tide
Low tide installation. Final fitting and fitting
Foam application
Putting the ebb in place
If the metal ebbs are more than one and a half meters long, then you can use liquid nails during installation, lubricate the surface of the base and then put the ebb in place.
Low tides on the windows
How to install ebb tides
Window installation is considered complete only when the installation of window sills is completed.
External sills (or, as usual, an external window sill) must be provided at each window. their main task is to drain water falling on the window. In this case, we mean snow or rain that flows down from the window.
Accordingly, external ebbs help protect the wall from water. In addition, external tides give the window a finished look. They are an integral element of both the window itself and the entire facade as a whole.
External tides are full of diversity. Today there are a huge number of them. They can be made of aluminum with a polyester or plastisol coating, from ordinary zinc-coated sheet or from plastic.
The choice depends only on what funds you have at your disposal.
If we talk about the configuration of the profile, then it must certainly have a bend corresponding to the window to which it will be attached. There should also be side bends and a bottom bend with a drip through which water will flow.
The width of the window sill is calculated so that it protrudes from the wall by 30 - 50 mm. The outward slope of the tide is required, because this ensures the free flow of water.
Installation of window sills
First, correctly installed external flashings should ensure that water cannot enter the wall surface.
Secondly, they must drain this water. And lastly, they must be firmly fixed, in other words, there must be no noise from gusts of wind and the sound of raindrops must be very muffled.
INSTALLATION DIAGRAM OF DIFTS
It is necessary to ensure that the tide goes under the window. On plastic windows there is a special profile at the bottom; the ebb is attached specifically to it. It is fixed using rivets and self-tapping screws.
The free space located under the ebb is filled with foam. This must be done to ensure thermal insulation, reliable fastening of the ebb itself, and absorption of noise from raindrops.
In order to prevent the polyurethane foam from raising the ebb, during the period of its hardening it is necessary to fix the ebb, pressing it well.
Another important nuance is the approach to external slopes. It is necessary to make sure that the ebb goes under the slopes - with side bends into the wall. Thanks to this, water will flow from the window and slopes at low tide.
In addition, this will serve as additional fastenings to the structure on the sides. To ensure this condition, it is recommended to install the sill before finishing the external window slopes.
The ebb, which is installed above the window, is called a visor. Typically, exposed elements are used for glazing winter gardens, loggias and the rest.
A profiled sheet of zinc-coated metal that does not have additional coatings is the most common and cheapest casting. Plastic and duralumin casts are used much less often.
If we talk about plastic, then it is considered not the best material for low tides. After all, under the influence of precipitation, the plastic cast will quickly lose its attractiveness.
How are duralumin casts made? Duralumin strips about a mm wide are bent and then painted using the powder coating method.
Polyester shimmers arch from already painted strips of zinc-coated steel. The paint is based on polyester. This coating does not crack or lose its color over time.
Visors and ebbs with a plastisol coating are quite resistant to temperature changes and precipitation. They have a cautious and neat appearance.
How to install a window sill? On the frame or under the frame?
Once, at one popular construction forum, I had to argue with a consultant on the topic “How to install the ebb and flow correctly? On the frame or under the frame?
How many disputes were there? And the modders, as one, justified almost foaming at the mouth that the ebb should be installed only under the frame. Well, anyway, let's see if this statement is correct?
How to correctly install a window sill?
So, there is a statement that the drainage system is installed only under the frame. And there is a logical explanation for this. In this case, water passes through the junction of the low tide with the window more efficiently and the possibility that it will flow under the window is small.
And what do GOSTs, which many window companies refer to, tell us about this? After all, not many people actually work with them, so installation according to GOST costs more, and for this reason clients rarely choose it.
Well, in fact, in GOST standards I have not found a single diagram with the installation of a low tide on a frame. This means we will consider it the correct option to install the ebb tide under the frame.
How to install flashing on frame?
And yet, paying tribute to the correct option (read also the article “How to choose the right plastic windows”), let’s talk about the second option. It must be said that in addition to the lateral and upper quarters, there is also a lower quarter.
Quite often there is a situation when the frozen window is made incorrectly in height. You can read how to measure a window here. The bottom of the frame rises below this quarter. Knocking down a concrete quarter is not a pleasant enough experience.
And the installer has only one option - to install the ebb on the frame.
How to install the ebb on the frame correctly? Although the method itself is considered incorrect, when installing it is important to comply with certain indispensable conditions:
- Do not block drainage holes.
- Sealing the joint between the mounting shelf and the frame with silicone of good quality.
- The distance between the screws (bugs 4.2 x 13) is about 200 mm.
- Coat the screws with silicone.
I will definitely tell you about the advantages of this option, as surprising as they are:
- additional insulation of the window sill profile area with polyurethane foam (the width of the frame is usually 60 mm, and the width of the window sill profile is 30 mm. Insulating this area with foam provides the best thermal insulation)
- the height of the window is 2 - 3 cm larger, which is very important for a number of clients (additional light)
- the window sill rises lower (looks more aesthetically pleasing)
- Ice or condensation on double-glazed windows is eliminated (if there is poor insulation between the frame and the window sill profile)
Making metal casting with your own hands
You can make metal castings yourself; the design is not particularly complex.
Window sill patterns
How to make them?
Step 1. Buy a sheet of galvanized steel with a thickness of within 0.5 mm. Pay attention to the quality of galvanizing, the layer thickness must be at least 40 microns, the surface is uniform in appearance, sagging and omissions are prohibited.
Galvanized sheet (galvanized)
Step 2. Measure the length and width of the workpiece, taking into account the hems. Leave about two centimeters around the entire perimeter for hems. Take the length with a reserve; it is better to cut off the excess later than to throw away the ebb.
Step 3. Transfer the measurements taken to a sheet of iron. For drawing, it is better to use an ordinary felt-tip pen; pencil lines are hard to see. Use regular markers, do not use waterproof ones. Visible marking lines must then be removed; problems will arise with waterproof dyes. The sheet must have a bend line for installation under the window frame and a bend line for the protruding part of the ebb. It is better to cut with metal scissors, or at least with a grinder. After the grinder, you need to remove burrs from the cut line.
Step 4. Place the sheet on the flat edge of the table, press it with one hand, do not allow vibration. With your other hand, gently bend it, tapping the sheet with any piece of the board. If you have a mallet, that’s great, it’s easier to work with.
Galvanized sheet
Sheet fixation method
Bend of steel sheet
Practical advice. To increase rigidity, you can make a drip. It not only improves the tide, but also diverts water further from the wall. The drip edge is an additional Z-shaped bend along the lower edge of the ebb.
Bend the metal slowly, start from one edge and gradually move towards the opposite. The sheet should bend like a wave. Do not try to bend it right from the middle, as unevenness will certainly appear. Apply blows from top to bottom, part of the plane of the mallet should bend the metal, and the second part should hit the edge of the table at the same time. The first time, bend approximately 30°; until the right angle, you need to make several passes along the line back and forth. The more passes, the smoother the bend of the sheet.
Making low tide
It’s not difficult to learn how to bend sheet iron; after just a few centimeters, you gain experience. If you have concerns, practice on unnecessary pieces of galvanized steel. You will be able to control the strength, direction and frequency of the blows, and the bend will be even. In terms of quality, it is, of course, somewhat inferior to a sheet bending machine, but you have the opportunity not only to save on cost, but also to produce moldings of your own sizes separately for each window.