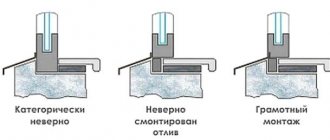
The installation of new plastic windows is considered complete after the window openings are completely finished. Namely slopes. The fact is that the polyurethane foam used to seal windows is very sensitive to environmental influences; it is simply destroyed by sunlight and low temperatures. In order to maintain the functionality of the window system, slopes are made. How to make slopes with your own hands, and what do you need to know for this?
Previously, window slopes were made from a cement-sand mixture; the choice of materials was small. But today the variety allows you to choose the appropriate material, taking into account the price and decorative design of the room.
The choice of material will depend on whether the finishing will be done on the outside or inside, although for full functionality they need to be done on both sides at once.
External slopes
You can make external window slopes with your own hands the old fashioned way - cement and sand, but it is better to use modern materials.
- Made of mineral wool (foam plastic). Most often, such finishing is used in the general insulation of a home. With such slopes, the thermal insulation of the house will increase, and their service life will be very long.
- Using facade plasters. The manufacturing principle is the same as when laying a cement-sand mixture, but more convenient. A variety of plasters will help to decorate windows externally. Typically, decorative plaster is used in combination with insulation.
- Plastic. Such slopes can be made both inside and outside the house. They are very durable, and insulation can also be hidden under the plastic covering.
- Drywall. It is also a very versatile material, but outdoors it requires good waterproofing to prevent premature destruction.
Causes of condensation
Simply put, condensation forms where cold and warm air meet. Why does this happen at the edge of the glass unit, next to the slopes?
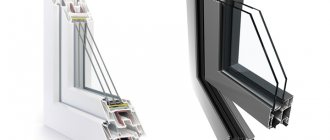
Since we are talking about metal-plastic windows, it becomes clear that metal conducts the body very well. If the window profile were entirely made of metal, it would provide virtually no protection to the room. To avoid this situation, polyamide inserts are used. By using hard plastic, the most important part of the task is achieved: getting rid of cold mystics.
A cold bridge is a section of the enclosing structure (in our case, a window profile) that has a reduced thermal resistance.
That is, in the case of the profile itself, we avoided heat leaks and cold air flow. Glass itself does not conduct heat well, so the junction of glass and frame, most often aluminum, becomes a kind of cold bridge. So it removes heat from the room and becomes a place where warm and cold air meet, falling out in the form of condensation at the edge of the window.
About the same thing happens on slopes. And the essence of the problem is connected with such a concept as an isotherm.
Isotherm (isothermal process) is a line of equal temperatures or a junction of temperatures that runs inside the wall.
Condensation occurs at the dew point. And if this indicator goes into the room, condensation forms there. In well-planned structures, of course, this does not happen, but this requires correct thermal calculations of the enclosing structures. Most often, the dew point is precisely on the slopes, because in this place the concrete layer has the smallest thickness. That is, in the case of a blank wall, the dew point is on the street, and in the case of a window opening, inside the room.
So, our task is to move the dew point in this place back to the street.
How to properly insulate the slopes of plastic windows? Most often, owners decide to insulate window slopes from the inside. But this also has its negative sides. Let's not forget that the essence of physics is that it is not cold air that rushes into the apartment, but warm air into the street.
By insulating the slope, we deprive the concrete walls of heat, which means they will freeze even more. Considering that the service life of concrete under conditions of temperature changes is limited, this situation will harm the building envelope. And yet, people often insulate the premises of apartment buildings, the safety of which is not expected to last for decades. In addition, insulating slopes from the outside will often require the involvement of hired workers. Therefore, in the previous paragraphs only the theory of the processes was described, and it’s up to you to decide how best to insulate slopes in a particular case, take into account the durability of the structure or the cost of the issue.
Options for finishing internal slopes
Indoor slopes are made from a material that matches the overall design concept of the room.
- From plasterboard. Universalism as it is, such slopes can then be finished with decorative plasters, painting, wallpaper, etc.
- Plastic. Do-it-yourself plastic slopes are quite a practical solution. In operation, such openings will be unpretentious, and the variety of colors allows you to create a rather sophisticated design for relatively little money.
- Styrofoam. Additional insulation will not hurt, and the resulting perfectly smooth surface can be easily puttied and painted. Also, such slopes can be combined with plastic panels.
- Plastering. Using modern plaster mixtures, you can finish openings quickly and inexpensively.
There are a lot of materials that can be used for finishing slopes; the choice depends on personal preferences, financial capabilities, and of course the design.
How to properly insulate the slopes of plastic windows
Internal and external insulation of windows can be carried out using the same material. The installation technology is approximately the same, only the final finish is different.
Using such a universal, pliable material as polystyrene foam, you can easily make insulated slopes on PVC windows yourself, without turning to specialists.
How to insulate the slopes of plastic windows inside
It is recommended to begin installation of warm slopes immediately after their installation, until the construction foam collapses under the influence of moisture and loses its thermal insulation qualities. The work order is as follows:
- Trim off excess polyurethane foam remaining after installing the windows.
- Treat the slopes with a primer containing an antiseptic. It will prevent mold from appearing.
- Plaster the slopes, leveling the surfaces. This will ensure a better fit of the insulation.
- After the plasters have dried, the surfaces are primed again to improve the quality of adhesive application.
- Prepared pieces of foam are made less smooth by treating the surfaces with sandpaper. This will make it easier to glue them to the slopes.
- Cut the foam into the required pieces according to the previously measured dimensions, leaving small allowances.
- The foam parts are glued to the prepared slopes using mounting adhesive. Wait for the glue to dry completely, then trim off the excess foam.
- The corners can be puttied or decorated with decorative corners, which will make them smoother and more beautiful.
- The inside of the window openings is plastered or plasterboard is glued, then putty is applied, the surfaces are primed and painted.
- Decorate the outer parts of the slopes.
You can purchase ready-made foam parts. They are sold as a set, have standard sizes and are easy to install on slopes.
Technology for finishing external openings
How to make external slopes depends on the chosen material. The most common option is with insulation and facade plasters. They are often used in combination.
External slopes with insulation
According to SNiP, it is recommended to make external slopes with mineral wool, since it is less flammable, but polystyrene with a density of 30 or more can also be used. How to properly finish openings with insulation?
- The surface of the openings is prepared, for this purpose the installation site is cleared, and fragile areas are restored. After these works, primer is used, preferably with deep penetration and an antiseptic.
- After priming, prepare the adhesive mixture by mixing it with water and thoroughly stirring with a drill and mixer.
Special glue is purchased for attaching the insulation. There are a lot of varieties, the most famous brand is Ceresit.
- An adhesive is applied to the insulation cut to size and pressed tightly to the surface of the slope.
- After gluing, the gaps between the window and the slope are sealed with foam.
- Plaster corners are attached to the corners using the same glue. And a façade mesh is glued onto the insulation surface for reinforcement.
- The resulting surface is covered with another layer of glue.
In the future, the outer layer can be finished with plasters or other facing materials.
Openings with facade plasters
Usually used as decoration in addition to slope insulation. But it can also be done as a separate option. Step by step, it looks like this.
- Prepare and prime the slope surfaces.
- The first layer is made using starting plaster and reinforcing mesh.
As a tool, it is better to use a straight Venetian trowel; it is more convenient than ordinary spatulas. If you need to lay down a layer that is too thick, you can additionally use beacon profiles.
- The resulting surface dries for up to 5-7 days, then it is covered with decorative plaster or a finishing layer of gypsum mixture.
- Painting using facade (preferably silicone) paint.
Which slopes are better, plastic or plaster?
Plastering slopes of plastic windows has the following advantages:
- availability and low cost of material;
- the ability to plaster yourself;
- if damaged, it is easy to repair an area of any size;
- fire resistance;
- solidity of the coating;
- good vapor permeability;
- environmental friendliness;
- the ability to be given different shapes and painted in a variety of colors;
- high strength.
Minuses:
- more time is spent on execution;
- plaster finishes get dirty faster;
- cracks may appear.
Installing plastic
Plastic slopes can be quickly installed, they do not fade, are fairly easy to clean and have an attractive appearance that harmonizes with the windows themselves (it is advisable to choose the same shade).
This is the most common and universal method. Plastic slopes can be quickly installed, they do not fade, are fairly easy to clean and have an attractive appearance that harmonizes with the windows themselves (it is advisable to choose the same shade). When installing such slopes, mineral wool is used, which provides the necessary thermal insulation, sound insulation and water resistance. You can make them quite easily with your own hands. Slopes made of plastic have a fairly decorative appearance, a flat and smooth surface, and a long service life (equal to the service life). They can be made fairly quickly (within about two hours). Install plastic slopes without additional work on puttying and painting. They have a good degree of vapor impermeability, which protects walls and foam insulation from freezing.
Tools and materials
Before starting work, stock up on the necessary set of tools.
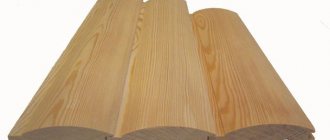
- Plastic strips 8 mm thick.
- U-shaped strip of plastic (the so-called starting strip).
- F-shaped strip of plastic.
- Wooden slats about 12 mm thick.
- Insulation material (usually mineral wool is used).
- Scissors and metal knife.
- Construction stapler with staples.
- Building level.
- White silicone.
- Self-tapping screws (4.5 mm and 95 mm).
- Drill or hammer drill.
Related article: How to repurpose old curtains into new home interior decor
If the window has recently been installed, it is better not to remove the protective film until the work is completed.
Installation steps
Wooden slats are placed around the entire perimeter of the window. To fix them, use 95 mm screws. The slats are placed flush to the walls.
- Wooden slats are placed around the entire perimeter of the window. To fix them, use 95 mm screws. The slats are placed flush to the walls. To prepare the wall surface, a hammer drill and a drill are used as needed. To obtain perfectly smooth slopes, vertically attach the slats to the wall, leveled.
- It is necessary to fill a U-shaped strip along the outer edge of the window. For fastening, use 4.5 mm self-tapping screws. A slope strip is inserted into the gutter of this strip. The joints of the U-shaped strips should make it possible to install the plastic at specified angles. Therefore, when crossing U-shaped strips, it is necessary to partially cut off the corners with a knife, thereby ensuring an even and smooth joint on the inside.
- The F-shaped strip is being installed. Its groove should be located opposite the previously installed groove of the U-shaped strip. In the rest of the part, which is located above the opening, the F-groove must be cut off. This must be done because the upper part of the F-strips should be overlapped. This strip must be attached to a wooden batten using a construction stapler. After joining, all excess parts of the F-strips should be cut off with metal scissors. This method is convenient because it does not require further gluing of wallpaper around the window. The F-strip covers all defects.
- The plastic is installed in the grooves while the insulation is laid at the same time. Here it is important to measure the size of the plastic as accurately as possible. If the joints cannot be made perfectly smooth, you can rub them with white silicone.
External finishing is much more important than internal finishing, since polyurethane foam, left without protection from ultraviolet sunlight that destroys it, very quickly deteriorates and becomes unusable.
It is advisable that the installation of all slopes be carried out the next day after installing the window, when the foam is already sufficiently dry. Polyurethane foam can be used as a thermal insulation material. To obtain optimal performance, installation of slopes and window sills is best done simultaneously.
Many, trying to save money, order installation without exterior and interior window decoration. Some believe that internal beauty is more important than external beauty and do not finish the window from the street side, leaving the installation seams without protection from the outside. In fact, the exterior decoration is much more important than the interior, since polyurethane foam, left without protection from the ultraviolet rays of the sun that destroys it, very quickly deteriorates and becomes unusable. If you want to save money, then it is better to wait with the interior decoration. External treatment must be carried out as soon as possible after installation.
Article on the topic: Primer for wood: how to prime wood before painting, features of the work