There are increased demands on finishing in the kitchen. Moisture and temperature changes, steam and fat evaporation, dyes and soot - all this is invariably present in the kitchen and necessarily affects the material of the walls, ceiling and furniture.
Do-it-yourself plastic ceiling in the kitchen is perhaps the simplest and most affordable way to provide the room with an attractive appearance without having to repair the finish every six months.
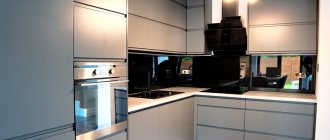
Ceiling panels for kitchen
In practice, there are 2 types of finishing materials.
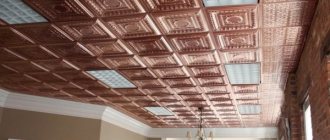
- Expanded polystyrene boards - as a rule, have a size of 50*50 cm, are very light and very decorative. The surface of the tile is always made in relief with a complex pattern, which, in fact, is its main attractiveness. For the kitchen, laminated material is selected, since it can be cleaned with a damp sponge, and cleaning in the kitchen is always a pressing issue.
- The panel ceiling in the kitchen in the more conventional sense is assembled from polyvinyl chloride slats of different thicknesses. It can resemble clapboard or form an almost flat, seamless surface. This option is, without a doubt, washable, and is also resistant to quite aggressive household cleaners.
There are lamellas for the wall - more rigid and thicker, and for the ceiling - 0.5–1 cm thick. The latter require care when installing or repairing. This option is implemented much more often, as it is distinguished by its variety and affordable price.
The plastic panel can be attached directly to the surface if the ceiling is flat, or it can be installed on a suspended frame. As an option, a rack structure can be used, where not aluminum panels are mounted, but plastic ones.
Panel installation
Installation of panels includes some types of preparatory work. The base must be prepared before hanging the panels on the ceiling. After the frame is assembled, finishing continues. The strips are attached to the metal with self-tapping screws. The panels are cut based on the width of the frame. Controlling the deflection in the middle, the first panel is installed in the side fillets and pressed until the side also falls into the gap made for it.
Then the panel is reinforced with a wide shelf. The stapler and nails are used at this stage. The second and other panels go one after another, using the same method. Following the recommendations, there will be no problems in finishing the ceiling with panels. If additional questions arise, the video tutorial can help answer them, and a visual representation of the work will make the information easier to understand.
Frame method
The second method of installing a panel ceiling is frame. Assembling the frame is the very first point at the beginning of work. Such a frame can be made of wood, metal or plastic. This method is most often used when there is high humidity in the room. It is also suitable if you plan to install recessed lamps. Wooden blocks may be suitable, as well as a plastic profile.
The frame method involves removing excess plaster before creating a wooden frame from beams. The peeling parts of the plaster are removed as they are absolutely useless for further work. Then a frame is created for the panels.
Related article: How to choose ceiling curtain rods
Assembling a wooden frame. Wooden slats for work should have a size of 10-40 by 40-55 mm. The ceiling must be level or level and in good condition. The planks are installed around the perimeter of the entire room, at a distance of 40 cm from each other. Such planks are fastened with dowels or self-tapping screws. In case of unevenness, first draw a line under the frame using a level. The bars are installed in the places where the panels are installed, every 50 cm, and then slats are installed on them. The metal frame is assembled using exactly the same technology and using similar components.
Here is a clear sequence and stages of work:
- The location of the frame parts is marked with a marker or a tubular water level;
- The metal frame has its own installation rules. First, UD profiles are screwed in; they must support the weight of the installation. The distance between the ceiling and the bottom of the frame should be 25 mm;
- The main profiles made of metal or wood are mounted after installing the UD profile.
It is best to start working from the window. The installed profiles are designed for attaching fastening strips to them. The last strip to be installed is on the wall opposite the window location. Skirting boards are mounted in the grooves of the fastening strips. Heating pipes can also pass through the ceiling. They are provided with holes of the required diameter. However, it should be taken into account that the PVC trim near the pipes may be damaged, that is, warped.
Frameless
With frameless assembly, the panels are attached directly to the ceiling or wall. If the surface is strong enough, finishing ceiling panels are attached without previous layers or frames. For fastening to the ceiling, glue or liquid nails are used. The main condition for the room in which work will be carried out is that it must be dry. A notched trowel is used to apply the mixture. The same spatula is used when laying tiles.
Frameless installation can save time, but costs, which would seem to be reduced due to the unnecessary purchase of beams or panels for a metal frame, will be used to purchase an adhesive mixture or liquid nails. Recessed ceiling lamps, which are very popular with modern designers, specifically for lighting kitchens and other rooms in a modern style, cannot be installed.
Advantages and disadvantages of PVC panels
The material has a lot of advantages and is perfect for finishing the kitchen.
- Speed and ease of installation: you can build a suspended structure with your own hands in just a day.
- The material is moisture resistant and insensitive to both direct contact with water and the action of steam.
- Plastic is very easy to clean from soot or grease. The only thing that could damage the material is the dyes, but this is unlikely.
- The panels do not rot, are not susceptible to mold and are not deformed under the influence of dampness.
- The finish is lightweight, so there is no load on the base surface.
- The appearance of plastic is extremely diverse: it can imitate any natural material, reproduce any shades and patterns, and even have a different texture, even a mirror one.
- Affordable cost is possible even with the most modest renovation budget.
The disadvantages of the product are the following.
- Flammability - alas, plastic (even self-extinguishing) burns and melts in the presence of fire.
- The material is deformed at a relatively low temperature – 100–120 C.
- The finish is vapor-tight, so it’s worth taking care of additional ventilation.
Types of panels
Of course, the decorative possibilities of plastic kitchen ceilings are lower than, for example, suspended ceilings, but there are a lot of possibilities here too.
Product Shape:
- tile-type panels - 0.3–0.98 m. Their surface is not embossed, but it is quite capable of reproducing patterned finishing tiles;
- slatted panel (lamella). The width varies from 0.13 to 0.3 m, and the length is 0.9 to 3 m. The so-called siding ceiling in the kitchen is assembled from lamellas;
- sheet panel - distinguished by the largest dimensions: width - 0.5–1.22 m, length - 0.98–2.44 m. Installation by yourself is difficult, since the product is quite fragile with large sizes.
The lamellas are joined to each other during installation. In this case, different types of surface can be formed:
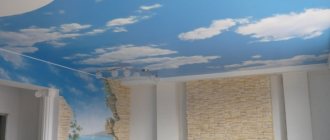
- Seamless lamellas, when laid, form a smooth surface on which the joints are almost invisible. This option is popular when decorating the ceiling “under stone”;
- rusticated - with a chamfer, when connected, they form a decorative recess. Here the seams are part of the design;
- models with a relief surface - most often they imitate the same lining. It is impossible to obtain a terrain that is too complex. The strength and wear resistance of such material is noticeably higher, however, it also has an appropriate cost.
The color range of plastic is not limited, however, plastic ceilings in the kitchen must be selected in accordance with the interior. To be fair, white or even pastel colors are no longer nearly as popular as they used to be. A ceiling surface with a complex pattern can be obtained with special lamellas.
They are made in two ways:
- thermal film - an ornament or pattern of a natural material is applied to a film that is glued to plastic under pressure. The option is affordable, but does not differ in durability;
- Direct printing requires special equipment, but a kitchen ceiling of this type is not only beautiful, but will also last much longer. The technology makes it possible to solve the issue of decorativeness of the material in a non-trivial way: on the ceiling made of plastic panels in the kitchen, photos from the archive can be applied to their surface, and you can get an exclusive image.
The surface of the lamellas can also be different:
- matte – with low light reflectance. Suitable for most interiors;
- glossy – shine is provided by the varnish coating. For a ceiling made of PVC panels in the kitchen, it is better to choose glossy ones, as they look more elegant and more practical: they have better water resistance. There is no question about how to wash them: ordinary water, soapy water, and any detergents that do not include abrasive particles will do.
Advantages of plastic
An aesthetic ceiling covering can be beautiful enough to be considered the most modern solution in terms of kitchen ceiling design. Ceiling material can be very easy to maintain - and installation costs can be minimal.
What benefits does a user get by installing ceiling panels in their kitchen?
- PVC plastic panels can be of various shapes and sizes. The dimensions and number of sections per panel allow you to choose from a wide range exactly those panels that can decorate your kitchen, taking into account the finish of the walls and the color scheme of the furniture;
- The PVC finish is very easy to clean and practical to maintain. Cleaning is very simple, without the use of special cleaning products. Soot and dirt on the ceiling are very easy to remove, and restrictions in this regard exist only for glossy or mirror surfaces - abrasive substances are prohibited in this case;
- The high moisture resistance of PVC panels can withstand even a real flood. The ability to dry on its own, without cracks or damage, is a very important factor, and the material does not require third-party intervention. It may be necessary to remove the plastic ceiling only if there is really too much water;
- Facing a bathroom or balcony can also be done with such panels, and it is moisture resistance that plays a decisive role here. And for the kitchen, such material characteristics are especially relevant;
- Installing panels helps hide wires and communications from pipes, and this is very convenient - there is no need to make special recesses in the surface of the ceiling, and the wiring with pipes is kept quite freely;
- Ceiling defects can be hidden behind PVC panels. Even serious unevenness in the ceiling does not pose any difficulties for installing the panels, and the panels themselves are aesthetically an excellent way to hide defects and unevenness, without the need for additional plastering or finishing work on the ceiling;
- Temperature changes do not affect PVC, the shape of the panels remains stable, as does its stability, which is very convenient;
- Installation of spotlights is carried out without problems - these are the ceilings that are ideally designed for this type of lighting. They can be mounted anywhere, and they look very beautiful;
- Preventative work, repairs and maintenance of plastic ceilings can be done on your own, which does not cause absolutely any difficulties or problems. The frame is assembled initially, then plastic panels are attached to it. There is no need for a perfectly flat ceiling surface;
- By including soundproofing materials in the frame, you can obtain a high degree of sound insulation, and such work is also very simple to carry out;
- The environmental safety of plastic ceilings is very high. The coating does not create an unpleasant odor due to temperature or moisture and does not decompose. This makes this ceiling qualitatively different from a suspended ceiling of a similar type;
- The price of a PVC panel is very affordable, you can do the installation yourself, all these factors included in the package can significantly affect the savings of your home budget.
Related article: DIY playground decoration
How to make a plastic ceiling in the kitchen
This work is quite simple. In addition, if a mistake is made at any stage - from calculations to fixing the plinth, there is always an opportunity to correct the defects without increasing costs too much.
Materials and tools
To finish the kitchen ceiling with PVC panels you will need:
- the finishing itself - the number of lamellas is determined by dividing the surface area by the area of the plank. In this case, it is worth considering not only the width, but also the installation method. For the seamless option this does not matter, but when laying rusticated ones - yes;
- material for the frame - in the kitchen, a metal frame is preferable, since wood is not as resistant to moisture as galvanized steel. To build a suspension system, you will need a guide profile - it is mounted around the perimeter of the room, and a ceiling profile - forms a frame. This is where you need a plan: looking at the drawing, it is easier to take into account all the features of the room and correctly calculate the number of profiles;
- fasteners - determined by the nature of the base ceiling surface: as a rule, it is concrete, so you will need a self-tapping screw or dowel for concrete;
- ceiling plinth - covers the junction of the finishing with the wall.
In addition, you need the following tools:
- screwdriver - for fastening the frame;
- scissors for metal and a knife for plastic;
- pliers, hammer;
- level, tape measure, square.
Ceilings made of PVC panels in the kitchen: calculation of materials
Correct calculation of materials will allow you to purchase the required number of panels and create a beautiful design in the room. Having measured the length and width of the ceiling, the resulting figures are multiplied, then divided by the area of 1 panel, its size is indicated on the packaging. Experts advise adding 15% to the result obtained; this is necessary for reserve, because during the work there are cuts or offsets that need to be replaced.
To calculate the number of PVC panels for the kitchen, you need to measure the area of the ceiling, then divide it by the area of 1 panel
A more rigid profile is used for placement along the ceiling - UD, and for transverse placement - a lightweight one - CD, dowels are purchased at the rate of 1 piece per half meter of profile, self-tapping screws are taken in identical quantities.
It is better to purchase fastening materials with a small supply, this will save you from an unnecessary trip to the hardware store. The ceiling plinth will complete the invented design; it will be a harmonious completion of the renovation work to create an ideal and low-maintenance ceiling.
How to make a ceiling in the kitchen
To begin with, remove the old finish from the base ceiling surface: paint, whitewash, wallpaper. If the plaster is old and begins to crumble, it is worth completely clearing the ceiling of it. There is no need to re-plaster, but priming with an antiseptic primer is a must.
If there are traces of rust from leaks or mold on the surface, the plaster will have to be removed completely, and in some cases, part of the concrete will have to be removed.
- The future ceiling must be exactly horizontal to the floor, so the distance to it is set aside from the floor. To do this, select the lowest corner, mark the level of the frame, then exactly the same distance is laid in other corners. A mark on the wall is made using a chokeline, or using a cord rolled in blue.
- Along the marked line, the guide profile is secured to the wall with self-tapping screws or dowels.
- The location of the ceiling profile is marked on the ceiling. The pitch between the slats is usually 60 cm. However, when laying ceiling sheets, the distance is determined depending on their size.
- The ceiling profile is fixed to the ceiling using rigid U-shaped fasteners. The step between them should not be more than 70 cm. The suspensions are installed on the ceiling surface first, and then the ceiling profile is fixed, guided by the marked lines.
The installation of each element must be accompanied by a check for verticality and horizontality. This is necessary so that the installed ceiling remains parallel to the floor.
- At this stage, all necessary wiring and communications are installed, which must be hidden by slats.
- A starting strip is mounted along the perimeter below the guide profile. The slats are cut so that their length is 0.5 cm less than the distance between the walls.
- The ceiling in the kitchen is made of plastic panels and is assembled from the window, since this area is the most illuminated. The lamella is inserted into the starting strip and secured to the profile with self-tapping screws through the protrusion, and not through the base material. The next element is inserted into the groove of the starting strip and inserted into the groove of the previous lamella. The mount is the same.
- The last lamella usually has to be cut to width. First, it is inserted into the starting bar, and then, thanks to the flexibility of the material, into the previous one.
- A ceiling plinth is fixed around the perimeter.
- To install lighting fixtures, a hole is pre-drilled in the panel intended for this purpose. The material is also cut in advance in order to go around a pipe, box, protrusion, etc.
Repairing the ceiling in the kitchen with plastic panels is possible without installing a frame. This method is implemented with a flat ceiling surface and in cases where there is no need to hide communications or install hidden lighting - backlighting, built-in lamps. This work is even simpler: apply liquid nails to the surface and glue the lamellas one by one. In this case, the starting strip is not needed, but the ceiling plinth will be needed.
A ceiling made of panels in the kitchen is a budget, but quite practical and decorative option. It is inferior in variety of forms to plasterboard, but thanks to the reproduction of any natural and artificial materials, it is no less interesting.
Carrying out installation work
The question “how to make a plastic ceiling?” is of interest to many home craftsmen at the moment, since everyone who does not classify themselves as oligarchs wants to save on repairs. Naturally, installing this ceiling structure yourself will be much more profitable than entrusting such work to specialists. In addition, PVC panels are not particularly difficult to install, and anyone can handle their installation.
Find out also about the best way to paint the ceiling in the kitchen.
List of required materials
So, to carry out installation work you will need the following:
- Polyvinyl chloride glossy panels. Their dimensions are standard: 250 mm wide, 600 cm long. The thickness of the material can vary between 5-8 mm. If you do not plan to decorate the ceiling with large and heavy elements, then you can choose the thinnest panels.
- Profiles for fastening the ceiling structure. L-shaped profile, PVC molding plinth, internal and/or external corner (depending on what kind of ceiling structure you have in mind). Ceilings made of plastic panels in the kitchen are most often installed without lathing, and the junction of the wall and the panel is covered with a foam molding.
L-shaped profile.
- Wooden slats measuring 40-50 mm wide and 20-25 mm thick. The length of the slats is determined by the size of the room. It is advisable to use materials made from softwood. Instead of slats, you can use CD and UD profiles, which are used when installing drywall, however, in this case you will have to fasten the panels with screws.
Advice! It is not advisable to use a wooden frame in rooms with high humidity, since there is a high risk that the slats will behave over time. If you decide to install wooden sheathing, treat the frame with a special protective solution that will protect the structure from both moisture and insects.
- A U-shaped metal fastener that is used for drywall profiles. In this case, we will use it to attach wooden slats.
- Plastic dowels and various screws, as well as metal staples for the stapler.
- Electric drill or screwdriver.
- Bench hammer, pliers, stapler.
- Metal scissors if you will use metal profiles during installation.
- Construction level, wood saw, tape measure.
- Construction knife, construction corner, marker or pencil.