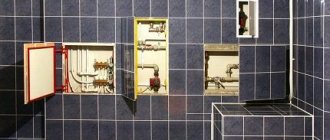
There are several functional areas in the bathroom, three of them are related to the location of plumbing equipment. This is the area at the sink, the area near the toilet and the bath or shower area. As a rule, it is the toilet and shower areas that are separated by a partition. The bathroom also needs at least one storage area, but it’s better to have several to store household chemicals, cosmetics and towels separately.
Very often, a bathroom is forced to be combined with a laundry room and, accordingly, a washing area appears, in which there is usually a washing machine and a laundry basket. For more details on filling and planning the bathroom and toilet, read the article “Arrangement of plumbing fixtures in the bathroom, toilet and combined bathroom. Dimensions of plumbing equipment"
If you have a very small bathroom, then we usually don’t talk about full zoning; it’s good if everything you need just fits into the existing volume. Read about how to expand a bathroom in the article “Redevelopment of a bathroom, toilet and combined bathroom. Basic principles with examples."
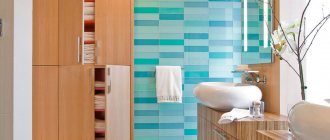
An example of zoning using partitions in a bathroom
But if you are lucky, and the dimensions of the bathroom allow you not only to calmly place everything you need, but also to experiment with the arrangement of plumbing fixtures, and also give you the opportunity to play with space and zones, then this article is for you.
Using a small ledge to zone the toilet area
Most often they try to disguise and hide the toilet; this is the area that is the least attractive. If you have such a desire, then plan to place the toilet, hygienic shower or bidet away from the entrance. For additional camouflage, you can install a blank or decorative partition. You can find an overview of possible partitions for zoning here.
Partitions for bathroom zoning
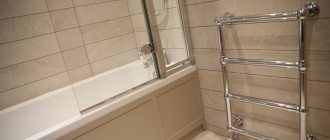
For a shower area, a partition is not just a decorative detail, but a reliable means of preventing splashes and leakage, which is why increased demands are placed on it.
Partitions in the bathroom should be made of materials that are not affected by moisture, and the greater the likelihood of water getting on the partition, the more moisture resistant it should be.
Glass partition for bathroom
Glass is absolutely not afraid of water, transmits light, looks light and elegant, so it is ideal for shower enclosures. It is better to make the partition from tempered glass, as it is stronger and safer.
Partitions made of colored and plain glass in the interior of a bathroom
However, not all so simple. When choosing a glass partition for a shower, the main attention should be paid to the fittings (fasteners and seals); it should also be moisture-resistant and waterproof, and should not change its color under the influence of water and cleaning agents.
Glass blocks will also serve for a long time, but they are not very popular in Russia, since the majority of the population associates them with Soviet factories, bathhouses and canteens, where they were used in abundance.
We create a glass partition with our own hands
The small area of the sanitary room in most “Khrushchev” and “Brezhnevka” buildings does not provide residents with the necessary coziness and comfortable living conditions.
Therefore, the question arises: how to make a bathroom partition in such a way that it is convenient, not too expensive, and not subject to mechanical disturbances.
Having decided on these indications, you can begin to achieve your dream.
If you really want to, you can assemble and install a glass curtain of the simplest design on your own.
For this you will need:
- tempered glass of a suitable size, 4–10 mm thick with processed edges;
- aluminum profile with clamps, matching in size to the thickness of the glass;
- fasteners (dowels, screws and self-tapping screws);
- fastenings for the movable part of the partition;
- set of drills;
- screwdriver;
- adjustable wrench;
- sealant or liquid rubber;
- building level;
- impact electric drill with screwdriver mode;
- a simple pencil or marker;
- roulette;
- hammer;
- dry clean rag.
Step-by-step instruction:
- Mark the location of the glass partition and its attachment points to the ceiling and floor (or bathroom).
- Drill holes in the ceiling and floor for the dowels and carefully hammer them in with a hammer.
- Make holes in the aluminum profile and attach it with self-tapping screws.
- Mark the holes on the glass and make them using a special diamond-coated drill, stepping back from the edge of the canvas at least 10 mm.
- Mark the points for attaching the glass to the profile and drill holes.
- Fill the profiles with liquid rubber or sealant, insert the glass into it and clamp it using special clamping screws.
- Mark the holes for attaching the hinges, drill them, and secure the sash.
- Seal all joints with sealant, remove excess with a dry cloth.
We suggest you read: How to supply water to a shower stall
It is strictly forbidden to use ordinary window glass when installing partitions yourself - this can lead to serious injury and disfigurement.
Bathroom partitions made of plasterboard, concrete and foam concrete
Drywall itself is not the most reliable material, but its moisture-resistant version, lined with ceramic tiles or mosaics, can easily exist in the bathroom. A plasterboard partition can even serve as a shower partition if good waterproofing and high-quality cladding are done.
One of the advantages of plasterboard partitions is the ability to make them curly, rounded, with niches, with lighting and shelves. In such a partition you can organize a storage area. But there are pitfalls here too. In order for such a partition to serve for a long time and please the eye, you need a very good specialist tiler, since this design has external corners, the installation of which requires special skill and good equipment.
Round concrete shower screen in the bathroom
Foam concrete is also suitable for such partitions, but it is difficult to lay out rounded shapes from it. But you can cast anything from concrete, but again you can’t do it without a specialist.
LiveInternetLiveInternet
Partitions inside the bathroom - made of brick or moisture-resistant plasterboard - are initially designed for zoning. However, if you look at them from the point of view of a decorator, such a design can also fulfill other roles:
- become an interesting decorative dominant;
- serve for additional storage of bath accessories (if there is a niche or shelves);
- turn into a stable support for other design ideas.
With such a wide range of practicalities in mind and your need for interesting solutions, we have put together in this issue a gallery of a variety of bathroom partitions that may lead you to the optimal solution. You will see:
- 16 examples of low partitions for zoning in the bathroom, including 4 options from different angles;
- 12 examples, including the use of high zoning partitions (up to the ceiling or at a distance of 50-70 cm from it), including 3 options in detail and even with equipment placement plans.
But before you move on to reviewing the ideas, a few words about when this solution is really appropriate. The idea of installing a partition in the bathroom appears in different situations. But most often this is due to the need for visual isolation of some plumbing fixtures (essentially a functional area) combined with the possibility of not counting every square centimeter.
We are not talking about the fact that the bathroom must necessarily be large, but you should have some reserve space. In terms of square meters, this is quite a bit (with a partition depth of 15-30 cm and a length of 50-80 cm - no more than 0.1 - 0.24 sq.m), but still, this solution is best suited for a bathroom from 4 sq.m. The shape of the room does not matter.
If we are talking about high partitions, it also makes sense to take into account their visual volume. That is why we do not recommend considering such a design if the bathroom area is less than 6-8 square meters; an exception can be made for a very short partition that resembles a ledge (length no more than 30-40 cm with a height “to the ceiling”).
Proceed to view the gallery and do not forget about these restrictions!
__________________________
low zoning partitions for the bathroom:
Height - from 1.00 to 1.50 m, depth - depending on the available area, length - at least 40 cm, but not more than 1 m.
In our country, they are most often used to visually separate the toilet and bidet, and sometimes to separate the bathroom, suggesting intimate relaxation. In the West, it is quite popular to use such partitions as a support for glass delimiting the shower area. See this section for different options for using low partitions.
4 tours of bathrooms with low functional partitions: option 1 - partitions on both sides of the washbasin separate it from the bathtub (left) and toilet (right), these can also be furniture modules with shelves:
option 2 - a partition between the washbasin and toilet as part of a plasterboard structure for the installation of plumbing fixtures:
option 3 is another example of two partitions enclosing a washbasin, on the left is a shower (the partition is like a rack for glass), and on the right is a bathtub:
option 4 - two low partitions separate the toilet (on the left) and the bidet (on the right), in unison with them there is a partition separating the bathtub from the shower stall:
__________________________
high partitions for zoning the bathroom:
The practical meaning may be similar to low partitions. However, it becomes possible to create storage reserves or a decorative dominant.
Thanks to the high partitions (up to the ceiling or so), you can create niches with shelves (photos 4 and 5) or even create a spacious relaxation area in a large bathroom (photo 7), placing the partition in the center of the room.
Photo 9 is an example of the fact that such partitions can be made not only from building materials, but also as a piece of furniture (for example, a wooden shelving unit).
3 tours of bathrooms with high partitions: option 1 - a partition separates the shower area and toilet:
option 2 - two partitions opposite each other, the right one divides the toilet-bidet area with a shower, the left - a washbasin and a bench for resting after bathing:
option 3 - a combination of high and low partitions in a spacious bathroom:
https://www.design-remont.info
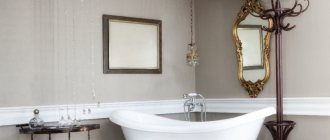
Decorative partition for the bathroom
Decorative partitions are used to separate the toilet area from the rest of the bathroom space. Regardless of whether splashes of water get on the partition or not, it must be resistant to moisture and mold formation; as a rule, various finishing coatings impart such properties: enamels, varnishes, impregnations.
Plastic and wooden partitions for zoning a bathroom
A decorative partition can be made of wood, MDF, plastic or metal. It could be a forged structure, a laser-cut MDF panel or a wooden lattice; modern technologies make it possible to make amazing partitions for zoning, and designers are constantly throwing up ideas for comprehension and implementation.