Wall preparation - foundation requirements
Before laying tiles on the wall, you need to make sure that the rough surface of the wall should be perfectly flat. Small differences of a few millimeters are possible. It is important to understand that the smoother the wall, the easier it will be for a beginner to handle. The wall will not always be level, especially if tiles were previously laid on the walls, and after removing them, significant irregularities have formed on the walls. These irregularities need to be leveled out. In this article we will not touch in detail on the issue of leveling the surface of the walls; we only need to mention some of the “tricks” of experienced craftsmen. If you want to save time and money, you can use the same tile adhesive to eliminate small irregularities. The glue is applied with a spatula and leveled using the rule.
After applying the solution to the wall, you should wait a day. The specified time should be enough for the mixture to dry.
If the walls were initially already puttied and brought to perfect condition, it is necessary to prime the walls. To do this, the walls are cleaned of dust and other contaminants, and a primer is applied to them using a roller.
We will not recommend using any suitable primer. We will recommend a proven one, which is used by professionals - use the “Betonokontakt” primer.
Important! If you lay tiles on a wall with differences in level of more than 5 mm, this may result in the formation of “steps” between the tiles.
This happens as the glue dries; it spreads evenly and can “pull in” the tiles that have more tile adhesive underneath. It is not possible to correct such a defect without compromising the integrity of the entire finish. Therefore, it is better to seal all the recesses in advance and wait until the solution dries.
Installation stages
Before starting tiling work, it is recommended to watch the video on how to properly lay tiles on the wall, as well as use the following step-by-step recommendations:
- measure the surface area for cladding and count the number of tiles;
- decide on the size of the tiles and the presence of decor in the coating;
- create on paper a layout plan for the facing elements;
- prepare the necessary tools;
- prepare glue and material for grouting;
- prepare the work surface;
- installation.
Any construction and repair work begins with preparing the working surface.
Preparing the surface for cladding
To properly lay tiles on the wall, you must prepare the work surface. Further installation, as well as the result of the facing work, depends on how competently the preparatory measures are carried out.
Preparing the surface for cladding includes the following points:
- carefully inspect the wall covering;
- for minor defects, you can limit yourself to one or two layers of plaster. Leveling the surface is done using a level and spatulas. The surface can be leveled using various materials, depending on the purpose of the room. Thus, for residential premises, gypsum-based compounds are used; in rooms with high humidity (bathrooms and kitchens), cement-based compounds are used for leveling. Plaster is used for concrete and brick bases. If the height differences on the working surface are too large, plasterboard slabs are used to level the coating;
- before eliminating defects, it is necessary to remove the layer of old coating, then remove dust and dirt;
- Before final installation, the walls must be primed;
- After priming, the coating must be treated with an antiseptic composition.
After completing the preparatory activities, you can begin laying the tile material.
Surface marking
Preliminary marking of the surface will help to correctly lay the tiles on the wall. Using a level, you need to mark a line that will indicate the height of one facing element relative to the floor. You can lay tiles starting immediately from the second row. In this case, a metal block or profile is fixed on the drawn line to support the tile.
You can glue the tiles to the wall after laying the floor covering. Then the installation of tiles begins from the first row. Laying tiles from the second row is carried out when the installation of the cladding begins from the wall.
Choosing tiles
Having figured out how to quickly lay tiles on a wall, you need to understand that high-quality installation also depends on the correct choice of facing material. You can choose any tile (smooth, plain, with a matte surface, with ornaments), but the material must meet the following requirements:
- be of high quality and durable;
- match the general style of the room;
- have the right size.
When calculating the amount of tiles for cladding, you need to take another 10% additionally in case of defects or adjustments during the installation process.
Necessary materials with tools
To properly lay tiles on the wall, you need to prepare the necessary tools and materials for tiling work. Check out the list of main tools:
- adhesive composition;
- spatulas (regular, serrated and rubber);
- brushes;
- primer;
- composition for grouting joints;
- building level;
- roulette;
- plastic crosses for setting the width of the seams;
- rubber hammer;
- pencil;
- tile cutter (manual or electric).
The materials and tools are prepared, the surface is prepared, and installation can begin.
Installation
Before you begin installing the cladding, it is advisable to familiarize yourself with the video below on how to correctly lay tiles on walls, as well as the following recommendations:
- After marking, you need to fix the support bar at the level of the second row of tiles. This action is necessary to prevent the upper rows of facing elements from sliding;
- The adhesive, ready for use, can be applied directly to the wall or to each tile separately. The applied composition is leveled using a spatula with serrated edges;
- installation of the facing coating can be done from the center (for complex installation) or from the edge (simple installation);
- solid elements are laid first, threaded elements - after installation is completed;
- after applying the adhesive, lightly press the tile for better adhesion to the surface, then tap it with a rubber hammer;
- if it is necessary to make adjustments to the laid tile element, then this must be done before the solution has hardened;
- to determine equal intervals between seams, special plastic crosses are installed;
- The bottom row of tiles is installed last. The lower row may contain threaded elements (if necessary).
During the installation process, do not forget to check every two laid tiles using a level. If necessary, adjust the laid elements with a wooden hammer.
It is worth paying attention to such an important point during installation as installing tiles in the corners. The following connection methods are distinguished:
- perpendicular, when the seam is visible;
- labor-intensive, in which you need to cut the end at an acute angle (45 degrees); then they are joined;
- the joint is closed with a special profile;
- In the bathroom, sealant is applied to the grout joints.
Depending on the method of installing tiles on the walls, a certain amount of waste remains. With the simplest installation, when rows of tiles are laid horizontally or vertically, a minimal amount of waste remains. Diagonal cladding, on the contrary, leaves the largest amount of waste. The most difficult tiling method is considered to be laying tiles in a herringbone pattern.
You can lay the tiles so that the wall looks like brickwork. In this case, offset laying of tiles is used. Which option to choose for installation depends on tastes and preferences in each specific case.
Errors may occur during operation. So, if an uneven surface is noticed during installation, it can be corrected using tile mortar (but not too thick a layer). The resulting chips during installation can be hidden when filling the seams with a fugue at the end of the work. Small defects can be covered with borders, or another decorative design can be selected (possibly in the form of a film).
Properly executed cladding, in compliance with installation rules, will delight you with a long service life.
After installation is completed, one more part of the work needs to be done.
Grout
It is necessary to correctly glue tiles to the wall, observing each stage in the technology of facing work. When laying the tiles is completed, you need to wait until the mortar has completely dried. Plastic crosses, to determine the width of the seams, must be removed before the solution dries.
The grout for the joints should match the color of the tiles. But, if desired, you can make the seams, on the contrary, contrasting. The grout is applied using a rubber spatula. To avoid leaving gaps between the seams, you can treat the edges with a more liquid fugue solution. By the way, grout allows you to close small defects after laying the facing coating.
Pay attention to the final stage of the work. When the seams have lightened, you can begin to clean the tiled surface. The excess fugue is washed off, and the tiles are rubbed to a shine.
Choosing tile adhesive
There are a large number of brands on the market specializing in the production of tile adhesives. It is quite difficult to choose from such a variety, so it is worth initially evaluating the criteria:
- technical characteristics of the mixture;
- operating conditions (humidity, temperature, ultraviolet radiation, external or external decoration);
- consumption, which will allow us to talk about the efficiency of the chosen option;
- price.
All adhesive mixtures differ in component composition, they can be:
- cement;
- latex;
- silicone;
- epoxy.
If we talk about the cement composition, which is just suitable for laying tiles on walls - after gluing the tiles to the wall, you can “work” with it only for 20 minutes (straighten, pull). Therefore, it is better to act quickly, harmoniously and constantly monitor the level.
Comment from our master: “Tile adhesive dries quite quickly, for professionals this is a plus, but for a beginner it can be a problem. There is a simple “life hack” - you can add a little detergent (absolutely any) to the mixture, it will slow down the drying process, and the master can easily adjust the level of the product at any time. But you need to add very little of it - 20-30 grams per bucket of solution.
To mix the solution you will need water and a dry mixture. Water, in the volume indicated on the bag, is poured into a plastic round bucket (it is most suitable for kneading) and the required amount of the mixture is added. After this, using a construction mixer, mix the solution until a paste-like mass is formed.
Our expert advises: “It’s better to knead at a slow speed so that no air bubbles form in the solution.”
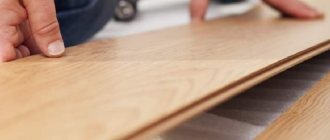
How and with what to cut tiles
Cutting tiles is a necessary stage of work. There are few places where you can find an object that did not require trimming. Since we are talking about tiles (they have a more porous structure than porcelain tiles for floors), they can be cut in several ways:
- glass cutter - to perform the manipulation with the greatest precision, the tile is pre-soaked in water for an hour, after which it becomes more pliable for cutting;
- a grinder on which a diamond-coated disk is installed;
- A tile cutter is one of the most common tools, affordable, and can be found in every hardware store.
Note that if you are planning to lay tiles on the floor as well, then it is better to immediately take care of purchasing an inexpensive tile cutter. It's not expensive, but at least it will help with tough floor tiles.
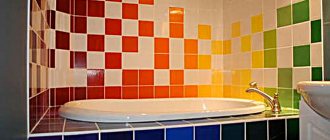
How to beautifully lay tiles in the bathroom
Ceramic tiles as the main material for finishing bathrooms have become so widely used that they have become a truly classic solution, a basic one when deciding on the choice of material. Especially large, we can confidently say, unlimited opportunities for creating a unique design are provided today, when the market is literally overflowing with tiles of the widest range and decent quality.
Yes, tile is not the cheapest material for finishing surfaces, but it can be considered one of the most reliable and durable materials. Tiles, unlike cheap and quite practical plastic, are not afraid of scratches, impacts, pressure, do not create a space in which mold can accumulate, and do not fade in the sun. The tile feels very comfortable in conditions of high air humidity (hello to all types of wallpaper and wooden materials), does not ignite (let’s think about plastic again), and is easy to care for - just wipe with a rag or sponge with a minimal amount of detergent or without it at all.
The variety of color and ornamental design options for tiles, their textures, sizes, shapes, and the abundance of tile decor allow, if desired and with sufficient effort, even a non-specialist to create a bathroom or toilet interior of amazing beauty and comfort. As one of the finishing materials, ceramic tiles are often found in kitchen interiors, but today we are still talking about the bathroom.
The most important factor when choosing your favorite option for laying out tiles in the bathroom or creating your own, unique one is the area of the room and the height of the ceilings in it: the fact is that a huge number of options are simply not suitable for a small bathroom, visually distorting the space and making it even smaller. It is clear that the color scheme should be chosen lighter.
We will not discuss the technology of laying tiles, we will focus only on a few of the most proven, repeatedly and successfully tested principles of its arrangement and color combinations, which allow us to achieve maximum effect and brighten up some objective shortcomings of the room.
Read also How to decorate a window for the New Year. Ideas, examples, photos
You can see all the advantages of the proposed layout methods in the photo, so we will only briefly outline the main features of each method.
֎ Horizontal lines. Alternating contrasting lines create a feeling of integrity, coherence, order, and also visually expand the space. The width of the stripes can be very different, but do not get carried away with experiments. ֎ Vertical lines. The vertical orientation of the cladding, with one or many lines, on the one hand, visually narrows the space, but on the other, raises the ceiling. Lines can also be of different widths.
֎ A border formed from the floor by 1-2 rows of tiles of the same color as the floor tiles. This is a traditional option, visually expands the space and “lowers” the ceiling. ֎ The next option, called a “wall panel,” is a development of the previous one and has the same effect on the perception of space. In this case, there is no strict color connection to the floor tiles, however, at least 1/3 of the height from the floor is laid with tiles of a darker color. There are options when the bottom third of the wall is finished with tiles of lighter shades, or a method when the same third is shifted to the middle of the wall.
֎ Accent elements in different functional areas. As a general rule, elements of tiles of other colors are laid out on a lighter background, which take some of the attention to themselves. There should be only 1-2 such elements, maximum three in the most spacious bathrooms. ֎ Kaleidoscope. Anyone who has looked at the randomly formed, but possessing some kind of structural logic, patterns in this children's toy will understand what we are talking about. This requires a large supply of colorful tiles and creativity. ֎ Separate color for each zone. This rather strict type of layout does not involve mixing colors on one surface, the exception is usually the floor, which is laid out with tiles of the same colors that were used on the walls (as an option - a chessboard).
Read also Liquid wallpaper in the interior: photos, examples, tips, ideas, advantages and disadvantages
֎ Splash is a type of layout for spacious rooms, which consists of haphazardly arranged, splash-type tiles in a tone contrasting with the main color of the wall. ֎ Geometric patterns. A much more classic version, which has been relevant since Antiquity and will probably always be popular. However, you need to understand that cramped spaces do not accept “geometry” very well; here you need to show a lot of imagination in order to place a pattern that will not depress perception.
A combination of several methods may be the most successful option, which can advantageously highlight the features of the location and size of the bathroom. In any case, all the proposed rules are nothing more than recommendations; every owner of an apartment or house has every right and absolute freedom to create his own design, adhering to the rules or ignoring them. We invite you to explore the options presented in the photo, which may suggest a specific idea for implementation or become a source of inspiration for personal creativity.
What angle to start from?
Regarding installation technology, installation options may vary depending on the type of room, its area, the presence of complex communication nodes, and corners. As a rule, craftsmen initially carry out markings in order to thereby reduce the number of cut tiles and avoid problem areas. Laying can begin from the door from the entrance or the far wall, but there is a rule that the whole tile should be in visible areas, and the trimmings should be in places closed from visual contact.
Our expert advises: “In addition to the above rules, there is one more important technique. It is better to lay the tiles “from bottom to top”, without gluing the very bottom row. This is due to the fact that after laying the tiles on the floor, its level will rise, and according to all the rules, the wall tiles should “cover” the floor tiles. Therefore: we measure the approximate height of the bottom tile, draw a horizontal line for the beginning of the second row, ideally screw a wooden block along the line (for convenience) and begin laying the tiles from the second row. Then the floor is laid, and after that the bottom row of wall tiles.”
Laying tiles on the floor
You probably don’t realize that ceramic tiles are divided into four types based on their impact resistance properties? So, the “weakest” tiles belong to the first class - they are usually installed in bathrooms. The most durable tiles, the highest, fourth class, are used at the entrances to buildings, institutions, etc.
The technique of laying the floor is similar to the work associated with wall cladding - here it is also necessary to determine the starting point.
This point should coincide with the leading vertical row of the wall.
- The tile joints must be sealed the next day with a specialized sealant or clean cement mortar. A rubber spatula is used for this. For wide joints (up to 5 mm), a little sifted sand is added to the cement.
- It is necessary to apply an absolutely straight ruler to the selected wall, and attach a corner to it. Then, stretch the tape measure along it so that you get a line perpendicular to the wall, reaching the opposite wall.
- Then neat pieces of tiles are cut, which will be laid in the corners and along the walls. They should be glued in such a way that the tile rows on the floor and walls are strictly symmetrical.
The notched trowel is extremely convenient for working with floor tiles
- Work begins from the corner of the room farthest from the doors. The tiles cut into regular pieces should be laid along the walls.
- The tiles must be laid at the same level. The tiles are deposited with gentle blows of a rubberized hammer. Try not to step on newly laid surfaces, but if absolutely necessary, place a heavy, flat board on the floor that can be stepped on.
Advice! You will always have a choice - whether to cut off the bottom of the door jamb, or cut the tile to its shape. So, when cutting a small piece, be sure to use a tile cutter to avoid splitting!
Use pliers to break off the piece you cut, and then carefully work the edge using a block or sandpaper.
First you should try on the cut piece, and only then, making sure that everything is in order, glue it on. Start applying the sealant from the corner farthest from the doorway, trying, if possible, to use it extremely sparingly. And of course, until it dries completely, it is not recommended to step on the tiled floor surface.
Step-by-step process for laying tiles
The process begins by attaching a guide to the wall, which will serve as a starting strip for the second row from the bottom. It can be in the form of an aluminum profile or a wooden beam.
Using a spatula with a smooth side, apply the glue to the wall (you can apply it to several tiles at the same time), and then spread it with the serrated side of the spatula. The same procedure for applying the adhesive is performed on the tiles.
By the way, the choice of the size of the trowel teeth depends on the size of the side of the tile:
A plastic cross is placed on the guide profile to ensure a uniform seam horizontally. The tile with glue applied is pressed against the wall. Depending on the thickness of the layer, you may need a rubberized hammer; tap it on the tile from the center to the edges to evenly distribute the solution and remove excess.
Comment from our master: “A rubber mallet is good, but most masters prefer to tap the tiles with just their fist or palm.”
All the tiles of the lower horizontal row are laid out using the same principle, and their evenness must be checked using a bubble level. Plastic crosses are inserted between the tiles to maintain the width of the seam.
We have a separate article on our website about what size of crosses is best to choose. Read more at the link on the right. Having checked the level of the bottom row, you can begin laying the next row, not forgetting to constantly check the horizontal and vertical, and adjust the position of the tiles if any defects are found, in the form of “steps”.
Remember, tile adhesive can be easily adjusted within 20 minutes.
The thickness of the adhesive layer on walls is usually less than for floor installation. A layer of 4-6 mm is enough, but do not forget that on walls that were initially not entirely level, the consumption of the solution may increase.
The initial setting of the glue occurs in the interval from 30 minutes to several hours, so it is very important to pay attention to whether unevenness, shifts, or disturbances in the pattern have formed during this time. After 3-4 hours you can remove the plastic crosses.
To be sure, you can stretch a thread along the upper edge of the tiles; this will help you constantly monitor the horizontal level.
The next and final stage of installation is grouting. It is performed a day later, as soon as the tile adhesive has completely hardened.
How to lay tiles on a wall correctly: necessary tools and materials
Proper laying of tiles is not complete without components. You will definitely need tile adhesive, sealant and grout, primer and putty, plastic crosses, and a device for mixing the glue (you can use a spatula).
Before you start laying tiles, you should prepare all the necessary tools and materials in advance so as not to be distracted during the work process.
It is necessary to take a responsible approach to the selection of elements such as:
- Tile saw;
- Ruler and pencil;
- Master OK;
- Level;
- Wooden slats;
- Bucket for solution;
- Tile spatula.
And one more integral component is the tile itself. In order not to make a mistake with the quantity, you just need to add an additional 10% to the resulting number.
Related article: How thick should a wall made of aerated concrete be?
Grouting joints
As already indicated, grouting is carried out only after the glue has completely dried. Waiting times vary between 24-48 hours. It all depends on the microclimate in the room, that is, temperature, humidity level, the presence of drafts, and most importantly, the thickness of the layer.
To perform the manipulations, you will need to purchase a rubber spatula and a special grout mixture; there are quite a lot of them on the market, and they differ not only in composition, but also in color. In construction stores you can find ready-made grout in tubes and jars, or use the classic version in the form of a dry mixture.
Comment from our master: “In normal situations, ready-made grouts are not used. In most cases, cement-based grout is suitable.”
The dry powder is mixed with water until a thick paste-like mass is formed, and applied to all seams using a rubber spatula.
The grout must be applied evenly to all the seams of the tiles and, using a rubber spatula, “rub” it in to its entire depth. After 30 minutes from the moment of application, excess grout is removed with a damp sponge, and after 1-2 hours you can begin to completely wash the walls.
It is very important that the grout is rubbed in completely, without voids. Since grout, in addition to its aesthetic properties, also acts as wall waterproofing. Compliance with the above steps and recommendations will allow you to correctly complete the installation process without much difficulty. Exactly following the rules and observing the proportions when mixing mixtures indicated by manufacturers on the packaging will allow you to achieve the desired effect.