They say that there is no better motivation for action than a visual reminder. If the list of strategic tasks constantly catches your eye, then the risk of forgetting to solve current issues is much lower.
A nice board for notes that appears in the interior will not only give you the opportunity to organize yourself and neatly place all kinds of reminders, but will also serve the purpose of decorating the space. If you want to have an original and eye-catching accessory in your home, don’t rush to the store. Try making your own note board.
What to create from?
“Handmade aces suggest assembling a note board with your own hands from wine corks, hoops, and making it from an old mirror”
You can get a platform for posting notes from anything. Absolutely anything will do:
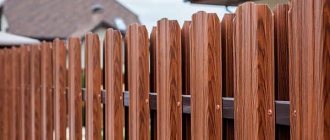
- tree;
- cardboard;
- plywood;
- metal grid;
- a metal sheet;
- glass;
- textile.
Note board
Handmade aces suggest assembling a note board with your own hands from wine corks, hoops, and making it from an old mirror. Use your imagination and look around - maybe you will come up with your own idea of what to make an exclusive home organizer from.
Master class “modern board for notes”
If you want to make a convenient thing of modern design, then make such a tablet board for notes or photographs. How many of these tablets to make, decide for yourself - it all depends on the idea. When you implement several boards, it will be an exposition with interesting inspiring pictures, postcards and notes. Moreover, it is not at all difficult to make it from a purchased document holder tablet with your own hands.
Materials:
- tablet holder for documents (buy at the office);
- acrylic paint;
- nails and hammer;
- Double-sided tape.
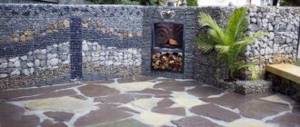
Article on the topic: How to make a bench for your home yourself: wood, stone, metal
Stages of work:
- We paint the paper tablet with bright acrylic paint that matches the style of your interior.
- Let it dry, and in the meantime, think of a place to place it and nail it.
- We hang the dried note board on a nail, securing the corners with double-sided tape to the wall so that it does not warp.
A composition of several brightly colored boards, made by yourself and hung on the wall, looks stylish and fresh.
What types of note boards can there be?
There are different ways to place a note on the board:
- write;
- attach with a magnet;
- attach with buttons;
- stick.
The placement method determines the material and method of manufacturing the accessory.
Cork board
An incredibly convenient thing for attaching drawings, notes, receipts, and paper crafts. Elements are fixed on such a note board using buttons, which can also have an unusual design. An alternative to buttons can be ribbons or braid. They need to be pulled over the work surface so that it is possible to slip a note with information under the strip. The easiest way is to make a note board with your own hands from a solid piece of cork, although improvisation in the design of the product is welcome.
Cork board for notes
Magnetic board
This model is considered a more modern version of a home organizer. Sheets with information on it are fixed with small magnets. In its standard form, the product has a strict and laconic design. You can make your note board less formal by using colorful notes and fun-shaped magnets for notes. It’s a good idea to complement the accessory with metal cups, which will be so convenient to hold unusual-looking pens for making notes.
Magnetic note board
Graphite board
The item comes from childhood. Making a graphite note board with your own hands will bring back memories of school and awaken nostalgia for childhood. Notes are not attached here. Notes are written on the board itself with chalk. Young children will also appreciate the “write and erase” process. They will be happy to spend many hours near the note board.
Graphite note board
Fabric board
This is a real creative testing ground. This is where, and here you can definitely show all your talents and skills. A variety of fabrics will help demonstrate taste and originality of thinking. Use the most innovative ways to design note boards, working on them with your own hands.
A fabric note board will allow you to show your imagination
The accessory can be made from a plain fabric and decorated with applique or embroidery. The patchwork looks interesting. Original macrame decoration. On such a board you can sew many pockets for storing stationery and paper, or attach notes to the fabric surface with special clips and colorful pins.
Note board in patchwork style
With the start of the school year, parents are bombarded with additional information load. And, plunging into school everyday life, a responsible parent (or more often a caring mother) begins to paste his house with reminders: on what day this or that event will take place, what to bring to school, when is the last day for handing in waste paper, what aids to buy and etc. And throughout the entire school year, families with children hang these bright paper stickers: on the refrigerator, in the hallway, on the lamp on the desk.
Notes with reminders are, of course, good, but haven’t you ever felt the desire to somehow organize all this in one place, so that you no longer have to spend extra meters around the apartment looking for exactly the information that is needed at a certain moment? So, it would be very appropriate to post all the information about the school, for example, above your child’s desk. And as a means of recording all notes, use a wall board designed for this purpose. A note board is a decorated flat surface on which you can attach (hold) small pieces of paper with notes, photographs, clippings, etc. using rope, braid, or ribbons.
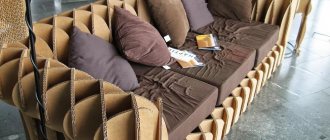
A board for notes will collect all your “reminders” together and help teach your child to plan things and navigate daily tasks. Its use, or rather the shape and color in which it is made, will also add zest to the design of your interior. Therefore, in order to “kill all the birds with one stone,” we suggest making a note board with your own hands. Well, we will tell you how to do this with the help of this master class.
To make a note board we will need:
- scissors, glue gun and 2 glue sticks (can be replaced with glue for fixing textiles, glue “moment”);
- wooden or plastic frame with a back wall, glass is not needed;
- a piece of fabric the size corresponding to the rear base of the frame;
- padding polyester or thin foam rubber of a size also corresponding to the rear base;
- to choose from: elastic band, satin braid, colored ribbon or rope, string, jute;
- decorative nails with a short stem, a mallet with a rubber tip or a hammer to fix them.
MANUFACTURING INSTRUCTIONS
1. First, take a photo frame (it can be either wooden or plastic) and disassemble it into parts. Namely: we take out the glass (we don’t need it) and separate the back wall and the frame itself. Initially we will work with the back flat surface of the frame.
If you suddenly have an old frame lying around, but without the back, don’t rush to buy a new one. Do it like we did: just cut this part out of thin plywood or thin fiberboard to fit the frame.
2. Next, we measure a piece of thin foam rubber or padding polyester according to the size of our back base. It’s worth noting here that if you use padding polyester, the density of your note board will be lower than when using foam rubber.
Having cut the filler to the size we need, we glue it using a glue gun or glue to the back base. Glue it pointwise, but quite often, so that it does not move or hunch over. See below what we should get (we used padding polyester).
After fixing the padding polyester to the back surface, we need to prepare a piece of fabric that will be the main background of our note board. This is where your imagination can fly. This will be the main background of the note board, so choose a fabric that matches the style of your interior in the room and of course your personal preferences. It will be the same in size as our base itself, but it is advisable to make allowances on each side. This is necessary to bend the fabric to cover the padding polyester or foam rubber and fold the edges. The amount of fabric for allowances depends on the density of your workpiece. If it is foam rubber, larger allowances are needed. We used thin synthetic padding with an allowance of 0.5 cm for each side.
Next, using a glue gun or glue, stretch the fabric tightly and firmly fix it along the edges, slightly bending the ends.
3. Now you need to do an intermediate fitting of the rear base and frame. This step is necessary to check if the edges of the back base are in the way of inserting it into the frame. Since sometimes you can make a mistake and bend the fabric too much or bend a very thick padding polyester and then it will be necessary to eliminate this point. So, let's try it on. Hurray, everything is fine for us!
4. Now we again take out the base of our future masterpiece and work only with it. Set the frame aside. At this step we will need: colored rope, decorative elastic, braid or satin ribbon, as well as decorative nails to fix it on the canvas.
5. Next we will do very important work. Using thread and braid, determine the diamond shapes that will directly fix the leaflets. In order to make the work progress more easily, we decided to use a thread to determine the center and secure it with a nail. Here it is necessary to make a note about the nail: its head should be large enough in diameter to allow it to grab your braid, rope or ribbon. We fix the fixing cord or tape along the edges of the rear base again with a glue gun or instant glue.
6. Based on the size of your diamonds along each diagonal, we will measure equal segments (these will be the edges of our diamonds). Since we needed a larger board for sticky notes, we made them very small. The intersection of the threads, as well as the center, is fixed with a nail.
7. Next, bend all the ends of the rope or tape (braid) on the back side using a glue gun or glue. Cut off excess braid, rope or ribbon. Here's what happens:
8. Now we take on the other diagonal. We work with it according to the same principle as with the previous one.
9. Now we have almost come to the end. All that remains is to put everything together.
10. Install the mount, if you didn’t have one, hammer a nail into the wall in the place where you want to see your masterpiece and hang it. Voila!
Where to place a notice board in the house
“A board for notes is a must-have in a child’s room.”
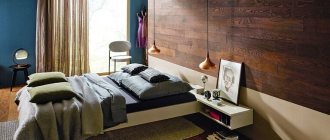
We are used to thinking that note organizers are a staple of office interiors. In our house they are replaced by mirrors and refrigerators. But with the help of a handmade note board, you can very successfully enliven your room space.
An empty wall above the desk will be an excellent place to “reside” for an accessory. Shelves in this area may look bulky, and posters and calendars are somehow not entirely appropriate there. A decorative board for notes, and even created with your own hands, will be the optimal solution to the issue of decorating a work corner.
A board for notes in the design of a work corner.
The appearance of a small, interestingly shaped and designed note board in the hallway will add comfort to everyday life. It should be attached near the telephone shelf or key holder, then the accessory will not discord with the interior and perhaps even emphasize the stylishness of the hallway.
Note board in the hallway
Such a thing is irreplaceable in the kitchen. Housewives are happy to display recipes for culinary masterpieces on the information board and create lists of products to buy on it. It is in the kitchen that notes are most often left for household members.
Board for notes in the kitchen interior
A note board is a must-have in your child's room. For a child, it is better to hang a graphite version so that he can express himself without the risk of being punished, and draw with crayons or a marker not on the walls, but on a specially designated surface for this.
Graphite board in the nursery
Older children will love the magnetic board model for notes. On it they can attach a schedule of lessons and bells or arrange a mini exhibition of drawings.
Magnetic board for notes will appeal to teenagers
If you think about the location of such furnishing elements, then in addition to traditionally fixing them on the walls, which is certainly convenient, boards can be hung on doors. The advantage of this solution will be that the accessory is always in front of your eyes. However, writing on a note board hanging on the door, whether made by yourself or bought in a store, will not be very convenient, since the door leaf is movable and will need to be held so that the board does not “run away” from the marker.
Placing a notice board on the door
Another popular place to mount information boards is in the refrigerator. Here you can also experiment and use its actual wall as a surface for attaching notes, without any additional elements. For greater clarity and for aesthetic purposes, the information field should be highlighted with a frame. For example, magnets can be placed around the perimeter of an improvised note board.
Original note board on the refrigerator
Price and sizes of cork boards
Of course, a cork board is useful for making presentations and for demonstrating a graph of sales growth for a chain trading office, but we know its real purpose. Therefore, the price of a cork board does not depend much on the size and manufacturer.
As a rule, presentation cork boards on the wall are located in the far corner of a stationery store and do not amaze with their brightness and unusual appearance. But the price tag is impressive. For example, a Magnetoplan board measuring 1.8 by 1.2 m with an aluminum frame and a set of fasteners will cost an office 7,750 rubles. There are cheaper options, but the sizes will be very modest. Not suitable for a serious investigation - 40x30 cm and a wooden frame, but the price is 350 rubles. And the average cork board will cost three thousand, and its size will be one meter by twenty meters. It is produced by GBG.
How to make a note board with your own hands
Let's look at several not-so-complicated options for making information boards at home.
Marker board
Keeping in mind that markers write only on smooth surfaces, you should use plastic or glass. In our case, the accessory will be created from an A3 photo frame. We remove the glass from the structure and paint one of its sides with white paint. Let the layer dry and put the product back together. You can completely simplify the task and replace the stage of painting the glass by placing a sheet of white paper under it.
DIY marker board for notes
You will be able to use the resulting note board in different ways. Most often, it is immediately sent to the wall and made into a regular reminder. Less often, a homemade product is made mobile, that is, it is picked up and walked around the room, making the required notes. It makes sense to attach a marker close to the accessory.
The marker board can be made mobile
French board
A cute and functional design can be assembled from scrap materials in just a couple of hours. It is made from cardboard, a piece of pleasantly colored fabric, braid, buttons - in general, whatever the housewife always has on hand. You can make a whole composition from wall boards for notes, assembled with your own hands. A functional selection of accessories will become the interior highlight of the home.
French note board
What to prepare for work
The first thing you need is a solid base. It can be made from plywood, but if you don’t have it at hand, use thick cardboard, maybe even a piece of fiberboard. To make the product soft, you will need to make a padding polyester or foam rubber backing. It is important to choose a fabric with a color and pattern that matches the overall interior design of the room. To decorate the note board, prepare:
- braid or narrow thin ribbon made of satin;
- beads;
- stones;
- buttons.
The tools you will need are: an awl, a ruler, a furniture stapler, a needle with a large eye (a gypsy needle as an option), scissors.
Work progress
It will be easier for beginning needlewomen to work with a base that is not too dense, such as cardboard. A square of a given size is cut out of it. Next, on the base of the note board, make diagonal markings with your own hands so that you get a grid.
Cut the base to the desired size
At the intersection of the lines you will need to make neat holes. Use an awl or large needle. The holes will be needed to fix the padding polyester to the base. Please note that the backing is cut to the size of the cardboard, while the decorative fabric layer is cut out with extra room for hems. The cut is placed on the backing and secured on the back side with glue or stitched with a stapler.
Pin the fabric on the wrong side
All that remains is to finish the board for notes. We pass the braid through the holes made in the base, monitoring the quality of the thread tension. At the intersections of the ribbons we will attach beads or an unusual button design. The tape will act as a note holder.
Pull the tape diagonally
If you stop fussing with weaving the note board with braid, you will get a soft surface to which you can attach reminders with pins.
Secure the tape at the intersections
Chalk writing board
This organizer will help you get rid of piles of papers. When making a chalk board with your own hands, feel free to mix paints to give its surface exactly the color that is pleasing to your eye. As with the French board, you will need a rigid base, perhaps a ready-made picture frame. This base will need to be painted, but not with pure acrylic paint, but with a mixture of it and grout for the seams. The ingredients are mixed in the following proportion: add 1/5 spoon of grout to one spoon of paint.
Chalk Board Ingredients
The cardboard is coated with this composition in several layers until an opaque surface is obtained. The border frame of the note board is also painted, but with contrasting paint.
The surface is covered in several layers
The dried base must be sanded with a piece of chalk. Lay it flat and rub the surface well. The resulting dust is removed with a sponge. All that remains is to assemble the structure and hang it in the chosen place.
If you decide to create a note board with your own hands in a minimalist interior, refuse to frame the base. Simply cut a piece of plywood and paint it with the above composition.
DIY chalk board for notes
Master class “chalk board”
An excellent opportunity to get rid of a lot of paper is a chalk board, which you can make yourself. Drawing and writing with chalk is fun and easy, so everyone will appreciate this idea - from children to adults. It's nice that you can choose the color of this board at your discretion. To get a stylish shade of lavender or mint you need to mix white paint with lilac or green paint.
Material:
- acrylic paint for the board and frame;
- a hard brush with even bristles;
- a frame with a base or just a base in the form of hard cardboard or plywood;
- grout for seams;
- plastic cup and spoon;
Stages of work:
- Take 1 plastic teaspoon of paint, add 1/5 teaspoon of grout and mix everything thoroughly in a small plastic container, such as a glass.
- We paint a cardboard or plywood base with this paint in 2-3 layers, so that the result is an opaque surface;
- Also paint the frame itself, but with a different paint for contrast.
- Now we sand the painted cardboard, running chalk over it, laying it flat, removing the dust from sanding with a sponge;
- We assemble the frame and base - the chalk board is ready!
A piece of plywood painted with this paint can serve as a board for notes - original do-it-yourself minimalism.
Related article: 3 simple ways to make a soft headboard
If you have an unnecessary frame that is not suitable for either paintings or photographs, then give it a second life. You can easily make a stylish and unusual note board out of it. This is a wonderful hand-made panel for attaching notes - a luxurious interior detail. Simply stretch the fabric over the base as in the first method or apply paint and grout to create a chalk board.
In addition to the proposed options, there are many ideas, the popular retro options are especially interesting. For example, an aged frame with ropes stretched in three rows, on which 3 wooden clothespins are hung. With the help of these clothespins it is convenient to fix notes - unusual vintage.
Video gallery
Photo gallery
Interesting ideas for creating note boards
If you have some kind of frame or just an old hoop at your disposal, try transforming it all into an original item. The empty space can be covered with fabric or tied in several rows with rope. In the latter case, the notes will be attached with clothespins.
Hoop note board
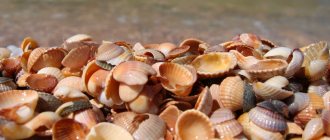
Do-it-yourself cork boards for notes look great. Wine bottle corks are simply glued onto a rigid base in a random or systematic manner. They can be arranged in a spiral, in square blocks, etc.
Cork board for notes
Cork board in the interior photo
Kirill Sysoev
Calloused hands never get bored!
A cork board will be a real find for those who are used to planning things ahead, want to visualize their desires, or simply have a stand to remind them of important events. Notes, pictures, advertisements, and small objects are attached to the accessory. This stand is common in offices, schools, kindergartens, and more and more people are hanging it at home.