Tea drinking is considered a special ritual filled with comfort and a spiritual atmosphere. Avid lovers of hot drinks often face the problem of storing tea bags. I would like them to always be in a visible place, but at the same time not spoil the kitchen order. For these purposes, special houses are often used, which are sold in stores in a large assortment. You can make your own tea house from cardboard and paper yourself, saving money and making crafts of better quality. To do this, you need to find the right pattern and stock up on the necessary materials.
Where crafts come in handy
Tea houses are one of the latest trends in modern handmade. Their main function is to store tea bags. Previously, the owners kept tea in ordinary cardboard boxes from the manufacturer. However, this kind of packaging quickly lost its attractive appearance and allowed moisture to pass through, causing the stored products to deteriorate. Over time, true tea lovers began to have special houses in their kitchens for storing it. They began to act not only as a box for products, but also as a decorative element for the home.
Today there is a wide range of tea houses on sale, made in various colors and designs. However, many owners encourage making such decorative elements themselves, because this process is considered quite easy. And the household members themselves can avoid exhausting shopping trips in search of an attractive house.
In addition, decorating crafts is considered an interesting activity for children. Here you can give free rein to children's imagination, as well as something to captivate your child for several hours.
A good gift will always be considered one that is made with your own hands; also, crafts will fit well into the interior of your kitchen. They will decorate any event - from home tea parties to special occasions.
Schemes for tea houses
This kitchen accessory can be made according to your own design.
You just need to think through in advance all the details of the future house, its size and appearance. Then you should draw a model of the product on paper and indicate its parameters. It is also possible to use ready-made diagrams, which will save time on making crafts.
The following scheme is suitable for making both one-story and two-story houses. The parameters of the base, roof and wall length are the same for both options. The height depends on the number of floors.
The presented sketches can be adjusted: the designs can be simplified or complicated. The next photo shows a finished craft with a simple structure.
More complex structures consist of several buildings and include windows, balconies, and chimneys. Such houses are convenient for storing different types of tea.
The house can accommodate not only tea bags, but also sweets. The candy dish will serve as a fenced yard, which is attached to the wall of the house.
In addition to choosing the design of the product, you need to decide on the material. The most suitable materials for kitchen crafts are cardboard and wood.
Required materials and tools
A large tea house can be made from almost any available materials. It can be cardboard, paper, newspaper tubes, plywood. However, the size and shape of the craft may vary. Many craftsmen advise making a tea house with your own hands from cardboard, since this material is the easiest to work with. What you will need to create this craft:
- thick cardboard (you can take sheets from under a regular box);
- PVA glue;
- scissors;
- a simple pencil for sketching;
- ruler;
- scrap paper;
- stationery knife.
Scrap paper or thin cardboard will be needed to glue the main elements for the craft. When all the tools and materials are prepared, you can start making a tea house out of cardboard.
How to make a big house out of paper and cardboard
A tea house made from a box is one of the crafts with a low degree of manufacturing complexity. You will have to spend only 2 hours of your time to create it.
Step by step assembly
How to make large houses out of cardboard with your own hands - master class:
1. The first thing you need to do is find suitable options and patterns for the pattern. You can select them from our gallery.
2. When the pattern is selected, you need to cut out the parts of the required sizes from cardboard. A standard kit for creating a craft consists of 4 side parts, 2 pieces for the roof, 1 cardboard for the bottom of the house and 1 part for inserting into the roof. In order not to get confused about the sizes, it is better to focus on the indicators that are presented in the diagrams.
3. It is better to cut out parts using a sharp stationery knife. If you use scissors, the cardboard may bend and the cut may turn out uneven.
4. Cut out pieces of paper (or thin cardboard) 20 cm long and 3 cm wide for gluing the walls of the tea house.
5. Connect the base of the craft using PVA glue. If the parts do not stick well, you can use Moment glue.
6. Now you can start working on the bottom. To glue it, you will also need to cut strips of paper 9 cm long and 3 cm wide and use them to attach the lower part of the house to its walls.
7. To create a roof, you need to take a part with length and width parameters of 10*6.
8. It needs to be bent in half to form a triangle.
9. Using paper or thin cardboard, fasten the roof parts together as shown in the figure. If the cardboard does not bend well, it can be pressed along the seams with the blunt side of a stationery knife.
10. Using the same pattern, glue the lower part of the roof of the tea house.
11. The resulting part must be placed on the base (wall) of the craft.
If everything in the process was carried out according to exactly the planned scheme, then you should get the silhouette of a house, which now needs to be beautifully decorated.
Design ideas
Decoupage of a tea house is a simple procedure for decorating crafts for adults and children, helping to transform it. Using available home remedies, you can make a beautiful and stylish house that matches the design of your specific kitchen. One way to decorate a craft is to treat it with acrylic paints, varnish and napkins with interesting patterns. For decoupage you will need the following tools and materials:
- the tea house itself;
- acrylic primer;
- napkins;
- varnish;
- brushes;
- a piece of sandpaper.
How to make a large cardboard house complete:
1. Walk over the workpiece with sandpaper to slightly level the surface of the craft and remove any roughness.
2. Using a dry cloth, remove any sawdust that will remain after leveling.
3. Cover the entire craft with acrylic primer. It is best to apply 2-3 layers of the product so that the paint adheres better to the workpiece.
4. When the primer has dried, you need to go over the surface of the workpiece again with sandpaper.
5. Now you can take napkins with drawings and cut out the necessary elements from them and glue them to the base of the house. It is best to use PVA glue in the process, and you need to apply it to the surface in a thin layer so that the napkin does not tear.
6. Now you should leave the craft for several hours to dry completely.
7. To give the house a more interesting look, the picture can be completed using acrylic paints. This way it will look much more impressive.
8. When the paints have dried, you need to varnish the surface of the craft. It is best to apply it in several layers to provide the house with reliable protection from fading and mechanical damage.
The varnish takes a long time to dry. Therefore, it is better to wait for a while and not use the house for its intended purpose.
The decoration option using napkins is considered one of the simplest and fastest. If the owners want to make the tea storage house spectacular and unusual, they can use clippings from old newspapers and inserts from magazines for decoupage. Also, beads, sequins, artificial flowers, and New Year's elements are usually used for decoration. It all depends on the imagination of the household, as well as on the design of the kitchen in which the tea house will be located.
Templates and diagrams with dimensions
Below are the most common patterns with standard sizes.
Coloring
Now let’s paint the “boards” with brown paint diluted with water. This color will show through worn, light paint.
As noted above, on the bottom of the workpiece we will have a background picture with polka dots.
We prepare the surface for decoration by covering it with a thin layer of artistic acrylic primer. In order not to stain the painted “boards” and the brushed part of the workpiece, we protect the surface with masking tape.
Let's start simulating boards again. Apply wax or a candle to the borders and paint with acrylic paint.
In this case we have a light beige color.
After complete drying, we will show the abrasions with coarse sandpaper. We move along the “planks”.
Don't forget about the wooden tag that will decorate the front part of the workpiece.
Now you can paint the brushed part of the workpiece. In this case we will use Sayerlack white water-based patina. We paint so that the patina fills all the depressions of the relief surface. Instead of patina, you can use white acrylic construction paint slightly diluted with water.
After drying, use a damp cloth to wipe it off the protruding parts of the brushed surface and secure the work with wax or acrylic varnish.
Gallery of finished crafts
Tea houses are a common accessory for storing tea and decorating the kitchen. Today you can make it yourself from any available materials. All you need to work is 2-3 hours of free time and a little patience.
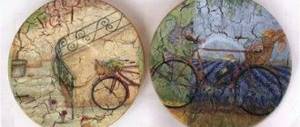
Decoupage
Let's start decoupage.
We glue the napkins onto the side parts of the tea house using the file method.
For beginner decoupage artists, I would like to note that the image is on a white background, which makes it easy to paint the borders of the napkin with the same light paint that was used to paint the “boards.”
If you do not have the opportunity to print pictures on a napkin, you can use the method of implanting a printout.
We thin out the paper with the background picture using tape and stick it to the bottom of the workpiece.
Here it is important to accurately measure the width that is needed for this part of the workpiece. In this case, we measured 5 cm. And before gluing, you need to place the soaked paper on the edge of the file in order to carefully butt it to the bottom of the workpiece. After drying, excess paper is sanded with sandpaper.
Well, almost everything is ready.