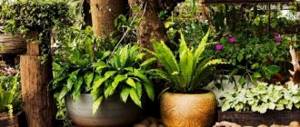
Vase from saw cuts
The product can be assembled quickly and without male help. During the work you will need:
- varnish;
- vinegar;
- sandpaper;
- hot glue;
- small cuts of different diameters (but the same length).
The method of execution depends on the purpose. The simplest option is to use a “vase” as an addition to the pot. In this case, there is no need to make the bottom.
First, the cuts themselves are prepared. Treat them in a vinegar solution and remove any remaining dirt with a cotton swab, and the preparations will become completely safe for children. Unevenness is smoothed out with sandpaper. The next thing you need to do is coat the log houses with varnish and leave them for a day.
Next, the cuts are placed around the flowerpot and connected using hot glue. When the bottom tier is ready, move on to creating the next ones until the craft is equal in height to the pot. Alternate log houses of different diameters.
Hand-made products
Handmade is valuable in any case. And handmade wood products are doubly valuable. There are not so many real craftsmen who master the technique of working with wood at the highest level, and if we are talking about manual processing of wood, then there are only a few of them. The demand for wood products created by masters of their craft is always great, sometimes it exceeds supply many times over and leads to an increase in the price of the products.
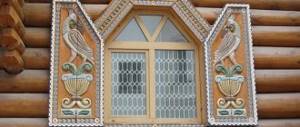
House made of branches
Even branches of small width are needed for crafts in the form of a square or rectangular house. Small, irregularly shaped branches will make an interesting miniature building with a conical roof. The second option is more difficult to implement, so it is better to opt for the first.
A house with right angles should be decorated with:
- cones;
- acorns;
- pine needles;
- pieces of bark;
- moss
All this is easy to find in the forest. At the very end, lay out the area around the house from the collected decorative elements.
The preparatory stage begins with the branches and decorating elements being dried for several days. Irregularities are left unchanged, because this will only improve the composition.
A sketch is created, the branches are cut in accordance with it. Door and window openings are cut out. The role of the door will be played by a piece of board with smaller branches glued on.
The roof truss structure is also made from twigs. The roof is made of straw. A beautiful house/hut is ready.
Furniture
Handmade furniture is sophistication and chic. Today, the demand for such furniture is growing every day. Professionals in their field make various beds, sofas, chairs, stools, garden benches, etc. Real masters of professional woodworking want serious money for their creations, but such things are worth every ruble spent on them.
The price of furniture is determined by the grade of wood, because not so few materials are required to create furniture. The most expensive specimens are made from mahogany by hand.
Furniture that has some parts of the natural structure of wood is considered a special delight. That is, the tree is not processed into the correct lumber that we are all accustomed to. For example, a stool. The seating surface is made of perfectly smooth processed solid wood, and its legs are the root system of the tree from which the entire product or the entire kitchen set was made.
Exactly the same options are found with beds, where fragments of solid wood can be successfully used in the legs or at the head of the bed. There are many options for such furniture.
Feeder for kindergarten (step-by-step master class)
Making feeders is more of an activity for adults than for children, however, some kindergartens require such work to be completed as homework. The acquired skills will be useful to the child in the future.
The first thing you need to do is get boards 1.5-2 cm thick. Plywood, preferably moisture-resistant, will do. Next, the components of the feeder are cut out. A detailed diagram will help you correctly calculate the proportions.
Then you will need to make recesses in which the glass will be securely fastened. There is an alternative method - it can be attached to the ends using screws. It is recommended to go with the second option.
In order for the product to take on its finished form, all parts are assembled using dowels, glue and self-tapping screws. The corners are carefully polished. Inside the structure, a perch is inserted into 10 mm holes. One of the halves of the gable roof is securely attached to the walls, and the other, together with the ridge, is installed later. The slopes are connected with furniture hinges.
What you need to get started
A small sheet of plywood or other compressed wood shavings, an electric jigsaw, a sanding machine (you can get by with sanding paper, this process will take longer, but is less expensive), high-quality glue, a simple pencil.
We have listed the most basic tools that you will need in any case, regardless of what kind of craft you are going to do. We bring to your attention a photo of wooden crafts in the form of a bird feeder...
A universal wooden craft that many people probably come across is a bird feeder. This is a very useful thing that attracts the eye with its decorative design and at the same time benefits the winged ones.
Its service life can be long if it is pre-treated with special protective agents (varnish, stain, paint), which will protect it from the external environment. This activity is very exciting, so you can make it with children, because it will cause them real delight and instill a true feeling of doing good.
In addition to this useful item, you can make other decorative crafts that will become an impressive decoration for your garden. For example: an owl will become a pleasant decoration at the entrance.
From small tree branches, you can create a stretcher for photographs, which can later serve as a pleasant surprise for a loved one.
Cute little things can also be made from the bark of various tree species (oak, ash, acacia, chestnut, birch).
An interesting solution would be to build decorative refrigerator magnets from tree bark. This original idea will not leave anyone indifferent.
The classic option for wood crafts is plywood. From it, without much effort, you can cut out any animal, subsequently painting it with bright colors. This method will help you and your children unite and do such an entertaining activity.
From durable wooden slats you can make a children's swing in the garden, beautiful decorative fences for small front gardens. By cutting down a tree in half rings approximately 60-80 centimeters high, you will provide yourself and your loved ones with real stump chairs for a pleasant relaxation in the garden.
- Choosing a brick of your life
- DIY shoes for life
DIY is a place for DIYers.
Don’t be afraid to experiment, be creative, give free rein to your imagination, and you will certainly succeed!
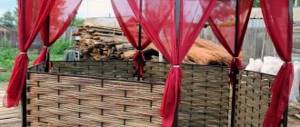
DIY piggy bank made from bars
All you need:
- Bars.
- Paper.
- Glue.
The optimal length of the blocks is 4.5 cm, width - 2 cm, height - 1.5 cm. They are placed on paper, creating a square. The distances between the corners are no more than 1 centimeter. 4 more elements are placed on top, this time repeating the shape of a rhombus. Before adding a new “brick” it needs to be treated with glue.
The next tier is again in the form of a square, the fourth is again diamond-shaped, etc. There will be a total of 12 layers in the design.
In the penultimate of them, the bars are placed close to each other. In the top row, 2 fragments are placed as close as possible, but so that the wide coin fits through sideways.
The work on the product does not end there - 2 wide boards are attached to the bottom. If you need to get the contents, just tear off one of the two upper elements. It is not necessary to destroy the product.
Kitchen products
Today, various wood products for the kitchen are in great demand. Among them are bread bins, salt shakers, cutting boards, furniture, and much more. The world has taken a course towards environmental friendliness and natural materials, but here we cannot do without wood. A kitchen where wood is the main material is highly valued and is considered a sign of wealth and style.
It should be noted that the creation of such a kitchen requires a very, very substantial investment of money. The result, of course, will please both you and your guests! Many people decide to spend so much, justifying it by the fact that such a kitchen is equipped not for years, but for decades.
Making a New Year's wreath for a kindergarten or home: instructions with photos
First, 2 rings are cut out of corrugated cardboard. Then burlap is glued to one of the 2 rings. The other is wrapped in crumpled newspaper pages. The thread will secure the structure properly.
The rings are glued together; so that the burlap “looks” up. Next, glue is used again: plumbing flax is attached to the top, thereby creating the basis for the cuts.
Thin sections of the same size are gradually laid on the surface of the wreath and immediately glued. The product should be decorated with a satin bow.
Snowflake made from ice cream sticks
You will need several dozen popsicle sticks, a glue gun, and glitter (or other decorative items).
The sticks are overlapped and glued. This creates several long lines. Other sticks are attached to them, so that everyone faces in the same direction.
Several strips are glued on top of each other in the middle, resulting in a figure with a round outline. The edges of the snowflake are decorated to your taste, using an additional number of sticks. The finished craft is decorated with glitter and buttons.
In nature, snowflakes have a complex and varied structure, so you should create several pieces, using your imagination as much as possible.
Rocking horse for a child
This toy was in almost every family. Making a horse with your own hands will be an interesting and educational activity.
The design is assembled from several basic elements, including 2 sidewalls with raised edges, a saddle and a head with handles. The connecting boards will bear the main load.
The basis for the horse is spruce or pine boards 2 cm thick.
The child's parameters are important. Typically the toy has the following dimensions:
- width (bottom) - 28-30 cm;
- length - 75-80 cm.
The height of the saddle is selected individually.
First, the sides of the base are connected. To work, you will need a clamp and glue (cold curing). The horse's head is obtained from a separate large board. It is better to make a saddle without a large backrest, so that it is more comfortable for a child to sit on a horse.
Original table
To make crafts from wood cuts with your own hands, you can use not only a whole log, but also individual sawn circles. To make such a table, you need to take two large cut circles and several small ones of the same thickness. The base is made slightly smaller than the tabletop. “Pancakes” made of wood need to be thoroughly sanded several times. First, a large one (100) is taken, then it is cleaned with a smaller one (80). The same preliminary work is carried out with all the details of the future legs of the coffee table.
An important point when making such crafts from wood cuts with your own hands will be clear, even planes of the circles. If the angle shifts, the table will come out crooked, and no one wants that. It is also necessary to follow safety rules when working with sharp tools and small parts.
When everything is ready, you can start assembling all the elements. The base is placed down, and a slightly smaller “pancake” is attached to it to weigh down the leg so that the table does not tip over. Next comes the most difficult part of the assembly process. “Pancakes” are installed with a one-third shift, first in one direction, then from the middle up the elements are shifted in the other direction. They should come together from above under the countertop.
One wide circle is also installed under the table cover so that there is a solid base and objects from the table do not fall onto the floor. Next, to make crafts made from wooden cuts look colorful, the tabletop can be varnished. The entire structure of the tree will appear, and the table will look bright and festive.
Tree bark craft
In addition to the main material, you will need moss and a cardboard blank in the form of a tree with a wide trunk and a voluminous crown. The process of creating a tree is very simple, and the end result is a beautiful and bright toy for children.
The crown of the workpiece is generously lubricated with glue. A large amount of moss is attached to the top. Just like in most previous master classes, there is also work for children. Let them lay the moss on the crown and further decorate the toy.
The decorating details will be multi-colored balls of different sizes. A glue gun is used to secure it in the moss.
The craft will resemble a tree when the trunk is trimmed with pieces of tree bark. You need to lay it carefully and not go beyond the edges of the workpiece by more than 1 cm. That is why the fragments are selected carefully and in advance.
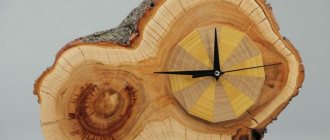
Decor element
Nowadays it is fashionable to hang decorative elements on the front door. It is quite easy to make such a heart from wood cuts. Even a novice master can do this job. Saw cuts of different sizes are suitable, the main thing is that the thickness is the same. Then all the elements are glued together to form the design desired by the author. It could be a heart, like in the photo below, or a butterfly or dragonfly. You can make your favorite cartoon character if there are children living in the house.
A screw is screwed into the middle, and a rope is tied to it, with which the picture will be hung on the wall or door. You can close the fastening with a bow or a flower made from ribbons.
Beautiful stand for hot food
To make a product of a classic shape, small sections and wooden slats are placed in 2 levels. The log houses are placed below, forming the base. However, it is better to spend a little more effort and get a modern device that resembles a grille.
For the stand you will need furniture dowels, heat shrink material and scissors. It's worth looking for square bars in the store so you don't have to cut them with power tools.
Recessed holes are made in the boards for fixing dowels. A total of 9 bars and 12 connecting elements are needed. Adjacent wooden blocks are placed at a distance of 1 cm.
This is exactly how much needs to be cut from the heat-shrinkable tube, a total of 12 fragments 1 cm long. One is put on each of the dowels, exactly in the middle.
A small amount of glue is poured into the holes in the squares, and the open ends of the chops are fixed inside.
The finished product does not require decoration. If desired, it can be decorated with painting or burning.
Making crafts is not only an interesting, but also a useful activity. Homemade items will decorate the interior and save money. Step-by-step instructions will help you achieve the perfect result.
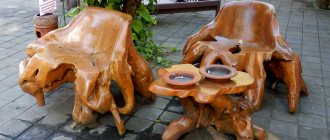
Chair for the garden
You can use a chainsaw to cut such a comfortable chair from a large log for your summer cottage. To make it stable, you must first cut the base evenly and install it in its location. Next, start processing the seat. Here you need to act carefully so as not to make it too thin, otherwise, when the body rests on it, the thin layer may break off and cause trouble for the sitting person.
The seat is cut straight. The bark on the front of the chair is cut off so as not to scratch the legs or tear the clothes of the person sitting on it. You can cut out the unnecessary part of the log from the back side. Then the chair will be much lighter, and it can be moved from one place in the yard to another. To make crafts made from wood cuts with your own hands look beautiful, they need to be sanded so that the surface is smooth. To make the wood shine and look brighter, you can rub it with vegetable oil. Impregnated wood will not deteriorate longer. After several impregnations, the chair must be washed and dried. That's it, the piece of furniture is ready! You can sit down.