Before buying a washing machine, many people wonder how to properly connect it to communications. There are two options for the development of events: call a professional craftsman or do all the work yourself. Self-installation is a responsible undertaking; you will need to observe all the details, correctly connect the inlet hose to the water supply, and drain the drain into the sewer. It is important to choose a place for installation and correctly supply the device with power. Instructions and useful tips will help you avoid getting confused during all stages of installation.
Choosing a location for installation
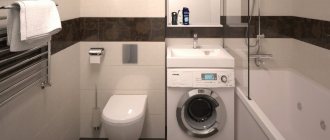
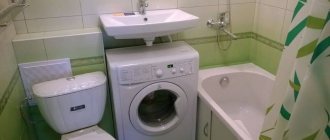
In a standard apartment there are several places where you can place a washing machine - a bath, toilet or kitchen. Narrow appliances with horizontal loading of laundry are usually placed in the toilet. In exceptional cases, the machine is installed in the corridor or pantry, if opportunities permit.
The washing machine must be installed strictly at floor level
The main condition for choosing a place for a washing machine is a perfectly flat floor surface.
Advice. It is best to install the machine on a concrete floor. In this way, vibrations during operation can be reduced. And the twist-out legs will help ensure the correct position of the device.
How to properly install a washing machine
To properly connect a washing machine with your own hands, you will first need to install it properly. Many craftsmen recommend doing this no further than 2 m from the point of connection to the water supply, since a short distance ensures normal operation of the pump without overload.
Washing machine near the connection point
When installing equipment, it is extremely important to level the unit so that it is stable on the floor. To do this, use a building level. Reliable fixation of the machine without distortions will ensure the integrity of the structure and the safety of the components, otherwise they may be damaged due to strong vibration.
Installing equipment by level Adjusting the tilt of the “washing machine” is quite simple, for which the design has legs. They need to be turned until the required level is reached and the unit assumes a stable position. Please note that in many modern models the level is adjusted automatically, so it is important to remember to level the machine according to the instructions.
Unit adjustment bolt
Unpacking the machine
Manufacturers take great care in transporting their goods. The washing machine is carefully packaged. They do this in order to prevent damage during transportation.
Attention! Before installation, read the instructions and complete all necessary steps.
The machine must be freed from its original packaging and the transport bolts that secure the device tank must be removed. They are easily unscrewed, and plugs are attached instead.
Attention! Do not operate the washing machine with transport bolts, as this may cause damage. The warranty does not cover such a problem.
Stage #2 - preparation for installation
The purchased machine is delivered to the apartment in packaged form. All rotating parts are fixed with fasteners (bolts, bars, brackets), which protect the device from accidental damage during transportation.
Before starting installation, it is important to remove all fasteners (bolts, brackets, clamps) that protect the machine parts during transportation
The delivered washing machine should be freed from the box, and then begin removing the fixing parts:
- From the rear wall of the unit you need to remove the brackets , which are installed for the rigidity necessary for transporting household appliances. Such elements also hold flexible parts of the structure, namely the hose and electrical cord.
- Following this, it is necessary to remove the bars placed between the tank and the body of the device. To do this, just tilt the washer slightly forward.
- You should also remove the bolts that are installed on the front of the machine to secure the drum. It is better to immediately insert plastic plugs into the holes from the removed elements (they are usually included with the model).
Released fasteners must be carefully packed and stored: they may be needed when calling for service.
Image gallery
Photo from
Washing machines are transported with the obligatory installation of fastening bolts that fix the position of the internal moving parts. They must be removed before connecting.
There is a key included with the washing machine to remove the bolts. With its help, you first only need to loosen the fasteners
Hold the bolt with a wrench and carefully remove it along with the plastic insert. Then you need to close the hole with the plastic plug included with the model.
The bolts removed from the washing machine, along with the plastic inserts and wrench, must be stored. They may also come in handy if home equipment has to be transported
Installation points for fastening blots
Loosening the bolts with the supplied wrench
Removing the bolt along with the plastic insert
Collecting shipping bolts for storage
We recommend: How to clean linoleum after repair
Required Tools
Connecting a washing machine will require you not only to study the instructions or your own knowledge, but also to have some tools. So, prepare:
- adjustable and gas wrench;
- ball valve;
- fitting, tee or ferrule (depending on the type of pipe);
- threaded adapter;
- withdrawal - as necessary;
- flexible hose.
Washing machine installation tools
Connecting the washing machine drain to the sewer
We sorted out the connection to the water supply. Now you need to connect the washing machine to the sewer so that the dirty water drains freely and the spin cycle begins. This can also be done in several ways; choose the most convenient one.
Draining water from the washing machine through a siphon
The most common way to connect a washing machine to the sewer is through a siphon of a kitchen sink or washbasin. Therefore, the same principle is used to connect the drain hose to the bathroom.
| Illustration | Description of work |
Connection to siphon | Method 1. The simplest. There are special fittings for the siphon with a special branch. It is into this that the drain hose from the machine is inserted and a clamp is put on for better fastening. This is a simpler way to solve the problem, but also less practical. Since over time, it is in this area that blockages will often occur, and the water from the sink will drain slowly. Also, when draining, the water leaving the machine into the sewer can simply rise into the sink, which can then lead to problems if the sink is small or to complete unsanitary conditions if there is defrosting food in the sink at that moment. Another disadvantage is the possibility of water from the sewer getting into the tank. But some models provide a non-return valve for the washing machine on the drain, which completely prevents such a nuisance. |
45° tee 90° tee | Method 2. The most reliable. You will need a pipeline tee at 45°, or better yet, at 90° for a 50 pipe. In principle, a high-quality connection can be made in any case. |
Turn off the siphon | Turn off the siphon. |
Connection to siphon | We insert a tee in its place and securely install a siphon in one branch. |
Connecting the drain | We insert a 20 or 25 mm reduction into the second branch and securely attach the drain hose to this gasket. If he sits in it loosely, then you can tighten a couple of rows with fuma or electrical tape. |
Connecting the washing machine drain hose to a cast iron drain
Despite the widespread use of metal-plastic, many apartments still have cast-iron sewers. As you can see from the previous instructions, working with new pipes is easy. You just need to choose the right fitting, and the trick is in the bag. When will you have to tinker a little with cast iron? Let’s take a closer look at how to connect a washing machine to such a sewer yourself.
| Illustration | Description of work |
Rubber reduction | We insert the reduction into the cast iron elbow. Its size is 72×50 mm. |
Tee 50 mm | We insert a 50 mm tee into the fixed reduction. |
Reduction by 20 mm | We insert a 20 mm reduction into one of the branches of the tee. |
Drain hose attachment | We also securely attach the drain hose from the washing machine here. To ensure that it sits well, the hose is wrapped with electrical tape. |
Connecting the device to the water supply system
There are several ways to connect the machine to the water supply:
- Connection without using water supply. This option is more suitable for use in the country. After all, country life should also be comfortable. And the lack of running water should not be a reason to refuse the benefits of civilization. So, you will need a large tank, which must be installed at a height of at least 3 m. Connect the hose from the machine to it. This will create the necessary pressure. If you do not want to carry out high-altitude work with the tank, then you can purchase a pumping station, but this method will be very expensive.
Connecting the washing machine through the tank
- Connection via tee. An easy way to connect. A flexible hose is used for this. It is connected to a water tap or toilet tank supply. The connected hose must be of sufficient length, and a tee must be used to connect it. Before each wash, the tap hose will have to be unscrewed. This is not entirely convenient and this method can be used as a temporary option. Connecting a washing machine to the water supply of the toilet tank is a good idea, but only if they are located nearby.
Connection via tee
- Connection via metal-plastic pipes through a fitting. An excellent way for owners of metal-plastic pipes. A part is cut out of a cold pipe, and a fitting (connecting tee) is cut into the opening, to which a ball valve is fixed. The connecting areas must be sealed with rubber cuffs.
Connection via metal-plastic pipes
- Connection via crimp coupling. For this method you will need a ¾ inch flexible hose. It needs to be connected to the machine and a special tap, which cuts into the water supply using a crimp coupling. This is done only if the pipe is metal. The coupling includes several halves that are placed on the pipe and tightened with bolts. It also includes a threaded outlet onto which a valve is placed (preferably a ball valve). To allow water to enter the pipe, a hole is made through the coupling.
Connection via crimp coupling
Advice. Manufacturers recommend turning off the tap after each wash. This will avoid the possible risk of flooding the premises.
Connecting the machine to water
Connecting to water is one of the most critical stages of installing a washing machine. All steps must be carried out as carefully and clearly as possible, so that later there are no problems with leaking hoses.
Tap for connecting the washing machine to the water supply
Taps for connecting faucets and washing machine inlet hose
It is important to consider water shutoff
The first thing you need to do is measure the length of the hose for taking in and draining hot water. When installing the machine close to engineering structures, we assume that the machine will be close enough to the water, so the length of the hose should be enough to both receive and drain hot liquid. Usually the machine is equipped with drainage hoses and fittings, but their length does not always satisfy the owners’ needs. In this case, there are two options to solve the problem:
- purchase a longer hose for intake and drainage, equal in diameter to the original one, and a siphon from a specialized plumbing store;
- try to slightly reconstruct your own pipes by laying an adapter - copper or plastic pipes in the direction of the connection we need, in order to ensure unhindered intake and drainage of hot water.
The first case is the most ideal for installation because it requires less cost. You just need to connect the machine to the water supply, connecting it to the water intake point. The hose to the water is laid so as to be protected from unnecessary kinks and possible damage. It can be placed behind the bathroom, behind furniture, or placed in special grooves on the wall. It is important that the hose from the water supply does not run under tension; there should always be a small margin of sag. This will make it possible to freely use the hose while the machine is operating, taking into account vibration.
Correct hose bend when connecting a washing machine
How to connect wires
The second option of laying a hose to the water involves some difficulties, but it is also quite possible for connecting the machine and the water supply. It is best to use plastic pipes as an adapter, in which rust does not form.
Insertion into metal plastic using a tee
In addition, such pipes are less clogged. When installing additional pipes, it is necessary to ensure that the connections to the water are tight so that it does not flow out of the cracks. To do this, it is more advisable to install a flexible hose for both intake and drainage of water.
Features of installing the machine to the sewer system
When the work on connecting the washing machine to the water supply lines is completed, it’s time to think about where the dirty waste water will go. The device must be connected to the sewer system. This can be done in several ways.
- Draining water into a bathtub or sink. A very simple option, but perhaps not the most reliable. Some manufacturers include a “hook” hose in the washing machine package, which is fixed to the wall of the bathtub or sink. Its advantage is that you do not need to bother installing the machine to the sewer. But there are many more shortcomings. Dirty water will stain the enamel of the bathtub, especially acrylic ones. A small blockage in the sink while draining the machine can cause flooding for your neighbors. Often, due to vibrations during draining of water, the “hook” falls to the floor, which can also cause a serious flood.
Draining water into a bathtub or sink
- Connection via siphon. To drain the machine permanently, you will need to purchase a siphon. It has an outlet for washing machines, which should be located above the siphon elbow. Otherwise, dirty water will be sucked into the washing device. As a result, an unwanted foreign odor may appear in the device.
- Connection to the sewer pipe. This is a way to connect the washing machine directly to the sewer pipe. It should have a thickness of 4 or 5 cm. To do this, use a seal and an S-shaped drain hose. The hose is inserted into the pipe so that it does not come into contact with wastewater. The upper part of the hose is placed at a height of 55 cm from the floor.
Connection to sewer pipe
Steps to connect a washing machine
The entire path from purchase to operation of the product is divided into several stages. The scheme for their implementation will be something like this:
- Selection of necessary tools, auxiliary materials and equipment.
- Preparing the washing machine for installation after delivery.
- Installation and alignment of the housing in a predetermined location.
- Fastening of external parts (hoses, sleeves, adapters).
- Connecting the unit to utility networks.
- Test run of the machine in test wash mode.
Preparation of materials and tools
To connect to a water supply system with metal pipes, you will need gas, wrenches (adjustable) wrenches, seals - FUM tape or other winding. A special water supply hose, if it is not included in the factory configuration. Based on a pre-prepared list, a set of fittings (couplings, tees, bends, locknuts, etc.) is purchased.
If the insertion is to be made into a plastic (PVC) pipe, then you will need a specific tool for welding such pipes and shaped fittings and adapters for metal threads corresponding to the material.
The absence of an electrical outlet in the designated location will require the purchase of additional electrical equipment. A cable of the required length and sufficient power with a grounding conductor, a waterproof socket (preferably with a built-in circuit breaker).
Preparing the washing machine for installation after delivery
The product is delivered to your location in packaged form. The packaging itself is a technological element, since it is intended not only to protect against external influences, but also to secure important structural parts from damage during transportation.
Therefore, after removing the upper frame of the packaging box, carefully inspect all possible fixation points.
Important. If you leave at least one of the parts in a fixed state, this may negatively affect the operation of the unit, even leading to serious damage.
Particular attention is paid to the drum fixation elements. For different models, fixation methods may vary. We carefully read the factory instructions supplied with the product.
We unfasten the brackets holding flexible hoses and other components. Lastly, unscrew the bolts securing it to the bottom wall of the packing box. The entire package with mounting bolts, spacers and brackets is stored indefinitely. In cases of a complaint return, or delivery to the nearest technical service center, the packaging kit is simply irreplaceable.
Reinstalling the washing machine. Leveling the washing machine
In order for the product to serve as long as possible and with maximum benefit, you should take seriously all the nuances of its installation.
One of the main qualities of modern washing machines is the almost complete absence of vibration and noise. It is not without reason that the requirements for flooring have already been mentioned above. Minimize noise and vibration levels by aligning the product body in a horizontal plane.
The main tool for leveling floor unevenness is the screw feet of the washing machine. However, their power reserve is not always enough for a completely level position of the body. It is necessary to use additional pads, which, due to increased vibration, must be cup-shaped so as not to slip out from under the leg.
Determine the correct horizontal position using a level. Although the old “old-fashioned” method often turns out to be more accurate. It consists of using a wide, shallow plate filled with water almost to the brim. Such a plate installed on the top panel will immediately indicate the direction of the slope.
Advice. As an additional means to reduce noise and vibration, rubber or felt pads are used, which are placed under each support. Such linings additionally reduce the effect of sliding on the same tiled floor.
Connecting the washing machine in the kitchen to power supply
So, water supply, sewerage and electrical energy are involved in the operation of the machine. It remains to correctly connect to all of the listed communications.
For safety reasons, it is better to replace the electrical outlet with a waterproof one with a mandatory grounding terminal. If the installation is carried out in an unequipped place, then a cable corresponding to the parameters is laid directly from the power panel. To lay the cable, you can use the channel of the floor plinth or use a special cable channel of a foam or tubular type.
It is advisable, if not mandatory, to install a residual current device (RCD) on the power line of the washing machine. In addition, there should be no more than 70 cm between the outlet and the unit. This is the standard for connecting electrical machines that use water.
Connecting the washing machine to the water supply
Learn more about connecting the water supply. Ideally, it is performed on a straight section of the pipeline. To avoid labor-intensive tapping, they usually use any threaded element available on the route . Instead of a coupling, for example, a tee is installed, which makes it possible to install a threaded outlet for the water supply of the washing machine.
The outlet is closed with a special shut-off valve, which is included in the factory kit. Such a tap serves as an adapter of thread parameters from 0.5 to 0.75 inches, that is, a size corresponding to the union nuts of the water supply hose, which should also be included with the machine.
The water supply riser should be located in close proximity to the housing and no further than 0.5 m.
Fastening the hose to the washing machine
Before connecting the hose, check the presence of a mesh filter and rubber gaskets. There is a nuance - the filter is installed on the fitting of the unit itself with the convex side inward.
The union nuts are faceted with hand grips. Screw on by hand without using tools. It is important to ensure that the gaskets do not fall out during screwing.
The hose is first attached to the threaded element of the shut-off valve. Then, trying not to create kinks or twists in the hose, screw the nut of the inlet fitting onto the machine itself. For compactness, one turn is allowed along the length of the entire hose.
Connecting the hose to the mixer
In rare cases, it is recommended to connect to a kitchen sink or bathroom faucet as a temporary measure. This can be done in different ways.
Directly to the faucet spout using a special adapter. This adapter is screwed onto the thread of the mesh filter of the spout tube, and water is supplied by the mixer lever.
This option provides an interesting, but controversial opportunity to use the hot mode of the mixer and save energy on heating water by the machine itself. The possibility is considered controversial because in certain washing modes the automation is not able to accurately determine the required temperature and a failure occurs.
Another method involves using a riser to supply cold water to the mixer. A tee is screwed onto its thread and further actions are similar to those described.
Electrical network for washing machine
The work on connecting the machine seems to be completed, but one important detail remains - the power supply.
Advice. Preferably use a three-wire outlet. Protect yourself and ground the distribution board.
If you need an extension cord, only use one that is grounded.
Washing machine connection diagram
A good option would be to connect the device with a separate wire from the electric meter. It has automatic protection installed. If such a wire has not been laid, then a portable RCD can be used.
Connecting a washing machine to communications is not a difficult task, but requires attention. Of course, it is better to leave it to professionals who will take care of all the aspects in order to further ensure the safe operation of the device. Do-it-yourself installation comes with many risks, but if you are prepared for them, then get to work.
Installation and connection of the washing machine: video
How to connect a washing machine: photo
How to connect a washing machine to the bathroom water supply
All standard washing machines are connected to the cold water supply line using the inlet hose provided in the kit; its length from foreign manufacturers is 120 or 150 cm. A hose pipe with a diameter of 3/4 inch, bent at an angle of 90 degrees, is screwed by hand to the back wall (for this there are protrusions for fingers on the threaded nut), the second end is connected to the water supply pipe using an American pipe having a seal with a plumbing gasket.
Rice. 7 Washing machine connection diagram
Water supply to the washing machine
Gone are the days when water taps and a piece of rubber hose were used to fill the washing machine with water; now the hose is built into the unit and screwed to the pipes. To supply water to the washing machine, bends or tees with a shut-off valve are always used - this allows you to turn off the water at the end of the wash and is convenient when repairing or moving equipment.
To install a tee through which the inlet hose is connected to the washing machine, you will have to make an insert into the line using methods that depend on the materials used.
A simple method used on old faucets is to supply water through an adapter with a tap installed at the inlet of the faucet in the bathroom; an extension coupling is installed on the hot water. The second option - connecting the hose through a tee installed in the shower head line, is used in modern models of mixing devices.
It is quite easy to connect the automatic machine to the water supply if the bathroom has a washbasin, to the mixer of which water is supplied with flexible hoses. During installation, turn off the washing line, screw in a tee adapter with a shut-off valve, and screw the supply hose of the washing machine to it.
In apartment buildings, an old metal pipeline (if there has been no major repairs) or polypropylene pipes are most often used to supply cold water. If you can cut into a metal pipe yourself using various methods, then to connect to a polypropylene pipeline you will have to use a soldering iron with a special soldering iron for polypropylene pipes and in this case you cannot do without the help of a plumber.
Rice. 8 Connecting the hose from the bathroom faucet
Ways to tap into a water supply system yourself
As noted above, cutting into a polypropylene pipeline without soldering is an impossible task; if the water pipes are made of cross-linked polyethylene or metal-plastic, you can connect it yourself using fittings for metal-plastic pipes, in particular tees with compression or push fittings.
To connect to a steel pipeline with your own hands, it is easier to use overhead couplings with rubber gaskets and a threaded outlet for a washing machine, or modern Gebo compression fittings.
To install overhead couplings, turn off the water, drill a hole in the pipe at the desired point and then place two halves of the coupling on the section, connecting them with four fastening bolts. A shut-off valve is then screwed to the central outlet, which has a threaded pipe for connecting a hose.
Rice. 9 Connection for the washing machine through a compression fitting and examples of its location
When using Gebo tee fittings, a small section is cut out in the pipeline so that both ends of the pipes fit into the tee with some margin. Since a tee fitting cannot be inserted into a narrow area, during installation you will have to bend one of the pipe ends, insert a tee into it and then insert the other end into the fitting. The final fixation of the connected ends occurs after screwing the union nuts to the tee body.
In exactly the same way, using compression (crimp) tees, a connection is made to a water supply system made of cross-linked polyethylene or metal-plastic.
Rice. 10 How to connect an automatic washing machine through a tee to steel pipes
Crane and its installation
To connect the washing machine to water, use a tap whose outlet has an outer diameter of 3/4 inch. On the construction market you can find compression tee fittings with a tap at the outlet - they are convenient to use for connecting a hose to polyethylene or metal-plastic pipelines.
If a tee is built into the steel pipes to connect the washing machine to the water supply with a threaded outlet, you can select a modification of the faucet with branch pipes so that one of them has an internal or external diameter corresponding to the outlet of the coupling, and the second has a 3/4-inch external thread for connecting the washing machine hose .
When using a polypropylene adapter tee with a metal outlet, you need to connect a ball valve to it and then a supply hose.
Connecting the washing machine to the pipe connection connected to the flexible faucet connection or outlet to the toilet cistern is easiest done using a special tee with a tap. During installation, one of the tee pipes is screwed onto the pipe, a flexible liner is connected to the other, and the machine can be connected via a ball valve.
Rice. 11 Supply water to the washing machine through a tee connected to the flexible connection of the mixer