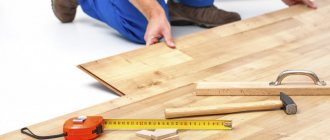
Required Tools
If you decide to do the repairs yourself, you need to purchase everything you might need.
- We need the most common tools that every craftsman has at home:
- Shaped screwdrivers, with various attachments.
- Knife for cutting drywall sheets with replaceable blades. Some craftsmen prefer a special saw for drywall, but this point is not important, the choice depends only on individual preferences.
- A hammer is the most indispensable assistant in all construction work.
- Rulers, at least a five-meter tape measure.
- Metal scissors, wire cutters, pliers.
- Water level.
- Power tools: screwdriver, hammer drill.
Having decided to learn how to work with sheets of drywall, the above equipment will be quite sufficient. Of course, if you plan to earn money by renovating apartments or want to make some rather complex structure from LGK in your house, you will also need more professional tools: laser levels, a needle roller, a tool for fastening profiles, for making holes in sheets, planes.
Methods: how to lay tiles on drywall (video)
By gradually following all the recommendations presented in this article step by step, you can easily create a stunningly beautiful plasterboard structure covered with tiles with your own hands, saving on the work of professionals.
- Author: admin
Rate this article:
- 5
- 4
- 3
- 2
- 1
(0 votes, average: 0 out of 5)
Share with your friends!
Preparing walls for leveling
First you need to figure out the current state of your walls.
Since you are not a professional builder and cannot determine by eye what preparatory work needs to be done, it is better to rely on the basic criteria:
- quality of sound insulation;
- use a level to determine whether your walls are level;
- the condition of the old finish, are there any emergency areas where cracks have formed or pieces of plaster are falling off.
After inspecting the walls, you can think about how you plan to work with the drywall. It can be attached in two ways:
- using profiles - frame method;
- using glue - frameless method.
The preparation of the wall will depend on the option you choose.
In the frame method, you need to build a sheathing from metal profiles that will completely cover the old finish. If the wall is in quite tolerable condition, then no special preparation measures will be required.
Of course, if the old plaster falls off in layers, then it would be better to remove it, because with a large collapse, the fastening of the profile on which the entire structure rests may be damaged.
If you prefer glue as a method of fastening, you will have to put more effort into preparation.
Note:
It is imperative to clean the walls of the old coating, remove all irregularities and foreign bodies.
The adhesion strength of the glue and the surface depends on the quality of this stage. After removing all excess, it is recommended to prime the wall and the drywall itself; subsequent work can be started only after the primer has completely dried. The frameless method of fastening gypsum boards should be chosen by those who have the most even walls.
It wins due to its low cost and complete lack of skills to carry out the work.
When working with an adhesive solution, you do not need a large amount of equipment, the fastening process itself will be much simpler and faster due to the fact that you do not need to build a frame, and the glue is significantly cheaper than metal profiles.
Cutting plasterboard sheets
A standard gypsum board has a height of 2.5 meters and a width of 1.2 meters. The sheet does not always fit perfectly into the dimensions of your room; in most cases it will need to be trimmed.
Make full preparations before starting work - measuring the walls, calculating the required amount of drywall, and only then they can be cut according to your measurements.
When marking sheets, take into account the location of all switches and sockets, because holes for them are made before fixing the plasterboard to the wall. After all the measurements have been made, you need to mark it with a marker, only after that you can start cutting.
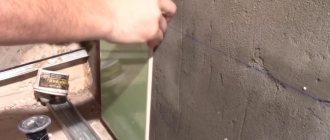
For cutting, use a mounting knife or a special saw. It is convenient to do this work on the floor or on a large table. To cut, run the knife with strong pressure along the drawn line, the blade should go deep at least to the middle of the thickness. Then the sheet must be placed on the edge of the table, then broken along the cut line, turned over and cut through the remaining cardboard with a knife.
Advice:
If you need to cut the sheet in height, it is better to do it from the top side, because the factory edge is still better processed than the one you get at home.
Types of drywall and their features
Sheets of this material, of course, differ in parameters such as thickness and size, but for laying tiles another division is more important - according to the type of technical properties.
Two types of drywall are produced:
- ordinary, intended for any finishing work in dry rooms;
- GKLV, that is, a moisture-resistant material that can easily withstand not only humidity, but also temperature changes, intended for work in bathrooms, kitchens, balconies and loggias.
Contrary to the strong belief that tiles can only be used to decorate gypsum board sheets, they can also be used to seal simple material; the only differences will be in how to lay the tiles on drywall .
The screen under the bathtub can also be made of plasterboard and tiled
Features of the types of this material when used for cladding are as follows:
- GKLV - does not require special processing, but these sheets must be fixed either directly to the wall, for example, when used to level it, or to a reliable metal frame, since the structure must withstand not only the weight of the future tiled decor, but also the sheets themselves, and moisture resistant the type of material is much heavier than usual;
- if a simple material is used, then the thickness of the sheets should be at least 12.5 mm; thinner cardboard will simply bend under the weight of the tiles before gluing the tiles. This type of material must be carefully primed, glued with a painting net, the mesh can be glued with ordinary glue, for example, PVA, and reinforcing horizontal profiles can be used in the design, with a distance of at least 50-60 cm.
After these preliminary manipulations of the entire structure, it is necessary to “catch your breath,” that is, stand for about a day, after which you can begin cladding.
Mounting options
Fastening gypsum boards with glue
For frameless fastening method
a special adhesive is used. To work with it, you need to have wide notched and regular spatulas. After priming and drying, you need to cut the plasterboard and prepare the work area, because the diluted glue dries within 30 minutes and it would be completely inappropriate to waste time on unnecessary actions. Ready-made glue can be applied in two ways:
- using a notched spatula;
- flatbreads with a regular spatula.
You should choose the first option when you have perfect walls. Is it possible to apply glue randomly? Of course, if you lay the drywall on a flat, clean surface, and then spread the substance evenly using a notched trowel. As soon as the glue is applied, the sheet must be immediately lifted and attached to the wall. At this stage, it is necessary to use special equipment to secure the LHA in a vertical position, but in household repairs you can do without it. You just have to hold the sheet for a while until the glue sets.
The second option is more suitable for those who have slight uneven walls or holes. Having retreated a certain distance (approximately 40 cm) from the edges of the sheet, evenly distribute the cakes around the entire perimeter.
Particular attention should be paid to the height of the products; they should not be greater than the curvature of the surface. After which you need to lift and lean the sheet against the wall; if it lies unevenly, you can use a rubber hammer to adjust the level. Using the same hammer, you need to walk around the perimeter of the sheet to trim the convex parts.
Installation of drywall on sheathing
This method of fastening is called the “frame method”. It will save those who want to make their home perfectly smooth, but in practice the old walls have very poor characteristics. Those who have old plaster in a deplorable state, very crooked walls, which is not uncommon in old houses, as well as poor sound insulation or a very cold wall. The frame will hide all the errors of the old coating and provide the opportunity for additional insulation and sound insulation from neighbors.
Construction of sheathing
To erect the frame, you must have all the power tools mentioned earlier, purchase metal profiles of various types (rack-mount CW and guide UW) and brackets for attaching the rack-mount profile.
The first step is to install two guide profiles, one on the floor, the second on the ceiling. They should be parallel and at the same distance from the wall; this can be checked using a water level. The profiles are secured with self-tapping screws, and this is the beginning of our rigid structure. Next, you need to mark where the CW profiles will stand and secure the brackets that hold them on the walls. The brackets are mounted vertically at a distance of 50 cm from each other. Afterwards, the rack profiles are inserted into the guides, secured with screws and staples.
Installation of drywall on the frame
The sheathing is ready.
All that remains is to secure the gypsum board itself. It is attached to the frame with self-tapping screws; one sheet requires approximately 40-50 pieces. You can insert insulation or sound insulation into the resulting honeycombs in the sheathing - cut the material to the size of the honeycombs and secure it with a sheet. If the drywall has been trimmed, then a special recess is made on the vertical edge, like a factory sheet, it is necessary for better joining of the edges.
When installing drywall on the frame, you should monitor the level of screwing in the screws; you cannot leave the caps - they will be visible even through the finishing. If you twist it too tightly, it may fail and the sheet may burst.
Reinforcement with additional strengthening of gypsum boards on walls
To strengthen the seams of drywall, a special mesh is used - serpyanka.
This step is required:
Without such a seemingly trifle, the joint of the sheet will be uneven and too flimsy, which will have a bad effect on its further use.
After gluing, the mesh is puttied and cleaned using a special grater, which will smooth out all the unevenness. Now the preparatory work is done.
Tools, adhesive composition and installation diagram
Before installation begins, an inventory of tools and accessories for work is carried out. The minimum list includes:
- a regular bucket or other container for preparing the adhesive;
- standard spatulas, with a serrated edge and a rubber working part;
- building level and tape measure;
- tile cutter;
- rule;
- restrictive crosses or SVP (tile leveling system);
- metal (wooden) strip and fastening material with accessories;
- rags, sponge and water.
The role of good glue is difficult to overestimate - the plane is made of plasterboard, high humidity, temperature changes. It should not saturate the sheet deeply, but should hold the finishing element firmly. Such conditions determine the use of special, reliable adhesives from well-known manufacturers, without saving on price. For example: "Knauf". Liquid nails can only be used to restore part of the surface.
Laying tiles on drywall
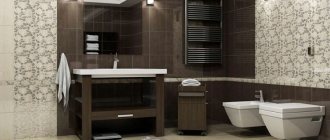
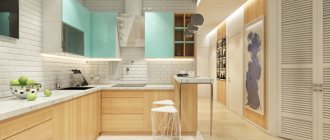
When planning the installation scheme, you should take into account the characteristics of the premises. Thus, laying tiles on drywall in the bathroom is carried out in such a way that the overall pattern is not “smeared” by the equipment (bathtub, sink, toilet, partition, corner of a future cabinet), and the water supply and drainage pipes are conveniently covered by the tiles - they will be painted several times in the future .
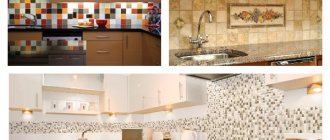
Correct laying of tiles on drywall in the kitchen, in turn, should take into account the placement, along with plumbing equipment, sockets, lamps, and wall cabinets. One of the recommended options for laying a mosaic apron is this simple and win-win pattern.
How to lay tiles on a plasterboard wall
Step by step guide
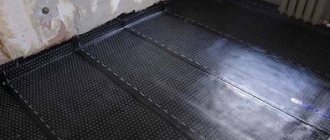
- Carefully prime the plasterboard wall. Let dry. This stage is necessary for better fastening of the waterproofing. When choosing soil, give preference to a special composition for wet rooms; it will help further protect the GLK from moisture and mold.
- Lay waterproofing on the floor extending half a meter onto the wall. In those places where a bathtub or shower stall is supposed to be placed, it is recommended to treat the entire wall. Waterproofing rooms such as the bathroom and kitchen is simply necessary, because in the event of a pipe break, you won’t have to make repairs to your neighbors as well. Due to its properties, it will not let water through.
- Re-priming of waterproofing and clean areas of plasterboard walls. When choosing soil, give preference to a special composition for wet rooms; it will help further protect the GLK from moisture and mold.
- Putty. You need to putty the GLK to achieve perfectly smooth walls; the putty will cover all the screw heads, and will also provide additional protection for the fragile cardboard surface of the drywall.
The preparatory stages for the tiles are completed, we leave our object for a day to completely dry the finish and begin the process of laying the tiles. It is important to do this job correctly:
- We will need a long, even strip that is attached to the second row of the future tile. Being its base, it will not allow the undried tiles to move. Secure the strip with self-tapping screws, do not worry about extra holes in the wall - after finishing the work, the screws will be removed, and the last row of tiles will take their place.
- Counting the number of rows and columns. To do this, you need to measure the wall, tiles and, with a margin for seams, determine the number of rows and tiles in one row. This stage is carried out to determine whether all the tiles will fit intact or whether there will be a place where it will be necessary to trim. In case of trimming, installation begins from the most inconspicuous row, then the trimmed tile will not be visible.
- Mixing the adhesive solution. When choosing, you should focus on the size of your tile and, of course, the brand. High-quality cement cannot be cheap. At this stage, there is no need to save money, because we need to securely glue the ceramic tiles. It is the solution that will be the main link between the tiles and the wall; the durability of the repair depends on it.
- Using a special notched trowel, we spread the solution onto the tiles and start laying from the edge, the first tile lies on the batten, and then we lay it sideways and vertically upward. Crosses are inserted into the joints, which will maintain the same distance at the seams. Gradually fill the empty middle with tiles. When the laying of all rows is completed, they must be left to dry.
- Removing the slats, pulling out the crosses and filling the first row with tiles. We also leave it to dry, but for a shorter time.
- We take out the last crosses from the first row, go over the seams with grout and let everything dry completely within 24 hours.
Important:
It is better to choose a grout that matches the tone of the tile and has antifungal properties; it will be able to preserve its appearance for a long time and will protect your tiles from troubles in the form of mold.
- Rinse off the grout with cold water and wipe with a dry cloth.
Load limit for plasterboard-finished base
Is it possible to glue heavy natural stone tiles in a bathroom or kitchen? Do not forget that drywall is quite fragile, which means you cannot glue too heavy materials to it. Otherwise, over time, the tiles will begin to fall off along with the glue; such a moment can greatly upset you.
Remember:
On average per 1 sq. m gypsum plasterboard permissible load 20 kg. If you use regular tiles and do not apply excessive facing materials, this design can last for more than one year.
It is also necessary to calculate in advance where all the shelves and cabinets will hang if you prefer the frame method of working with drywall.
In this case, when constructing the sheathing, additional reinforcement of the walls is performed using a sheet of chipboard or inserting wooden blocks into the cavity of metal profiles.
When installing gypsum boards with glue, this step can be skipped; the wall itself will serve as the load-bearing structure. However, we must remember about sharp and rounded corners, if any.
Tips and nuances for saving
If you decide to glue tiles in the bathroom or kitchen, then you should take full responsibility for the choice of materials. Give preference to water-repellent compounds with special protection against fungus and mold. Choose only high-quality grout from proven brands; cheaper analogues will help you save money, but within a year or two they will turn yellow and wash off.
Additional Information:
When calculating the number of GLA sheets and tiles, make a reserve of 10-15%.
When fastening, the sheets will be cut, and you will be left with many pieces that cannot be used anywhere. And tile is a very fragile material. If it is purchased from a limited collection, and you accidentally break several pieces, then there will be no place to buy them. And it’s rare that stores agree to sell such goods individually.
All mixtures that will be used indicate the calculated consumption per 1 m2, follow these recommendations.
What type of drywall can tiles be glued to?
Laying tiles on walls is used as the main decoration of walls in rooms with high levels of humidity: kitchens, bathrooms and toilets. In other cases, other types of tiles can be used, most often gypsum, but they use slightly different compositions and technologies.
An example of laying tiles on moisture-resistant drywall
Since the walls of the above-mentioned rooms under the tiles will be exposed to moisture, their plasterboard wall cladding should be made from moisture-resistant sheets.
The peculiarity of this material is that cardboard is more water-resistant, as well as filler additives that perform hydrophobic and antifungal functions. The combination of moisture-resistant drywall with tiles makes the walls resistant to high humidity and mold formation. But, if necessary, the tiles can also be glued to other types of sheets, wall or fire-resistant.