A private house or cottage is not only a place for recreation and living, but also an area where there are various utility rooms and household facilities. In addition, on any site there are not only gardens, but also vegetable gardens, which means that it is necessary to provide storage space for agricultural implements and finished products. In our material you can learn about the types of outbuildings and why they are needed, in addition, we will determine the optimal location of the structure, its appearance and shape.
Choosing a suitable location
The barn can be combined with other outbuildings, or erected as a separate object. In this case, you will have to use a number of recommendations:
- The barn should be conveniently located in relation to other buildings.
- Do not be located on an area reserved for garden crops.
- Do not violate the general principle of landscape organization.
- Do not contradict the requirements for sanitary and fire regulations.
The owner has the right to resolve the first three requirements independently, but as for the last, a number of requirements must be taken into account. This is especially true if the barn is intended to contain small pets or poultry.
According to requirements:
- The outbuilding must be located at a distance of 4 meters from the neighboring property.
- Should be located at a distance of 15 meters from a residential building.
- At a distance of at least 30 meters from a source of drinking water.
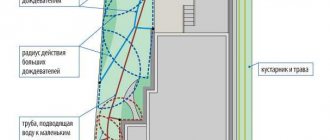
It is advisable that the barn be located on a hill, otherwise it may be flooded by melt or rain water. The shed can be positioned so that it serves as wind protection for garden crops.
It is also necessary to take into account the fact that the shed may disturb the neighbors, covering their area from the sun's rays. If this happens and the neighbors complain, the court will force the building to be demolished or moved to another location.
Installation stages
How to build a utility block with a toilet with your own hands?
First of all, when constructing it yourself, you need to try to use every centimeter of usable space.
To do this, you should clearly decide on the layout and also prepare in advance the necessary material and equipment for the work.
Tools and building materials
It is important to buy the amount of building materials that will be used without a trace and a small percentage on top. This is necessary if you have to redo something.
Layout of a garden outbuilding with a toilet.
For brickwork, in addition to the main material, you will need:
- container for mixing the solution;
- trowel for picking up the mixture;
- cement and sand for preparing mortar;
- levels, vertical and horizontal.
Brickwork is the slowest way to build walls. You cannot complete a large volume in a day; you always need to give time for the mortar in the masonry to dry.
Do-it-yourself cladding of a toilet with a utility block for a dacha with wood will require:
- carpentry meter;
- levels;
- a machine or even a saw for cutting boards to the required length;
- nails
A small building can be sheathed with boards in a short time. Almost the same amount of it may be needed when it is planned to line the utility block with a toilet with ondulin.
The same tools are useful here as for wooden construction.
Step-by-step construction plan
After a space has been allocated for the utility block on the dacha plot, a drawing has been drawn up and the basic materials have been prepared, construction can begin.
Diagram of a country house outbuilding with shower and toilet.
For a sufficiently large utility block, a foundation and phased construction of walls and roof will be required.
To get a neat and strong foundation:
- it is necessary to clear the site for the future building;
- mark the corners of the building, stretch a rope between them;
- dig a foundation around the perimeter; a depth of half a meter is quite enough for a normal, non-seismic region;
- now you need to fill the foundation with a concrete mixture and allow it to harden;
While the foundation hardens, it is necessary to dig a drain hole. It should be the size of the toilet and shower (if there is one) and one and a half to two meters deep. The walls of the pit must be lined with bricks.
Next, work continues on the installation of walls and roof:
- you need to make a floor above the foundation. It can be made of boards or concrete. The last option assumes that the shower floor will be tiled. In any case, when installing the floor in the shower room, you must immediately make a place for draining the water;
- Now we need to make a frame for the walls. It can be made of a metal corner or a thin wooden beam;
- the finished frame of a wooden toilet and utility unit is sheathed with edged boards;
- a roof is erected over the last row of walls.
The frame can also be covered with plastic, siding or even slate.
The step-by-step process of installing a wooden country house can be followed in the video:
You can build a shower, toilet and utility unit from brick or foam concrete. Then the construction will be done without a frame and permanent walls will need to be erected above the foundation immediately.
What a toilet and utility unit look like under one roof is indicated in the article.
What a garage with a bathhouse will look like and how to build it is detailed in this article.
How to build a utility block with a carport can be seen in this article: https://2gazon.ru/postroiki/navesy/dlya-mashiny-na-dachu-sozdajte-maksimalno-udobnye-usloviya.html
Materials and technology
Due to the low requirements for both technology and materials, the construction of a barn can be ensured by:
- Frame technology.
- Using concrete blocks.
Frame technology
This type of technology allows you to build any structure in a matter of days. To do this, it is enough to install and secure the frame on the prepared base; if necessary, fill it with insulation and decorate it with finishing materials.
Advantages of frame technology:
- The design turns out to be lightweight, so it does not require a powerful foundation; it is enough to get by with a pile or columnar foundation.
- The structure is erected quite quickly, since there is no wet work.
- Upgrading can be done with any decorative material.
- The room retains heat perfectly.
The frame structure, in addition to the fact that its construction requires a minimum of time, is also considered an economical structure. The disadvantage of this design is problems with fire hazard, since the main building material is wood.
Important point! You can increase the resistance of a structure to fire if it is treated with fire retardants and non-combustible materials, such as mineral wool, are used as insulation. It is under no circumstances recommended to use polystyrene foam, although it has excellent thermal insulation characteristics.
Alternatively, the frame can be sheathed with oriented strand boards, since this type of finishing material is quite practical and affordable. The boards are made from wood chips and polymer resins. Such a shed is used for storing gardening equipment, as well as for keeping animals in the summer. If the structure is also insulated, then animals can be kept at any time of the year.
Covered with OSB boards
Although OSB boards are considered moisture resistant, they are not intended for direct contact with moisture. In addition, direct sunlight destroys the polymer adhesive. In this regard, slabs require additional measures to eliminate these problems. As an option, the slabs are coated with waterproof paints or enamels.
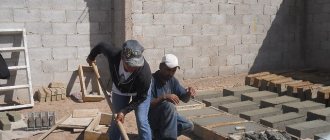
Application of concrete blocks
Cinder block shed
Budget construction requires the use of budget materials, which include foam, expanded clay and slag concrete. Despite their (relative) cheapness and availability, such blocks are quite strong and durable, and are characterized by low thermal conductivity. The blocks, 20 cm thick, have the same characteristics as brickwork, almost half a meter thick. A room made of such blocks can also be used in winter.
If such blocks are used to build a barn, a strong foundation will be required compared to the frame option. As a rule, a strip shallow foundation with reinforcement elements is suitable for such a structure. The laying of concrete blocks is carried out according to the principle of bandaging the seams. In other words, the laying technology is the same as laying brick walls.
Important point! Walls made of porous materials, which are characterized by low frost resistance and high moisture absorption, require mandatory external finishing.
Schemes and drawings of sheds
Despite the fact that this is a barn, the structure is considered capital, so it is necessary to have a drawing as a basis for calculating materials and as a basis for construction. When drawing up a diagram, it is necessary to take into account a number of factors that will affect the final result, including in terms of saving materials and costs. It is imperative to take into account the actual dimensions of building materials in order to reduce the amount of waste. Therefore, the dimensions of the shed must be compared with the dimensions of both building and finishing materials.
As a rule, the drawing is made taking into account all projections, since all facades may have some differences. In this case, it is necessary to indicate all dimensions, both of the entire structure, and the dimensions of openings for windows and doors, as well as the thickness of the walls. If there are any structural elements that require special attention, then they are depicted additionally, indicating their technical features, indicating the dimensions in more detail.
Basically, the barn is not distinguished by the complexity of its layout, so it is necessary to provide all partitions if it is necessary to delimit the room depending on their purpose. In each room, depending on its purpose, at least one small window should be provided. Windows are especially necessary if you plan to keep animals in the barn. Access to sunlight has a beneficial effect on the development of animals and birds.
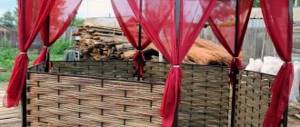
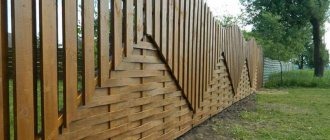
What is a cabin with a woodshed for a summer cottage made of?
Almost all types of summer cottages are made using frame technology. You can use a wooden beam or a profiled metal pipe. The following materials are used as cladding:
- edged board;
- sheet material (OSB, chipboard);
- profiled sheet;
- siding.
The choice directly depends on whether the building is planned to be rebuilt or moved in the future. In this case, the following can be used as construction and finishing materials:
- beam;
- thick board;
- lining;
- metal sheets.
If you need to build a stationary outbuilding with a woodshed, then it is better to use lumber, brick or gas block.
Attention! It is not recommended to use plastic lining for cladding the outer walls of a utility block with a firewood shed, since this material is more suitable for interior decoration of a bathroom or shower if they are planning to equip them.
Construction of the foundation
If the structure of the barn is frame, then you can completely get by with a columnar or pile type of foundation. Block walls require a more powerful and reliable foundation. Such a foundation can be a shallow strip foundation, although in any case the type of soil should be taken into account. If the soil is clayey and heaving, then it is better to abandon the pile or columnar foundation altogether. During seasonal soil movements, the supports may simply be squeezed out or skewed. On weak peat bogs it is better to give preference to a pile foundation.
Marking stage
At this stage, the foundation is marked on the ground using a tape measure, a long cord, and stakes. Correctly, and most importantly, you can quickly mark the foundation using: Theodolite. Start marking from the longest wall of the building, fixing its position with a cord and pegs. After this, measurements are taken using a tape measure and, using stakes and rope, the position of all other walls is noted.
- Egyptian triangle. To do this, you need to pull the cord, after which a point is fixed at a distance of 4 meters from one of the base corners. Then from this point, 3 meters are measured in a perpendicular direction. There should be a distance of 5 meters between points. The second point is marked with a peg, adjusting its position. From this point further construction of the foundation is made.
Marking for the foundation
The correctness of right angles is controlled by measuring the distance between adjacent but diagonally opposite corners. If the distance is the same, then the angles are even.
More accurate fixation of dimensions is carried out using cast-offs, which are temporary posts and crossbars made of wooden slats, which are carried beyond the dimensions of the foundation. Nails are nailed to them, and a rope is pulled, which is removed before excavation work begins.
The process of constructing a strip foundation
The construction of a strip monolithic foundation consists of the following stages:
- Digging a trench half a meter deep and 40 cm wide.
- Pillow rashes made of crushed stone and sand, 10 to 20 cm thick, with compaction.
- Forming formwork from wooden boards.
- Laying the waterproofing layer.
- Installation of a metal frame (rebar).
- Concrete pouring.
After finishing the pouring, the foundation is covered with a film to avoid premature drying. This is especially true in hot weather. Alternatively, periodically water the foundation surface with water. After a week or a week and a half, it is permissible to begin further work. By this point, the concrete will already be able to gain initial strength.
As an option, not a monolithic type of foundation, but a prefabricated type of foundation, assembled from concrete blocks, is suitable. In this case, you should not use porous materials that have increased moisture absorption, which will lead to rapid destruction of the base.
Columnar foundation
To build this type of foundation, brickwork, concrete blocks, asbestos-cement or PVC pipes with a diameter of up to 150 mm, railway sleepers, etc. can be used as columns. Such posts are installed in the corners of the building, as well as every one and a half meters along the perimeter and under partitions.
If the columns are made of blocks or bricks, then they are made like this:
- First, holes are dug up to 40 cm deep.
- Sand is poured into the bottom of the pit in a layer of up to 20 cm and compacted.
- After this, blocks are laid or brick columns are laid out, measuring 40x40 cm and about 60 cm high.
- As the solution hardens, the columns are coated with waterproofing compounds.
A columnar foundation made of pipes is made like this:
- Using a hand drill, holes are drilled in the ground up to 1 meter deep.
- A layer of sand 10 cm thick is poured at the bottom of the wells.
- Waterproofing in the form of roofing felt is laid on top of the layer of sand.
- The pipes are installed and fixed.
- Fittings are placed inside the pipes, 3-4 pieces each.
- The inside of the pipes is filled with concrete.
- After the concrete has dried, the pit sinuses are backfilled.
In this case, the pipes act as formwork. If the soil is not problematic, then concrete is poured immediately into the prepared well with waterproofing.
Pile type foundation
Installing piles is a very labor-intensive process that requires special tools. Basically, screw metal piles are used, which are screwed into the ground. Here you cannot do without special equipment or special devices with levers for effort.
After installation, the piles are leveled by cutting, after which the pile cavity is filled with concrete. It is advisable to carry out compaction using a vibrator. After a week, when the concrete has hardened, work can continue.
Barn without foundation
If you plan to store only gardening tools in the building, which does not require a massive structure, then such a shed can be built without a foundation. Despite this, the structure will still have to be raised from the ground to a small height. For this you can use a wooden beam. The construction of such a shed does not require the construction of a foundation, which means you can save money on it, and there is no point at all.
In this case, the building area should not be more than 20 square meters and have a height of no more than 2 and a half meters. This is necessary so that the building has the lowest windage, otherwise a strong wind will easily overturn it. In this case, you need to take into account the nature of the soil, and it is better to equip the place with good drainage so that moisture does not accumulate under the shed, which can lead to rapid destruction of the beams. Such a shed will stand for many years on sandy soils that quickly absorb precipitation.
Naturally, the service life of such a building can be increased if the lower part is treated with antiseptics.
To build a shed without a foundation, you must adhere to a certain sequence, for example:
- First, the site is prepared by leveling, compacting and forming a drainage layer of crushed stone and sand.
- It is better to bury the posts in the corners into the ground to a depth of about 65 cm.
- To assemble the frame you will need a beam measuring 50x100 mm.
- It is enough to cover such a structure on all sides with planed boards, after which it can be painted.
The nature of the roof is single-pitched, made of corrugated sheets. This design turns out to be quite light, so the load on the walls and the ground is minimal. The design of the shed is not only simple, but also economical.
Construction of a utility block with your own hands
Once we have decided on the set of materials to be used, we should choose the type of shed needed. It can be an ordinary barn. However, if we want to create a multifunctional utility block, then when starting construction, we should take into account that a bathhouse with a utility block and a gazebo with a utility block are good combinations that increase the efficiency of this building. It would be a good idea to make a canopy from corrugated sheets, which will be used as a garage or as a source of shade during hot times of the day.
Perhaps the reader has a question: “Why are we going to assemble the utility unit with our own hands, if there are such a large number of ready-made samples on the market?” The answer is simple and obvious: “The best way to create a useful structure that satisfies you with its characteristics is to build it yourself. It's inexpensive and high quality. All you need is clear step-by-step instructions and the desire to create.”
In addition, the construction of turnkey cabins is a rather delicate undertaking for the owner of a dacha. Even if you are personally present at work, you run the risk of being deceived by workers who perform a large number of operations without your knowledge, only handing over the key to a “freshly built” building.
What we offer is such an instruction “a la how to build summer cottages with a shower, toilet, veranda (albeit small, but “all verandas are a veranda”), and so that the summer kitchen is close, with a strong roof made of corrugated sheets . The proposed scheme will consider the process of assembling a frame-type utility block on a foundation made of foam blocks. Tested by experience: this combination has served faithfully for many years.
Step 1: Planning the territory for the construction of a utility block
Before choosing the components that will make up our utility unit, you should take into account the features associated with the legislative aspect of this event. Distances, according to state standards, should be as follows:
- between your building and the border with the neighboring territory - 1 meter;
- between the shower/toilet and the residential building – 8 meters;
- between the livestock pasture and the residential building - 12 meters (including the distance from the livestock pasture and the residential building).
These government requirements impose some restrictions and sometimes even bring some inconvenience. However, these restrictions do not prevent you from laying a woodpile or planting bushes on that very “meter” between territories - approach the problem creatively!
Step 2: Selecting the necessary building modules to calculate the area of the utility block (along with the foundation)
Each module of the utility unit (be it a barn or a summer veranda) requires, albeit small, space. So in total the creation can occupy an impressive area. Here is the approximate required area for each module separately:
- Barn. It will perform one of the most important functions - storing tools, as well as other necessary things. The area depends entirely on your goals (you will need at least 4 square meters of free space for storing tools, but if you plan to dig a cellar , install any machines or a workbench, even if it is a primitive table with a vice, then the appropriate free space will be needed ).
- Cellar. If there is no other building with a cellar on your site, and you need to store stocks of “pickles/jams,” then it will be a good solution to this problem. Usually it is combined with a barn or veranda. The volume and occupied area depend on requests and start from one cubic and square meters, respectively.
- Shower. A small extension occupying an area of one and a half square meters. Looking ahead, I will say that it is worth deciding in advance on the method of water drainage, since this greatly affects the level of necessary treatment to isolate the foundation from the effects of water (to avoid “washing out” the foundation) and the amount of work carried out. There are two of them: drainage using pipes into a ditch or a special tank (sewer tank) and direct discharge of water into a special pit under the shower. The first method is less labor-intensive and safer, but we will also look at the second.
- Bathhouse. A small steam room will take up six square meters. It is worth considering that the area occupied by the stove is calculated individually, since it greatly depends on its size.
- Summer terrace. To save space, it can be combined with a porch. We suggest you put some chairs and a portable table on it. The required area is from four square meters.
- Toilet. Due to the fact that the planned design of a “house block with a toilet” is a building that combines many functions, the option with a cesspool is not suitable for us for a number of reasons (bad smell, proximity to the summer kitchen and living quarters, difficulty in cleaning and designing due to the structural features).
We offer two options to choose from:
- a more budget option - a toilet with independent removal of biological waste (dry toilet);
- a more expensive option - disposal of biomaterial into a special sewer tank. In any case, the area required for this module is from four square meters.
- Alcove. A gazebo will be a good addition to your building. In it you can have a good time chatting after a long day of work, spend an evening with guests, or just relax after going to the bathhouse. Usually chairs or stationary benches are placed in gazebos. Occupied area – from 6 square meters.
- Garage. Many summer residents have cars; Accordingly, it becomes necessary for these machines to have their own place.
In our case we can use the following projects:
— projects such as “garage-shed made of corrugated sheets and timber”;
— projects such as “garage-shed made of corrugated sheets, timber and foam blocks”;
— projects such as “garage-canopy made of corrugated sheets, timber, foam blocks and gates.”
Step 3: Start of construction: foundation for the utility block
The foundation is the head of everything...
(Unknown author)
Both urban and many country houses cannot do without a strong foundation. We will need a foundation that is less expensive and technologically complex to install than that of urban high-rise buildings.
Which roof is better
When installing the rafter system, the same materials are used as for the frame. After manufacturing the rafter system, it is strengthened with the help of lathing, which is made with an inch board. You should not use wane, as such boards quickly become unusable.
To make a roof in a barn, you can install:
- A pitched roof, when the roof rests on opposite walls, and the heights of the sides have different heights. A pitched roof is considered optimal if the span does not exceed 6 meters.
- Gable roofing, when the roof rests on opposite walls at the same height, while the roof slopes are connected at the highest point, called the ridge. It is used for span widths greater than 6 meters.
The angle of inclination of the roof slopes depends on factors such as the intensity of wind and snow loads.
For example:
- The more intense the wind loads, the smaller the slope of the slopes.
- The heavier the snow load, the greater the slope should be so that the snow that accumulates on the roof melts off faster.
In addition, it is necessary to take into account the recommendations of the roofing material manufacturer.
Shed with pitched roof
Since large barns are not built, you can use a pitched roof, but it is necessary to ensure a minimum angle of inclination for a particular type of roofing material.
For example:
- Slate will require at least 20 degrees.
- For a soft roof, you can get by with 5 degrees.
- For corrugated sheeting, this parameter is 8 degrees.
- For tiles this is at least 25 degrees.
If a barn is being built from concrete blocks, then a support beam-mauerlat should be installed and secured on opposite walls. As for frame structures, the role of support beams is performed by the upper strapping beam.
Rafter boards are installed starting from opposite walls. The pitch of laying the rafters depends on the size of the beams, so for greater reliability, all elements are connected in pairs. Fastening to the support beam is carried out using a tie-in, as well as using metal plates.
The final stage is installation of roofing material:
- Slate is fastened with nails to the upper wave, metal tiles - with roofing screws to the lower one.
- The sheets are laid with longitudinal and transverse fly patterns.
- For better sealing of joints, EPDM rubber gaskets are used.
- The minimum weight of the roof is 50 mm for slate, 100 mm for thin sheet materials.
Barn with gable roof
The technology of assembling a rafter system of 2 slopes is no different. The only differences are that the ridge knot is formed:
- With an overlay at the top of the corner.
- With additional spacer bolt.
- With fastening of rafters at the point of the ridge run.
- Attached to the top of the ridge beam.
Although a gable roof is more complex, it is more resistant to wind loads. In addition, there is enough space under the roof to be used for various purposes.
Assembly diagram of a gable roof of a barn, dimensions 3.5x3.65 m
about the village - MULTIFUNCTIONAL BARN / HOW TO MAKE IT WITH YOUR OWN HANDS EASILY / agricultural vlog / EVERYTHING IN YOUR MIND
Do-it-yourself utility block 5x3
▲Frame house $500\Do it yourself frame house for 30 thousand rubles