DIY chicken coop for 10 chickens.
When designing and building a chicken coop, it is important to keep many components in mind. After all, a chicken coop is both a comfortable home for birds and an outbuilding designed to make it easier for people to care for animals and increase labor productivity. Therefore, before making a chicken coop with your own hands, let's figure out what design elements and features should be inherent in every good chicken coop.
1. We rise above the ground
Dampness and moisture are the main enemies of any chicken coop. In a damp room, birds begin to get sick, so the chicken coop is always raised above the ground. Some designs provide for a very high lift - up to a meter, and sometimes higher. If your area, like ours, does not have excessive humidity, then 25-40cm should be quite enough.
2. Placement of the chicken coop
Speaking of terrain! Choosing the right place for the chicken coop is 50% of success. Here are some tips to help with this:
- choose a place in the shade (for example, under the shade of a large tree), otherwise the coop will overheat during the summer months, which can lead to disease
- the place for the chicken coop should be as dry as possible - do not place the chicken coop where water collects after every rain
- try to choose a secluded place that is not too exposed to the wind (this is how the fence protects the chicken coop from the wind, and the trees from the abundance of direct sunlight)
- If you think you've found the perfect place, don't rush - watch carefully for a while: you may notice hidden problems.
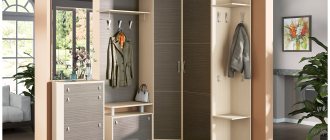
3. Inputs and outputs for chickens and people
Each chicken coop must have an entrance for birds, as well as access for cleaning the premises. In our chicken coop, the passage for the chickens is made behind the back wall, and two doors provide the possibility of cleaning the chicken coop.
4. Nests and roosts
Chickens will lay eggs in the nests, and you will take these eggs from the nests, so the nests should be comfortable for both you and the chickens. It is believed that the ideal nest size is 30x30cm in length and width, and 30-40cm. in height. In this case, it is recommended to make the entrance to the nests narrower.
There should be easy access to the nests from the outside.
The lid opens, so you don't have to climb inside the coop to collect eggs.
The lid must be inclined so that water flows freely from it and does not fall into the nests.
The total length of the perch is calculated based on 25 cm per chicken. Since we are planning our chicken coop for ten chickens, we have enough crossbar for the entire length of the chicken coop (almost 2.5 m).
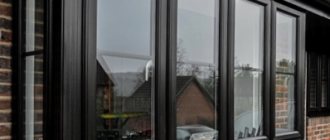
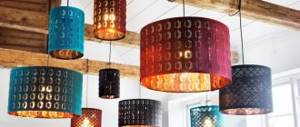
5. Lighting and ventilation of the chicken coop
Chickens simply need light. Reduced daylight hours are one of the main reasons why chickens stop laying eggs in winter, and experienced owners know that this problem can be solved by turning on a light bulb. Therefore, there should be windows in the chicken coop!
It is better to make windows on at least three sides so that light penetrates into the chicken coop throughout the day. Also note the hinged ventilation window on the back wall. In wet weather it can be opened for additional ventilation. The windows above the slots on the front wall also open. Ventilation is very important, but remember: no matter what tricks you use to ventilate the winter chicken coop, be sure to provide the ability to adjust the air flow until it is completely blocked - this will come in handy in winter, when ventilation will suck out precious heat.
Important features and calculations
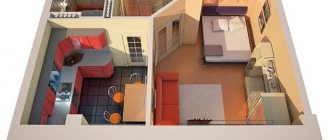
At the beginning of work, you need to determine what type of poultry housing will be used. This is important for calculating the dimensions of the building and the design model. When keeping poultry on the floor, you need to plan approximately 1 m² for 4-5 chickens. So, for 10 individuals, the area of the chicken coop should be at least 2 m². When keeping cages, you can equip a smaller chicken coop, since the cages can be placed one on top of the other.
You can build a chicken coop for keeping birds using a combined method; it provides cages and floor space for each individual. Then you need to decide for yourself whether to allocate space for a chicken coop with or without walking.
It is also important to determine what breeds of chickens will be kept in the chicken coop; this affects the height and design features of the interior design:
- If these are heavy breeds for meat, then nests and perches are made lower.
- For laying hens, you can place nests up to 40-50 cm from the floor and perches at a height of up to 70 cm. For egg-laying hens, it is important to equip the nests well, make a ladder to them in the center for uniform use of the nests.
It is recommended to choose the right location for the chicken coop. It should be borne in mind that its inhabitants wake up at 4-5 o’clock in the morning. If you place it next to a residential building, the sound will wake up the people living there. In addition, if there are quite a lot of chickens, the smell from the droppings will be heard close to the chicken coop.
It is also worth considering where the communications are and the size of the chicken coop and run. Before starting construction, it is worth drawing a complete plan of the entire structure. This is necessary in order to determine what and how many materials are needed to construct the structure.
Chicken coop drawing.
Below we provide drawings of our chicken coop. For construction, we used softwood timber and boards, as well as 15mm thick plywood. It is quite possible to use OSB for the floor and roof underlay. When specifying the pitch between joists and rafters, the distances are indicated between the centers of the beams.
How to insulate a chicken coop with your own hands
So we built a chicken coop. Now we have to insulate it. Various materials can be used as insulation. Mineral wool is perfect for this.
As well as polystyrene foam and polystyrene foam.
At worst, you can line the walls with cardboard and old blankets.
The insulation is placed between the beams and then covered with plywood. Otherwise, birds may peck it off (they especially love polystyrene foam).
In winter, it is also worth covering the windows with insulation. It is important to provide artificial lighting.
In case of severe frosts, infrared lamps can be provided. At the same time, their operation can be controlled by a timer or even a thermal relay - this eliminates unnecessary hassle, eliminates the human factor (forgot to turn it on/off) and saves money.
DIY chicken coop. Summer paddock.
During the warmer months, chickens need more space and will happily spend most of their time outside. Therefore, when making a chicken coop with your own hands, you need to make an open summer pen for chickens. The paddock area is calculated using the formula 1 sq.m. for every chicken.
Pay attention to the mesh at the bottom of the coop - it protects against predators. It should be buried 20-30cm into the ground, since some predators are quite capable of making a tunnel. And if there are large birds of prey in your area, then the enclosure must also be protected from above.
It is also very important that at least part of the pen is in the shade - the chickens should be able to hide from the scorching sun. If there is no natural shade, then build a small canopy.
So that birds can freely enter and exit the chicken coop raised above the ground, a simple ladder is usually built for them.
How to build a chicken coop for laying hens with your own hands in 4 days!!!
Have a good time everyone. Today, the author of the YouTube channel “Home Master” will share with us how he built a chicken coop for laying hens with his own hands in 4 days.
Materials:
Two meter board 25x150.
Quantity 135 pieces Beam 50x50. Length 2 m. Quantity 50 pcs. Board 50x100. Length 2 m, 2 pcs. Length 1.5 m 3 pcs. (Tying.) Profile pipe 60 by 60. Four pcs. 1.5 m each Steel strip 4 mm thick. Approximately 1 m Roofing felt 1 m Penoplex 19 sheets Corrugated sheet C21 two sheets of two meters and two sheets of 1.5 m each. Galvanized ridge 200 mm length 2 m 70 pieces of roofing screws 28 mm and 10 pieces for a ridge 40-50 mm Oil recovery Screws 50 mm and 90 mm Old window Hinges. Pens. Hooks. Espagnols Reinforced corners 50 by 50 20 pieces Mounting foam 1 cylinder OSB sheet 2000 mm by 600 mm. Can be replaced with six boards 25 by 150 Nails. Tools:
Screwdriver Miter saw Jigsaw Clamp Square Magnetic square Welding machine Circular saw Vise Electrodes Drill for installing poles Laser level angle grinder Cutting wheel for metal Drills Hammer Manual bubble level.
The first day. The author made holes for the pillars (piles). The master chose this type of foundation because there is a slope in this place, and there is water nearby.
The size of the future chicken coop is 2000 cm by 1500 cm.
Then, using a laser level, I set the plane and made marks.
Second day. I cut all the posts according to the markings.
Then he began to assemble the harness.
Next, under each corner, the author placed a strip of metal.
And I cut out rectangular blanks 10 cm by 15 cm for each post. Then I welded them to the pipes. The result was piles with caps.
Then I made holes in the plates. And secured the harness with screws.
Having previously placed pieces of roofing felt. And installing the crossbar in the center for structural rigidity.
Next I treated the wood with waste oil.
Then I made a subfloor from a 25 by 150 board.
The edges were smoothed with a circular saw.
Afterwards, the author attached a 50 by 50 mm beam to the board, as shown in the photo.
Then I laid down sheets of penoplex.
And foamed the seams.
Then I covered everything with boards.
Then the author assembled two frames from timber. With dimensions like the floor. These will be the two walls of the future chicken coop.
Having installed the frames in their places according to the level, the author temporarily secured them with jibs.
Then I prepared the boards for the interior cladding.
And secured them to the wall frames.
The author leveled the top with a circular saw.
We ended up with two walls; on one of the walls, the author left an opening for the door.
Then the master began assembling the frame of the third wall, on which there will be a window and boxes for laying hens. All sizes are clearly visible in the photo.
Next I assembled the frame of the last wall. Which, the author made of two sections. He secured the upper section tightly with screws, and will fasten the lower section with hinges so that it opens.
The author’s idea is that by opening the section you can clean the chicken coop without entering it.
Then I covered these frames with boards on the inside.
View of the chicken coop from the outside, at this stage. Then I insulated all the walls with penoplex and went through all the seams with polyurethane foam.
Next is the outer skin.
The master also covered the opening section first with a board, then with penoplex and foam, and again with a board. After sheathing, the author installed this section on hinges. Examination.
On this day, the master still managed to make a rough ceiling.
Day three. I assembled the frame and insulated it with penoplex.
And covered it with boards on top.
For reliability, the author installed a couple of bars inside the chicken coop and secured them with corners.
Then the author began to frame the roof. Assembly of the middle part, from two bars of 2000 mm and four bars of 400 mm. To obtain a total height of half a meter.
I leveled this part and secured it.
Then I made a rafter system from the timber.
The roof slope on the side of the wall where the boxes for the nests will be located will be 2000 mm, and on the opposite side - 1500 mm.
Then I covered the gables with boards.
Next I made the sheathing.
Afterwards I secured the corrugated sheeting and the ridge. Next I made and installed the door.
Installed the handle and hook.
The door was also insulated during assembly, as was the entire chicken coop.
After preparing the window.
The author made the window edging from timber and OSB strips. This created the height of the window. Then I installed the window.
To fix the window, the author made wooden pinwheels. And installed the handle.
Now the master began assembling the nests. Insulation. Temporary support. Sheathing.
After assembling the walls.
Insulation again.
Day four. Exterior cladding and cover installation.
He made the perch out of timber, rounding all the corners on it.
All adjacent parts were pierced with a sealant.
And he introduced chickens.
In the future, the author will provide lighting, make feeders with drinkers and natural ventilation. And that's all for me. Thank you all and see you again! Source
Become the author of the site, publish your own articles, descriptions of homemade products and pay for the text. Read more here.
Do-it-yourself chicken coop from scrap materials.
A German farmer turned an old kitchen cabinet into a small chicken coop.
This scrap coop is fully compliant with EU chicken housing specifications and provides enough space for three hens to collect and lay eggs.
The cabinet compartments contain storage areas for sand, straw, feed and eggs.
Tiny curtains have also been made for the chickens as they prefer to lay their eggs in the dark.
Chickens need space to roam, so the coop is placed in the backyard to give them plenty of room to roam.
A chicken coop made from scrap materials shows how modern methods of keeping chickens can be implemented using non-standard means.
As you can see, in the construction of such a seemingly simple thing as a chicken coop, there are many nuances and important points, lack of knowledge of which can negate all efforts.
But despite this, anyone can build a good chicken coop with their own hands.
The main thing is to arm yourself with the right knowledge and think through all aspects of the design in advance.
You can build a chicken coop according to our drawings, or, taking their basis, modify its structure to suit your needs. Please share your experiences and tips on this topic in the comments!
Determining the dimensions
The construction of housing for birds begins with calculations of the size of the chicken coop. On average, 2-3 chickens can fit per 1 m², depending on the breed. 20 broilers, due to their inactivity, can live in a room measuring 7 m².
The construction of housing for birds begins with calculations of the size of the chicken coop
“Laying hens” need a spacious room - 1-2 birds per 1 m². Accordingly, the construction area may differ - 20-30 m².
Don’t forget that chickens need to have nests, drinking bowls, a feeder, and a place to sleep.
The average height of a chicken coop is two meters. It can be increased or decreased at the discretion of the owner. But you must remember that the room needs to be cleaned, so the low ceiling of the chicken coop is impractical for cleaning.
Be sure to read:
How to make nests for laying hens with your own hands, step-by-step instructions, photos and videos?