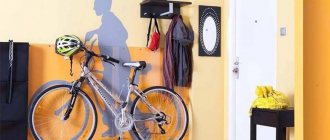
How not to decorate a modern interior in order to achieve a unique comfortable environment in a residential building. To revitalize, decorate and decorate an empty wall in a room, it is appropriate to place beautiful butterflies. There is a situation when an expensive renovation has been completely completed in a room, pieces of furniture have been placed, attractive curtains have been hung, but there is still a lack of additional accessories - some kind of individual highlight.
A photo of butterflies on the wall shows how interesting this wall design option is, which will undoubtedly attract attention, perfectly completing the image of the room space.
Preparatory work
The tradition of using paper butterflies as wall decoration arose relatively recently. Multi-colored moths can quickly transform the interior of a room, filling the atmosphere with romanticism and pleasant dreams of relaxation. The preparatory stage will help you achieve the desired result:
- It is better for paper butterflies to have a wall that is as free from foreign objects as possible. A good overview enhances the aesthetic pleasure of a handmade creation.
- Determine the area and shape of the image on the wall. It can occupy a compact area or be dispersed as much as possible over the surface.
- The easiest way to make butterflies is from colored paper, but there are still a lot of interesting ideas for decorating a wall with original butterflies. The manufacturing material and its compatibility with the interior of the room are thought out in advance.
- A wall with butterflies of different sizes looks impressive. Pre-prepared stencils for cutting will help you quickly complete the task.
Comment! When choosing a template, it is worth remembering the difficulty of cutting out intricate shapes.
How to make butterflies
There are quite a lot of materials for making. The simplest and most accessible is paper. In order to make beautiful paper butterflies on the wall, just take a regular white sheet and then draw patterns on it with paints. Instead of paints, you can use colored paper applique, then your product will turn out voluminous and even more attractive.
To apply the design, you can use ready-made stencils found on the Internet, or you can take ready-made pictures or photos, print them on a color printer and cut them out.
Ready-made stencils
Products made from very dense material, such as cardboard, will be more durable. They will last longer and will not lose shape under the influence of moisture or other factors. In modern stores you can find quite a lot of different materials for creativity, such as corrugated paper, colored foil or plastic film.
If you decide to decorate your walls with fabric butterflies, keep in mind that it must be dense in order to hold its shape well. If you do use a thinner fabric, first soak it in PVA glue and then shape it into the desired shape.
The design will have a greater effect if you combine butterflies with other products. They will look great in combination with flowers, grass, dragonflies and birds.
Some room design options
Select the color scheme of the composition based on the interior of the room so that its elements do not get lost, merging with the color of the surfaces.
Of course, you can resort to the simplest option by painting insects on the wall. However, you will end up with a monotonous, not particularly distinctive silhouette of a butterfly in the interior, and when you get tired of it over time, you will have to re-glue the wallpaper or repaint the surfaces. While decor made of paper, cardboard or fabric can simply be detached and moved or assembled in another new composition.
Characteristics of individual materials for butterflies
You can make elegant moths for the wall with your own hands from various materials. Only paper models have several solutions:
- classic colored paper or double-sided colored sheet;
- cardboard;
- corrugated paper;
- newspapers and glossy magazines.
In addition to paper decor, other versions of original butterflies are used in the interior of the room:
- from vinyl records;
- a contour painted on the wall with phosphor paints, applied using a stencil;
- from nylon tights, which are covered with a wire frame;
- from cans or plastic bottles.
Advice! If you have no experience, it is recommended to make several copies from different materials, then attach them to the wall and choose the appropriate option.
Paper
The easiest and cheapest way to make moths with your own hands is from ordinary colored paper. There are several design techniques. If you plan to stick the entire butterfly on the wall, then paper painted on one side will do. When creating a three-dimensional composition, when only the body of the moth is fixed, it is preferable to use double-sided colored paper for work, so the appearance of the decorative elements will only benefit.
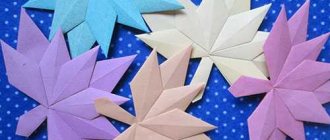
In addition to classic colored paper, pieces made of corrugated material look original on the wall. The butterfly turns out more airy and light, it is easier to give volume to the figure.
Moths on the wall look extraordinary when they are made using glossy magazines, postcards, newspapers or wallpaper. In addition to simply cutting butterflies out of paper, they can be additionally colored, combined with other shades of a similar material, or made multi-layered. There are practically no boundaries for the flight of creative imagination.
Cardboard
To cut out butterflies on the wall, select cardboard of low density. Otherwise, the process will cause a lot of trouble.
Comment! Cardboard is considered the most suitable material for decorating three-dimensional wall decor with moths. It holds the shape of the figure well.
Naturally, in this case it will not be possible to make a corrugated copy of the butterfly. Rigid material cannot be folded into small folds.
Cardboard is optimal for cutting out openwork moths. For decoration you will need a sharp stationery knife and a lot of patience. A high-quality result of wall decor is possible only with perseverance and the ability to carefully work with small details.
It is also better to prepare a butterfly stencil for subsequent cutting out numerous copies from cardboard. Original templates for cutting butterflies from paper are presented below:
Textile
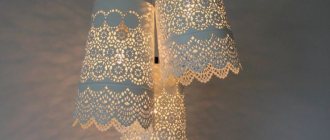
To give the paper wall decor a complete look, it is sometimes supplemented with similar elements on the lampshade of the lighting fixture. But paper moths are not suitable here, so they turn to fabric analogues. Butterflies made from fabric are not complicated:
- Using a cardboard stencil, the outline of the figure is applied to the fabric;
- the part is cut out;
- the workpiece is given rigidity;
- if necessary, the moth is additionally decorated (wire antennae on the body or beads on the wings);
- The butterfly is attached to a suitable surface.
Advice! Experienced needlewomen can try imitating veins on the wings using a thread and a needle.
A little exotic
Extravagant people will love the idea of creating wall decor based on vinyl records. Key process steps:
- Initially, the outline of a butterfly is drawn onto the vinyl with chalk.
- In the initial state, the material is hard enough to cut a figure out of it; the plate needs to be softened. An oven with a foil-lined baking sheet or a microwave will help you accomplish your plans.
- When the vinyl becomes plastic, it is taken out and the shape is quickly cut out. If the butterfly has not acquired the desired shape before cooling, the heating process is repeated.
- At the final stage, the moth is given the required volume.
It is more difficult to attach a vinyl butterfly to the wall than a paper one. It cannot be removed later without damaging the surface.
The material for making a moth can be a sheet of tin or a beer can, which is pre-washed and straightened. The contours of the selected stencil are transferred to the material with a marker or an awl, and the workpiece is cut out. Decorate the figurine with nail polish or colored markers.
Attention! The edges of the butterflies turn out to be very sharp, so you need to work extremely carefully so as not to cut yourself.
Tin decor can be hung on a thread. It would be appropriate in a loft interior; for a classic design, paper butterflies would be the optimal solution.
DIY paper butterflies on the wall. Option 3.
- colored paper or origami paper
1. Place several sheets of construction paper into one pile and fold them in half, and in half again, to create a variety of butterflies when you cut them out.
2. Draw a butterfly on a piece of cardboard and cut it out.
3. Use the cardstock butterfly to draw a butterfly on the top sheet of the stack, tracing the cardboard template.
4. To stick the paper butterflies to the wall, use double-sided tape.
Making outline butterflies
Let's start with the simplest option on how to make contour butterflies. Main stages of the creative process:
- It is better to cut butterfly stencils for the wall from medium-density cardboard. A suitable material would be cereal or tea packaging.
- The original moth can be selected and printed from the templates below.
- The silhouette you like is applied to cardboard and cut out. A wall with butterflies of different shapes on it looks more colorful.
Some useful tips for decorating paper butterflies:
- For cutting, use the entire figure; if you want to achieve perfect symmetry, the workpiece is folded in half.
- Specimens with minor asymmetrical deviations look more natural on the wall.
- If there is a need to obtain moths of different sizes, the template is converted through a graphic editor.
Making your own decorations
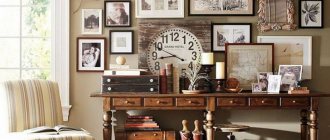
It's no secret that winged beauties can be used to decorate not only walls, but also photo frames, paintings, chandeliers, mirrors, and ceiling surfaces. This design is by far the most popular as it embodies joy, love and tenderness.
To create this decorative accessory you practically don’t have to spend a large amount of money, time or material. Suitable paper sheets can probably be found in any home. But if this does not happen, the material can be purchased at any regular office supply store, and they are quite inexpensive.
Sometimes you don’t have the desire or time to draw and cut out the silhouettes of an image, then you can use special ready-made stickers with a sticky base.
Before you make butterflies on the wall, it is important to know that to make them it is not at all necessary to use only paper; you can also use any suitable available raw materials:
- colored paper;
- soft sheets of cardboard;
- vinyl record;
- textiles treated with starch;
- thin metal sheet (beer or lemonade iron can).
Absolutely different sizes, colors, shapes are allowed, depending on the desires and preferences of household members. Naturally, you should take into account the quality and composition of the material at hand.
Please note that flying moths can be placed either in a dense flock (in the form of a whirlwind) or as individual elements of interior decoration.
Design of openwork specimens
Openwork paper butterflies are best made using cardboard. To work, you will need a sharp knife, a blade and a printed template with lines for cutting. Obtaining high-quality decor on the wall is possible with painstaking work. The algorithm of actions differs only slightly from cutting out contour butterflies. First, select and print a template. The required number of elements is cut out from it.
Advice! It is first recommended to cut out the small details inside, and then move on to cutting out the outline of the butterfly.
Using a blade or a sharp knife can damage the surface of the table, so it is recommended to protect the table top with a sheet of plastic, plywood or chipboard. Openwork paper butterflies on the wall usually add volume. A little trick can make the process easier. The product is slightly moistened and rounded, the resulting bend is fixed. After the moisture evaporates, the workpiece will retain the desired shape.
Options for volumetric paper decor
Three-dimensional figures of paper moths look impressive on the wall. There are several options for creating butterflies of complex configurations:
- multilayer instances are created;
- use corrugated paper;
- the figures are formed by folding the sheet into several layers;
- The art of origami is deservedly popular.
Multilayer
Placing multilayer moths on the wall is quite simple:
- several blanks of the same shape are cut out of paper;
- color and size of parts may vary;
- the elements are placed one on top of the other, the bodies are glued together, and the wings are bent in different directions.
Multi-layer butterflies look impressive not only from contour blanks, but also from openwork details. To do this, you will need paper in contrasting colors or similar shades. For the upper part, an openwork blank is taken, the lower one remains contoured. The following photo will help you evaluate the result:
There is an interesting technique where you can make a multi-layer butterfly on the wall from one sheet of paper by folding it in a special way. The photo below demonstrates the simple manufacturing process:
Corrugated paper
It is quite easy to work with butterflies on a corrugated paper wall. The algorithm of actions includes the following steps:
- The required paper colors are selected.
- Rectangles are cut out with an approximate size of 7x10 cm.
- The blanks are stitched in the center with large stitches, after which they are assembled with an accordion and secured with thread in several turns.
- The resulting paper bow is folded in half, and the future wings of the butterfly are straightened.
- Then the desired configuration is cut out along the edges.
- Narrow strips form flagella for antennae, which are glued to the body.
The interesting process is clearly demonstrated by the photo:
Ideas for beginners and professionals
It’s very easy to prepare butterflies from double-sided colored paper for wall decoration:
- First, a diamond or square is cut out.
- The figure folds like a small accordion.
- The two pieces are joined together and secured in the middle with thread.
- The antennae are formed from wire.
The photo will help you follow the main stages of making butterflies for the wall:
The origami process, which is so interesting for children, is somewhat complex. One option for making a paper butterfly is presented below:
Selection of material
You can make stencils from paper, cardboard, film, fabric. Let's consider each of the options.
Paper
It’s the easiest way to make a panel from multi-colored paper. Moreover, this is the cheapest decor option. This material can be replaced with glossy paper from a magazine you read. The resulting butterflies can be arranged by color into an overall picture.
Important! A fully glued decoration will not protrude above the wall level. Butterflies that are attached at a distant distance will flutter their wings when the air moves.
Cardboard
Such decoration is more difficult to make, but it is more reliable. Cardboard quickly takes any shape and retains it for a long time. You can make the wings curved or rounded. You just need to wet the cardboard and bend it with a weight. After drying, it will take any shape. Due to the large weight, it will be more difficult to attach such a panel.
Film
Thick or self-adhesive vinyl film makes great colorful stencils. Glossy butterflies will not only sparkle, but also shimmer in the room. The manufacturing process is the same as in the case of thin cardboard. Self-adhesive film does not require additional fastening at all, and the usual colored film is fixed to the wall with glue.
Advice! In order for the butterfly to twitch its wings, you need to secure only the central part of the workpiece.
Textile
To decorate walls with plain liquid wallpaper, drapery, or any base that is soft to the touch, you can use fabric. Such butterflies will fit into the interior and even improve the design. It is better to attach them completely with glue. To create a three-dimensional decor, you need to dilute PVA glue with water. Very thin fabric can be wetted, stencils cut out, and then allowed to dry in the desired shape.
Related article: Choosing panoramic paintings: a variety of subjects
Mounting options
You can securely fix paper butterflies on the wall in various ways:
- If the issue of preserving the wall surface is not relevant, PVA glue or wallpaper solution will help to secure the paper figures.
Comment! Regardless of the chosen template, whether it is a contour or an openwork butterfly, three-dimensional paper figures look more impressive on the wall. A light breeze can set the wings in motion, making them flutter like real ones. - Small pieces of polystyrene foam will also come in handy in the process, which are initially glued to the body of the butterfly and then to the wall.
- Similarly, double-sided tape is used instead of polystyrene foam.
- When the task is to maintain the integrity of the wallpaper after removing paper moths from the wall, they are secured with safety pins.
There are many options for creating decorative images on the wall using paper butterflies. A huge heart or a whirlwind receding into the distance, individually distributed specimens or a flock of flowers comfortably located on flowers - there are no limits to creative imagination.
Recommended Posts
Protecting plants from heat
Apartment aviary for dogs
White spirit: technical characteristics
Wallpaper or decorative plaster for walls
Drawing of laying paving slabs + photo
DIY wall mounted shelf + photo
Paper butterflies on the wall. Option 1.
- colored paper or self-adhesive film
- bright magazine pages
- tape or PVA glue
- pen or felt-tip pen
1. Prepare one or more cardboard templates.
2. Using templates, start making butterflies - trace the stencil on colored paper or self-adhesive film (which will be easy to stick to the wall).
* You choose the number and size of butterflies yourself.
3. If you are using self-adhesive film, then you are almost done - you just need to peel off the paper layer so that the body of the butterfly becomes sticky. Now just stick the butterflies on the wall as you like.
If you used colored paper, you can attach the butterflies to the wall using pins, glue, or regular or double-sided tape.