DIY autumn leaves made of paper and crafts from them: master classes
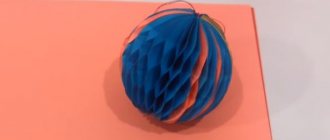
Today we want to tell you how you can make autumn leaves from paper from the simplest paper modules. And these will, of course, be maple leaves - feathery, wide and simply very beautiful. Moreover, the leaf is beautiful in itself, and can be used as an element of a garland or as a component of other crafts, ideas for which you will find below.
Today we will talk about how to do:
- DIY autumn leaves made from paper
- Crafts from paper autumn leaves
DIY autumn leaves made from paper
To make autumn leaves out of paper, you needed:
note paper (multi-colored), square; we have a side of 8 cm;
scissors;
any glue.
How to make autumn leaves out of paper: master class
We work with note paper - squares with a side of 8 cm. Of course, to create autumn leaves, you can use paper of any color and format, the main thing is that it is a square or rectangle, cut to form a square.
If you take a separate leaf (8x8 cm) for each module, the finished leaves will come out too large. They can be used, say, to create a wall garland (wall garland, because the leaves are not double-sided after all) or to decorate a large display case.
If each leaf is cut into 4 parts, the finished autumn maple leaves will come out in a good size, neither large nor small. And the scope of their use is expanding dramatically! This could be a packaging design element, a fragment of a postcard or a craft. Below we will look at how to decorate a gift box with such leaves, make a drawing of a tree with paper leaves and an autumn wreath.
Let's get started.
To create one maple leaf according to our sample, you will need 10 squares, i.e. 2.5 sheets for notes.
We fold one of them in half and in half again, pressing the folds well. We unfold it to its original position.
Under the sheet marked in this way, we place two more sheets of paper for notes and cut all three sheets along the folds.
We fold 9 squares out of 10 diagonally.
Then we unfold each one (the module in front of us is positioned so that the fold lies vertically) and bring the right and left corners to the fold, as shown in the next photo.
Three modules are already ready (let's call them large), and with the remaining six we do the same, but now we bring the lower cuts on the right and left to the fold. It turned out like this (let it be small modules).
Here are all the modules that are needed to assemble one autumn maple leaf from paper.
We put small modules in pairs, like this.
Lubricate them with glue - the area that is highlighted in the photo with red shading.
Then we glue the large module.
We got three shamrocks. On one of them, we lubricate the folded wings, indicated in the photo with red shading, with glue.
Glue trefoils onto the glue strips so as to assemble a maple leaf fan.
We have one square left. Lubricate about half the square with glue (the lubrication area is marked in red).
We seal the back of the leaf with it.
Now you need scissors. The lines for cutting are outlined in red.
We bend the corners to form a leaf stem.
We coat one of the parts with glue.
Your handmade autumn paper sheet is ready.
What can be made from them?
Crafts from paper autumn leaves
Of course, there are a great many options for creating crafts from autumn leaves from paper. We will give only a few of them. For example, they can effectively decorate a gift.
Gift packaging
A gift in an ordinary cardboard box will instantly “sparkle” if you tie it with jute twine and decorate it with a couple of paper maple leaves. What do you think?
Wreath of autumn leaves made of paper
First we will make a blank: a cardboard circle for the base of the wreath. To do this you will need a compass.
Let's cut out our circle.
And let's start assembling the wreath. You can glue it with anything - any glue that sticks to paper. To save time and make the craft more reliable, we used double-sided tape.
We cut it into relatively narrow strips and stick it all over the ring.
Remove the protective paper and glue the finished paper leaves.
The leaf wreath is ready.
Craft tree from paper leaves
It’s simple: on a sheet of whatman paper we draw a trunk and branches with paint.
And glue our autumn leaves from paper in random order.
Eva Casio specially for the site Handicraft Master Classes
www.supermasterclass.ru
DIY paper leaves. The best ideas and master classes
In what cases might you need a master class on how to create paper leaves with your own hands?
? Perhaps you have to brightly and originally decorate the hall before the autumn holiday in kindergarten or make autumn paper crafts for kindergarten together with your child. Some ideas will be useful not only for children, but also for experienced craftswomen who like to create unusual decor with their own hands.
To create a picture from leaves, it is not at all necessary to use natural material; you can fold an origami “Maple Leaf”, which will become an indispensable element of bright autumn panels and compositions. Folding origami is easy, but at each stage you need to be careful and follow the master class step by step.
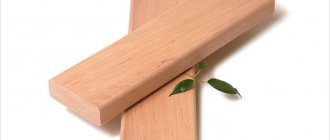
If you decide to make paper leaves with your own hands
, then you need to prepare paper squares of bright colors with a side of 8 cm. For one craft, we will need three such squares of the same color, and their size may vary depending on the desired result, whether you will use them as an element of the composition or as a decorative element.
In this origami voluminous leaves made of paper with your own hands
will consist of three parts, therefore, unlike other origami master classes, here we cannot do without glue.
- Paper squares 8x8 cm orange, yellow, red colors
- Glue stick
- Scissors
We will only need scissors at the first stage, when we will turn the paper rectangle into a square. The first fold line must be laid diagonally, as shown in the picture. After that, the two side triangles must be bent to the center line outlined at the previous stage. At this stage, we should have a “diamond” blank, which must be turned towards us with a sharp corner consisting of two halves.
The top corner must be folded down and then tucked inside. Now the upper side corners must also be bent to the center line, as shown in the master class, immediately after which we bend them back. So we outlined a fold line that will allow us to tuck these corners inward. All that remains is to bend the upper triangles down, and we have the first workpiece ready. We need to make three such blanks of origami leaves from paper with our own hands, diagrams
repeating step by step each time. All that remains is to put the three blanks together, gluing their sides, and we must not forget about the leg.
DIY maple leaf made from paper
looks neat, bright and voluminous, they will become an original holiday decoration.
DIY corrugated paper leaves
If you love creating paper bouquets and flower arrangements, then you can’t do without interesting ideas on how to create paper leaves with your own hands. Master
class is usually an integral part of making a paper flower, but now we'll highlight a few simple ideas that you might find useful.
DIY corrugated paper leaves
most often they are made together with a twig, so that they can then be easily attached to the stem, so you get a full-fledged flower.
Just like the petals, it's very easy to create your own paper rose leaves.
, and all because of the characteristics of the corrugation. The structure of the material allows you to give the cut parts a curved shape, as close as possible to the natural one.
- Green corrugation
- Floral wire
- Floral ribbon
- PVA glue
- Scissors
Let's start by cutting several identical blanks; to do this, you can fold the corrugation into several layers. For a rose, you can do without a template; here the leaves have a simple oval shape, but if you need to make carved leaves, you should use a pre-printed template.
On the cut piece you need to find the center line by bending it in half lengthwise. Apply PVA glue along the center line with a brush, apply floral wire and bend the workpiece in half again, pressing the place where the corrugation and wire are glued with your fingers. When the glue dries, we need to carefully level the outer side of the leaf and wrap the branch with floral tape, hiding the base.
DIY autumn leaves from corrugated paper
You should also cut it according to a template, but for such a craft it is better to take dense corrugation that holds its shape.
DIY paper leaves: diagrams, templates
The simplest and most interesting entertainment is to cut out leaves from paper with your own hands, diagrams, templates
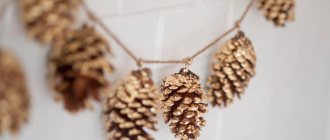
will become your assistants in creating bright, original items that can decorate your interior. If you cut a lot of paper leaves of different shapes and sizes, you can make an original autumn wreath or topiary, and a garland with leaves will become the brightest decoration of the autumn holiday.
DIY paper leaf garland
is also created from templates that need to be printed on a color printer and then cut along the contour. You need to glue a string to the cut-out blanks on the back side, and the finished garland can be hung. The beauty of this craft is that the templates can be of any color and size, but if you don’t have a color printer at hand, you can use paints to uniquely decorate the paper blanks.
If you choose the right templates, you can cut out any autumn leaves from paper with your own hands.
– maple, oak, linden, birch. And you will definitely find a use for them in your creativity. For example, you can take dry tree branches and carefully glue colored leaves to the ends of the branches; this will become a bright interior decoration and replace the bouquets of fresh flowers with which you decorate the house in the summer.
Remember how in winter we decorated glass with openwork snowflakes; these crafts have the unusual name “vytynanki”, and they can be made not only for the New Year. If you want to brightly decorate the glass in the fall, filling the house with warmth and bright colors, then using the punching technique you can make paper leaves with your own hands, templates
here they have many small sections that are cut out using a breadboard knife.
This is a difficult job where you will have to use sharp tools, so you need to be especially careful. It is convenient to create protrusions on a rubber mat.
myhandmade7.com
Craft from origami leaves No. 3 (Postcard)
If desired, origami from “Maple Leaf” paper can be made even more original by painting the finished leaves in a variety of colors.
Coloring the leaves
Trace one such sheet along the contour of half of the cardboard sheet folded in half.
We trace the sheet along the contour
Go along the contour with a stationery knife and glue the sheet to the other half, opposite the resulting hole.
Glue the leaf
You will get an original postcard! We sign “September 1st” on it, color the free space to your taste - and now you have something to congratulate the teacher with!
Making a congratulatory inscription Autumn origami card
You can use origami leaves for a variety of purposes, as long as you use your imagination!
A video master class will help you make a beautiful maple leaf using the origami technique:
Autumn Leaf Origami
How to make autumn leaves from colored paper » My Diy Ideas
Published 11/19/2017 · Comments: 0 · Views:
209
Autumn cannot be confused with any other time of the year. After all, it is during these three months that you can see the yellowed leaves that decorate the streets of your beloved and native city. They can be of different shades: from yellow-green to brown. Therefore, you can choose the most suitable color of paper or just use everything that can be found in a stationery store.
Necessary materials:
- colored paper;
- ruler;
- scissors;
- pencil;
- glue for paper.
Stages of making autumn foliage:
1. To create foliage, take a sheet of A4 or A5 paper in yellow, orange or red. Draw a diagonal line from the upper right corner to the lower left and use scissors to divide the sheet into two halves.
2. Take one part of the sheet and carefully bend the corner to get an even triangle with a vertical fold line.
3. Open the workpiece. We have a vertical fold line and two identical halves of the triangle.
4. We create spaces along the entire vertical line every 1 cm. We begin to bend the workpiece according to the marked marks from the very bottom of the triangle.
5. So we reach the top of the triangle.
6. Slightly straighten the folds of the bent sides.
7. Fold the workpiece in half.
8. Apply glue to both sides of the workpiece. We press and get a beautiful neat leaf. You can add a twig to the base of the leaf, which is also best made from paper. To give a more natural look, it is better to give preference to corrugated paper, which will match the tone of the foliage.
9. This way you can create another leaf, and then another. So we will make a large number of elements from colored paper.
10. As a result, we will get real leaf fall from autumn paper leaves. They can be made in different colors and shades to make it much more beautiful and interesting.
mydiyideas.ru
Wreath made of paper autumn leaves
To make autumn leaves from paper for such a wonderful wreath on the door, you will need ten sheets of colored paper measuring 8 x 8 centimeters per leaf. You can use smaller or larger sheets, the main thing is that it is a square.
Instructions for creating a wreath from autumn paper leaves:
- Take one sheet of paper.
- Fold it in half to form a triangle.
- Unfold the sheet and place it with one of the corners facing up.
- Fold the left and right corner of the diamond to the center fold line, as in picture 1.
- Fold the new left and right corners of the figure towards the center again, as in picture 1.
- Make three pieces of the same parts as in step 4.
- Make six of the same pieces as in step 5.
- Take one part from point 4 and two from point 5.
- Fold the three pieces as shown in picture 2.
- Lubricate the top part with glue and glue the bottom two to it.
- Make two more parts in the same way.
- Glue all three components together, as shown in picture 3. Each component must be placed on top of the other. As a result, you will have a finished leaf.
- Now you can make a branch. Glue the paper to the back side of the finished leaf so that one corner peeks out (diamond-shaped).
- Trim the glued sheet of paper on both sides and fold it as shown in the picture below.
- One autumn sheet of paper is completely ready. Make a few more leaves and combine them into a wreath shape.
autumn leaves made of paper – DIY and master classes
We tell and show how to decorate your house with bright, unfading leaves.
September brings with it an autumnal mood, but in the first weeks it gives us only a light drizzle and darkened greenery instead of an Indian summer with golden leaves. Well, it's time to take matters into your own hands and decorate your home with bright and cheerful leaves yourself.
Inspired by designer and blogger Charlene's post about making maple leaves with her daughter, we decided to do the same thing in our office and swap out our summer decor for something more seasonally appropriate.
So, we needed: a dry branch, watercolor and regular office paper, narrow masking tape, red and yellow acrylic paint, floral tape and wire, a sponge, a bristle brush, and a palette to mix the paint. All of these can be found at your local hobby store.
The complex shape of a maple leaf is difficult to reproduce from memory, and it turned out to be a great excuse to take a walk in the park. There was no shortage of fallen green leaves and dry branches broken by the wind. By the way, if you store leaves it is better between sheets of paper. crushed by a voluminous book (we remember how we made herbariums in childhood), otherwise they will wither from the dry home air.
Finally, we got to work. First, we outlined the leaves with a pencil. For the experiment, we chose two types of paper: watercolor and thin, for the printer.
We cut out future leaves along the contour.
“Veins” were twisted from floral wire (this is a thin metal vein wrapped in colored paper) to strengthen the leaf and create a petiole for it.
At first we decided that the veins could be simply glued, but this turned out to be a bad idea. Firstly, the glue refused to hold them tightly, and secondly, the bare wire looked very unnatural on the sheet. Therefore, masking tape was used.
The leaves are cut out, the veins are glued on - it's time to mix the paints. We tried several shades, and came to the conclusion that there is no need to split hairs: pure red and yellow colors will suffice.
The paint was applied with a sponge: you can quickly cover the entire sheet with paint and make beautiful spots on it. Plus, even a child can easily handle it if you do this project together. The sponge can be replaced with a bristle brush, but then you should apply the paint not with smearing, but with vertical movements, just like with a sponge. For greater naturalism, you can use a thin brush and darker paint to draw veins on the leaf (in maple they diverge in different directions from the petiole itself).
The watercolor paper, as expected, behaved well and did not curl even under several thick layers of paint. The “printer” one easily curled due to moisture, so painting the leaves was a bit difficult. But after drying, the small leaves became like real ones. Conclusion: for large sheets of paper (10 cm in diameter), take watercolor paper; for small ones, you can get by with regular paper.
Hurray, our leaves are ready! The hardest part remains - attaching them to the branch. We tried wrapping them with a wire stalk, and attaching them with masking tape, and to hide the joining place we used floral tape. This is crinkled wax paper, slightly sticky and reminiscent in color and texture of the surface of a branch or stem. Our brown tape turned out to be exactly the same color as the branch, and so sticky that small leaves could be tied directly with it.
By the way, at this stage you found out that thickly painted acrylic watercolor paper is quite heavy, and our thin wire and thin branches can hardly support these leaves.
We finally secured all the leaves.
This is how the bouquet turned out! +100500 for a romantic autumn mood in the Kvartblog office.
Have a warm autumn! Create alone and with the whole family, and let your home always be elegant.
DIY
kvartblog.ru
DIY autumn leaves (3 ways)
How to make autumn leaves from paper with your own hands (3 methods + templates).
Autumn is probably the most colorful season of the year, thanks to the fact that the leaves of trees and shrubs are painted in bright colors. For many people, autumn leaves are often a source of creative inspiration.
Autumn leaves are a beautiful, but not very durable material, so you can make them from paper with your own hands.
How to make autumn leaves with your own hands
One way to make autumn leaves is to cut them out of colored paper, preferably double-sided. The edges of small leaves can be cut with curly scissors.
Leaves brought home from a walk are suitable as a template. But if you need to do a craft urgently, and there is no way to collect them, then here are leaf templates especially for readers of the blog “MORE creative ideas for children”