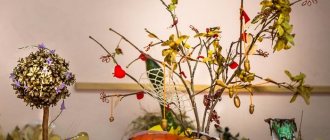
Preparation of natural materials for crafts
You can make beautiful crafts from natural materials with your own hands after first preparing the raw materials.
List of recommendations for its processing:
- It is advisable to collect acorns when ripe and fresh, when they fall to the ground. Rotten and decayed specimens should be skipped. Oak fruits are collected with cups (pluses), which are also used to create crafts. Acorns are stored in a cool, damp place.
- It is better to take the cones for work in an unopened form; such samples are easier to work with.
One of the stages of preparing cones for crafts is soaking them in water.
It is advisable to collect spruce inflorescences on damp soil, because they will dry out more slowly and retain their original shape longer. Having collected the cones, they need to be sorted by size, shape and type, and then placed in separate boxes.
- It is recommended to collect the leaves in the fall, at which time they acquire the brightest shades. To prepare them well, the collected leaves should be laid out between sheets of paper and ironed with a slightly heated iron, then covered with thin cardboard and a weight placed on top.
If the material is stored for a long time, it is advisable to change the cardboard spacers periodically. The inflorescences are dried in the same way.
- Various seeds are collected mainly in the fall when ripe.
- For products, it is worth selecting elastic branches from trees such as lilac, spruce, dogwood and pine. It is not advisable to pick fresh branches from trees; it is better to collect not very dry specimens on the ground.
Various herbs are used to bind (fasten) parts of the craft, but it is worth considering that when the material dries, it becomes brittle.
- Before use, it is recommended to carefully clean and dry the moss in the sun. The spore plant is easily glued with any glue.
- Poplar fluff is collected in sunny, dry weather, then the material is cleared of seeds.
- Any feathers are suitable for work (passerine and poultry). Before use, they are washed, dried and combed to give a natural shape.
- The collected shells should be washed with a small brush and laid out in the sun to dry. Arrange dry material by type and size. Store at any temperature.
- Any kind of sand can be used for crafts. It is advisable to first clean it of various impurities and debris, then dry it.
- Before use, eggshells are washed in water and the film is removed, then placed in a solution of water and 2 tsp. soda This will give the material strength.
Acorns
You can make a boat from available natural material in the form of acorns.
Crafts from natural materials: step-by-step production of a boat from acorns
Step-by-step execution of the product:
- Oak fruits of different sizes must be washed and dried.
- Take a large acorn and pierce it on the side with a needle. Insert a sharp toothpick into the hole formed; it is advisable to move it deeper into the part. These steps will help you create the mast.
- Pick up several oak caps: one whole cap, ½ part of a cap and 1 cap with a stalk.
- The half piece must be attached to the wide side of the acorn to form food. Fix the cap with a tail on the narrow part of the fruit, and the remaining cap will serve as a stand; it is attached to the main part on the side.
- Place the ship horizontally and attach an oak leaf to the mast. If the upper sharp part is long, then it is advisable to shorten it.
- Finally, attach a thread to the stern, wrap it around the mast and tie it to the bow of the vessel, and hang a flag on top.
Making a sheep:
- Prepare 2 acorns, one large for the body, the other with a smaller cap for the head. Use an awl to make 1 hole in each piece for the neck.
- Make 4 indentations for the legs in the bottom of the body, find suitable sticks and stick them into the holes.
- Pick up a short stick from a tree and use it to connect the head and body of the sheep.
- Roll a large number of small balls from cotton wool, dip each of them in glue and attach to the body. In this way, cover the entire surface of the body and the cap, giving them fluffiness.
- Use a dark felt-tip pen to draw the animal's eyes and mouth.
Painting made from natural materials
- small branches (choose the size yourself)
- thread of several colors
– various natural materials (leaves, cones, acorns)
*You can make a triangular or square shape.
1. Connect the ends of the sticks using thread (see image). You will have a frame for your work.
2. Tie one end of a colorful thread to the corner of the frame and begin wrapping the thread around your frame, leaving plenty of room for the embellishments.
*Try wrapping each branch twice (see image).
3. When you have wrapped the entire frame, tie the end of the thread to the opposite corner of the frame.
4. Start collecting natural materials from forests, parks and/or your yard (leaves, flowers, nuts, etc.).
5. Try to secure the collected material between the stretched threads. Use your imagination to create different pictures.
Cones
The pine cones make original and beautiful products.
Step-by-step process of decorating a candlestick:
- A large ripe cone must be carefully disassembled into plates so as not to damage them.
- Cut a circle for the base from thick cardboard. Its diameter should be 2 times larger than the glass for the candle.
- Glue cone plates on the prepared circle along the edge in a checkerboard pattern to create the first tier. Then glue the next layer, filling the gaps in the first row. In this way, arrange subsequent layers until the desired height is reached.
- Wait until the product dries and place a candle cup in the middle.
Crafts from natural materials: step-by-step production of a basket from pine cones
Master class on making a basket:
- Connect 12 cones in a circle using thin wire, which is best matched to the color of the spruce inflorescences. To do this, fasten the wire to the first part, and simply wrap subsequent pieces with a cord. The lower parts of the fruit should form the outer side of the circle.
- Make the next ring using the same method, only with a smaller diameter, using 10 cones. If you plan to make a deep basket, then you need to add 1 more tier.
- Fasten the created circles together with hot glue.
- For the handle, take 10 spruce fruits and connect them in the same way as the lower circles, then attach it to a frame made of thick wire.
- Cover the bottom of the basket with thick cardboard and glue 3 cones to the outside of it.
Leaves, flowers, seeds
Children can make beautiful crafts from natural materials with their own hands together with adults.
Bouquet of roses from maple leaves: step-by-step implementation
For example, to arrange a rose from maple leaves:
- You should collect fresh maple leaves. Their edges need to be tucked towards the center. Install a stem from an ordinary stick inside.
- Take the next sheet and, bending its sharp edges, wrap it around the middle.
- It is recommended to select foliage in different shades, then the product will look rich.
- Perform similar twists until a beautiful inflorescence emerges.
- To disguise a gray stick, you need to wrap it with a green ribbon. This will help close the dangling stems of the leaves and secure the bud.
To make fish, you should adhere to the following technology:
- Draw the outline of a fish on blue paper and cut out the blank.
- Make scales from linden leaves and glue them to the body of the fish.
- To decorate the tail, you need to take brown quince foliage.
- Use acorn caps to outline the outline of the head.
Step-by-step production of dragonflies from seeds:
- Sculpt a round head and an elongated abdomen from plasticine.
- Attach eyes from apple seeds at the top.
- Make the insect's tail from a dry elongated branch and attach it to the lower part of the belly.
- For the wings, take ash wings and insert them in pairs on the sides of the body.
- Form the paws and whiskers from thin wire.
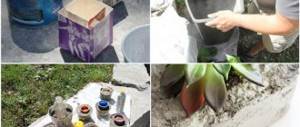
Step-by-step creation of a painting from fresh flowers:
- For the base, select any piece of wood, treat it with a brush and then sandpaper. Attach a hook at the back so that the product can be hung.
- Drive nails in the center of the wood figure in a circle. The diameter of the circle depends on the size of the plant's rhizome; it should be slightly larger than the root.
- Place moss in the middle of the circle and water it well. Place a succulent on top of it, cover all the soil with moss, and also water it.
- To fix the craft you need to create a grid. To do this, wrap the bottom nail with twine, then wrap the remaining screws over the ground, thus forming a small mesh. This will help keep the flower in place.
Grass, moss, poplar fluff
Crafts made from natural materials can decorate a room. For example, a moss topiary can be placed on a windowsill or balcony.
Crafts from natural materials: step-by-step production of topiary from moss
Master class on making crafts:
- Place a cube of polyurethane foam or a hard sponge in a clay pot. Cover it with thick crumpled paper.
- Insert the trunk of the future product there in the form of a branch. One end of it will be placed in the pot, and the other needs to be stuck into a foam ball.
- Cut a sphere out of foam plastic and place moss on it, while wrapping the circle with thread to secure the moss. You should make sure that there are no voids on the ball.
- To decorate the pot, you need to wrap it in burlap and tie it with a bright ribbon on top.
Step-by-step process of making a swan from poplar fluff:
- Draw a silhouette of a swan on blue cardboard.
- Using a thin brush, brush over the entire shape of the bird.
- Carefully spread down raw materials in an even layer over the adhesive surface.
- Glue a bead as an eye, and cut out and attach a beak from red paper.
Crafts from natural materials: step-by-step production of a horse from grass
Technology for making a horse from grass:
- Cut tough grass, about 40-50 cm long.
- Lightly dry the green raw material (30-40 minutes) to make it easier to bend.
- Take a small bunch of grass and bend it in half, then wrap it with threads, moving 2-3 cm from the edge. You need to pull the thread tight.
- Measure 1 cm from the wound fiber and bend it one more time, the animal’s neck will come out. Take soft spikelets and cut off their stem so that a fluffy piece remains. Align the ears and neck, and fasten them along the entire length.
- Just below the formed part of the body, divide the grass into 3 segments. These will be the front legs and torso.
- To form the forelimbs, individually bend the grass tufts in half, connect them and secure them at the base with a thread.
- Cover the horse at the base of the neck with a large armful of grass to create a body.
- Wrap the body with thread. Divide the grass tuft located below the body into 3 parts: for the tail and hind legs. Fold them and secure with yarn.
- Embroider the eyes with floss and spray the mane with hairspray.
Crafts made from natural materials for children: autumn shooting stars
For one star you will need:
- 10 long stems from leaves (in this case stems from chestnut leaves)
- wire or multi-colored threads
- decorations (small leaves, sprigs of berries)
1. To make one star element, connect two stems for strength. Fasten them together with wire or thread. You have one blank (star element).
2. Start assembling the star by passing each element over and under two other pieces intersecting it (see image).
3. Start decorating the star by tying branches of berries, leaves and other decorations to it.
* These stars can be used to decorate your home, cottage, corridor, veranda, etc.
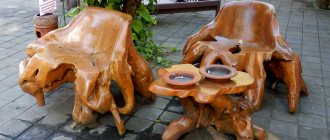
Natural wood
Children can easily make beautiful crafts with their own hands from natural materials.
Master class on making a star:
- Even sticks or branches of wood should be laid out in the shape of a five-pointed star.
- All corners must be tied with rope and decorated with a bright satin ribbon.
- The craft is suitable for decorating a New Year tree or as a gift to relatives.
Step-by-step design of a photo frame using bark:
- From thick paper, cut out 2 identical parts for the frame, which should be glued on 3 sides. Leave an opening at the top for a photo.
- Cover the front side of the craft with pieces of bark in the form of a mosaic.
- The remaining gaps between the material are filled with moss.
- Grate the birch bark or chop it with a large file. Fill the glued joints with the resulting powder.
You can also make a table from a piece of wood
Method for making a stool from sawn wood:
- You will need a metal frame consisting of 3 legs attached to the top.
- A piece of wood should be secured to the top of the frame.
- The thickness of the round timber is made as desired.
- The cut surface is made in its natural state or sanded and varnished.
- If there is no metal base, then wooden blocks are suitable for the legs.
Compositions made from natural materials: autumn crown
- cardboard or thick paper
- leaves of different colors and other natural materials that can decorate the crown
1. Measure the head circumference of the future king or queen. Use this information (adding a few more centimeters) to cut a 5cm wide strip of cardboard.
*You can cut out several strips and glue them together if one sheet of cardboard is not enough.
2. Cut another strip from another cardboard, but this time cut one side in a zigzag pattern.
3. Cut a piece of duct tape the same length as the cardboard strip and place it on a flat surface, sticky side up.
4. Glue one cardboard strip to the top half of the adhesive tape (just above the middle of the tape), and the jagged part to the bottom (just below the middle of the tape). You will be left with an uncovered piece of duct tape in the middle.
It is to the uncovered part that various natural materials can be glued.
*Alternatively (if you have covered all the tape), you can use Moment glue (or PVA) or another strip of tape to attach the natural decorations to the crown.
Decorative stone and pebbles
Children love to paint stones in the form of all sorts of animals and objects. While on vacation, it is worth looking for various decorative stones on the sea coast that have bizarre shapes, unusual colors or unique prints. Such specimens make exclusive jewelry (pendants, bracelets and necklaces). The flat configuration allows you to draw any image.
Fridge magnets made from sea pebbles
The most common option is a magnet; its design involves the following steps:
- Decorate the stone with any image.
- Glue several small or 1 large magnet on the back side.
- Attach the products to the refrigerator.
You can create a souvenir from multi-colored sea pebbles as a memory of your vacation. To do this, you need to purchase a glass container of any shape and fill it with colored pebbles. Shells and artificial algae are added as decoration.
Shells
The simplest crafts for children made from shells are presented in the form of ladybugs:
- Select round, voluminous sinks, clean and dry them.
- Paint the parts with red paint.
- Wait until the workpieces dry.
- Paint over the head with a black marker or paint, draw a stripe in the middle, and draw spots on the sides.
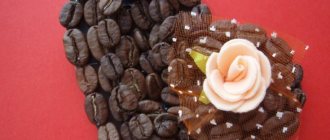
Step-by-step design of a heart made of shells:
- Draw a heart on cardboard and cut out a template.
- Punch 2 holes in the upper part with a hole punch or awl for hanging.
- Glue sisal to the front side of the workpiece.
- Cut out a heart from burlap so that its size is 1 cm larger than the cardboard piece.
Crafts from natural materials: step-by-step production of a heart from shells
- Glue the fabric part to the reverse edge.
- Thread a rope into the hole and tie the cord with a double knot from the inside of the product.
- Cover the side where the sisal is with shells of the desired size.
- Attach a starfish to the center with glue.
- Glue twine along the contour of the craft.
Crafts made from natural materials in kindergarten: finger puppets
- cardboard cylinders (from toilet paper or paper towels)
- thin twigs or a thin brush
- colored paper (if desired)
- plastic eyes or plasticine
- buttons or small stones
1. Start gluing the piece of paper evenly to one end of the cardboard tube.
* If you want, you can first cover the cardboard cylinder with colored paper, or you can do both options - without colored paper and with it.
2. Glue small branches on the sides - they will act as hands.
3. Glue buttons or pebbles along the cylinder.
4. Glue the eyes or make them out of plasticine and add them to the cardboard cylinder.
Sand
Beautiful crafts from natural materials are made with your own hands from such an unusual component as sand.
Step-by-step process for making an applique from colored raw materials:
- Prepare the stencil. To do this, you need to draw the outlines of the desired image on cardboard (or find a drawing on the Internet and print it), then mark the shades to be painted with numbers.
- PVA glue should be applied to the first segment with a brush so that it does not go beyond certain boundaries.
- Pour sand of the desired shade onto the resulting adhesive sector, and blow off or shake off excess sand. To avoid mixing colors, you must first glue the material in dark shades, and after it dries, start with light colors.
- It is recommended to varnish the finished painting and place it in a frame.
Children's crafts made from natural materials: leaves mask
- leaves of different sizes and colors
- cardboard (you can use a cereal box, for example)
- strong thread or elastic
- PVA glue or “Moment”
1. Draw a mask on cardboard and cut it out.
2. Check where the eyes will be and make the necessary holes in the paper.
3. Make small holes along the edges of the mask (you can use a stapler) and tie a thread or elastic band to keep the mask on your head.
4. Using glue, start attaching various fallen leaves to the mask. It's a good idea to start with the large leaves at the edges and slowly cover the mask, ending with the small leaves closer to the middle of the mask.
Eggshell
Eggshells are considered an affordable and easy-to-use material.
Step-by-step design of crafts from these raw materials:
- Prepare a hard shell from raw eggs (wash and dry), then paint it with watercolors, acrylic paints or food coloring. It is worth considering that such material does not stain evenly.
- Grind the dried raw materials with tweezers or a rolling pin. To prevent the egg shell from sticking to the roller, place it between paper sheets. It is advisable to grind the skin to medium size. If the material is painted in different colors, then it must first be sorted by shade.
- Cover the front side of the plastic plate with black paint.
- Then make the desired stencil and turn it face down.
- Rub the visible side of the sheet with chalk to create a white carbon copy. Place it on the dark surface of the plate and secure it with tape around the edges.
- Translate the drawing in pencil. To prevent it from being erased, you need to trace it along the contours with a helium pen.
- When the entire image is clearly visible, the chalk should be wiped off with a dry cloth.
- After this, peel off the tape, remove the template and a light sketch will be visible.
- Now you need to squeeze the glue onto a certain area and place the crushed shell on it; tweezers or a scalpel will help with this. First of all, it is advisable to lay out large elements.
- Gradually fill in all fragments of the picture.
- After gluing the entire image, the background should be painted.
- When the work is dry, coat it with transparent construction varnish.
Feathers
Beautiful DIY crafts made from natural materials are made from bird feathers.
Step-by-step decoration for curls:
- Form a medium-sized fan from organza in the form of a ribbon. Secure it from below with thread.
- Bend the pin in half so that one edge is slightly higher than the other.
- On a rectangular felt blank, place 3 identical feathers with cut ends, 1 white fluffy feather and a pre-created fan. Add a pin and an artificial flower, and secure the components with a glue gun.
- Wrap a regular comb with satin braid and attach the created decor.
Poultry making process:
- Cut out a bird shape from thick paper.
- Cover the resulting workpiece with feathers, starting the process from the tail.
- Feathers can be dyed in different colors if desired.
- Form a tuft from small fluffy parts.
- The finished product can be glued to cardboard and hung on the wall.
Nature crafts in autumn: collage
- dried thin branches (in this case, a grapevine)
- thread of different colors
- decorations (leaves, flowers)
1. Make a circle from the twigs as shown in the image. You can secure the structure with threads or wire.
2. Start wrapping a circle of branches with colored thread to create a “web”. At the end, tie the thread tightly into a knot.
*You can wrap the thread however you like.
3. You can decorate the round frame with leaves (insert them between the threads of the web) and other natural materials.
Fruits, vegetables, berries
Many different masterpieces are created from edible gifts of nature.
For a vegetable penguin you will need the following components:
| Name | Quantity, pcs. |
| Eggplant | 2 |
| Carrot | 2 |
| Sweet red pepper | 1 |
| Peppercorns | 2 |
| Toothpicks as needed |
Master class on making crafts:
- Cut off the stem of a large eggplant and cut off the skin at the belly using a knife.
- Another eggplant needs to be cut parallel lengthwise into 4 segments. The outermost segments will serve as wings.
- Cut off the sharp tip of a small carrot to create a beak.
- Form paws from a large carrot root. To do this, cut the blunt edge of the fruit in half. Cut triangles from the inside of the paws, now they will be directed in different directions.
- Use sweet red pepper to create an oval shape for the belly and 2 circles for the eyes. Make the pupils out of peppercorns. They are pierced with a needle, then toothpicks are inserted into the resulting beads.
- Assemble the penguin using toothpicks.
Banana dachshund registrations:
- Form a body from 1 small thick banana. Carefully cut out paws from it at the bottom using a knife.
- Create a head from another fruit. To do this, peel the fruit down to half, cut off part of the pulp with the skin so that the remaining skin turns into dog ears.
- Bend the ears to the sides, attach peppercorns in the form of eyes.
- Finally, attach the head to the body with a toothpick.
Step-by-step formation of a berry bouquet:
- Form a base for the craft from salt dough, wrap the mass in a napkin, leave the top open and place the resulting bag in a glass.
- Then take the washed berries (cherries, strawberries, blackberries) and put them on skewers. Stick the created blanks in random order into the dough base to create a beautiful composition.
- It is recommended to place the skewers at a short distance from each other so that they stand freely.
- The dough that peeks out should be masked with curly parsley or dill.
- Prepare a decorative bright napkin and pack a container with a bouquet in it to hide the dough wrapper. Tie the top of the container with a ribbon.
Whatever natural materials you come across, you can use them to make beautiful crafts with your own hands, which can be presented at a competition or placed at home as a reminder of the beauty of nature.
Article design: Natalie Podolskaya