Types of clay
Nature gave us two types - red and blue versions. Red clay is most often used to make products (although you can also find DIY white clay crafts for sale on the World Wide Web).
For its further use, the clay is filled with water, waited for several days, and thoroughly mixed until a single structure is formed.
To use it as a base, the clay must become similar to plasticine. Clay can be found on the banks of a river, in the ground, or in a quarry for the extraction of this material.
This material may be:
- Skinny;
- Average;
- Bold.
In order to find out the quality of this natural component, it should be kneaded and made in the form of a sausage (by the way, very often many master classes on creating crafts from clay begin this way). If, as a result, the sausage does not crack and does not stick to your hands, then you can safely start using it.
Clay crafts are a great way to keep your children occupied at the dacha (after all, they are sometimes very bored).
You just need to give them softened clay, and their wide imagination will help them create clay masterpieces, which, after completely drying in the sun, will be ready for children's games.
How to make polymer clay at home
From a material called polymer clay or plastic, you can create the most unexpected elements. It is often used as a basis for jewelry, making bracelets, rings, headbands, or brooches. All these decorations will shimmer with the bright colors that you choose for sculpting. Jewelry on the neck looks especially beautiful - these are pendants, necklaces or just beads. In second place comes dishes that are decorated with polymer clay with your own hands. Glasses, mugs, teapots or spoons - they can decorate your table for months.
- How to make a man miss you
- Candles with Longidaza
- White tattoos - application technique, care and correction, advantages and disadvantages, design ideas with photos
You can make toys in the form of jointed dolls entirely from polymer clay or make a small dish set for them: its modeling will be especially interesting for a child. Today, skilled craftswomen make from this material everything that their imagination allows - from key rings to a bouquet of flowers, while there are already many recipes according to which polymer clay is prepared with your own hands. If you buy it in a store, the composition contains polyvinyl chloride and liquid additives, i.e. plasticizers. For self-production, the basis is starch, glue with glycerin and soda.
- How to earn a big pension
- New fines for dog owners and car owners
- Where to invest small money
Polymer clay for modeling from potato starch
The first recipe for making polymer clay with your own hands is based on potato starch. Often corn is used instead. The only difference is that the appearance of potato starch products turns out to be a little grayish. If they used corn for the craft, then they look whiter. The recipe itself will require the following ingredients:
- Vaseline or hand cream – 1 tsp;
- baby oil – 2 tsp;
- PVA glue – 100 g;
- lemon juice – 2 tbsp. l.;
- potato starch – 100 g.
To work you will need an enamel pan. Pour about 1 liter of water into it and put it on fire. While the liquid is boiling, follow the instructions below:
- Take disposable cups. Pour glue into one of them, pour starch into the other.
- Place the glue in another enamel container. Add butter with cream and lemon juice there, mix well.
- Next, heat the mixture over a pan of water, i.e. in a water bath. Just don't do this for too long, or the clay will overheat and become stiff.
- After this, add starch to all ingredients. With such small proportions, you can do it all at once rather than gradually.
- Stir vigorously so that the mixture does not stick to the bottom of the container.
- Lumps will begin to appear in the mixture, it will become like cottage cheese, and then turn into a large lump. At this point, remove the container from the water bath.
- Lubricate your hands with cream and start kneading the mixture.
- Roll the clay into a ball shape, cover it with a layer of cream and wrap it with film to prevent air from getting inside. So the material should ripen in about 12 hours.
Recipe from glue and glycerin
The following instructions assume the addition of glycerin at one stage of the work. This substance helps to avoid cracking of finished products. For this recipe you will need materials in the following proportions:
- PVA glue – 2 tbsp. l;
- cold water – 1 tbsp.;
- glycerin – 10-15 drops;
- potato or corn starch - 1 tbsp.
To prepare polymer clay according to this recipe, follow these steps:
- Arm yourself with a saucepan with a thick bottom. Mix glue and half water there.
- Cook the mixture over low heat for about 3-4 minutes, stirring constantly.
- Take a separate container where you combine the remaining water and starch.
- Place the starch mixture in a saucepan with water and glue, add glycerin there, then mix thoroughly.
- Turn off the heat and leave the pan to cool briefly.
- Place the clay on a table sprinkled with starch.
- Knead the “dough”. It will be sufficient if it becomes pliable and its surface is smooth.
- Form a ball of clay as shown in the photo. Then wrap it in cling film and place it on the refrigerator shelf for a couple of days.
DIY self-hardening polymer clay
Using the latest recipe, you can prepare self-hardening clay. This option will require the following materials and tools:
- baking soda - 2 tbsp;
- water – 0.25 tbsp.;
- corn starch - 1 tbsp;
- spatula for kneading dough;
- waxed baking paper;
- non-stick pan.
Self-hardening polymer clay is prepared according to the following instructions:
- Combine all the listed ingredients in a saucepan.
- Heat it over the fire, stirring constantly. When the mixture has dispersed a little, add a couple of drops of any aromatic oil, such as cinnamon. This way the finished raw material will have a pleasant smell.
- Keep the mixture on the fire until bubbles appear and a large lump forms. All this time, do not forget to stir, scraping the mixture from the bottom.
- When you see that the mass has begun to resemble mashed potatoes, turn off the heat.
- Pour the contents of the pan into another container, the bottom of which is lined with waxed baking paper.
- While the “dough” is cooling, grease your hands with rich cream.
- Knead the mixture into one large lump. Keep it in an airtight container to prevent the edges from hardening.
- The raw materials are already ready for modeling. Roll out thin sheets of it, cut out any shapes with molds, make patterns on them with a toothpick, and then dry in air or in a radiator.
What brands of clay can you buy?
To make crafts from polymer clay with your own hands, you first need to decide on the brand of clay.
Today you can find many different options for clay mass on sale, but the most famous are perhaps:
- “Tsvetik” is an inexpensive Russian product, but this is perhaps its only advantage, since sausages cannot be made from such clay, there are no interesting additions like a pearlescent shade, plus a weak color palette.
- "FIMO". A good foreign analogue that can offer the buyer a good assortment of shades that do not lose their color properties after baking the item. Universal, therefore suitable for any equipment.
- "KATO". Quite a specific clay that is baked only at high temperatures. Plus, it is very difficult to knead it with water; you will need a hammer or some other heavy object.
- “Cernit.” A material that works well when sculpting dolls or imitating some stones. The material is somewhat reminiscent of wax, so you need to knead it well before starting work. This is the only way to achieve the desired effect.
Mica Shift (mica-shift)
A technique that requires working with metallized polymer clay that contains mica. The plastic is rolled out and an extruded pattern is made on the workpiece using a stamp.
Then the upper part of the pattern is cut off so that the texture remains and baked. In the process, mica particles are displaced, forming a three-dimensional pattern.
Many craftsmen like to mix different techniques, making handicrafts from polymer clay with their own hands. As a result, amazing works come out that can be called masterpieces.
What is needed for the creative process
After a person initially familiarizes himself with the future work (in particular, he looks at a large number of photos of handmade clay crafts), he will want to get down to business as quickly as possible.
But what will he need for comfortable work:
- First of all, a free place where you can create quietly without disturbing others;
- Of course, a knife. It is advisable to find the sharpest one (or just sharpen the old one well) or, better yet, a special one. As a last resort, use the table option;
- A rolling pin (not a plastic one). This is due to the fact that plastic can quickly become unusable from the effects of polymer clay. An alternative is a special roller that can roll out the material;
- Toothpicks for applying tiny details;
- Additional accessories in the form of buttons, jewelry, beads, etc.;
- Sanding paper for final cleaning and removing fingerprints from objects;
- Various types of varnishes. This is perhaps the most important attribute, since it is what allows crafts to last longer.
Second way
This recipe is more suitable for sculptural plastic, as the products are more durable and solid.
To make such clay we will need st. wood glue, 100 g corn starch, tbsp. l. stearic acid, glycerin and petroleum jelly, 13 g of citric acid and container. It is best to take one where the coating does not burn.
Combine all ingredients except starch. Then, put on warm heat and stir. Slowly add table starch and mix thoroughly so that there are no lumps. After our mixture begins to peel off from the edges of the sides, spread it onto the work area and knead it like dough. Then, let it cool and put it in the refrigerator, after wrapping it in cling film. If you want to paint, you can do this using regular acrylic paints.
Related article: Crochet “Owl” sleep mask
This method of creating clay is perfect for dishes.
Operating rules
While working, it is worth remembering that there are several fundamental rules that help you make cute crafts from clay with your own hands.
This may include:
- Maintaining cleanliness. Wherever the craft is done, everything around it should be sterile. And the person himself is recommended to do the thing with gloves;
- Using a plasticizer (can be bought at any hardware store). One of the most famous brands is “Moldmaker”. An alternative could be some creams or Vaseline;
- Availability of clay reserves from a solid structure (necessary in some cases);
- Purchase of varnish for finishing application;
- Purchasing a special baking gel;
- Using a film covering (or a regular bag) as a protective measure.
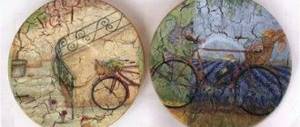
Buttons
DIY clay crafts for beginners can start with the simplest option - buttons. They are very easy and quick to make. Plus you can make a lot of them.
To prepare such crafts you need the following materials:
- Clay. It could be polymer, or it could be something else;
- Clear nail polish
- The most common paints that will help you color buttons;
- Sanding paper;
- Sleeve for baking an item
- Thick needle;
- A beautiful button (preferably with a lot of small details).
Stages of work:
- We take clay and make small balls out of it. You can choose a completely different color;
- Take the button and apply it to the workpiece;
- Next, we use a thick needle and make several holes;
- Place the finished button in the sleeve and bake;
- The result obtained is carefully cleaned with sanding paper.
At the very end, we open the product with transparent varnish and colored paints.