25737
Many owners of residential property do not use balconies for any purpose, but such a decision is considered irrational. If you properly insulate and decorate this room, it can replace a storage room, dressing room or other room. For storing various items and accessories, cabinets installed along a certain wall of the room are considered preferable. It’s quite easy to make a balcony cabinet with your own hands, for which you can use different materials.
Selecting a design and creating a drawing
Before you make a cabinet on the balcony with your own hands, you should decide what kind of structure will be created. It can be presented in numerous types, differing in design, size and other characteristics.
Before directly choosing a specific type of structure, it is recommended to decide for what purpose the balcony cabinet will be used, since its dimensions and features must be suitable for the chosen purpose.
The most popular cabinets created for balconies include:
- standard design, equipped with three compartments. The doors can be sliding, and in this case you get a sliding wardrobe for the balcony. They can also be hinged. This design is quite large in size, so it is preferable to create such a cabinet with your own hands for a large room. If the loggia is small in size, then it is allowed to make two sections for the cabinet. Different materials can be used for production, and assembling a cabinet with a simple design is quite simple using standard tools. The products are attractive and spacious. They can be open at the top, and flowers or decorative decorations can be installed here;
- corner cabinet - selected if there is a small balcony. It does not take up much space and is also considered easy to create. By using an angle that often remains unused, the central part of this design is characterized by good spaciousness. A corner cabinet can have a different design, and the frame and lining can be made from different materials;
- pencil case - if it is impossible to allocate a lot of space for a closet on the balcony, then it is allowed to make a structure presented in the form of a pencil case. It’s easy to make cabinets for the balcony with your own hands; this video will help you with this. Usually it has many small shelves and compartments, so you can store many different items here. Usually a significant height is chosen, and any design can be chosen. The frame and cladding can be made from various materials. It is equipped with standard hinged doors, and such furniture can be installed anywhere on the balcony;
- a built-in wardrobe on a loggia is considered an excellent solution if there are various niches or recesses. Its size depends on the available space. Due to independent work, the production of a cabinet with optimal dimensions is ensured.
Built-in
Angular
Pencil case
With branches
If during finishing you choose to cover the balcony with clapboard, then the same material can be effectively used to form an attractive cabinet, which guarantees a holistic and interesting interior. After choosing the optimal design, you need to start creating drawings. Often standard designs with two doors are chosen, and it is possible to choose both sliding and hinged doors. Drawings are generated independently or you can find suitable diagrams on the Internet. When working independently, the diagram must be made using special computer programs so that even the smallest details and design features can be calculated.
It is recommended to immediately create the detailing yourself, which involves highlighting all the parts, when combined, a complete piece of furniture will be obtained. Using such a drawing, building a cabinet will not be difficult.
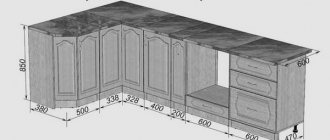
The optimal dimensions for any cabinet are:
- height within 250 cm;
- width equal to 120 cm;
- depth from 45 to 60 cm;
- a distance of 35 cm is left between the shelves.
The above parameters are considered universal, but they can differ significantly, since when assembling the structure yourself, the space on the balcony allocated for installation, as well as its purpose, is taken into account.
How to make a cabinet with your own hands
If you are new to creating furniture, you should read the step-by-step instructions for making a balcony cabinet with your own hands:
- We put markings in accordance with the selected cabinet layout. It is necessary to check the correctness of the drawn lines with a level or plumb line.
- Using a plumb line, we determine the lower boundaries of the frame. This way we ensure that the base of the cabinet is level.
- We prepare the frame parts in accordance with the drawing.
- We assemble the upper and lower parts of the frame and fasten them together with vertical posts.
- Along the marked lines we install horizontal crossbars necessary to secure the shelves on them and to provide additional rigidity. We fix them to the vertical posts using metal corners.
- We attach the shelves to the crossbars. We process the edges of the shelf with a router or sandpaper.
- We install door frames using hinges.
If you still can’t decide whether to make a cabinet yourself, then we recommend that you familiarize yourself with photos of cabinets on the balcony that you made yourself. Often, such cabinets fit into the interior of the balcony better than those purchased in a store.
Preparatory stage
Before making a wardrobe on the balcony, you should carry out some preparatory steps, these include:
- formation of a drawing;
- determination of materials to be used for construction;
- it is decided which design will be used, and it must correspond to the chosen style for the balcony;
- fittings, drawers, fasteners and other elements are selected to create a truly beautiful design.
After the preliminary stages, you should prepare all the elements for work.
Cabinet elements
Corner wardrobe for the balcony
The most spacious and largest cabinet option. Before you assemble the corner cabinet on the balcony yourself, you need to decide whether you have enough space for it.
DIY bread box - step-by-step master class on making and tips on how to decorate a wooden model (105 photos + video)
DIY high chair - interesting drawings and projects on how to make a comfortable and functional high chair (120 photo ideas)
DIY built-in wardrobe: 115 photos of original ideas and video tips for building built-in wardrobe models
Materials and tools
Initially, you should decide what material the cabinet will be made from. The materials most often selected for these purposes are:
- wood - it provides an attractive and durable product. The wooden frame is highly reliable and resistant to various influences;
- Plastic – A plastic cabinet is considered inexpensive to create, so you won’t have to spend a lot of money to get one. But it is not recommended to make the frame from plastic, as it will not have sufficient rigidity and strength. The material is presented in various colors, so the shade of the plastic part is selected, due to which the optimal design of the structure is made.
Wood
Plastic
Often a cabinet is created from lining on the balcony, which has good strength, attractiveness and the desired color.
After deciding what material will be used during work, the following elements are purchased and prepared:
- it is advisable to make the frame from high-quality wooden beams, the cross-section of which is 40x40 mm, but it is possible to replace the timber with metal profiles, and the resulting frame can then be sheathed with different panels or other materials for sheathing;
- Different materials are selected for cladding, but since the structure is made for a loggia, it is advisable to choose plastic or wooden lining for its finishing, and the thickness of the elements should be approximately 8 mm;
- it is allowed to choose plywood or chipboards for cladding, but these materials must be moisture-resistant, reliable and not the cheapest, and their thickness must be within 10 mm;
- to assemble the frame, you need to use high-quality furniture blanks, and metal corners are also prepared;
- purchased fasteners, which include self-tapping screws and dowels, as well as nails for fastening the rear wall;
- if you plan to equip the structure with doors, then choose what they will be made of, as well as what opening principle they will have;
- tools are being prepared, which include an electric jigsaw, but it can be replaced with a circular plate, an electric drill equipped with different drills for woodworking, a milling machine, a screwdriver, a chisel, a sheet and a building level.
In order not to spoil expensive material, it is recommended to carry out all work in advance in accordance with pre-made drawings and calculations.
Tools and materials
Chipboard end protection tape
The positive side of choice
There are several positive aspects of choosing a cabinet:
- you will save space. After all, the design of the cabinet itself implies compact placement of many items for comfortable use;
- low price, it all depends on the model you choose, or independent execution of the product;
- Suitable for absolutely everyone, because you can make a custom-made wardrobe for your balcony. This choice is suitable for those who want to add their own flavor to the furniture and complement it;
- from the aesthetic side, a correctly selected combination of colors and appearance will decorate your interior.
Preparing parts
It is necessary to carry out the process of creating a design step by step in order to avoid significant mistakes. It is recommended to carry out all work on creating the structure on the loggia, where the finishing has already been completely completed.
The design of a standard cabinet is considered simple, so you only need to prepare the parts correctly:
- parts of the future frame are being prepared, and we make them from wooden beams or metal profiles, and their dimensions must fully correspond to the pre-made diagram;
- the lining elements are cut out so that they have the required dimensions for fastening;
- fasteners are prepared for fixing parts of the sheathing to the frame.
If you do not have experience in this area, then it is recommended to first watch a video of creating a cabinet on a balcony with your own hands in order to take into account the main nuances and rules of this process.
Compartment door components
Required Parts
Built-in wardrobe on the balcony
The simplest option for a cabinet is a built-in one. The thing is that the walls of such a cabinet are tightly attached to the walls, which makes the structure as durable as possible.
When making a built-in wardrobe for a balcony with your own hands, you can attach the shelves directly to the wall, which will save on material, and therefore save money.
The disadvantage of this cabinet option is that there must be walls on both sides. If there is a window on one side and not a wall, then this option is impossible.
The place where the cabinet will be built needs to be measured in several places. If you do not take into account the curvature of the walls and floor, the cabinet may not fit into the niche.
Assembly
Any master begins work by marking the room where the work is performed. If you don’t have the skills, it is recommended to look at several photographs, which show step by step all the steps describing the creation of the cabinet. The main stages of assembling the structure include:
- Mark the places on the balcony where there will be a closet, and during work it is necessary to use a building level so that there are no distortions
- then begins fixing the ceiling and floor elements of the future frame on the loggia with your own hands;
- the master connects these parts using vertical posts, and they must be set using a building level, and fixation is carried out with self-tapping screws, the distance between which is approximately 40 cm;
- intermediate crossbars are attached, located horizontally, and they are designed to secure the shelves, and self-tapping screws and metal corners are used to fix them;
- further it is determined how to beautifully make the shelves, for which they must have the required dimensions, and also be installed in such a way that they do not protrude beyond the frame made;
- doors are created for the future structure, and photos of how these actions are done are presented below, and they must have optimal dimensions, calculated in advance in the process of creating the drawing;
- The resulting structure is sheathed, usually using lining made of plastic or wood.
Usually, the same material that is used to cover the walls of the room is chosen for covering the cabinet, since this solution is considered optimal for obtaining a holistic and interesting finish. Thus, if you carefully understand how to make a cabinet from lining, you will get a reliable, attractive and multifunctional design. It will accommodate many different items and will also fit well into the loggia.
Installing rear struts
When installing, use a level
Wooden frame
Connecting element and plastic plug
Installation of the top and bottom panels
Fastening the frame bars
Term of use
The temperature regime of the balcony is different from that of the apartment. Therefore, due to weather changes, furniture suffers. Therefore, it is so important to take this fact into account when choosing.
Depending on your location, the weather, what is typical for the region, choose a built-in wardrobe for the balcony that will withstand temperature changes and instability. The material must tolerate moisture well.
Manufacturing and installation of doors
Doors that are optimal in size and appearance are certainly made for the cabinet. They can have different parameters, and their design is chosen in such a way that they fit well with the style of the room, its appearance and the cabinet itself.
Doors are often chosen for this design:
- standard hinged ones, but for their effective use there must be quite a lot of space in front of the cabinet;
- sliding ones, due to which a sliding wardrobe will be formed;
- roller shutters that open and close according to the principle of using blinds.
When choosing or creating doors yourself, it is necessary to take into account the width and height of the furniture made so that there are no difficulties with the process of opening or closing them. The most affordable are swing doors, which can be made from wood or plastic. After manufacturing and processing the doors, they should be placed on hinges, after which they are attached to the desired areas of the made cabinet.
Sliding systems are considered expensive because they require installation of guides on the sides, top and bottom. Additionally, a roller system is attached to the door leaf. This door option is needed to create convenience when using the cabinet. These doors make all the furniture look attractive.
Roller shutters are considered the most expensive, but their appearance is attractive, so they look good in any room. It is advisable to purchase roller shutters that have already been made at the factory, and they are sold complete with all the fasteners necessary for installation.
Thus, cabinets for balconies are considered the optimal solution, since they can store various items. They can be presented in different designs, and the most preferable is to create them yourself. In this case, furniture will be made that has the required dimensions and parameters. During the work process it is allowed to use different materials. The whole process is divided into successive stages, so first a drawing is made, parts are created, and then the structure is assembled and decorated. Simple steps ensure that you get beautiful and unique furniture that can accommodate many different items. Now you know how to make cabinets on the balcony with your own hands and it won’t be difficult, besides, photos of how to make them are presented in the selection.
Door fastening
What are they made from?
Cabinets are made from different materials. However, not all of them are suitable for the balcony, because there are sudden changes in temperature and humidity. This must be taken into account when choosing material. What is it made from:
Natural wood . This natural material has advantages. It is resistant to moisture, however, provided that the wood undergoes high-quality processing. It is durable and reliable. But there is a drawback - the high price, so wood is rarely used for manufacturing.
Laminated chipboard . This material has many positive properties and characteristics :
- high strength of the product - it is difficult to damage the surface;
- retains heat - models made of chipboard can be preserved in winter;
- long service life - the material is not exposed to moisture;
- You can make any variants out of it. It is easy to cut and drill.
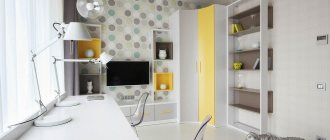
Created to fit the size of the balcony
Metal-plastic - a universal option. These are highly durable and reliable. They can be installed even on non-glazed balconies. The material does not react to sunlight, heat, frost and moisture.
Natural lining - this material is the best in all its moisture resistance indicators. It is suitable for use as the main material when creating.
Small, light shelving
The material is selected depending on the operating conditions and the stylistic features of the room.
Laminated chipboard has: resistance to moisture, it does not dry out, does not crack, and does not swell when exposed to moisture.
These characteristics are suitable for using the material in the construction of a cabinet for a balcony.
Cabinet doors
Before deciding to choose a model, you need to think about the type of door opening. Depending on the area, different types of sashes will be appropriate or not. Furniture manufacturers equip them with the following doors:
Coupe doors are the most popular option
- swing - a classic option. Built-in products with hinged doors can be seen in many photos. It will be easy to make such a model, but it will be difficult to fit it into a small space. After all, such a system will require additional space to open the doors;
- accordion door - this mechanism is based on the use of several leaves of equal width, which fold into one when opened. When opened, such a system takes up little space, but its cost is high;
- compartment doors are the most popular option. This system saves space, is reliable and easy to install.
The chest of drawers is suitable for both flowers and tools
All these points must be taken into account when choosing a model for a loggia.
Placement rules taking into account the size and shape of the balcony
The optimal place to install a built-in wardrobe is considered to be its location near the front door, that is, on the opposite side of the window leading to the balcony. If this place is occupied, then you can consider other options:
- near a room window, if the corner is free, the structure will have a non-standard shape, since this corner is always small. You can place part of it under the window - it will be a kind of niche. And the rest, which will have a slight width, can be placed under the wall;
- for balconies with sloping corners, a corner one is the best option. It can be mounted directly into the corner itself. This is also suitable if the entire balcony opening is glazed;
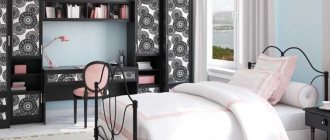
Small library on the balcony
- The largest, most spacious closet will be obtained if there is a deep niche on the balcony. You can install a regular front structure or a large corner structure there.
Minuses
It is also worth talking about the disadvantages of choice:
Loggia design - 45 photos of amazing design options
- Balcony in Khrushchev - planning a convenient design for a small balcony (75 photos)
Small loggia - 84 photos of the best ways to arrange it comfortably
- difficult location. You need to calculate the dimensions, height, width in advance to be able to fit the cabinet on the balcony;
- you need to consider the material’s ability to withstand high or low temperatures, the presence of high moisture and resistance to heavy loads.