Gone are the days when they used everything as a ceiling plinth: gypsum, wood, paper tape with an ornament... Of course, gypsum and wood are successfully used to this day, however, the types of materials for this much-needed finishing attribute have become noticeable more: plastic, foam plastic, polyurethane...Even floor skirting boards are used for this purpose. However, it is the polyurethane plinth for the ceiling that is, at times, almost the only solution, due to its exceptional flexibility, which other materials do not have to the same extent.
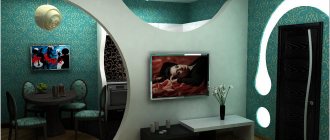
Decorative skirting boards for the ceiling: without them the design is not complete
Decorative skirting boards are now widely used, fortunately, purchasing them is not difficult.
By installing a decorative plinth, you can easily remove a number of flaws associated with the curvature of the walls and ceilings in your home.
What seemed almost tragic in terms of quality before the stickers (installation) of the skirting boards, afterward acquires, if not ideal, then a quite decent appearance.
What does a decorative plinth provide:
- Noticeably “removes” the curvature of walls and ceilings. Visually, of course.
- It gives the room a certain completeness, that is, it puts the finishing touches on the repair of walls and ceilings.
- Using skirting boards of various widths, you can easily give the room a more attractive look, expanding the room optically, or visually raise its low ceilings to some extent. It is for this purpose that wide and narrow skirting boards are intended.
- Using decorative skirting boards with different patterns, you can give the room a more elegant or even “expensive” look.
Current renovations cannot be done without decorative skirting boards, no matter what budget is involved in the renovation of a given house.
What is the name of the plinth on the ceiling: there are not many names
Skirting boards for the ceiling are called differently.
No matter what the ceiling plinths are called, the essence of their purpose does not change.
At different times, ceiling plinths were called by different names.
Titles:
- Baguette;
- Frieze;
- Platband;
- Fillet;
- Balustrade.
You can, of course, argue about the correctness of the names, but the name of this decorative item will not change the essence of the item. Most often this decorative item is called a plinth, or baguette.
Plastic skirting boards for the ceiling: a very popular option
Plastic skirting boards are very common and popular for a number of reasons.
Reasons for this choice:
- They are not at all afraid of moisture, which allows them to be used in bathrooms and kitchens;
- Used if the ceilings are finished with plastic.
These skirting boards resemble an L profile - the so-called “elka”.
In this case, the plinth also has a decorative function, compared to the usual “Elka”, which is used when installing “lining”.
The best way to bridge the gap, which is usually inevitable when decorating plastic ceilings, is with a plastic plinth - in this case, the decor not only does not suffer, but also benefits.
Types of skirting boards for the ceiling: choose according to your taste and budget
The modern construction market offers a sufficient range of skirting boards for ceilings.
Your baseboard in your apartment is the result, first of all, of your choice, although this does not at all negate the help of a designer or sales consultant.
The choice of skirting board depends on many factors.
How to choose a plinth:
- The budget you have for renovating your apartment decides a lot. If your budget is very limited, then you should purchase foam skirting boards. They are the most common baseboards for various reasons: low cost, ability to paint them in the desired color, ease of installation.
- There is a dependence on the material of the ceiling and walls.
- Dependence on room humidity. For example, you should not install a wooden baseboard in a bathroom, but it is recommended to choose baseboards made of polyurethane or PVC.
- The choice of plinth largely depends on the configuration of the room. If the room is non-standard, especially with radii or columns, then a flexible plinth is needed.
There are different types of skirting boards, and each type has its own purpose.
Types of ceiling plinths
It is most convenient to classify ceiling plinths by material of manufacture. Looking at various photos, it can be noted that the most common types of fillets are made of:
- Expanded polystyrene;
- Polyurethane;
- Polyvinyl chloride;
- Gypsum stucco;
- Tree.
There are 2 important requirements for the material, which it must fully comply with:
- Do not have too much weight so that it can simply be placed on glue;
- Be so flexible as to be able to smooth out the unevenness of the walls and adhere tightly to the surface.
It is worth noting that gypsum and wooden skirting boards are used extremely rarely. For example, when the walls of the house are made of timber or you need to make decorative alabaster stucco.
To add depth and a unique atmosphere of charm, fillets with hidden lighting are used.
All types of ceiling plinths for suspended ceilings are glued to the surface, unless another method of installation is provided using special clips.
Wooden plinth for the ceiling: wood is always in fashion
No matter how scientific and technological progress advances by leaps and bounds, giving us more and more new products almost every year, wood, as a finishing and construction material, does not lose its relevance.
Advantages of wooden skirting boards:
- Beautiful, solid appearance;
- Has the beauty of natural material;
- It is possible to paint the plinth in any color, and, in addition, this plinth can be varnished, emphasizing the texture of the wood;
- It is easier to work with wood, and it will look more harmonious if, say, the work is carried out in a country house or in a country house where the walls are covered with wood.
Of course, there are now plenty of materials for you to choose from. However, many lovers of natural materials, as well as people who are especially careful about their health, do not want to hear about other types of material.
Be that as it may, wood is one of the most expensive finishing materials today.
One has only to add the obvious: wood is a classic that is always in fashion! Besides. It should be noted. which is for attic-type rooms, especially when using wooden panels. A flat wooden plinth is very popular.
Skirting boards and wallpaper on the ceiling: an advantageous combination
Skirting boards and wallpaper on the ceiling are a very common modern solution, and finishing cannot be done without it.
Wallpaper as a ceiling decoration is an excellent alternative to ceiling covering, both for major renovations and cosmetic ones. Read about this:
And everything would be fine, but sometimes those who do repairs have a completely legitimate question: how to glue the baseboard without harming the wallpaper?
However, this question may not be the only one. What should be done first: glue the baseboard and then the wallpaper, or vice versa?
Masters of their craft first install the baseboard, then remove all the cracks, and only then stick the wallpaper, adjusting it to the baseboard.
Step by step:
- After the plinth is mounted and all the cracks and irregularities are rubbed, the first sheet of wallpaper is pasted;
- The sheet of wallpaper, of course, may not fit exactly with the ceiling plinth. To do this, the sheet is glued with an overlap slightly higher than the baseboard.
- After the sheet of wallpaper is pasted and smoothed, it is necessary to trim off the excess wallpaper that is higher than the baseboard. To do this, take a steel spatula of medium width and apply the edge of the blade to the joining edge of the plinth at an acute angle.
- Using a painting knife, as if using a ruler (a ruler, in this case, a spatula), carefully trim off the excess wallpaper.
- The joining part of the wallpaper is smoothed again with a plastic spatula or a dry, clean rag.
As can be seen from the above, everything is done very simply.
In another variant, the situation is as follows: first the wallpaper is glued, and then, after drying it, the baguette is glued to the wallpaper using liquid nails. This option is widely used and also has a right to exist.
You can learn how to glue a plinth to the ceiling from the material:
Foam skirting boards for the ceiling: the most popular option
Yes, today foam ceiling plinth is the most common, although options besides the mentioned plinth exist, and there are many of them.
There are plenty of reasons to choose foam baseboards.
Reasons for choosing:
- Low price;
- The plinth can be easily painted in any desired color;
- Simple installation that does not require special qualifications;
- Possibility of gluing to almost any surface;
- The possibility of gluing this plinth to fairly cheap materials: glue, putty;
- Ease of cutting skirting boards;
- Easy to join corners.
In addition to the listed qualities, the plinth bends easily (to a certain extent).
Foam plinth is equally applicable in various suspended ceiling designs, for example, for plasterboard. It is also suitable for a two-level ceiling.
Thus, taking into account all the listed qualities of the plinth, you can safely purchase a foam plastic one, which, despite its initially not very presentable appearance, after painting can be turned into a truly “royal” plinth. This largely depends on the painting, although it is still worth choosing a plinth, largely based on parameters such as its width and type of pattern.
Material on how to glue skirting boards to the ceiling in the corners will also be useful:
Ceiling plinth, decorations
To give various visual effects, special types of baguettes with a channel are used, into which a track of LED lamps is placed. Thanks to this, lighting appears, which changes the perception of the interior, making it airy and weightless.
Also, some types of skirting boards, for example, made from expanded polystyrene, can be painted to give it the desired shade, which emphasizes the overall concept of the chosen interior design style.
Floor plinth for the ceiling: one of the finishing options
Of course, there are some skirting boards for ceilings and different ones for floors. But. basically. The floor plinth is also quite suitable for the ceiling.
Perhaps you have wooden floor skirting boards, and you, as a supporter of natural materials, want to install them on the ceiling. Or, you suddenly replaced the plastic skirting boards that were purchased by mistake, or for the floor, with some others - so now what’s good to waste?
Be that as it may, floor plinths can almost always be installed on the ceiling.
Let's take, for example, the procedure for installing a plastic skirting board.
Step by step:
- We fasten the plinth with dowels to the wall, at intervals of half a meter. However, with increased curvature of the walls, dowels have to be placed more often.
- Pressing the plinth tightly against the wall, we drill a through hole between the plinth and the wall.
- Using an impact dowel, we secure the baseboard to the wall.
- During the work, as necessary. We use connecting elements: internal and external corners, as well as connecting connecting strips.
- Upon completion of the work, the decorative strip, made along the entire length of the plinth, is snapped into place into the plinth, covering the dowels and closing the installation groove.
If the walls are concrete, it is better to use drill bits, and instead of a drill, use a hammer drill.
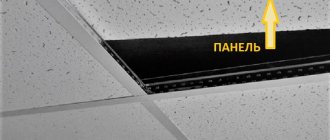
Ceiling plinths for suspended ceilings: types: comparisons and photos
Stretch ceilings are a very successful and practical solution to the issue of interior design. Their installation immediately solves the problem of unaesthetic appearance of ceilings and decorative finishing of the room. The only thing that will need to be provided for is closing the gaps that remain around the perimeter of the room in the places where the profiles and the canvas itself are installed. This role is taken on by special skirting boards.
Ceiling plinth for suspended ceilings types
To choose from the assortment of ceiling plinths for suspended ceilings in stores, the types of which differ significantly from each other in design, material, and fastening technology, first you need to understand what profiles there are for installing canvases. This will mainly determine what type of plinth you need to choose to decorate the perimeter of the ceiling. Therefore, we need to start considering the types of profiles (baguettes) used to fasten the tension fabric itself.
The content of the article
1 Profiles for installing a stretch ceiling1.1 Types of profiles for suspended ceilings2 Types of fastenings for suspended ceilings2.1 Harpoon fastening2.2 Bead fastening2.3 Wedge fastening3 Types of plinths for a stretch ceiling4 Criteria for choosing plinths for a stretch ceiling5 Tips for installing plinths5.1 The process of installing plinths5 .2 Video: how to properly install a plinth under a suspended ceiling
Profiles for installing stretch ceilings
The design of suspended ceilings is, in general, simple - it consists of PVC film, which is stretched and fixed into special metal or plastic profiles mounted to the walls under the surface of the main ceiling. These tension fabrics are designed for surfaces that have significant defects that are difficult to eliminate by other means. The film can give the surface a perfectly smooth appearance, and the plinth, which is fixed along the perimeter of the canvas, often also emphasizes the style of the entire interior.
The plinth will create a “completeness” of the interior of a room with a suspended ceiling
Most often, profiles (baguettes) are produced with a length of 2500 mm and, if necessary, are cut into the required lengths during the installation process, and are also adjusted at the corners.
The baguette is firmly fixed on the wall (sometimes on the ceiling) along a pre-marked, perfectly horizontal line, and only after it is completely installed, the canvas is fixed into it using a spatula, which is then stretched into a flat, smooth surface under the influence of heated air.
Threading the web into the guide profiles
The fastening of the canvas in the profiles is so reliable and strong that when stretched it can withstand a weight of up to 100 kg per square meter. In addition, very often the material from which it is made is waterproof. Thanks to these qualities, a suspended ceiling is able to withstand even a fairly large amount of water in emergency situations, for example, during flooding from the upper floors. That is why such ceilings are considered the best choice for bathrooms.
A suspended ceiling can sometimes save you from the catastrophic consequences of a flood from the top floor
If such a problem arises, it can be easily eliminated by a called master who will put the ceiling in order. In this case, the stretch fabric will also act as a protective barrier that can protect furniture and things in the room from damage by water.
Types of profiles for suspended ceilings
Profiles are divided into several types according to the location of attachment and functionality. They are wall, ceiling, special and dividing.
Wall profiles are most often used for installing such ceiling structures. It is fixed around the perimeter of the room on the walls - it even somewhat resembles a profile for hanging systems.
Wall profile equipped with its own plinth
The ceiling type of profile is used in cases where for some reason it is not possible to attach it to the walls.
Ceiling profile
Special profiles are used for certain connections in complex structures. Separating baguettes are designed for installing stretch ceilings on large areas that exceed 60 square meters. m., since in this case there is a high probability of its sagging.
The dividing profile allows you to attach two panels to it
In addition, you cannot do without dividing profiles when assembling a ceiling from canvases of different colors or textures - it is possible to attach two canvases - on both sides. This type of baguette is used only in combination with a ceiling profile.
In addition, so-called visible and invisible profiles are produced.
A baguette is called visible because part of it remains visible when the canvas is already stretched, and a flexible plinth (insert) is installed on it.
Visible profile, which is covered with a special insert
The invisible profile is completely hidden under the stretched canvas, and if necessary, this structure is framed by one of the decorative plinths that are glued to the wall.
An invisible profile will indeed be practically invisible in itself.
Types of fastenings for suspended ceilings
There are three types of fastening of the canvas in profiles fixed to the wall - glazing bead, harpoon and wedge.
The fundamental difference in the type of fixation of the canvas in the profile
Each type has its pros and cons, which you should know when choosing a system.
Harpoon mount
Harpoon fastening of tension sheets is considered the most reliable of all existing ones, however, also the most expensive. Installation using this technology is carried out as follows:
Diagram of a harpoon blade clamp
The stretch ceiling film itself is equipped around the entire perimeter with a edging made of durable plastic or metal, which has the shape of a hook (harpoon). Using this hook, the canvas is secured inside the profile. Using this technology, the master has the opportunity to reduce the size of the canvas during its installation, since its tension occurs during fastening in the baguette.
Having secured the film around the entire perimeter, it is heated, and as it cools, it stretches and turns into a flat surface.
Warming up the canvas to obtain a perfectly flat ceiling surface
The baguette contains a special profile element, onto which a specially designed plinth for this system is installed. Its installation is the final stage of the installation process.
Bead fastening
This is the most affordable fastening system developed in Russia. When using it, you need to take a tension film slightly larger than the ceiling area. In this design, the profiles are fixed to the wall just below the ceiling, no more than one and a half centimeters below it. Next, the edges of the canvas are tucked into a baguette, in approximately the same way as it would be hidden under a regular ceiling foam border.
This is what a bead fastening looks like
The blade can also be fastened to the profile using flexible inserts - this happens in cases where there are slight curvatures in the corners of the plane.
The advantage of this mount is that you can always easily reach the main ceiling, if necessary, carry out wiring or carry out any repair work.
Wedge mount
The wedge film fastening system can be called a successful combination of quality and price. To install this structure, a special metal profile is installed on the walls along the perimeter of the room, at a distance of approximately 30 mm from the main ceiling.
Wedge fastening scheme
Next, part of the film is tucked into the profile, heated with warm air, and then the edges of the film are clamped into the baguette with special wedges. After the canvas has been installed and completely cooled, it will straighten out to a perfectly flat surface.
Upon completion of installation, excess film is cut off or hidden under the baseboards.
The wedge fastening system is somewhat more expensive than the bead fastening system, but will provide higher reliability of fixing the film in the baguette. It can also be installed on slightly curved wall surfaces.
Another advantage of the wedge system is its easy dismantling, if necessary, to repair the floor surface or lay communications over the suspended ceiling.
Types of skirting boards for stretch ceilings
Now that all types of profiles for installing a stretch ceiling are known, it will be easier to figure out decorative plinths, which can be used to close gaps and maintain the overall style of the interior.
To decorate the stretch ceiling around the perimeter, skirting boards made of different materials are used: polystyrene foam, polyurethane and polyvinyl chloride (PVC).
The main advantages and disadvantages of the materials are summarized in the table:
| Baseboard material | Typical mounting method | Positive traits | Flaws |
| Expanded polystyrene (foam) | Light weight, ease of processing, affordable price, as well as a variety of textured patterns. | Lack of flexibility and increased fragility. Installation is carried out only with special glue, since the material is not exposed to solvents. | |
| Polyurethane | The high flexibility of the material makes it possible to design any shape, for example, a curved ceiling line or the junction of a canvas with a column. Durability of the material and ease of installation. | High price, heavier weight than other skirting boards, so they require reliable fastening with glue. If a fillet with a special groove for fastening to the profile is used, this quality is not a disadvantage. | |
| Polyvinyl chloride (PVC) | Lightweight and fairly durable plastic. The pattern on the plinth can imitate the textures of different materials. | Lack of flexibility and color change over time (yellowish appearance). |
Criteria for choosing skirting boards for a stretch ceiling
Skirting boards made from the above materials can be mounted on the ceiling in any room, but some factors must be taken into account:
The purpose of the room where they will be installed. For example, a material that is easy to clean is better suited for the kitchen - it could be PVC or polyurethane. Unfortunately, vinyl profiles may turn yellow over time, since the kitchen always experiences the largest amount of various fumes compared to other rooms. If fastening the plinth is provided for by the design of the installed mounting profile, then it is best to choose this option. As a rule, such skirting boards are purchased together with the entire stretch ceiling system, are included in the kit, and most often they are made of elastic polyurethane.
Very elastic polyurethane skirting boards (fillets)
A polyurethane plinth (fillet), or otherwise called an insert, can be included in the order even when purchasing a stretch ceiling system. Sometimes, the baseboard is chosen in accordance with the design of the entire room. For example, for classical styles, decorative elements imitating stucco are more suitable, while for modern design, smooth, narrow moldings are used. The plinth mounted with glue must be light and have a wide plane with which it will be glued to the wall. Its size should be at least 30÷50 mm. If the plinth is attached to the profile, then the width of the part adjacent to the wall should be equal to 20÷25 mm, with a profile height of about 15 mm. If there are columns installed in the room, or the ceiling has smooth curves, then you should opt for a flexible polyurethane plinth.
Flexible skirting boards are especially good for ceilings of complex shapes.
Such a border can have a special attachment to the profile or be fixed with one of the polymer adhesives.
Tips for installing skirting boards
If you use a regular decorative ceiling plinth, then in order for it to be well secured to the wall, you should adhere to several recommendations:
For ideal adhesion of the baseboard to the wall, it must be thoroughly cleaned of dust. If you plan to decorate the walls with wallpaper, then it is better to glue them after the baseboard is installed, since it will stick better to the wall than to paper. If the wall is painted with water-based paint, then it is better to carry out this process before installing the baseboard, waiting for the paint to dry, and then the primer composition at the gluing site. When purchasing a plinth, you need to take into account the shape and design style of the stretch ceiling. Gluing and adjusting the plinth in the corners is not so easy, and if you have no experience in such work, it is better to entrust it to specialists. If there is no skirting board that matches the color on sale, you can paint it. This work is carried out before installing it on the wall, otherwise you can ruin not only the wallpaper, but also the suspended ceiling fabric with random strokes.
The plinth should not be adjacent to the stretched fabric - a gap of 3 - 5 mm is left
Under no circumstances should a plinth be glued to a stretched PVC film, so a gap of 3–5 mm must be left between them. The border must be glued to the wall as securely as possible, and most often “liquid nails” glue is used for this purpose. To trim the edges of the segments at the desired angle, a miter box is used. If such a tool is not available on the farm, then on a sheet of plywood or thick cardboard you can draw a template, according to which you should mark and cut off the edges of the plinth. Foam and polyurethane borders can be easily cut with a sharp utility knife, but plastic borders are best adjusted with a hacksaw or jigsaw according to previously made marks.
We recommend: How to properly insulate walls with foam plastic from the outside - a step-by-step guide
The joining ends of the profiles also need to be glued
The ends of the skirting boards at the joints, both at corners and in straight sections, are also lubricated with glue. If during installation small gaps form in some places, they can be carefully covered with acrylic-based putty.
Skirting installation process
The process of installing skirting boards requires precision and accuracy; only in this case can the desired result be achieved.
To work, you need to prepare certain tools and materials that will be needed for installation:
Required quantity of selected regular skirting board. It is better to purchase it with a small reserve, in case some section of the border is damaged. As mentioned above, instead of a regular plinth, a special polyurethane insert can be used, which is otherwise called a fillet or strip. No glue is needed for this element. Adhesive for mounting skirting boards. Liquid nail glue is best suited for this purpose - it will securely fasten the decorative element to the wall. A miter box or template with measured angles, which you can make yourself. Stationery knife or jigsaw. A simple pencil. Ruler and tape measure. Building level. Painting cord for marking lines.
Installation of a regular plinth occurs as follows:
Markings must be made on the primed and dried surface. The top line for installing the plinth must be marked, and then beaten off using a paint cord, at a distance of 3–5 mm from the stretched ceiling. Next, the height of the plinth is measured, and this distance is measured from the already drawn “starting” line, and again marked off with a paint cord - this will be the border along which the border will be glued. If there are protrusions on the walls and there are external corners, then you also need to make markings on them. To do this, a plinth is placed against the wall, and a mark is made along it with a pencil on the side surface of the protrusion. How such an operation is performed can be clearly seen in the photograph.
Marking lines for installing skirting boards
Gluing the border starts from the corner, but first you need to cut off the edges of the two joining sections at an angle of 45 degrees, using a miter box or template.
Joining strips in the corner
Please note that there are often ready-made elements for internal and external corners on sale. If you purchase them, you will not need to measure and adjust the corner parts of the border - this will greatly facilitate and speed up installation.
Ready-made corner elements are very easy to use
When purchasing corner elements, the border sticker begins with them, and then even sections are installed between them, adjusting them to size.
Glue is applied to the back side of the baseboard and its ends. It needs to be applied only to the plane that will be joined to the wall, since it is impossible for the glue to get on the stretch ceiling fabric.
Applying glue to the profile plane adjacent to the wall
Then, the plinth is applied to the wall exactly along the marked line and pressed tightly. Thus, all other elements are mounted. After waiting for the glue to dry, the resulting gaps at the junction of individual sections and the entire border with the wall must be carefully sealed with putty. If the baseboard has been painted, then you also need to add paint of the same color to the putty, achieving the most suitable shade.
When installing ceiling plinths, the main thing is increased accuracy!
The installation of some types of skirting boards for a suspended ceiling is generally similar to a similar operation on a conventional one, but requires greater care and caution. However, the reader will certainly find additional information about fixing ceiling plinths , which is presented in a separate publication on our portal.
A special plinth (fillet) is installed on a special protrusion provided for it in the profile on which the stretch ceiling fabric is fixed. The fillet will need to be adjusted at the corners by cutting off a certain part, but it does not require glue, which means that, if necessary, such an insert can be easily dismantled and then installed in place. However, such an insert for suspended ceilings will look ideal only if the surface of the walls is perfectly flat, otherwise it will only highlight the flaws of the wall.
Knowing how to choose the appropriate plinth and how to install a decorative border for a stretch ceiling, it is quite possible to carry out this process yourself, saving a certain amount.
In conclusion, a short video tutorial on installing plinths for a suspended ceiling:
Video: how to properly install a plinth under a suspended ceiling
Wide skirting boards for ceilings: purpose
The appearance of the room largely depends on the width of the plinth on the ceiling. A wide or narrow plinth is quite capable of transforming your room visually. Narrow skirting boards can make your room optically taller, while wide ones can, on the contrary, reduce its dimensions.
With a wide baseboard, a small room will seem even smaller and lower
The width of the plinth usually varies from 10mm to 200mm.
Advantages of a wide baseboard:
- Optically smoothes corners;
- It better helps smooth out all defects in walls and ceilings;
- Look very good in rooms with high ceilings.
At the usual ceiling height, the most rational width of the plinth is 4-6 cm. If the height is more than 3 meters, then the plinth is appropriate with a width of up to 7 cm.
Thus, having this information, you yourself can easily decide which size of ceiling plinth is best suited for your apartment. It will be even better if you look at the corresponding photos before choosing a plinth.
How to choose a ceiling plinth for a stretch ceiling
Everything is done in order of priority, a number of important questions are asked that need answers:
- In what room will the joints be finished?
- Is it dry or wet?
- Is it subject to temperature changes?
- What interior style is used?
- What are the dimensions of the room and the height of the ceiling?
Based on the information received, you can select a suitable ceiling plinth according to the following criteria:
- Width;
- Shape;
- Blossom.
It is important to understand that the height of the ceiling affects the width of the fillet, which will fit perfectly:
- Up to 2,500 mm – 40 mm;
- 2 500 – 3000 mm – 50-100 mm;
- Above 3,000 mm – the width of the plinth is 100 mm or more.
As for the shape and color, it can be anything. Including imitating natural wood or plaster stucco. There are also special fillets on sale that can bend in any direction and take any shape. They are usually quite expensive.
The plinth for the ceiling is flexible: it is not afraid of the non-standard shape of the room
In private houses, as a rule, as well as in rooms of complex configuration, finishing ceilings or walls with plinths can turn into a real problem. Fortunately, there is a flexible polyurethane baseboard for this purpose.
In order to make high-quality frames for columns, for example, it is not at all necessary to “sculpt” a plinth from plaster, since this is a very labor-intensive process. Nevertheless. There are still people who want to fashion their own unique plinth.
Advantages of polyurethane plinth:
- It bends easily, which makes it easy to cope with the most intricate shapes of walls and ceilings;
- It is not at all afraid of moisture, which allows it to be used both in bathrooms and in swimming pools and even baths;
- The plinth is consistently resistant to such harmful phenomena as temperature changes.
The plinth, of course, is somewhat more expensive than the same foam one, but given its useful qualities, the price is not that important, especially when, under certain conditions, there is simply no alternative to a polyurethane plinth.
Installation of ceiling plinths
In order not to damage the stretch ceiling fabric, the ceiling molding is placed on a special mounting adhesive. Other options for installing and fixing the fillet are possible, as is the case with a wooden plinth. But this is usually mentioned in the instructions, which you need to read so as not to spoil the finish.
You may need an antiseptic. It is advisable to know about this and other nuances so that unnecessary problems do not arise later.
Also, if it is assumed that the plinth will be washed or cleaned, then it is necessary to select its type from a material suitable for these purposes so that it can be well secured and will not fall off under the influence of moisture or temperature changes.
Installation of polyurethane cornice/plinth (video)
And in conclusion, I would like to note the following. The choice of skirting board ultimately depends only on you. However, before purchasing, it is worth thinking about the purpose and purpose of the plinth for certain premises. If you need to decorate curved surfaces, then, undoubtedly, you simply won’t find a better option than polyurethane skirting boards. If the room is rectangular or square, without complex ceilings, and also not exposed to moisture, then the best option would be a foam baseboard. Of course, before purchasing, it is definitely worth consulting with the finishers who will do the renovations in your apartment, or with a sales consultant in a hardware store. You should adhere to one and only rule: choose your “golden” mean! Good luck!
Decorative skirting boards - transforming the interior
The photo shows decorative skirting boards.
The surge of interest in interior design can be associated with the appearance of television programs and magazines dedicated to renovation. And it is thanks to them that the use of modern decorative skirting boards in interiors has become as commonplace as hanging wallpaper or painting the ceiling.
They are made from inexpensive and lightweight materials, which makes it possible to use them in almost any repair, which in most cases is done by hand.
Do you need decorative skirting boards?
Now in every hardware store you can buy skirting boards not only for the floor, but also for decorating ceilings or walls. Their importance in design is so significant that with proper use, the most ordinary room in a typical apartment can be changed beyond recognition, turning it into a North American ranch or a Norman-style bedroom.
[sticky-ad id=26821]
In addition, the presence of baseboards in the interior gives the entire renovation a finished look, and, importantly, helps to hide flaws expressed in the curvature of the walls or the unevenness of their connection to the ceiling or floor.
Polyurethane plinth for ceiling (photo)
- Author: admin
Rate this article:
- 5
- 4
- 3
- 2
- 1
(2 votes, average: 5 out of 5)
Share with your friends!