DIY autumn ekibana crafts made from natural materials.
Ekibana is the traditional Japanese art of making flower bouquets. Translated into Russian, this word, incomprehensible to us, means flowers that live. As a rule, the Japanese use exclusively live and, if possible, freshly cut flowers to create their floral sculptures.
But since we live in a country where it is not possible to grow fresh flowers all year round, our ekibana has been slightly transformed. In the autumn-winter period, florists and simply lovers of beautiful floral objects make it from all kinds of available materials. In addition to dried flowers and herbs, our people use chestnuts, autumn fruits and even rowan.
Crafts - do-it-yourself ekibans made from natural materials on the theme of autumn: ideas, photos
Idea #1
Idea No. 2
Idea No. 3
Idea No. 4
Idea No. 5
Idea No. 6
As you probably already understood, not only compositions made from fresh flowers have the right to be called ekibana. Therefore, if you wish, you can quite easily use any floral material. True, when composing these objects, one must remember that visually they should look as harmonious as possible.
Therefore, when choosing material for your future masterpiece, try to ensure that it matches perfectly in color. That is why you must remember that ekibana is not just flowers in a vase. If desired, it can be secured in a basket, a large glass, a plastic container, or even in a pumpkin. The main thing to remember is that the container in which you will attach the floral material should not be very bright.
If it is noticeable, it will draw attention to itself quite strongly and, as a result, the ekibana itself will be lost against its background. And, of course, remember that such a composition should be as dynamic as possible, that is, it will be better if you try to install the material at different angles and create at least two-tiered objects.
DIY Ekibana - Do It Yourself
The traditional Japanese art of flower arranging - ekibana - has gained popularity in Russia. Ekibana is the creation of compositions from cut shoots and flowers placed in special vessels.
For ekibana, a small number of colors are used, which should create bright accents. Learning this art requires practice and years of study. But if desired, every woman can create an ekibana with her own hands if she learns a few basic secrets.
DIY Ekibana: basic rules
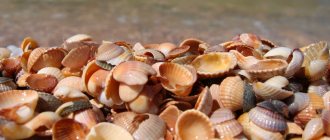
Any material is suitable for ekibana. These can be cones, dry herbs, flowers and twigs, sticks, leaves, seed pods, shells, seeds and cones.
Ekibana is made from 3 main components. It differs from the European flower arrangement in its asymmetrical shape. The shape of the ekibana changes depending on the direction of the branches, changes in places, and angles of inclination.
Initially, you need to select the longest component. The third element is the shortest. You can use fruits, flowers or leaves as it. Ekibana can be made from 3 identical elements or you can diversify it by replacing some element. Having installed all the elements, it is advisable to trim off everything unnecessary, strongly protruding or short.
Additional flowers or branches are installed between the main components of the ekibana. Their quantity can be very different, and they depend on the taste, splendor and size of the future composition. Additional components of the Ekibana should be shorter than the main element and directed in the same direction as it, and also match the color of the main components.
How to make ekibana with your own hands?
To create an ekibana with your own hands, prepare a small bowl or vase, flowers, three branches of different lengths, pruning shears, a kenzan or a floral sponge - a special device with needles that are used to secure the stems. Take a bowl or small vase without decoration with simple lines. Place a sponge in it and fill it halfway with water. If possible, use traditional plants - sakura branches, chrysanthemums, which are used to make ekibana in Japan. If there are no such flowers, beautifully blooming indoor flowers, garden or wildflowers are perfect. Flower arrangements with fruits look very unusual.
- Start making ekibana from a flower or a long branch. The first stem in the composition symbolizes the sky. Its value should be equal to the sum of the diameter and height of the vessel, multiplied by 1.5. Place the flower or branch in the sponge and tilt it slightly to the left. Insert the twig directly between the needles and gently deflect it. If the stem of the twig is hollow, place a piece of cotton wool inside. Instead of kenzan and a floral sponge, you can use plasticine, which is also easy to attach branches and flowers if you make holes.
- Then stick in a second flower or twig. Its length should be 2/3 of the first one and tilt it to the left too. This branch symbolizes a person.
- The next branch represents the earth, and its length is 2/3. Place it in front, tilting it to the right.
- Look at the Ekibana from the side; you should get the feeling that the vase contains a branch of one plant. If necessary, cut off any excess.
- Decorate the remaining free space between the branches with small flowers or greenery. But the main rule of Ekibana is to have as few components as possible.
DIY ekibana of gerberas and anemones
Take a wide basket and a special sponge for flowers, which is designed for fixing flowers. Before you start creating the ekibana, soak the sponge in cold water and place a cellophane film on the bottom of the basket.
Use a stapler to secure the curled Strelitz leaves. After this, insert the leaves into the sponge. For beauty, insert Salal and Fern leaves into the ekibana. To keep them looking beautiful and moist, spray them with floral spray. For this ekibana, use anemones and gerberas, but you can choose other flowers. Stick in flowers and accessorize them with pearls and small chrysanthemums.
Ekibana of carnations and lilies
- Mix Japanese and European styles to create a unique ekibana. Take a wide vase and soak a special sponge for flowers in cold water.
- Then place it in a vase and insert sprigs of Ruscus. Since the ekibana will not be high, insert the branches horizontally.
- Complete the composition with Salalah leaves or use the leaves of other plants.
- Insert carnations and lilies into the vase as the main ekibana flowers.
- Complete the branches with Statice or Limonium, or other contrasting colors.
- The final element of the ekibana will be lovely yellow chrysanthemums or ordinary tansy. This ekibana can decorate any holiday table.
Before creating a future ekibana, pay attention to the shape and compatibility of its floral components. Focus on the classic combination of colors and your own taste, do not limit your imagination, show all your creative potential. Ekibana can be made monochromatic or multi-colored, but keep in mind that some flowers do not match each other. You should not make an ekibana of poppies and lilies; lilies of the valley, roses, and daffodils also do not like to be near other flowers.
Be sure to supplement the ekibana with twigs or herbs. If you add a sprig of geranium to the ekibana, it will help extend the life of other fresh flowers in the composition. Ekibans with decorative elements - various decorations, ribbons, stones, lace - look very beautiful. But remember moderation! You will learn even more interesting things about flower arrangements in the article Floristry for Beginners.
Do-it-yourself ekibana can create a warm atmosphere in your home and improve your mood. It can become a unique gift, which will be perfect, by the way, if you want to surprise a friend or good acquaintance, and even become an additional income for a designer of designer floral designs.
Especially for LadySpecial.ru - Julia
6abc.org
How to make autumn ekibana from leaves: preparation and volumetric compositions
Bouquet of roses from maple leaves
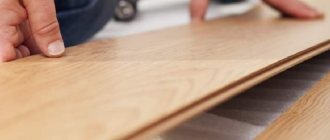
Master class on making a bouquet
The creation of any floral object begins with the preparation of the material. If you ignore this stage, then with a high probability you can say that in the end you will not get exactly what you wanted. As for preparing leaves for autumn ekibana, the first thing you should do is prepare a beautiful and undamaged material, and first lightly dry it from street moisture.
After drying, the leaves will definitely need to be treated with a composition that will make them more pliable and elastic. To do this, you will need to dilute 220 ml of glycerin in 450 ml of water, and soak all the decorative material in the resulting solution. After it has been in it for 3-4 days, the liquid will need to be drained and the leaves should be blotted with a paper napkin. And only after they become elastic can you begin to make a floral object.
Recommendations for making volumetric ekibana:
- So, first, prepare a vase, approximately 40 pieces of maple leaves, threads and beads for decoration
- Then we take the still wet leaves and begin to form a rose from them (the master class can be seen above)
- We make the required number of buds, and then begin to attach them to the stem
- It can be made from any flexible twig of brown or green color
- After your autumn roses are ready, let's start collecting ekibana
- To do this, pour sand into the bottom of the vase and start sticking the stems of our roses into it
- Having arranged all the roses, be sure to make them a so-called wrapper of beautiful maple leaves and, if desired, decorate them with beads
- If you don’t like this edging, you can easily replace it with a satin ribbon tied in a bow
The simplest DIY ikebana in 5 minutes
To create it you will need:
- Tall narrow vase (from 30 cm high and above);
- Secateurs or scissors;
- 2 orchids;
- Decorative items - glass balls, decorative sand;
- Tinga.
Stages of work:
- Place half of the vase with decorative sand or glass balls;
- We insert two orchid branches into the filler, which we place in this way: one should be placed to the right at an angle of 15 degrees relative to the working surface, and the second should be placed to the left at 15 degrees;
- One branch should be 15 cm higher than the other;
- The ikebana of flowers ends with a sprig of tinga, which we place between the orchids with a slight inclination towards the area of the smaller one.
How to make autumn ekibana from leaves: preparation and flat compositions
Leaf Butterfly
Mouse made from leaves
Birds made from leaves
House of leaves
A picture of leaves
Flat Ekibana is an ideal option for school and kindergarten. Some florists also call it foliage paintings and panels. Since in this case the leaves are attached to a dense base, all that will be required of you is to give them the correct shape and form certain shapes. If you wish, you can very quickly make a beautiful and airy butterfly, a small mouse, flowers from autumn leaves, or lay out a beautiful clearing.
But in order for you to get all these pictures, first you will need to prepare the decorative material. And if for a volumetric composition the leaves must be flexible, then for flat ones they must be as dry and even as possible. In view of this, all collected material will need to be properly dried.
So:
- The easiest way is to simply collect leaves of different shapes, tie them in small bunches and hang them to dry in a room with good ventilation. True, you must understand that in this case, when drying, the leaves will curl and will not be smooth and beautiful.
- If you want to get the smoothest possible material, then you can dry it with an iron. To do this, you will need to take a leaf, place it between two sheets of cardboard and iron it with an iron. This manipulation will need to be continued until all the moisture has evaporated from the material.
- If you have time, then put the leaves in a book and put it under a press. Open it periodically and let the moisture accumulated in it evaporate. If you are patient, you will eventually get a material that will retain both its color and its structure.
How to start doing ikebana
Before delighting your home with an amazing natural composition, you need to find a place for it, and it is this place that will dictate how the ekibana itself should look.
First, find a place where it will be well lit or backlit, will not disturb anyone, but, on the contrary, will fill the void in the interior. It may be a corner or window sill that is too empty. Having found such a place, you can decide on the color scheme and shape of the future bouquet. Determine the leading color in the room and decide what task the ekibana will have: to emphasize this color or contrast with it. For example, if the room has a blue base, then a composition of yellow sunflowers can serve as a contrast to it, and dark blue flowers will highlight the color of the interior.
Ekibana - DIY autumn composition made from chestnuts
Recommendations for making topiary
Ready-made chestnut topiaries
Chestnut beetle
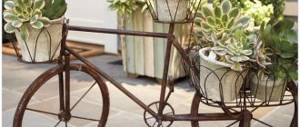
Vase made of chestnuts
Chestnuts are an ideal material for autumn crafts. With their help, you can make some pretty cute toys for preschool and school-age children, as well as wonderful and, most importantly, exclusive interior decorations. Above you can see an example of how using chestnuts you can make a composition called a beetle on autumn leaves.
Kids will definitely like this craft. You can also decorate a vase with this wonderful material (simply placing it on glue), and insert the same roses from maple leaves or dried flowers into it. Well, those who want to do something truly original with their own hands can try making a topiary from chestnuts.
Recommendations for making topiary from chestnuts:
- First, pour the gypsum mixture into the container in which your tree will stand.
- When it begins to thicken, install the trunk of the future topiary in it
- While it is fixed in plaster, start making the top
- Take a foam ball and cover it with chestnuts (be sure to cut them in half)
- Next, cut the corrugated paper into as small pieces as possible and fill the voids between the chestnuts with it (use glue to fix it)
- When the top is ready, fix it on the trunk and you can safely start decorating
- For this you can use dried flowers, small leaves, acorns, large beads
DIY Ekibana - MoiKompas.ru
DIY Ekibana: master class
1. Take a vase and place a piaflor (floral sponge) in it, which should be moistened with water.
This is how the composition will be arranged in the pot, so it needs to be secured. Add some water to the vase.2. Select three elements of the plant: long, medium and shortest. The most beautiful flower should be the tallest. Could the average flower be more modest? The last one is almost invisible. 3. We start making ekibana with the longest branch. The first stem means the sky. Determine the length of the stem. To do this, add the height and diameter of the vessel, and then multiply by 1.5. Place the first branch in the pot, securing it with a sponge, and tilt it slightly to the left. This is necessary so that the composition expresses dynamics.
4. Add a little cotton wool inside the pot.
5. Stick a second flower (branch) into the vase. Its length should be slightly less than the length of the first flower. This branch in Japan symbolizes a person. It also needs to be tilted to the left.
6. We take the third branch, which represents the earth. Its length is two-thirds, thus it will be the smallest. Place it in front, tilting it slightly to the right.
7. When looking at the composition, you should get the feeling that there is only one branch in the pot. Then you can show your imagination and decorate the craft at your discretion. Fill the space between the branches with flowers, greenery, and pine cones. Cut off unnecessary branches that you consider unnecessary. Do not use straight branches, they should all be curved, without straight lines. You can even add fruit for brightness and effectiveness, the main thing is not to overdo it.
8. Plasticine or foam plastic will help to secure the composition. This is how we learned Japanese art and created our own painting.
moikompas.ru
Autumn ekibana made from fresh flowers
Ekibana autumn
Floral composition with leaves
Autumn motifs
A little higher, we already told you that ekibana is, first of all, harmony, so when choosing material for this autumn object, give preference to flowers that bloom at this time of year.
The best option in this case would be asters and chrysanthemums. And in order for others to understand that you have created an autumn composition, you can supplement it with leaves, grass and interestingly shaped branches that have already changed color.
Yes, and when composing an ekibana, remember that it is advisable to place the brightest and most massive flowers in the center of the composition, this way you will create a point that attracts the eye, but at the same time does not distract from all the other elements of the man-made object.
So:
- At the initial stage, think about what your ekibana will ultimately be like, and in accordance with this, select a container for it
- After this, take a special sponge for ekibana and adjust its size to the selected container
- Place the sponge in a container and fill it with liquid, which will prolong the life of living flowers
- In the next step, start preparing the flowers (cut their stems at an acute angle)
- After this, carefully stick them into the sponge and try to immediately give them the desired slope
- Fill empty spaces with leaves, grass and branches
DIY Ekibana
The traditional Japanese art of flower arranging - ekibana - has gained popularity in Russia. Ekibana is the creation of compositions from cut shoots and flowers placed in special vessels.
For ekibana, a small number of colors are used, which should create bright accents. Learning this art requires practice and years of study. But if desired, every woman can create an ekibana with her own hands if she learns a few basic secrets.
DIY Ekibana: basic rules
Any material is suitable for ekibana. These can be cones, dry herbs, flowers and twigs, sticks, leaves, seed pods, shells, seeds and cones.
Ekibana is made from 3 main components. It differs from the European flower arrangement in its asymmetrical shape. The shape of the ekibana changes depending on the direction of the branches, changes in places, and angles of inclination.
Initially, you need to select the longest component. The third element is the shortest. You can use fruits, flowers or leaves as it. Ekibana can be made from 3 identical elements or you can diversify it by replacing some element. Having installed all the elements, it is advisable to trim off everything unnecessary, protruding or short.
Additional flowers or branches are installed between the main components of the ekibana. Their quantity can be very different, and they depend on the taste, splendor and size of the future composition. Additional components of the Ekibana should be shorter than the main element and directed in the same direction as it, and also match the color of the main components.
How to make ekibana with your own hands?
To create an ekibana with your own hands, prepare a small bowl or vase, flowers, three branches of different lengths, pruning shears, a kenzan or a floral sponge - a special device with needles that are used to secure the stems. Take a bowl or small vase without decoration with simple lines. Place a sponge in it and fill it halfway with water. If possible, use traditional plants - sakura branches, chrysanthemums, which are used to make ekibana in Japan. If there are no such flowers, beautifully blooming indoor flowers, garden or wildflowers are perfect. Flower arrangements with fruits look very unusual.
- Start making ekibana from a flower or a long branch. The first stem in the composition symbolizes the sky. Its value should be equal to the sum of the diameter and height of the vessel, multiplied by 1.5. Place the flower or branch in the sponge and tilt it slightly to the left. Insert the twig directly between the needles and gently deflect it. If the stem of the twig is hollow, place a piece of cotton wool inside. Instead of kenzan and a floral sponge, you can use plasticine, which is also easy to attach branches and flowers if you make holes.
- Then stick in a second flower or twig. Its length should be 2/3 of the first one and tilt it to the left too. This branch symbolizes a person.
- The next branch represents the earth, and its length is 2/3. Place it in front, tilting it to the right.
- Look at the Ekibana from the side; you should get the feeling that the vase contains a branch of one plant. If necessary, cut off any excess.
- Decorate the remaining free space between the branches with small flowers or greenery. But the main rule of Ekibana is to have as few components as possible.
DIY ekibana of gerberas and anemones
Take a wide basket and a special sponge for flowers, which is designed for fixing flowers. Before you start creating the ekibana, soak a sponge in cold water and place a cellophane film on the bottom of the basket.
Use a stapler to secure the curled Strelitz leaves. After this, insert the leaves into the sponge. For beauty, insert Salal and Fern leaves into the ekibana. To keep them looking beautiful and moist, spray them with floral spray. For this ekibana, use anemones and gerberas, but you can choose other flowers. Stick in flowers and accessorize them with pearls and small chrysanthemums.
Ekibana of carnations and lilies
- Mix Japanese and European styles to create a unique ekibana. Take a wide vase and soak a special sponge for flowers in cold water.
- Then place it in a vase and insert sprigs of Ruskus. Since the ekibana will not be high, insert the branches horizontally.
- Complete the composition with Salalah leaves or use the leaves of other plants.
- Insert carnations and lilies into the vase as the main ekibana flowers.
- Complete the branches with Statice or Limonium, or other contrasting colors.
- The final element of the ekibana will be lovely yellow chrysanthemums or ordinary tansy. This ekibana can decorate any holiday table.
Before creating a future ekibana, pay attention to the shape and compatibility of its floral components. Focus on the classic combination of colors and your own taste, do not limit your imagination, show all your creative potential. Ekibana can be made monochromatic or multi-colored, but keep in mind that some flowers do not match each other. You should not make an ekibana of poppies and lilies; lilies of the valley, roses, and daffodils also do not like to be near other flowers.
Be sure to supplement the ekibana with twigs or herbs. If you add a sprig of geranium to the ekibana, it will help extend the life of other fresh flowers in the composition. Ekibans with decorative elements - various decorations, ribbons, stones, lace - look very beautiful. But remember moderation! You will learn even more interesting things about flower arrangements in the article Floristry for Beginners.
Do-it-yourself ekibana can create a warm atmosphere in your home and improve your mood. It can become a unique gift, which will be perfect, by the way, if you want to surprise a friend or good acquaintance, and even become an additional income for a designer of designer floral designs.
Especially for Lucky-Girl.ru - Julia
lucky-girl.ru
Ekibana from dried flowers
Ekibana from dried flowers
Homemade vase
Bouquet in a beer glass
Autumn composition
Dried flowers are good because you can use them to create quite a lot of different objects. These can be bouquets, wreaths, paintings and original panels. The simplest ekibana, of course, is a bouquet. It can be done in two ways. If you prepare flowers yourself, then simply collect the plants that you like, make a bouquet of them, tie the stems well and hang them to dry in a dark, well-ventilated place (buds down).
If you do everything correctly, then in the fall your home will be decorated not only with a beautiful and pleasant-smelling composition. If you buy dried flowers and then make compositions from them, you will first need to adjust their stems to the same length, put all the flowers together, and then carefully look at whether all the elements of your ekibana are in harmony with each other.
As a rule, if ekibana is made from separately dried elements, then some of its parts stand out from the general visual sequence. If this happens to you, then just take sharp scissors and carefully cut off what, in your opinion, spoils the bouquet. After this, take a ribbon or thin twine and wrap it as carefully as possible around the stems of the flowers.
Recommendations for working with dried flowers:
- If you need to attach a bud to a stem or form one large one from several small flowers, then do this using thin wire.
- If you need to secure a ready-made composition, then use medium-thick wire. It will help you connect all parts of the floral object together without damaging the delicate structure of the dried flowers.
- Well, finally, let's talk about artificial stems. If you need to make them, then take the thickest diameter wire and wrap it as carefully as possible with satin ribbon or corrugated paper.
Basic styles
Before thinking about how to make ikebana, you need to familiarize yourself with the theoretical side of this art. First you should study the styles. There are many subspecies that differ in style.
- Rikka.
If translated literally, the name of this style translates as “plant that stands.” In other words, in the composition, most of the bouquet should be located vertically. You can use willow branches. Anyone can make a simple bouquet with their own hands. Based on this style, many other varieties have been created that are more complex. At the moment, this style, according to most experts, is considered outdated, so it is used extremely rarely.
- Seka.
Another famous style is Seka. It was introduced in the middle of the 17th century. It is a more simplified version of the Rikka style. The main difference is that when building a bouquet in the Seka style, only 3 plants are used, which will be arranged vertically. They will be associated with earth, sky and people. The main thing in style is to emphasize the beauty of plants.
- Nageire.
This style is called Heika in Japan. The main difference is that the base is a vase, but an unusual one. It should be tall and at the same time have a narrow neck. When making a flower arrangement, high-type plants are used. And the main support for them is the neck and walls of the vase itself.
- Moribana.
Moribana is the opposite of the previous style, but only if you compare it based on its base. In this case, tall narrow vases are not used. Now the basis is a vessel, which is very low, but wide, i.e. almost flat, like trays, saucers and plates. But this composition comes out voluminous when compared with the previous style.
- Jiyuka.
Related article: Filet knitting: free crochet jewelry patterns for beginners with photos and videos
This style is based on the use of several styles. This mixture turns out to be very interesting, and it will be useful for the bouquet creator to develop his imagination, because Almost all boundaries are washed away.
Ekibana of autumn fruits: a basket of cones or acorns
Master class on making a basket
Ready product
Basket from a box
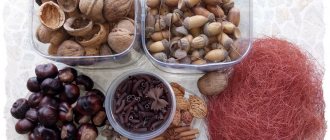
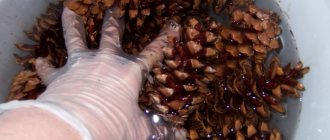
In autumn, there is literally a lot of decorative material lying under your feet that can be used to create an original autumn outfit. For example, you can collect acorns or cones and make an original basket out of them, which can later be filled with dried flowers, fruits or autumn leaves. The easiest way to make such a basket is to take an ordinary small cardboard box and carefully cover it with pine cones or acorns of the same size.
You can use a piece of grapevine as a handle for this craft. As a rule, it takes a little over an hour to make all the parts of an ekibana, and after that they are simply connected to each other with wire. If you are willing to tinker a little, you can make a basket exclusively from autumn fruits.
So:
- To begin, collect cones or acorns of the same size and shape.
- If you wish, you can bleach some parts using commercial bleach.
- Next, start forming the bottom of the future craft.
- To do this, take 6 cones and combine them into a flower (if the basket is larger, then you will need 12 or even 18 cones)
- If you use acorns, you can connect them together at the butts and then twist them into a tight spiral
- When the bottom of the basket is ready, begin to shape its depth.
- First, connect two or three cones together, and then form them into the wall of your basket
- At the next stage, using wire we connect all the workpieces together
- Add a grapevine handle to the basket and fill it with autumn apples, pears and rose hips
Ekibana - autumn fantasy in a basket
Ekibana idea #1
Idea for Ekibana No. 2
Idea for ekibana No. 3
If you don’t want to make a basket yourself, you can take a ready-made one and turn it into an original autumn decoration. Both fresh and dried flowers can be used as filling. If you use live plants, for example, asters or chrysanthemums, then you need to ensure that they need to create favorable conditions that will help them stay fresh for as long as possible.
In view of this, you will have to insert a plastic or glass container inside the basket into which you can place a floral sponge soaked in a nutrient solution. If you use dried flowers for filling, you will need to stick them into the sand or simply attach them to the walls of the basket with thin wire. Now let's talk about the compositions that are most suitable for ready-made baskets.
I would like to say right away that they do not look very nice on low and sparse bouquets. If you want your ekibana to be as beautiful and original as possible, then try to create an asymmetrical composition that will have two or three tiers. If it turns out that you have flowers with a small stem, then make a continuation of the bouquet on the handle, simply decorating it with buds. This little trick will help visually stretch your ekibana, thereby making it more noticeable.
Pumpkin ekibana for autumn holiday
Pumpkin Ekibana
Ekibana for the autumn holiday
Autumn composition
Pumpkin Ekibana
The original Ekibana
Pumpkin is better suited than all other fruits for creating autumn compositions. If you want to make a similar craft with your child, then opt for a vase. This type of ekibana is easy to do, but most importantly, it looks very impressive. If desired, you can additionally decorate it with bean flowers or simply make a very delicate and beautiful carving on a floral theme.
But, although such a craft is considered the simplest, it must be done taking into account some nuances. Firstly, you need to know how to choose the right pumpkin. Many beginning needlewomen mistakenly think that the larger it is, the more beautiful the ekibana will end up. In fact, the ideal option for creating an autumn composition are medium-sized fruits. As practice shows, they are the ones that have the most suitable shape for creating a vase. Secondly, you should never rush to cut out an opening that will imitate the top of a vase. First, you should think about what you will insert inside the fruit (a glass, a glass jar or a cut plastic bottle).
Once you understand what is most suitable for these purposes, take a ruler and measure the diameter of the container, and based on the data obtained, cut out a perfectly round hole. Yes, and if you want your vase to visually appear shiny, then cover its surface with glue, and then sprinkle it as thoroughly as possible with ordinary sugar. After it all dries, such a sugar coating will appear crystalline from afar.
Do-it-yourself Ekibana - the art of composing compositions
The ancient art of flower arranging (ekibana) originated in Japan and has conquered the whole world. It is akin to the poetry of the Land of the Rising Sun: laconic, elegant and filled with symbols. When creating ekibana, it is possible to use not only flowers, but also other plants, as well as objects: porcelain, stones, glass, clay. The compositions are designed to express the beauty of nature.
To find out how ekibana is created with your own hands, it’s worth getting to know it better. The name can be translated as “second life of flowers.” According to legend, this art appeared thanks to a Buddhist monk. There are three main elements. The first two are Heaven and Earth, and the third is Man and at the same time a Flower. Individual details of the composition also carry a certain meaning. For example, a pine tree symbolizes the concentration of the soul, while various fruits symbolize the body.
Let's consider further principles by which ekibana is compiled - you can really create a real masterpiece with your own hands! It is always worth observing historically established traditions. Because art originated as an embodiment of prayer, it remains a symbol of offering to the deity. As the basis of the composition, its central part is established as a symbol of truth. Tree branches serve this purpose. They are considered the homes of spirits.
Since ancient times in Japan, ekibana has been made with one's own hands from branches of pine and cypress; bamboo and white chrysanthemums have also been used. Over time, the arrangements changed, and gradually the solemn and naturalistic styles gave way to the Moriban direction. It reflected the influence of European civilization. This style is most suitable for any modern interior. The composition is installed on a metal stand. To get an expressive and beautiful ekibana, you need to secure tree branches and flowers between the needle-rods of the support with your own hands. The most important thing in the composition is the stem, symbolizing Heaven - sin. Since it is the basis of the future bouquet, it must be durable. The second flower is placed nearby. This soe is the personification of Man. As a rule, it is located on a slope. The height of this stem should be 2/3 of the height of the syn. The shortest is tai, the element representing Earth. It is positioned in such a way as to be slightly to the side or in front of the main elements of the composition.
Even a short overview of how to make ekibana with your own hands gives an idea of this art and allows you to try your own strength in creating a masterpiece. The main principle in creating a composition is always its simplicity, the impression of incompleteness and asymmetry. It takes many years to fully master the techniques and subtleties of arranging traditional Japanese bouquets. But you can create a small miracle yourself by following the basic canons. The size of the bouquet directly depends on the vase you choose: its depth and diameter. All elements must form a single whole.
The photo demonstrates very clearly how simple and perfect a do-it-yourself ekibana can be. It will bring positive energy to the house and decorate the interior.
fb.ru
Ekibana - autumn bouquet
Bouquet of leaves
Bouquet of dried flowers
Ekibana on the table
Bouquet of branches
Most people associate a bouquet exclusively with flowers. But in the case of ekibana, you have the opportunity to deviate from the generally accepted rules and make it from beautiful autumn leaves, dried flowers and twigs. If you manage to arrange these decorative elements correctly, then in the end you will get a floral object that will delight you all autumn and winter.
True, you must take into account that in order for this to happen, first you will need to dry all the components of the ekibana as thoroughly as possible and only then assemble it. Yes, and remember, it is not advisable to combine flowers and dry leaves at the same time. Since these elements are very bright in themselves, visually they will look slightly extravagant. Therefore, it will be better if you supplement the twigs with either dried flowers or leaves.
Ekibana from rowan
Autumn wreath
Rowan wreath
Autumn Ekibana
Above, we have already told you how you can make original floral objects using autumn flowers and fruits. But while talking about them, we forgot, perhaps, about the most beautiful autumn fruit - the mountain ash. With its brightness and ideal forms, it can make any ekibana more attractive.
Therefore, if you think that your craft looks unfinished, try adding bunches of rowan berries to it. If you want rowan to be the main element of the ekibana, then try making an autumn wreath from it.
So:
- Cut the required number of rowan bunches, rinse them in water and air dry
- While this is happening, take a piece of vine and bend it into a circle of the desired size
- If desired, you can replace the vine with a ready-made circle from a florist store
- Be sure to prepare dried flowers, castings of different colors and thin satin ribbons
- When everything is ready, start making your Ekibana
- To begin, fix the rowan on the circle (it is better to place them all as close to each other as possible
- After this stage is completed, begin to fill the voids that have formed between the bunches
- Attach dried flowers, leaves and pine cones to them, and at the very end decorate the wreath with small satin bows