Every person strives to make their home unique and beautiful. Pasting photo wallpapers will add a fashionable note and aesthetics of perception to the ordinary interior of the room.
To do this, you don’t have to spend a significant amount of money; just stick photo wallpaper with an unusual print or photo on the walls.
Decor using photo wallpapers is original and affordable.
In contact with
Today there is a wide selection of photo wallpapers: from large landscapes to interior photographs. After the purchase, a reasonable question arises about how to properly glue photo wallpaper. There are several rules that must be followed to achieve the desired result.
Preparing the wall surface
In order to stick photo wallpaper without flaws and defects, first of all, you need to put the surfaces of all walls in order. To do this, you need to clean them of old wallpaper, paint, and wall panels. After removing the coating, you should get rid of flaws and unevenness of the wall.
Note!
It is strictly not recommended to glue photo wallpaper over previous wallpaper, as this can lead to disastrous consequences.
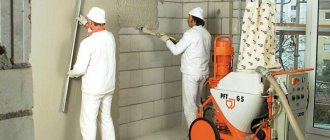
Any roughness or hole can distort the image, so it is advisable to level the surface or cover it with gypsum or cement plaster. After correcting the imperfections, you need to treat the walls with a primer.
An example in the photo of how to properly glue wallpaper in a nursery
Pasting rules
Tools and materials
In order for photo wallpaper to be hung successfully, we will need a set of standard tools..
It includes:
- natural based glue;
Note! Typically, photo wallpaper adhesive is supplied complete with the panels. Thus, the manufacturer saves itself from problems with incompatibility of materials and complaints from customers.
- bucket for mixing adhesive;
- brush for applying glue;
- tape measure and level;
- pencil;
- knife;
- sandpaper;
- roller for leveling the surface;
- putty knife.
Naturally, we will need the wallpaper itself. It is worth making sure that the color scheme of the selected image fits harmoniously into the interior and does not contrast with the color of the furniture, floor and ceiling, because photo wallpaper will play an accent role in the interior of any room.
Gluing process
Bright photo wallpaper
The video on how to glue photo wallpaper will become your indispensable companion, and we offer you step-by-step instructions.
- We prepare the walls.
To do this, you need to clean the walls from the old layer of wallpaper or paint. To make it easier to remove paper wallpaper, you can wet it with water or a special product.
Then the walls need to be sanded to remove dust and remnants of old wallpaper. If large cracks are found, use water-based plaster to repair them.
After the plaster layer has dried, it is recommended to clean it again with sandpaper. As a result, the surface of the wall should be smooth, clean and dry, only after that you can start gluing.
- Preliminary estimate.
Lay out all the existing panels to get a complete picture and compare it with the dimensions of the wall.
At this stage, you can evaluate whether the image will fit completely or whether part will have to be cut off.
- Wall marking.
The installation of photo wallpaper continues - the video tells us that it’s time to pick up a pencil and mark the wall under the panels.
Calculate the dimensions of each panel and draw a grid with the dimensions of each piece.
- Glue preparation.
Glue is the element on which the success of the planned event depends. Typically, photo wallpaper manufacturers supply their own special adhesive mixtures to ensure maximum compatibility of the material and the chemical properties of the adhesive. Mix the glue in the container, following the attached instructions.
- Sticker process.
So how to hang photo wallpaper correctly? We do it as follows.
Using a brush, apply glue to the back of the photo panel, then apply it to the wall in accordance with the markings. Smooth out part of the image with a roller from the center to the edges.
Gluing is done from bottom to top. After completing the entire painting, wipe the front side with a damp cloth, removing any excess adhesive. You may need to trim the edges of the fabric with a knife.
Tools and consumables
Before gluing photo wallpaper to the wall, you need to check whether all the tools and materials are available. The following list is required for work:
- Special glue and container for diluting it;
- stationery or sharp knife, scissors;
- a brush or a special roller for glue;
- spatula for removing bubbles under wallpaper;
- viscose fabric napkin;
- level and tape measure for measuring wall parameters;
- pencil for marking.
First you need to check the walls for dryness and cleanliness. Then you need to make markings for each part of the photo wallpaper to avoid unevenness. You should also first dilute the glue according to the attached instructions.
What do you need to hang photo wallpaper?
Tools and materials for gluing photo canvas:
- The wallpaper itself. Before ordering them, carefully measure the wall, decide on the location, size, and theme of the drawing. A rash choice can lead to additional costs for purchasing new material.
- Adhesive composition. Selected based on the type of wallpaper purchased. Before purchasing, check with a sales consultant in a specialized store to make the right choice. Pay attention to its color so that the glued pattern is not spoiled by visible stains of the adhesive composition.
- Stationery knife. It will help to smooth out uneven surfaces and trim protruding ends of the wallpaper.
- Several brushes. Use small brushes to glue the joints, large brushes to apply the composition to the main part of the canvas.
- A simple pencil. Necessary for marking on wallpaper and on the wall.
- Level. It will help to identify the correct proportions of vertical and horizontal lines.
- Ruler. Used to draw boundaries between parts of a drawing.
- Pure matter. It will come in handy if the adhesive composition goes beyond the edges of the pasted photo wallpaper.
- Rubber roller. With it in your hands, you need to walk over the pasted wallpaper, correctly distributing it over the surface of the wall, expelling air bubbles.
USEFUL INFORMATION: Where is the right place to start gluing wallpaper: from the window or from the door?
Organization of the work area
You can glue wallpaper only after closing all the windows. Do not create drafts, which may cause uneven drying, wrinkling or tension in some parts. The optimal temperature for wallpapering is 20°C.
The floors in the room should be cleaned of small debris, dust and dirt. This must be done in order to avoid the appearance of dirty stains and foreign particles getting under the photo wallpaper. For convenience, you can move the furniture away from the walls, or take it to another room.
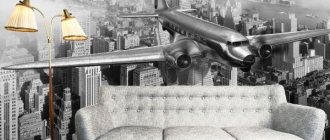
An example in the photo of how to glue wallpaper in the living room
Photo wallpaper gluing technology
When the preparatory work is completed, the glue is diluted, and all the tools are at hand, you can proceed directly to pasting photo wallpaper on the walls. How to stick photo wallpaper so that the joints are invisible? They need to be glued so that in the end the image looks like a single whole without inconsistencies or bubbles.
It is advisable to start gluing photo wallpaper from the lower central area, so you need to accurately and carefully apply the markings. Preference should be given only to natural-based glue. For example, containing cellulose or starch. [rek_custom1]
This is interesting: How to remove stains from wallpaper after pasting: 3 DIY methods for removing them
How to properly glue photo wallpaper - step-by-step diagram
Step 1: Surface Preparation
The surface, as a rule, is a wall, which must be thoroughly cleaned of old wallpaper and plaster. Then prime and apply a new layer of plaster. The goal of this stage is to obtain a flat and smooth wall. At this stage, you should also take care of the room temperature; it should be within +5–20 C, and sources of drafts should be eliminated.
Step 2: Assembling the pattern and marking the wall
The existing fragments should be combined into a whole image; this can be conveniently done on the floor. To transfer a drawing to the wall, you need to measure its total area and the dimensions of each fragment; markings are made using this data (horizontal and vertical lines). For convenience, each fragment can be numbered with a simple pencil on the reverse side. A level and ruler will be very helpful at this stage.
Step 3: Working with Glue
First, you need to prepare the glue according to the recipe indicated by the manufacturer on the packaging. The adhesive composition must be stirred very carefully so that the result is a homogeneous mass without lumps. When the glue is ready, it can be applied. The glue is applied to the back side of the fragment and to the section of the wall where it will be located.
You cannot leave photo wallpaper soaked in glue for a long time, otherwise the canvas will get wet, deform and lose strength.
Step 4: Pasting photo wallpaper
The order of gluing the fragments depends on the form in which the photo wallpaper is presented. If these are rolls, then they are glued from left to right in stripes. If this is a set of squares, then starting from the bottom from the left corner to the right, and the second row in the opposite direction. Using a rubber roller, the canvas is smoothed and air bubbles are also removed. It is necessary to strictly follow the markings to avoid overlapping joints and distortion of the design. Excess composition around the edges can be easily removed with a stationery knife, and drops of glue on the front side can be removed with a sponge.
- Author: Manager Andrey
Rate this article:
- 5
- 4
- 3
- 2
- 1
(1 vote, average: 5 out of 5)
Share with your friends!
The process of gluing photo wallpaper
First, you need to apply glue to the wall. This must be done 5-10 minutes before pasting, so that the glue partially dries: the water is absorbed and the wall is sticky to the touch.
Secondly, we select the first lower central canvas and place it clearly along the outlined contour. It must be smoothed from the middle to the edges. This is done with careful and soft movements using a roller, a viscose napkin or a special plastic spatula.
Thirdly, the subsequent canvas should be glued exactly end-to-end. It is not advisable to glue the canvases overlapping. If small bubbles appear, do not worry, as they will disappear when completely dry in a couple of hours.
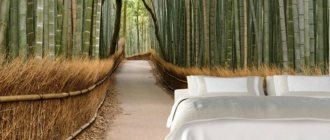
Photo wallpaper in the bedroom
Gluing technology
First we prepare the surface - you need to remove the old wallpaper. Dried coating can often be removed without the use of additional products.
If it holds tightly, then moisten the old wallpaper with water and leave for half an hour. Test to see if they come off with a spatula; if not, wet the paper wallpaper again.
When the old wallpaper is removed from the walls, take a closer look to see if there are any cracks in the plaster.
If they are present, we proceed as follows: we knock down the old, easily lagging layers of plaster, stretch the plaster mesh and plaster it rough.
This is the only way we can protect the new wallpaper from tearing in places where there are cracks. If there are no cracks, then we will not need a plaster mesh, but we will still have to plaster.
If the wall is relatively flat or the old wallpaper is slightly preserved on it, then you can get by with fine plaster. A 2-3 mm layer applied to the prepared surface is sufficient.
If the differences in wall level are more than 3 mm, then rough plaster is indispensable. When the coating is completely dry, it needs to be sanded.
Photo wallpaper will highlight any unevenness; even fine dust will be noticeable on them. Our task is to achieve a perfectly flat surface by grouting and then blow off the dust from it.
No further surface preparation is required unless otherwise specified in the wallpaper instructions.
As a result of the preparatory work, you should have a perfectly smooth wall in front of you without any color spots, and we can start gluing. Let's look at how to properly glue photo wallpaper.
The gluing technology is presented in the video.
Video:
We mark a horizontal line along which we will align the top edge of the canvas. If you are not gluing the canvas from the ceiling itself, then you may have to spend some time on the line.
Apply it with a pencil or marker and check with a level. Draw a vertical outline. If the wallpaper consists of several parts, then make outlines for each.
Move as far away as possible and see if it feels like the vertical lines are not parallel to the walls? If visually everything looks smooth, then you can start gluing it yourself.
It’s much worse if you understand that the drawn rectangle emphasizes the absence of right angles between the ceiling and walls.
In this situation, you will have to glue with a slight slope, as if hiding the slope of the corners.
It is not advisable to place massive furniture near the resulting picture (it will emphasize the bevel), and it is better to lower the level of the photo wallpaper below the surface of the coffee table.
To visually enlarge a small room, step back 5-10 cm from the ceiling to the top edge of the wallpaper; it is acceptable to leave the old wallpaper.
When the outline is marked, you can proceed to the practical part and start gluing.
We dilute the glue - slowly pour the glue into a container with clean water at the recommended temperature and stir at the same time.
Video:
Using a wide brush, apply glue to the back side of the first sheet of photo wallpaper, carefully lubricating the edges.
We combine it with the upper left corner, allocated for photo wallpaper, and, gradually smoothing it, glue the sheet to the wall. Try not to rub the photo wallpaper.
Our task is to gently align the coating and the wall, squeezing out the remaining glue. If glue leaks from under the edge of the photo wallpaper, immediately remove it with a rag. Glue the next sheet in the same way.
How to glue photo wallpaper to a wall - end-to-end or overlapping - is usually indicated by the manufacturer in the instructions.
Lightweight paper ones are mainly glued, overlapping each other. Vinyl or non-woven materials need to be glued end-to-end only.
The video shows that the bubbles formed when gluing photo wallpapers can be easily removed by piercing them with a needle. When all the sheets are glued, make sure that the edges fit snugly.
If necessary, bend the edge, apply a drop of glue and glue again. Go over all the sheets, squeezing out excess glue from the center to the edges. Now you need to let the photo wallpaper dry.
During the day, do not allow windows to be open - the photo wallpaper should dry naturally, the adhesion between the canvas and the wall should have time to harden.
Photo:
Applying glue to photo wallpaper canvases
To hang photo wallpaper efficiently and quickly, you don’t need to hire workers. The pasting process can be done with your own hands. Some photo wallpapers need to be impregnated with glue. Therefore, after applying glue to the surface of the wall, you need to apply it to the back side of the photo wallpaper.
If the instructions do not indicate that you need to coat the photo wallpaper with glue, then you only need to treat the surface of the walls. It depends on the base of the inner layer of wallpaper or its manufacturer. Be sure to read the information that comes with each roll of photo wallpaper. The instructions must be followed exactly to avoid unsatisfactory results.
Preparing the walls
The preparation of walls for wallpaper is the same for most types; the base wall should be as even as possible. After all, no wallpaper can hide uneven walls, with the exception of linkcrust. In our case, they will have to be leveled if there are any defects: holes, chips, convexities, work must be carried out to properly eliminate cracks in the wall, if any. There should not be any greasy, oily, etc. stains on it, because there is no guarantee that they will not appear on the surface of the wallpaper in the future.
Is it possible to glue photo wallpaper onto wallpaper? No, you can’t, you should always remember that they can only be properly glued onto a specially prepared base, so the wall must be completely cleaned of old coatings. During the gluing process, moistened old wallpaper along with new ones may simply fall off. As for painted walls, all paint must also be removed; such a surface does not provide high-quality adhesion.
Preparing the walls means ensuring not only a smooth, clean surface, but also that the photo wallpaper sticks to them efficiently and after time, so that it does not bubble up and does not begin to peel off after time. Therefore, the finishing line in preparing the walls is to treat the surface with putty and primer. It is the putty composition that, after drying, does not have a porous surface, and the primer increases adhesion, all this ensures 100% fixation of the wallpaper to the wall.
Preparing walls for photo wallpaper
Drying time of pasted photo wallpapers
The drying period is determined solely by the temperature and humidity in the room. Under optimal conditions, this period is 3.5-4 hours. Therefore, drying time may have different time limits. It should be borne in mind that photo wallpapers must be glued after applying the glue no later than 3 hours.
Note!
If for some reason you did not have time to glue the canvas, then you need to coat the wall with glue again.
You also need to adhere to the time limits after applying glue to the wall and gluing the photo wallpaper. After applying the glue to the wall, at least 1 hour must pass before you start gluing the canvases.
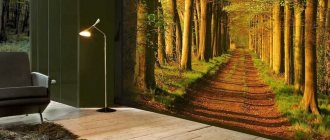
Photo wallpaper in oriental style
Cleaning glued sheets
You need to glue photo wallpaper onto the wall carefully and carefully to prevent the formation of dirty glue stains, which are very difficult to clean. If there is liquid glue left at the joints of the photo wallpaper, it can be removed with a soapy water solution. In this case, you need to act very gently so as not to tear the edges.
If the glue has dried, medical alcohol or acetone-containing products will help remove it from the canvas. But you need to use chemicals carefully so as not to damage the image. Do not forget about precautions when using solvent liquids.
Color scheme - how to choose the color of the walls for photo wallpaper:
Photo wallpaper – flowers on the wall.
Very often, photo wallpapers are associated with the earth, the sun, the hearth, and fire. Cool colors when choosing photo wallpapers are considered to be green, blue, light blue, blue-green and all sorts of shades of these colors. Some colors that are applied to photo wallpaper panels can create the impression that an object is approaching or moving away. It is important to know that if warm colors predominate in a room, then it is visually smaller, and, therefore, for small rooms it is recommended to choose photo wallpaper in cool colors, thereby optically enlarging the space.
Colors that can create a feeling of proximity to an object, as well as increasing its volume, are:
1. Orange. 2. Brown. 3. White. 4. Red. 5. Pink.
Colors that visually reduce the volume of an object and create a feeling of its distance are:
1. Gray. 2. Black. 3. Blue. 4. Purple. 5. Blue.
As for the green color, it belongs to neutral tones, which means it cannot influence either the distance or the bringing together of an object. All this is very important when choosing photo wallpaper, because you should take into account what you and your home need. But we should not forget about the appropriateness of the image, that is, where it will be located - in the bedroom, living room, nursery, office, and so on. See how to choose wallpaper for the living room. Now you can get started, because you already know how to glue photo wallpaper on a wall correctly and we hope you watched the video tutorials.
Practical advice
After purchasing photo wallpapers, while at home, carefully inspect them to exclude manufacturing defects or the consequences of improper storage and transportation. You can lose a lot of time, money and effort if a defect is discovered in the middle of the pasting process. It is impossible to return such wallpaper back to the seller. If defects are discovered in time, the photo wallpaper can be exchanged.
Another important point in pasting photo wallpaper is the marking. It is done as follows: a horizontal line is drawn in the middle of the wall, which should be equidistant from the floor and ceiling. The second line should be vertical in the center.
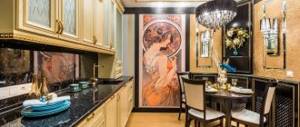
Photo wallpaper for the kitchen