Perhaps the biggest difficulty in installation work of this type is the question of how to glue wallpaper in the corners, and problems can occur both in the outer and in the inner corner - mismatch of edges between the sheets occurs. Is it possible to avoid this and how to do it so that the repair turns out to be of the highest quality - it all depends on you, your skill and desire to apply the advice that you now receive. All this will be discussed below, and in addition, you will have the opportunity to watch the thematic video in this article as additional material.
Before you begin, measure each wall you will be applying to to know how much wallpaper you will need. Using the kit, measure the height and width of the wall, adding 10cm above and below - this will help in finishing the ceiling and skirting boards.
To find out how many rolls of wallpaper you will use, multiply the width of the wall you want to place the wallpaper on by the height of the wall. If your wallpaper has prints, each stripe should be 10% higher so that the print is equal and the paper standard, when applied, is as expected.
Secrets of the masters
External factor
Smooth walls - 50% success
- First of all, so that the question of how to glue wallpaper with a pattern in the corners does not become a dilemma, you will need smooth walls
, the angle of which relative to the floor will be exactly 90⁰, without any deviations or allowances (the floor should be set to zero). If all the walls (partitions) in the room are strictly vertical, then each of the room corners, be it internal or external, will be the same along its entire length, regardless of whether it is sharp, obtuse or straight. The same applies to the edges of the slopes, which extend from the window or door onto the wall - both the vertical and the horizontal must be smooth, like the slope itself - to the horizon line the horizontal must be strictly parallel or have 0⁰, and the vertical must be strictly perpendicular and have 90⁰. - As mentioned above, you can achieve such geometric parameters using beacon profiles
, which are installed for plaster or, as well as metal lathing for plasterboard sheets, which are installed strictly according to the level. Another option is simply impossible and this is not a production instruction, but a mathematical law, which is not humanly possible to break or change. Any deviation of the wall by even one degree will result in mismatched edges at the junctions of the strips.
Note. Wallpaper can be either paper or non-woven (sometimes the paper can have fiber added, but for this case it is considered a paper base). So, the width of the paper, when the sheet is wet and glued, you can stretch it up to a centimeter with your own hands, but the non-woven fabric can be stretched up to 3 cm, but the price of such wallpaper is higher. However, this is not a reason to leave the walls uneven, since such stretching can only be done by an experienced craftsman.
Separate what you need to place the wallpaper
Cut out wallpaper and organize yourself
Container for diluting the glue brush. . Cut strips of paper according to measurements and follow the pattern if the paper is printed. Highlight the stripes on the back to find out the correct order for the application. Then specify the starting location for placement. Mark a line on the wall to guide you vertically. It is important that the application of the first strip of paper is perfectly aligned to guide the subsequent collages.
Protect your floor and spread the adhesive onto
Use 1.5 liters of water for every 30 grams of all-purpose glue. Dilute all the glue in the container with water and mix. Wait 30 minutes and see if the mixture looks like a gel. If so, the glue is ready to use. To apply the glue, a brush is the best option, but if you don't have one, you can use a roller to spread the glue onto the paper.
Secrets of smooth gluing
Recommendation. Many people are interested in which angle to start gluing wallpaper, and although this does not matter much for experienced craftsmen, for a beginner it can be an additional aid in their work. So, start doing this on the opposite side of your working hand, that is, if you are right-handed, then with your left, and if you are left-handed, then with your right.
Protect floors and items from any spills by using plastic to cover. Place the first strip on the floor or protected surface, with the pattern facing down. Run one layer of glue in half of the strip, from the center to the end. Then fold this half, glue it in place and repeat the process on the other half.
Materials for work
Leave the paper for 1-2 minutes before applying it to the wall so that it can absorb the adhesive. Take the paper still folded against the wall you want. Use a ladder and start the necklace at the top, not forgetting 10cm to the left at the ends. Unfold the paper and stick it to the wall, unfolding it all the way. For a smooth surface, use a clean, dry cloth to help with gluing.
Recommendation. Many people are interested in which angle to start gluing wallpaper, and although this does not matter much for experienced craftsmen, for a beginner it can be an additional aid in their work.
Even if you have brought the walls to zero, this does not mean that all the difficulties are over, since wallpaper on the outer corner (or on the inner) should be glued strictly according to the level, otherwise all the work on leveling the partitions will not bring you any benefit. The sheet width has a standard of 0.53 m and 1.06 m, which means that when marking we will use the same parameters. Let's imagine that a right-hander is working and we start pasting from the left corner.
Then apply the remaining stripes, being careful not to overlap them. Also note whether the patterns match each other according to the paper pattern. If you notice that it is not inserted correctly, carefully remove the paper and re-glue it.
After applying all strips of wallpaper, use a brush to remove any air bubbles, always brushing from the center. Smaller bubbles that are caused by excess glue are common and it is advisable to save the paper to secure it. They usually disappear when dried after 2 or 3 days.
To remove traces of glue that may stain the paper, soak a sponge in water and go along the seams. In the corners, leave a sheet of paper 1 cm above the other wall and glue another paper on top of the previous one. Mark well for better completion. To cut off wallpaper scraps, pinch the folds and corners of the baseboard and ceiling with a putty knife and use a stiletto to cut out what's left.
We retreat from the corner approximately 5-10 cm less than the width of the sheet with which we are working and draw a vertical line strictly according to a plumb line or building level for orientation. Now it turns out that when gluing on the right side, the strip will lie under the control line, and on the left, it will wrap around the adjacent wall, and if the corner (internal or external) is even, then the left edge of the sheet will also turn out strictly vertical.
In a situation where there are sockets and switches, after the paper has dried and using a stylus, make a crosshair over the area and carefully open the flaps. Then simply replace the mirrors and boxes. You can use it to highlight your decor as well as your dining room. and prints with items such as pillows, sofas, curtains and rugs. Choose vinyl paper, which is more durable and easier to clean.
In this environment, you have the freedom to choose any type as it has less traffic and little humidity. For the image, choose a fun one that matches what your child likes. Since the kitchen is more humid, avoid cellulose papers because they are less durable and opt for vinyl. One creative way to use wallpaper in the kitchen is to place it on half-walls or banners between cabinets and countertops.
Do not forget that wet wallpaper can stretch slightly when it is glued to the surface, which means you need to check the clarity of the vertical of each edge at least through the sheet so that it does not gradually deviate from the initially specified parameters.
Do not forget that wet wallpaper can stretch slightly when it is glued to the surface, which means you need to check the clarity of the vertical of each edge at least through the sheet so that it does not gradually deviate from the initially specified parameters.
You can make your wallpaper the highlight of your environment, as there are often colorful furniture and varied designs. Enjoy colorful and different prints, but if you're using it on all your walls, be careful to choose lighter colors so you don't leave the image too busy.
Types of wallpaper - choosing the latest materials
Since this is a very wet space, the type of paper most suitable for use in a bathroom is vinyl. Not very often, wallpaper on the ceiling goes beyond the obvious and can be that highlight in the design of the environment. In doubt what to use, choose and hide templates.
Well, how to wallpaper the corners if there is no way to level the walls, or if you did it, but made a mistake due to inexperience? In such cases, it is best to use either a pattern that does not depend on the joining (the first option is better). Here it is best to glue the strips overlapping when they do not match at the joints.
Well, how to wallpaper the corners if there is no way to level the walls, or if you did it, but made a mistake due to inexperience? In such cases, it is best to use either a pattern that does not depend on the joining (the first option is better).
It serves to highlight or escape from a unique environment without significant changes. There are many options for using an in-strip or half-wall. It can be used between benches and cabinets in kitchens, on walls with shelves or some furniture that takes up half the wall, and on walls that have tables leaning against each other.
Required materials and tools
Was this text helpful? Now that you know how to set a wallpaper, leave a comment here with your thoughts or questions about it! Let it dry completely and then sand the area so that it is completely flat and you can place the wallpaper in the room.
We continue to consider the topic of how to paste wallpaper in the corners and it should be said that overlapping joining does not at all imply gluing one strip to another - pay attention to the picture above. Since we prefer to glue the wallpaper on the corners entirely, we will simply cut off the edges that overlap each other with a paint knife, just try to ensure that the blade is new and does not tear the sheet.
Make sure there is no dust or dirt on the wall so that the wallpaper can be installed correctly. If there is dampness in the room, it is also necessary to repair it to avoid the wall peeling and then deteriorating the wallpaper. To do this, you must first know what it is, and if it is too deep, seek professional help in eliminating it.
How to glue non-woven wallpaper on internal corners
Once you've left the walls clean, you can start applying wallpaper. To do this, you must make sure that you have enough paper to cover the entire room and an adhesive that is suitable for the type of paper that will be used. Wallpaper adhesive preparation may vary depending on the manufacturer, the amount of water added, or the amount of time it must be left on before use. Therefore, follow the instructions detailed on the packaging.
You simply remove the extra strips and get an almost perfect fit, only without matching the pattern.
Photo - how to glue corners to wallpaper
You can also hide defects and protect them from damage using plastic, and above you see how to glue corners to wallpaper on the outer corner. But for internal joining, this option will not be the best - in this case, it is best to use a thin ceiling plinth made of the same plastic or even foam plastic (extruded polystyrene foam).
So, it's important to start placing your wallpaper next to a window, if one exists, and end up in a darker area. Using a paste brush, you should apply glue to the middle of each strip of paper; It is important to make a center for the edges and reset the corners. Then fold the strip of paper to match the other half and insert the glue.
The next step is to collect the paper from the top end and fold it in half so that it does not stick to the bottom of the wall for a while. Start placing the paper on the wall from top to bottom and from the center to the corners to remove air and prevent bubbles from forming. Even if it was old-fashioned, wallpaper made a significant comeback in interior design. Whether you choose an original print, a minimalist modern pattern, or a classic solid color, wallpaper is a great way to enhance a wall or redecorate an entire room.
Design Rules
How to choose the tone and theme of the photo wallpaper that you plan to place in the corner of the room?
Here are simple instructions for choosing the optimal solution for your purposes.
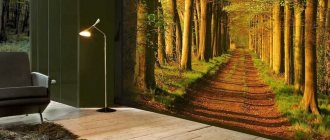
- Warm colors are more suitable for dark rooms - yellow, orange, light green. For rooms with bright natural light - cold (blue, light blue) . It is worth remembering that light colors visually expand the space, dark colors make it smaller.
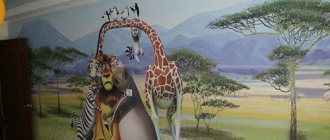
- The format of the picture affects the visual perception of the height and width of the room . If you want the room to look taller, place an image of a tall, slender tree on a light background in the corner, fitting it into a vertical rectangle.
The photo shows exactly such a solution.
But a squat rose bush inscribed in a horizontal canvas, on the contrary, will make the room appear lower and wider.
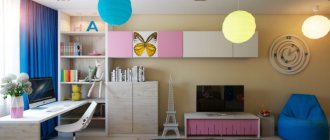
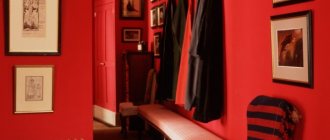
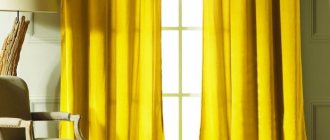
- To prevent the image from getting lost in the interior, use contrasting colors . Thus, a dark night city will attract the viewer’s attention in a room with light walls.
Please note: you should avoid an abundance of contrasting elements. If in the room we described you add red furniture to the corner photo wallpaper with a night city, the effect of concentrating attention in the place you need will be blurred.
What should you not do when choosing an image?
- Place portraits or large-scale elements on the corner. They will be appropriate on a flat surface.
- Place near the corner connecting two curved walls, vertical or even straight lines of the image. The curvature of the corner will become noticeable.
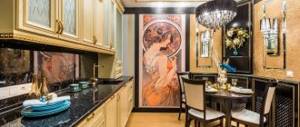
- Ignore scale. If a corridor stretching into the distance is depicted on the walls, its arch should be approximately at the level of the ceiling, and not your eyes.
The image is proportional to the size of the room.
Necessary materials
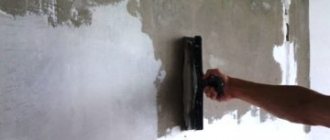
Often, before wallpapering walls, preliminary preparation of the surface is required.
After preparation, the wall should be covered with putty (read how to choose putty) followed by sanding (read how to properly sand walls). If the wall is already prepared, then materials for rough work will not be required.
You only need to have:
- Wallpaper.
- Glue.
- Primer.
The main material is wallpaper
, it is recommended to purchase one that is not very dense so that it is easy to glue. This is especially important when gluing corners. Before purchasing wallpaper, you need to calculate its quantity. To do this, the perimeter of the room is determined, the perimeters of window and door openings are subtracted and a small margin is added (5-10%).
When choosing glue
you need to be guided by the type of wallpaper.
Therefore, when purchasing them, you must immediately take the appropriate glue. A primer
will be required to ensure adhesion of the surface to the wallpaper.
Where to start
After preparing the surface (cleaning it from dust with a brush and applying a primer), you can begin gluing the walls.
Pasting begins from the part of the room that is most visible. To do this, using a plumb line, you need to make the appropriate marks on the wall so that the canvases are strictly perpendicular to the floor. Then the distance from the ceiling to the floor is measured and pieces of wallpaper are cut to the required length with a small margin.
You cannot start gluing the first canvas from the corner.
You need to retreat a small distance (half the width of the wallpaper). Then paste wallpaper on the entire wall.
Depending on the type of wallpaper, the methods of applying glue differ. Some types involve applying an adhesive to the wallpaper, which must be absorbed within 5 minutes. After this, you can glue the canvas to a wall previously coated with glue. But other types of wallpaper should be glued dry, and only the wall should be smeared with glue.
External and internal corners should be pasted last.
How to choose a theme for a room?
In order for photo wallpaper to decorate the room and not look like a random element, the image must fit into the interior and correspond to the purpose of the room.
For kitchen
It is best to choose a plot that supports the food theme and awakens the appetite.:
- Flowers and fruits . A large image of ripe, juicy fruit stimulates the appetite, and flowers usually do not distract from lunch.
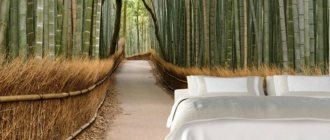
- Natural landscapes . Thanks to photo wallpapers, you can dine on the seashore or in the mountains.
- Cityscapes . This option is good for travelers and dreamers. Romantic people will love the narrow streets of old cities, while residents of big cities will appreciate the view of modern buildings from above.
Internal corners
Pasting an internal corner on 2 converging walls is done using the following technology:
- The distance from the corner to the pasted strip is measured on one wall, then on the other.
- Pieces are cut, the width of which has a margin of 2 cm.
- Carefully coat 1 piece of canvas with glue.
- Apply glue to the inner corner.
- The first canvas is pasted.
- The remaining strip is glued to the second wall.
- The wallpaper is being trimmed.
When gluing the first strip to one corner wall, you need to make sure that one side of the strip is flush with the wallpaper that was previously glued to the entire wall.
When applying the canvas, you need to carefully expel the air from under it. To do this, use a soft sponge to make smoothing movements from the center to the edge, moving from top to bottom.
The first strip for the corner is glued so that it extends 2 cm onto the 2nd wall. The canvas is ironed well in the very corner so that there are no air bubbles left there either.
After this, the 2nd strip is glued to the 2nd wall. It is glued using the same method as the 1st one and overlaps the already glued strip by 2 cm.
After this, you need to trim off the excess wallpaper. First of all, the wallpaper is cut at the top near the ceiling. To do this, apply a long spatula to the wallpaper at an angle to the ceiling and draw a strip along it with a sharp construction knife. After this, the excess part of the wallpaper is removed.
Then the same spatula is placed with the end part against the first wall that was glued, after which the spatula is slightly turned towards the corner. Then take a knife and use it to make neat cuts on the 2nd piece of canvas (it was glued to the 2nd wall).
You need to make light movements with a construction knife in order to make a cut only on the upper sheet without damaging the lower one.
Such movements must be done from top to bottom. Lastly, the part of the wallpaper at the bottom, which will be located under the baseboard, is trimmed.
But this was a presented method for gluing wallpaper on a corner in the case when wallpaper was already glued on 2 adjacent walls. Therefore, it is necessary to adjust the wallpaper to the edge of the last strip on one side and the other. But you can do it in another way: adjusting it to only one wall covered with paper.
The second way is as follows:
- The first strip is glued at an angle butt to the last strip.
- The excess part is placed on the second wall. On the second wall, 2 cm are measured from the corner in several places, and a vertical line is drawn.
- A construction knife is used to cut off 2 parts of the canvas.
- The same part is immediately applied to the corner with an overlap.
- Using a spatula and a knife, remove excess parts of the wallpaper that extend onto the first wall.
After gluing the second part of the canvas, you need to ensure that there are no distortions. After all, subsequent strips will be glued to this strip end-to-end and a misalignment may occur. Therefore, you need to constantly use a plumb line and a building level.
You can learn more about the process of gluing wallpaper on an inner corner in this video. Advice and recommendations from experts on each stage of work are presented.
External corners
The technology for gluing wallpaper on external corners is also based on butt technology. In order for the external corners to be ideal you will need:
- Glue the first strip, one edge of which will join the main panel on the wall, and the other edge will extend to the outer corner by 2 cm.
- Level the canvas.
- Glue the 2nd strip of wallpaper, one part of which will join the wallpaper of the 2nd wall, and the other part will overlap the first strip.
- Carefully level the canvas.
- Apply a long spatula to the glued 2nd sheet and cut off the excess part with a construction knife.
Do not forget about timely trimming of excess parts of the canvas from above and below. Often, when gluing the first canvas to the outer corner and extending it onto the second wall, folds appear.
To avoid this, you can use scissors to make cuts along the entire length of the canvas in the section of wallpaper that goes to the corner.
This will allow the strip to lie as flat as possible.
If wallpaper needs to be glued to an arched structure, then the technology is slightly different from pasting external corners. First, strips are glued, extending 2 cm onto the inside of the arch. The excess parts of the overlaps must be removed immediately. Then the width of the inner part of the arch is accurately measured, and a strip of the required length is cut out and glued. In this case, there is no need to trim the glued strip because it was previously cut straight.
Compound
If we talk about what material such wallpaper can be made from, it should be noted that there are not so many main varieties. And, as a rule, they coincide with the materials that are used in the production of ordinary roll wallpaper. So, here is a short list of them:
- Vinyl photo wallpaper. In fact, vinyl canvases are a fairly well-known trend in the wallpaper market. They have a significant number of advantages, including durability, the ability to carry out wet cleaning, and an attractive appearance. Among the disadvantages is poor air permeability. As for their composition, vinyl is only an outer, decorative layer. The base in such cases is made of non-woven fabric or paper.
- If we talk about non-woven photo wallpaper, then we must say that this is an excellent option at a competitive price. At the same time, you must understand that the interlining acts solely as a base for the vinyl or paper outer layer.
- Paper wallpaper is widely known for its environmental friendliness. In addition, the easiest way to glue them is with your own hands (just follow the instructions from the manufacturer). At the same time, the disadvantage is the short service life and the inability to carry out wet cleaning.
Related article: How to sew curtain tape: step-by-step instructions
This is the basic information that I would like to provide about corner photo wallpaper for the interior. We hope that it will help you when renovating or decorating the interior of your room.
How to glue wallpaper with a pattern in the corners. Step-by-step instruction
Working with plain wallpaper is much easier than with patterned ones. But to enliven the room and get an unusual design, you will have to complicate the task and work with the selection of patterns.
To apply wallpaper with patterns to external or internal corners, you need to adhere to the following technology:
- Take measurements of the first strip and cut it off.
- Measure 2 cm from the cut edge of the first strip and draw a thin line with a pencil. Fold the fabric along the marked line.
- Do the same work with the second piece that will be glued (also make a margin of 2 cm and bend the fabric along the line).
- You just need to first adjust the pattern, which will match in both canvases if they are bent along the lines.
- Then glue 2 strips on converging or diverging walls.
When gluing wallpaper with a pattern, you need to match the pattern as accurately as possible. Despite the fact that the corner is pasted over, all errors will be clearly visible.
To make the work easier, you can follow the advice of professionals:
- Buy wallpaper that is plain or has a small pattern. Due to this, you won’t have to spend a long time selecting a pattern on the corners.
- Using wallpaper with a large relief pattern, you can hide minor unevenness in the walls (or prepare the wall in advance and level the walls with plasterboard).
- For work, use only a sharp construction knife, otherwise it will be difficult to make an even cut on the canvas.
- Be sure to use the technology of wallpapering overlapping corners. If the panels are glued end to end, they will come apart over time.
- If, after gluing the canvas, excess glue passes through the joints, it must be immediately removed with a clean cloth. It is not recommended to use a hard brush, which can damage the top layer of material.
- Carry out the work carefully, because some types of wallpaper are afraid of getting glue on them.
Anyone can master the technology of wallpapering corners. If you follow the instructions, be careful and take your time, you can easily paste wallpaper not only on internal and external corners, but also on arched structures and around window openings.
Tips and ideas
Some types of photo wallpaper allow you to get unusual effects:
- The three-dimensional image on 3D wallpaper looks very realistic. An example is a landscape with flowers and grass in the foreground.
- The graphic drawing, which became the basis for a three-dimensional photo, gives scope for the appearance of visual illusions.
- Illuminated wallpaper will help you create a fantastic picture of the starry sky or a realistic image of the city lights at night.
- Wallpaper imitating paintings fills the room with a special atmosphere.
- Landscapes demonstrate the beauty of nature and emphasize a gentle or romantic setting.
- And sketches and sketches will help you relax.
- Graffiti is suitable for ambitious people who prefer extreme style, and for teenagers who are interested in art.
Photo wallpapers make a room unique. With their help, you can create perspective in a small space, add dynamics to a boring environment and complement the interior with the plot of the picture.