Preparatory stage
Before you begin a major DIY bathroom renovation, you should make a plan for the work that needs to be done. For example, decide on the replacement of necessary plumbing elements or possible redevelopment.
Next, try to draw a small sketch of the innovations that you would like to make; you can also make an approximate list of expenses that will follow after the start of repair work.
To carry out a beautiful renovation in the bathroom, special attention is paid to its type, since the bathroom can be either separate or shared, and in the second case you will have to take care of the “visibility” of pipes and risers.
The main types of finishing materials include:
- special waterproof paints;
- tile;
- waterproof or liquid wallpaper;
- plastic panels;
- decorative plaster mixture;
- glass tiles, which is an innovation.
Watch the video: DIY bathroom renovation in 6 days
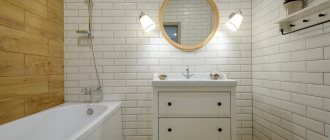
To gain at least a little space, in a small bathroom you need to think through the placement of plumbing fixtures to the smallest detail so that it is convenient to use, and at the same time the bathroom interior looks impressive. Once the location of the plumbing has been determined, all that remains is to figure out the lighting. Since the bathroom is small, it should be well lit to make it look more spacious.
There are several nuances that you should pay special attention to when choosing materials.
1. Pipes. Perfect for laying water pipes made of material such as polypropylene. You can consider an option such as metal-plastic, but it will be much more expensive, although it is perfect for those places where there are a large number of bends. It is also important to know not only the internal, but also the external diameter.
2. Armature and fittings. In this room it is possible to use only plastic fittings. This will allow you to avoid possible leaks also by connecting the pipes using a soldering iron.
3. Tiles. Porcelain tile is ideal, although it is a little more expensive than tile, but its rough surface will help protect you from possible falls. When purchasing, you need to test them by taking several tiles from packs of different batches. When folded with their back sides and installed on a flat surface, the edge difference should not exceed one millimeter. Then you need to fold them with the inner sides, and there should be no openings, bumps or kinks. When examining the front side of the tile under light, there should be a complete absence of cracks or streaks.
4. Glue and tools for tiling work. A glue that dries no earlier than 12 hours is ideal. The spatula is selected according to its characteristics. You should also purchase a tile cutter, a good diamond drill and beacons in the form of plastic crosses. A good helper will be flannel cloth, which is used during finishing grouting work.
Finishing
List of works
Bathroom finishing process:
- Leveling walls and floors.
- Wall tiling.
- Floor tiling.
- Ceiling finishing.
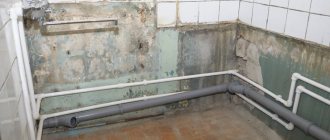
Preparation
The surface of the walls after removing the old layer of tiles often requires leveling, because the tiles can only be laid on an almost perfectly flat area.
There are several ways to level walls:
- Applying a layer of plaster.
- Filling minor unevenness with putty.
- By gluing sheets of plasterboard or by installing a profiled plasterboard structure.
You cannot do without the latter method when forming curly protrusions, which have recently gained wide popularity.
It should be immediately noted that even a cosmetic renovation of a bathroom will include all the finishing work described. Its difference from a complete renovation is only that the plumbing and communication systems remain intact.
So, straight to the finishing. When the surface of the walls is leveled, you can begin laying ceramic tiles.
Materials
To do this, in addition to the tile itself and special glue, you will need:
- A thin piece of wood spanning the entire width of the wall. It will serve as a support for the first row of tiles.
- Special tile crosses for fixing the distance between individual tiles.
- A spatula with ribbed edges for uniform application of adhesive on walls or tiles.
- Hammer with rubber butt.
- Construction level, price - from 670 rubles.
Bathroom wall tiling
Sequence of work
A wooden beam is attached at the bottom of the wall so that the bottom of the first row of tiles is at the level of the intended layer of floor tiles and can form a sealed joint with the floor.
Glue is applied to the tiles, and then rubbed with the edge of a ribbed spatula, evenly distributing the layer and removing excess glue. Place the tile against the wall, resting it on the timber, and lightly tap it with a hammer until it is level.
Place the next element next to the previous one, separating them with crosses. The gap between the tiles should not exceed 4 mm.
After laying the first row, lay the second on top of it, also dividing the rows with crosses. The seams between the tiles should be sealed with silicone sealant. To give the tiles the appropriate shape and size, use a regular glass cutter.
Advice! When renovating a bathroom in a Brezhnevka building, due to the considerable dimensions of the room, the space for the bathtub, which will not be visible, does not need to be tiled. This will slightly reduce the finishing area.
Once the walls in the bathroom are finished, you can move on to the floor. Tiles on the floor are laid in the same way as on the walls, except for the absence of wooden beams. Do not forget that special floor tiles are used for the floor.
Depending on the budget for repairs, the ceiling is constructed from PVC panels or a suspended ceiling system is installed.
False ceiling in the bathroom
The second one will fit perfectly into any design, but it is extremely difficult to do the work of installing a suspended ceiling yourself without special tools and the appropriate skills.
Installing a ceiling made of PVC panels is not difficult at all. On the ceiling being repaired in the bathroom, using a hammer drill, wooden beams with a cross-section of 20x30 mm, dowels and self-tapping screws, a wooden sheathing is constructed, to which PVC panels are attached using a mounting stapler. The corners of the ceiling are lined with a special PVC corner.
Advice! In the process of finishing the ceiling with PVC slabs, even before installing them, take care of the wiring for each ceiling lamp, then install the luminaires in the slabs and only then attach the PVC slabs to the sheathing, immediately connecting the luminaires to the wiring.
When approaching the final stage, do not forget to coat with sealant the places where the bathtub or shower stall comes into contact with the tiles. Additionally, a screen with sliding doors should be fitted to the bathtub.
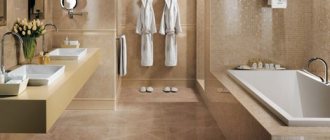
Finishing with ceramic tiles: bathroom and toilet design
The most interesting, but at the same time, time-consuming work is the final finishing of the premises. And here there is room for imagination:
Ceramic tiles are most often used as a finishing material due to their excellent performance properties, durability and easy maintenance. And most importantly, it fully complies with the basic requirement for a bathroom and toilet - hygiene.
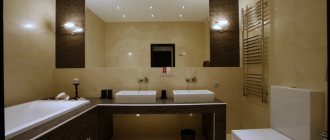
Another advantage of ceramic tiles is their versatility; the tiles go well with almost any building materials. By finishing the lower part of the walls with tiles and the upper part with paint or plaster, you will get a functional and attractive wall covering.
If the entire surface of the walls is tiled, you can revive and decorate the coating with the help of decorative borders and inserts. And using tiles of different colors, you can visually correct the unsuccessful geometry of the room.
Mosaic can be considered one of the varieties of ceramics. The advantages of this material include a wide range of applications (almost any surface can be laid with mosaics), ease of cladding and, of course, an attractive finish.
One of the most inexpensive options for finishing walls in the bathroom and toilet is painting the surfaces with waterproof paints. At the same time, designers recommend using glossy compounds for rooms with high humidity. Firstly, they visually expand the space of small rooms, and secondly, caring for such coatings is much easier.
If a room painted in one color seems boring, you can use vinyl decals to liven up the environment. Or use paint in different shades while maintaining the same color.
A good solution would be to make your own drawings on the walls. This will give the premises originality, and you will have a reason to be proud of yourself.