Deciding on the design and dimensions of the wardrobe
How best to plan a wardrobe depends on its location. Its design can be:
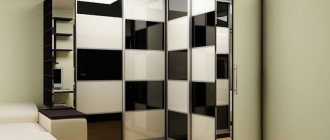
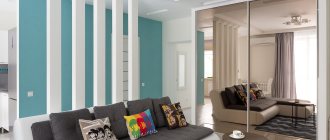
- Completely freestanding. The easiest option for independent design. The dimensions of the wardrobe are reduced relative to the allocated space in width and height to make assembly possible. If you plan a closet for the ceiling, it is better to allocate a separate mezzanine. It is not always possible to assemble a wardrobe standing upright. And if you assemble it lying down, then the diagonal of the sides will not allow you to lift it and move it to the designated place.
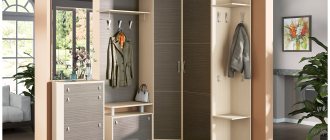
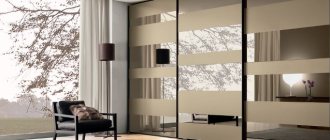
- Partially built-in. Planning a partially built-in wardrobe (for example, when installed in a corner, without a back wall or bottom) is also not difficult if you take all the measurements correctly. Shelves adjacent to the side wall may need to be filed in place if the angle is not level. When installing in a corner, it is better to leave the section adjacent to the corner for outerwear.
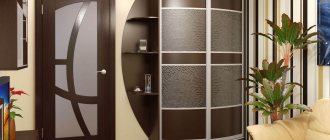
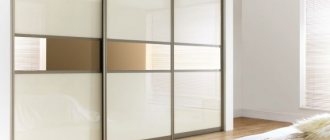
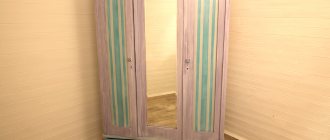
- Fully built-in. In this case, the sliding wardrobe is completely mounted in a niche and does not have a roof, bottom, side or rear walls. It is necessary to plan the internal content in such a way that all shelves and drawers are in the center. And leave the side sections, for example, under clothes on hangers.
Cabinet wardrobe
Partially built-in wardrobe
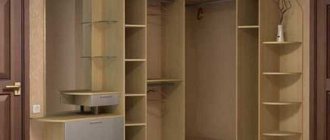
Built-in wardrobe
Layout
The ease of use of a coupe depends on the layout of its internal accessories. After listening to your wishes, the manufacturer will tell you what layout of the wardrobe inside will be suitable for different options.
For the correct layout, you need to choose the installation location of the compartment and its filling. Here are examples of basic configurations.
Hallway
The hallway closet is selected according to its shape and size. Inside such a module there should be storage compartments:
- Outerwear (barbell);
- Hats, scarves, gloves, umbrellas, accessories (drawers, shelves);
- Shoes (pull-out systems, shelves).
You can hang a mirror on the door.
Bedroom
The wardrobe in the sleeping room contains:
- Boxes (organizers) for underwear;
- Rods for hanging casual clothes;
- Shelves for bed linen, pillows, blankets.
In the bedroom it is better to design a built-in or corner wardrobe. So that it is located along the entire length of the wall.
Wardrobe
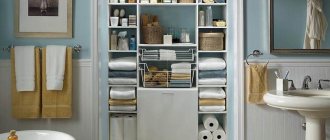
The space inside the dressing room module can be filled with anything, the main thing is to carry out a competent layout.
You can embed into it:
- Designs where casual and outerwear will hang;
- Cabinets and drawers for accessories;
- Holders and shelves for hats;
- Shoe racks;
- Mezzanines for travel bags and suitcases;
- Compartments for storing household appliances (ironing board, vacuum cleaner).
After clarifying important details, a drawing of the furniture is created. There are services on the Internet for creating wardrobe designs. The program helps calculate their cost. Shows a photo of the designed model. Gives you the opportunity to imagine whether it will fit into the interior.
What sizes to choose
With the size of the wardrobe, everything is individual. They are calculated taking into account the layout and area of the room where it will be placed. But there are also certain standards. For example, the depth should be 60 cm. This option will be roomy and comfortable. Suitable for storing not only clothes, but also shoes, bags, and accessories. The best place for it is the hallway or bedroom.
For a system in which you plan to store only light clothing, a depth of 50-55 cm is suitable.
In cases where such options do not fit into the interior, the depth size is selected individually. But it must be at least 40 cm.
You may be interested in: How to build a summer kitchen in the country: projects, photos, ideas and recommendations
The width depends on the features and area of the room, as well as the wishes of the homeowner. A wide wardrobe contains more sections. More spacious. A smaller product is compact and does not “eat up” space.
The planning height is chosen at the discretion of the client. For practical purposes, some install the structure in the ceiling, but the doors should be no more than 2.5 meters. In a room with a high ceiling, the uncovered part is equipped with additional doors.
How to organize space
Skillful organization and planning of the space inside a wardrobe is not possible without an idea of its filling. Typically, the system is divided into sections, inside of which shelves and a bar are placed. Drawers are installed less often.
Shelves are needed at the top and bottom. It is better to store rarely used items upstairs. Below are bags and shoes.
It is more convenient to install a bar for hangers in the upper part of the module, parallel to the door. So the things that hang on it will be clearly visible. This option is suitable for a cabinet with a depth of 60 cm. When the depth is shallower, the crossbar is placed perpendicular to the door. Then only the thing that hangs first is viewed. This is not very convenient. To solve the problem, a layout using a retractable system is used.
Drawers should be installed at waist level or below. They usually store organizers with underwear, socks, and tights.
For proper placement of different types of clothes, additional elements are used: baskets, hangers for skirts and trousers, holders for belts and ties.
The layout of the built-in wardrobe does not differ from the layout of the cabinet module.
Departments
Regardless of the configuration, size, number of sections, all models have mandatory sections.
- Shelves. Each shelf links the side parts and gives stability to the system. Their height depends on what is planned to be placed on them, and their width and depth depend on the size of the section.
- Boxes. Accommodates underwear, small items, hosiery. Increases storage convenience.
- Barbell. There are hangers on it where the main clothes hang.
If the system is designed for only two people, it is better to divide it into two parts with identical sections.
To improve ergonomics, additional fittings and accessories can be added to the design.
- A pantograph is a convenient but expensive alternative to a barbell. Accommodates hangers for shirts and blouses. To get them out you pull the handle.
- Baskets. They are a retractable mesh container. Its contents are always visible.
- Retractable platform for shoes. Placed on the lower tier of the structure. Has an inclined location.
- Organizers. A box or fabric case divided into cells. It is convenient to store socks, ties, underwear, and jewelry.
- Multi-level hangers. Accommodates many items in a small area.
- Trouser. Allows you to avoid creases and maintain the shape of trousers and jeans.
You may be interested in: House 6 by 12: layout options, choice of materials for construction
It is desirable that additional structures be built-in and modular. Then, taking into account the change of seasons, the filling of the system can be rebuilt.
Layout options
There are four types of sliding wardrobes.
- Linear (rectangular shape). Installed along the wall. Can serve as a room partition.
- Angular. Usually installed in small apartments. It completely fills the corner space. Suitable for storing a large number of items.
- Radial. Convex, round or concave shape. The model requires a lot of free space. Installed in spacious rooms. Most often placed in a corner of a room or niche. A closet layout with wavy lines makes the room appear larger.
- Built-in. Without ceiling, floor and walls. Installed in a place unsuitable for traditional furniture. Made to order.
For each option, manufacturers create individual circuits. In the hallway, part of the storage system is made open. They complement it with a seat and an area with hooks. Wardrobe layout options in children's rooms include pull-out cabinets for stationery and small items, open modules with shelves to accommodate toys and books.
A model installed on a balcony should have wide shelves. They store seasonal items, sports equipment, and tools.
To imagine what the wardrobe will look like, you can look at photos of different models online.
We leave space under the doors and adjust the depth
The peculiarity of sliding wardrobes is that the sliding system immediately “eats” 100 mm from the depth of the wardrobe itself. And all shelves and partitions must be recessed relative to the compartment body. And the drawers are equipped with mortise or simply non-protruding handles so that the sliding doors do not cling to them.
If you need to plan a wardrobe inside for the hallway, with storage of bulky outerwear, it is better to immediately increase its depth to 650 mm. So that later you don’t have to adjust the sleeves, shoulders, fluffy “hems” of sheepskin coats and fur coats, which “strive” to get in the way of the compartment door when closing.
If the hallway is narrow and a wardrobe with a depth of more than 450-550 mm cannot be made, it is more correct to immediately plan the transverse arrangement of the hangers on the pull-out rods.
What options could there be for hanging and hanging rods under hangers?
Zoning for a wardrobe
There are three main zones, which, depending on the location of the cabinet and its functions, are allocated for storing various objects and things, and accordingly, specific methods are chosen for their placement, hanging, and fixing.
Lower zone
Designed for storing bulky items, shoes, toys, household tools. The dimensions of such a zone are limited in height - up to 40 cm, the depth is determined by the depth of the cabinet - 40-60 cm for straight structures, for radius ones - by the radius of curvature of the facade.
Middle part
wardrobes are reserved for frequently worn items and therefore are equipped with the most diverse devices for their convenient storage. The dimensions of this zone vary depending on the wardrobe and are 1-1.5 meters in height. In this sector there are rods and pantographs, boxes, baskets, hooks, shelves, of different volumes and designs, determined by the ease of use and the number of things - dresses, coats, jackets, skirts and trousers, shirts and blouses, underwear and accessories.
Upper zone
are reserved for placing hats, bags and suitcases, large bedding, and household appliances. Height dimensions are limited by the height of the ceilings, and therefore the height of the cabinet.
Planning the roof and base of the wardrobe
You can skip this step when planning a wardrobe if you decide to make a structure without a bottom and a roof. In this case, the roof will be the ceiling, and the base will be the floor covering.
What could be the base of a wardrobe?
As for the roof, it can be overhead (in the form of a protruding canopy). Or inset, as in ordinary cabinets.
In the first case, the fasteners (confirmations) are screwed in from above. Therefore, it is better to immediately make a removable mezzanine to facilitate assembly.
In the second case, there is a possibility that the wardrobe can be assembled “standing up”, because the fasteners will be screwed in from the sides.
We divide the wardrobe into sections and check the doors
Any internal filling of a wardrobe is a combination of shelves, niches and drawers in vertical sections.
Partitions determine the width of the vertical sections:
- Typically, vertical sections of 500-700 mm in length are allocated for shelving shelves.
- Sections for clothes on hangers can be longer if a longitudinal hanger is used.
- If the wardrobe is shallow and transverse pull-out rods are installed, then the optimal width of the sections for hangers is 600 mm.
When arranging partitions, match their position relative to the sliding doors of the compartment! The shelves should not overlap with them, otherwise “dead” zones will form. Doors should not interfere with the sliding of drawers, baskets, rods and other storage systems.
Wardrobe space planning
When ordering filling individually, you should know that the cabinet is divided into 3 zones:
- Bottom. It stores shoes.
- The middle one houses the main part of the wardrobe; there are pantographs, rods, and shelves with drawers.
- Upper. It is recommended to use it for storing things that are rarely used.
The layout of the closet depends on the number of doors, because each storage unit must have easy access. So, if there are 2 doors, then there should be the same number of sections.
The clothes rail can be different, but the most convenient solution is considered to be 90 cm. For shelves, this parameter is 60 cm. Ease of removing clothes is important. For clothes, the dimensions of the shelf opening should be within 35...40cm. Short clothes on hangers will require an opening 0.8-1 m high, if you plan to hang outerwear, coats, for example, then at least 1.5-1.6 m
Other planning tips:
- The top tier should be made up to 60 cm high.
- It is not recommended to make shelves more than 60 cm deep, because then the folded items will need to be placed in 2 rows, and when you remove what you need from the second row, everything in front of it will fall down. This can be avoided by using large mesh boxes.
- A drawer is suitable for underwear and socks.
- When choosing any retractable system, you need to take into account that it should not interfere with closing the doors. To do this, the handles on them must be recessed or cut out on the pediment.
- Guides on drawers and shelves are important. Cheaper roller ones can only be opened halfway, which means you won’t be able to have access to the entire useful volume. The best solution is guides with closers - they move smoothly, move out quietly and fall into place on their own.
We develop internal content
How to plan a wardrobe inside, how to make its internal contents depends on the purpose of the wardrobe itself and its placement.
For example:
- For the wardrobe in the hallway, they plan to have more hanging space for outerwear, shelves for shoes, hats and bags, narrow drawers for mittens, gloves and other small accessories.
- For a wardrobe in the bedroom, it is better to design more shelves of different heights - for linen, things, voluminous pillows and blankets.
- In a nursery, it is more convenient for a child to use drawers and baskets, there should be more shelves, and hangers under hangers take up less space.
- In some wardrobes, it is important to allocate “household” sections designed to store a vacuum cleaner, ironing board, dryer and other household appliances.
Filling the wardrobe in the bedroom
The predominance of large space in bedroom wardrobe designs determines the constant storage of bed linen and bedding. Clothes compartments, as a rule, are equipped with a pantograph - a retractable bar for hangers, equipped with a lowering device, and a standard version of the bar. The pantograph allows you to make maximum use of the upper volume of the clothing block of the closet.
Also, the filling of the wardrobe in the bedroom consists of the following blocks, compartments and modules:
- compartment where mesh baskets are attached;
- block with the inclusion of an end or conventional hanger;
- a panel equipped with hanging hooks for replaceable and wrinkle-free clothes;
- trouser hangers and tie holders with a retractable mechanism;
- pull-out multi-level drawers storing small items - cufflinks, belts, handkerchiefs;
- on one of the walls it is advisable to determine the place where the iron and folding ironing board will be hung;
- compartments for lower shoe blocks, as well as a compartment for slippers.
Removable and rigid shelves, mezzanines
Let us repeat once again: in free-standing wardrobes under the mezzanine ceiling, it is better to make the mezzanines removable. In this case, sliding doors can be from floor to ceiling, or separate for the lower and upper parts of the cabinet. True, the design for these two options will be different.
If the wardrobe has a separate mezzanine, with its own sliding doors, its design will look like this.
If single doors from floor to ceiling are planned, then the bottom of the mezzanine is recessed to the level of the remaining shelves and partitions of the internal filling of the wardrobe.
The seam on the side of the wardrobe divided in this way will be almost invisible if the color of the chipboard is correctly selected and the texture is cut. However, it can always be “covered” with decorative side shelves or any other extension.
If we talk about the aesthetics of the sidewall, then the numerous holes from fastening the shelves do not add “beauty”.
To avoid making holes in the visible sides of the wardrobe:
- If possible, sections with shelves are placed in the central part, as was written earlier.
- They use hidden fastening in the form of furniture dowels and an eccentric tie.
- Alternate rigid fastening of shelves with removable ones.
Non-standard solutions
Sometimes the type of room requires a non-standard solution for installing a cabinet. For example, for a hallway with a dead-end or narrow shape, it is better to use a built-in structure. This option is more economical. The role of the side and rear walls in it is played by the walls of the room. The components are also fixed on them. Such modules do not have an independent ceiling and floor. To make a built-in wardrobe, you only need doors, guides for them, durable fittings, additional structures, and fasteners.
The height of such a wardrobe, as well as the width, depends on the size of the niche. Doors are designed to fit the distance from floor to ceiling. The depth can be adjusted as desired. Layout of a suspended ceiling in a built-in structure is not recommended.
This model of wardrobe will help you use every centimeter of space to your advantage. But you will have to disturb the decoration of the walls.
Another non-standard option is sliding wardrobes with built-in appliances or furniture (TV, bed, computer desk).
When installing a system with TV, the equipment is either hidden behind sliding doors or part of the system is made open.
With the help of the latest technologies, it has become possible to mount a TV in a closet door. For its manufacture, a special, more durable material is used, which significantly increases the cost of the product.
You will be interested in: Features of extensions to the house: types and nuances of construction
Using a wardrobe in a children's room, you can intelligently divide it into a sleeping area and a work area.
Arrangement of a corner wardrobe
The corner model occupies a non-standard room area. Its interesting design complements the interior in an original way. It is great for small rooms, capacious and roomy.
The shape of a corner wardrobe can be:
- L-shaped. Occupies walls and the corner between them.
- Trapezoidal. Asymmetrical option.
- Diagonal. The inside has a triangular appearance. It is usually installed between windows or doors on adjacent walls.
- Five-walled. The most massive option.
The large depth of a corner wardrobe can be not only a plus, but also a minus. Therefore, its internal layout is thought out to the smallest detail.
It is better to allocate space in the corner for a rotating stand or a two-level bracket with hangers. In the deepest part, hang seasonal clothes or those that are rarely worn.
The outer spaces are equipped with shelves and drawers. If the closet is in the hallway, then you should place shelves for shoes below.
Often corner models require additional lighting inside.
Checking the rigidity of the structure
With a built-in wardrobe design, the rigidity of the shelves and partitions is ensured by fastening them to the walls at key points. Long shelves for heavy, large items are reinforced with the help of special console holders.
Everything else is fixed with ordinary plastic commander corners.
If the wardrobe is free-standing, then in the design of high and wide niches for outerwear, as well as under long shelves (longer than 700 mm), it is necessary to plan stiffening ribs.
Otherwise, the finished product will be extremely unstable and shaky. Any distortions negatively affect the movement of the sliding doors; the doors begin to jam, or even roll to one side (the side of the distortion).
Part of the function of the wardrobe's rigidity is taken over by the rear wall.
About methods of fastening the back wall of a wardrobe.