Finishing overhangs with boards
If you look at old houses, you will see that the roof overhangs of most of them are either not covered at all or covered with boards. This is due to the fact that at the time of their construction there was no alternative to wood. Compared to modern soffits, wood cladding has a number of serious disadvantages.
- Wood is a fire hazard.
- Compared to modern materials, the board is the heaviest.
- Wooden cladding is afraid of dampness.
- Vulnerable to fungus, mold and insects.
- Over time, the boards dry out and crack.
- With the help of wooden cladding it is difficult to provide the required level of ventilation of the under-roof space.
Against the background of these shortcomings, the advantages of soffits made from modern materials appear even more clearly.
Soffits for roofing: materials
There are several types of soffits: with partial and full perforation, or blind soffits for lining the roof. The size of the spotlights, similar in design to conventional siding, reaches a width of up to 0.8 meters, which increases the convenience and speed of their installation. They are usually made from plastic, aluminum, galvanized or copper.
Let's take a closer look at the types of materials, assessing the advantages of each.
Metal soffits for roofing
Metal products are made of molded galvanized steel, onto which a protective coating is applied - pural, primer or polyester. Being lightweight, they are durable, easy to install and cost reasonable money.
Copper soffits for roofing
The most expensive, but also the most durable - will last more than a hundred years. Under the influence of the external environment, over time they become covered with a patina, which further protects the metal.
Aluminum soffits for roofing
The advantages include their non-flammability, immunity to temperature fluctuations and color fastness of the protective coating. Aluminum panels are also very light.
The listed types of panels are susceptible to corrosion and the negative influence of atmospheric air to varying degrees; metal soffits are afraid of even slight damage to the protective coating.
Plastic soffits for roofing
Perhaps the best option in terms of practicality, price and quality. Vinyl soffits for roofing are very light in weight, they are technologically advanced, because plastic is much easier to process and allows you to easily create the most complex shapes and types of connections.
Plastic panels are easy to cut, which greatly reduces labor costs and will greatly simplify the work if you do it yourself without any experience in such installation. The material easily withstands temperatures from -50 to +60 °C, is not afraid of rust, mildew and mold, is not flammable, and retains its original color for a long time.
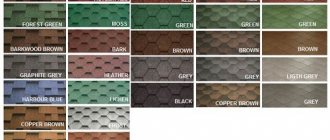
If the colors of soffits for roofing for products made of aluminum and galvanization are determined by the protective coating, then plastic soffits are painted in the mass. This is convenient, since mechanical damage that occurs during transportation, installation or operation - abrasions, scratches - will not be noticeable. For example, you can familiarize yourself with the products: the color options presented in their range will suit any roof design.
Do not try to connect soffit panels from different manufacturers in one design - they will not match the locks, so a high-quality connection of the panels on the same plane will not be ensured.
How can you organize roofing?
Manufacturers offer an extensive list of materials and systems that can be used to hem the roof. Among the most popular among developers are the following:
- Wood paneling or board . The thickness of the finishing material must be at least 2 cm. It must be dry and of the highest quality. Finishing with such material has a disadvantage: it is susceptible to the negative effects of precipitation and temperature changes.
- Profiled sheet . Made of galvanized steel sheet, the surface of which is coated with a layer of polymer. Thanks to this, corrugated sheeting is resistant to mechanical damage, as well as the development of corrosion. During installation, it is necessary to leave small gaps through which ventilation will take place.
- Plywood . Consists of several layers connected with glue. The presence of phenol-formaldehyde in the glue makes plywood resistant to moisture. The disadvantage of such a binder is that particles of phenol-formaldehyde are released into the atmosphere over time.
- Soffits . They take the form of plastic panels, the design of which provides for the presence of holes for ventilation. This filing is resistant to precipitation, temperature changes, and UV rays. Roof soffits can be made of different materials, which determines their quality and properties.
What is the best way to hem the roof?
According to experts, soffits are the most profitable, practical and effective material for roof lining.
Design and types of spotlights
In essence, soffit is siding for lining the roof overhang. Soffits are molded panels with interlocking elements to connect the elements, just like regular siding. Soffit panels differ in perforation and design.
A fully perforated soffit does not interfere with the free passage of air, while preventing the entry of water, insects, and birds. Such elements are used for lining attic overhangs and provide a large flow of air into the under-roof space. Thanks to frequent perforation, complete ventilation is ensured - this promotes timely evaporation of condensate and does not allow mold and mildew to develop in the under-roof space.
Using soffits with partial perforation, you can regulate the intensity of ventilation of the rafter system. Such panels are used if the attic of the house is not heated and too much ventilation is not required - while providing ventilation effectively, these panels eliminate unnecessary heat loss.
Panels without perforation are used to hem those areas where there is a danger of snow drifting or moisture ingress during rain.
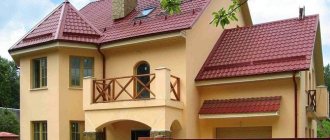
Construction of roof overhangs, their benefits and purpose
An overhang is usually called the lower part of the roof protruding beyond the level of the walls of the house. It protects the foundation and walls from rain. Its width can vary from 40 centimeters to a meter. In principle, according to construction rules, it is not at all necessary to file this part of the building.
However, some troubles may occur. For example, a strong wind, creeping up from the side under an unprotected roof overhang, can simply tear off the roof covering. And I want to hide the underside of the roof along with all the layers of its “pie” - waterproofing, insulation and the ugly lower part of the rafters. According to the rules, the roof is hemmed after all roof installation work. Also, before this, all external walls of the house must be insulated and finished. That is, filing is a kind of final stage in the construction and exterior decoration of your home.
Pediment and cornice overhangs and their differences
There are two types of overhangs - horizontal, also called cornice and pediment. The eaves overhang is formed by the lower part of the pitched roof, and the gable overhangs are the inclined overhangs formed by the side of the slope.
#1. Cornice overhang.
It makes up the underside of the sloping roof, facilitating the passage of air into the attic. This is typical for attic-type roofs. But on attic roofs, air enters through the overhang into the “roofing pie” - where there is an air gap. Then the air continues its path upward, all the way to the ridge. This is how roof ventilation occurs.
Now let’s imagine that the overhang will be tightly packed, for example, with boards. It will be bad - ventilation will not be provided. However, if the roof is not sheathed at all, then mice can crawl under the roof, birds or insects can fly in. The rafters will need to be protected with paint, otherwise fog and moisture will damage them.
Attention! From all of the above, we conclude that the lining of the eaves overhang should be made not dense, but ventilated.
This same ventilation can be done in several ways:
- The most basic option is to leave a gap between the building wall and the sheathing. If corrugated sheeting is used for filing, then this gap should be from 0.6 to 1.2 centimeters, for lining or siding - from 1 to 1.5 centimeters.
- For such options for lining roof eaves as metal sheets, slabs or lining, you can use ready-made ventilation grilles that are mounted into the material.
- If the overhang is sheathed with boards, for ventilation, gaps are made between them, from half a centimeter to a centimeter.
- Using soffits, you can use perforated material created specifically for these purposes.
Rule No. 1. In terms of volume, ventilation openings cannot be less than one five hundredth of the total area for ventilation. At the same time, roofing based on bitumen, as well as seam type, requires a larger diameter of these holes than clay tile roofing. After all, the latter still “breathes.”
Rule No. 2. All ventilation openings must be covered with grilles. If these are cracks, then we use a mesh. This measure will protect them from dirt, leaves, insects and birds.
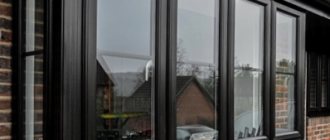
An example of a cornice overhang sheathed horizontally. Photo: krovmart.ru
#2. Gable overhang.
It is formed by the side part of the slope, located at an angle. Here you don’t need to worry about ventilation, but you should take care of proper protection from wind and moisture. Otherwise, strong winds blowing in gusts can drive rain between the sheathing boards that protrude outward. And this is already serious, since the insulation can get wet, ceasing to retain heat well.
Attention! Therefore, when working with the finishing of a gable overhang, tightness comes to the fore.
An example of a gable overhang.
Plastic soffits for roofing: installation
There is nothing overly complicated about installing spotlights; almost anyone who knows how to hold a tool in their hands can handle it. Actually, from the tool we need:
- Hacksaw or knife
- Screwdriver
- Ruler
- Roulette
- Level
- Marker
- Self-tapping screws with press washer
- Ladder or trestles - since the work is carried out at height.
In addition to the soffits themselves, you will need trim strips, which can be purchased in the same place where the soffits are purchased.
Mounting options
There are two common methods for lining roof overhangs with soffits: horizontal and diagonal.
With diagonal, the soffit panels are hemmed parallel to the roof plane, and the fastening profile is installed directly on the rafters. The roof slope with this installation method should not exceed 25 degrees.
This method is used quite rarely, since it is more labor-intensive and increases the consumption of material - after all, the area of the hemmed overhang in this case increases several times. And such a roof looks, with the exception of rare designer finds, very old-fashioned, and therefore is not popular.
With the horizontal method, a frame box is assembled under the overhang, and the soffits are mounted on it. This method takes less time, reduces the consumption of spotlights and eliminates the need for fastening work in hard-to-reach places at the junction of the roof and walls.
Instructions for filing overhangs with soffits
Depending on the manufacturer and the material used to make the soffits and additional elements, the rules for installing soffits may differ. Therefore, always read the manufacturer's instructions. In this case, we will consider lining the roof overhangs using vinyl soffits.
There are several design features for fastening soffit panels:
1. First, measure the J-profile of the required size; to do this, apply the profile across the overhang and apply a mark.
2. You can cut the profile to size using a grinder; everything is cut quickly, and the cut remains smooth.
3. After this, the profile is attached to the wooden frame using self-tapping screws.
4. After all the profiles are fixed, measure the distance between the two profiles to find out the size of the soffit strip. After this, the soffit strips are cut to the required size.
5. To install the plank, it is first inserted into the wall overhang and then into the eaves overhang and secured with self-tapping screws to the wooden sheathing.
6. If the J-chamfer is not used when hemming, then the frontal part of the overhang is also covered with soffits.
Installation technology
Do-it-yourself roofing with soffits is not difficult.
We will consider the horizontal filing method - as the most popular and least labor-intensive. The process is divided into several stages.
1. Preparation.
At this stage, you need to arm yourself with a tape measure and make sure that all rafter legs are the same length. After this, a cornice (so-called “wind”) board is attached, to which the drainage system brackets will subsequently be attached.
2.Marking.
We measure the length of the overhang and the distance from the wall to the wind board, after which we cut the soffits and guides to the required size. When cutting, it is necessary to take into account that there should be a gap between the end of the soffit panel and the guide strip to allow for thermal deformation of the panel - usually it is made 5 mm on each side.
If you use a power tool to cut plastic parts, then you need to make the cut at minimum speed, preventing the material from melting.
3. Lathing.
First, a 50x50 mm block is attached to the wall of the house at a level with an overhang. The same block is attached to the underside of the cornice board. At this stage, it is important to monitor the level - the bars must be located in the horizon, otherwise the entire structure will be skewed. Between the two bars, strips are mounted to which the soffits will be sewn.
4. Sheathing.
Two J-profiles are installed at the wall and at the eaves board. Next comes the turn of pre-cut soffits for lining the roof: installation begins with a fixed starting strip. The panels are fastened into a lock and pulled to the frame with self-tapping screws and a press washer.
Vinyl soffits experience thermal deformation when the external temperature changes. During installation, you should avoid rigid fastening and do not tighten the screws by about 1-2 mm to allow the panels to move when the linear size changes.
The choice of components - starting and finishing strips, fastening strips, as well as connecting profiles, depends on the design of your roof and the method of lining it. Rotations of overhangs are performed using an H-profile or a pair of J-profiles.
If you find it difficult to choose the necessary fasteners yourself, then you should consult with a specialist from the company that sells the spotlights.
Two main methods of filing overhangs
The variety of options for lining roof overhangs is great. This can be done perpendicularly and parallel to the overhang, using whole sheets or individual strips, using various materials and designs for fastening parts. However, in essence there are only two filing technologies.
Eaves hemming directly along the rafters
This is perhaps the easiest. The main thing is that the plane at the lower ends of the rafters is common. This method is suitable primarily for roofs with a small slope, no more than 30 degrees, and a projection of no more than 40 - 50 centimeters. They are hemmed along a sheathing made of boards or bars and screwed to the rafters. Hemming strips can be placed parallel to the wall, along the end of the rafters, or they can be placed perpendicular to the plane of the rafters.
An example of a cornice overhang sheathed along the rafters. Photo: dom.germanovich.com
Binder horizontal
It is indispensable when the roof has a steep slope. At the same time, installation is quick, and material is significantly saved. To work, you need to build a so-called box from beams, attaching it to the wall and to the rafters (top and bottom). So that water that gets onto the overhang can easily drain, the beam located on the rafters must be a centimeter lower than the wall beam. Boards are nailed from the corners of the roof to the corners of the house. When the overhang is more than 45 centimeters, you will need another longitudinal beam in the middle. The remaining longitudinal beams are reinforced with bars, filling them perpendicular to the wall.
An example of installing sheathing under horizontal sheathing of an overhang.
Hemming of the gable overhang - always along the sheathing
In this case, we do not pay attention to the method of filing the eaves overhang. Timber or boards are attached directly to the sheathing. Cladding strips are attached to these beams or boards running along the pediment.
Errors when installing spotlights
- The decorative covering of soffits is prone to fading in direct sunlight. This point should be taken into account during installation.
- Often there is poor quality or insufficient fastening of guide strips, which over time can cause a number of soffit panels to slide along the entire length of the roof overhang.
- No thermal gap between the panels and the guide bar.
- Lack of locks on the connections of the guide bars.
As you can see, anyone who knows how to hold tools in their hands can handle the installation process. The main thing is to do everything carefully and accurately - and you can easily transform the appearance of the roof of your home, giving it a complete modern look.
Step-by-step instructions for installing spotlights
The specific algorithm depends on the characteristics of the rafter system, the size of the overhang, the types of rafter legs and other conditions. To carry out the work, you should prepare measuring tools, a grinder with a metal disc, a screwdriver or screwdriver, a mounting knife, and a level. All work is divided into several stages.
Preparatory stage
Calculate the required number of planks, decide on the list and nomenclature of additional elements. To work you will need the following items.
Soffit panels.
- They cover all areas under the eaves and side sections of the roof slopes. The quantity is calculated after measuring the length and width of the overhangs; for unforeseen expenses, the amount received should be increased by at least 5%. If the frame has a complex shape, many different polygons, triangles and trapezoids, then waste increases, the stock should be increased. It is recommended to purchase at least two types of panels with different numbers of perforated holes; this will help adjust the size of the vents as technically necessary.
Profile-H for soffit
It is better to install the soffit on wooden slats 30×50 mm; it is recommended to impregnate the surfaces of the lumber with antiseptics.
Making a frame for the soffit
Quite an important stage; the final appearance of the binder depends on the correctness of its manufacture.
Step 1. Using a long water level, mark the wall at the level of the bottom plane of the cornice board. To do this, place the tool against the board and press the other end against the façade wall.
Align its position horizontally and make a mark on the wall. Prepare such marks at all corners of the building where the soffit will be nailed.
Preparing marks in all corners of the building
Step 2. Draw a horizontal line on the walls. This can be done using a long water level or a special tapping rope. If you work with a level, then the line is made in parts; the horizontal position of the upper plane of the tool is constantly checked. If there is a slight variation in height at the end, that’s okay. Connect the last segment of the line to the previously drawn horizontal mark.
Using upholstery rope is much faster, easier and more accurate. One end is applied in one place, and the second on the opposite side of the wall. The rope is pulled tightly, then raised slightly above the wall and released. After the impact, a perfectly straight line of blue powder is formed on the wall. The disadvantage of this method is that traces of blue may remain on a smooth, light wall. It is impossible to remove them, and after the rain dirty streaks will appear.
Horizontal line mark
Conclusion. If the facade walls do not have a finishing touch, then it is better to use a beating rope. If they are already completely finished, then professionals recommend drawing the line using a level and an ordinary carpenter's pencil.
Step 3. Attach the slats for the soffit frame to the wall.
If the house has insulation and the façade walls are made of foam blocks or wood, then for fixation it is better to take long fast-installation hardware.
For them, only the corresponding hole is drilled, the hardware is driven into it without additional elements. For brick or concrete walls you will have to use dowels; they are more difficult to work with. You must first drill holes in the rail and wall separately and constantly check that they match. Then insert the plastic elements of the dowels into them and only after that fix the slats with dowel nails.
Step 4. Attach slats along the entire length of the gutter belt. At the same time, pay attention that their lower edges are located in the same plane with the slats attached to the facade. The horizontal transfer must be done very carefully using a water level. When marking, do not forget to take into account the height of the J-profile, otherwise the frame will not be horizontal, but slightly inclined. The rail is screwed to the cornice board using ordinary wood screws.
Another photo of the process
Important. The width of the frame depends on the technical parameters of the soffit strips. Find out from the instructions what maximum distance they can withstand without additional stop points. There are slats that do not sag along the length of up to 80 cm; for them there is no need to complicate the frame by installing additional thrust slats. But you can find cheap soffit strips that begin to sag at a length of 40–50 cm.
If you have thin planks, then you need to increase the number of fixation points, and accordingly, make one or more longitudinal lines for fastening. They are screwed to slats installed on the wall and gutter belt. Then a long strip is fixed to these crossbars; it will serve as an additional support point for the spotlights.
Frame in the process of installation
At this point, the manufacture of the frame is completed, you can begin installing the soffit elements.
Soffit installation
We have already mentioned above that the work does not belong to a complex category, but requires increased care when marking and cutting off structural elements.
Step 1. Screw the finishing strip around the perimeter of the frame. If there is a need to connect two short strips into one long one, then this must be done in the following sequence.
- Using tin snips, cut off part of the flat surface of the plank from one end. The length of the platform is approximately 2–3 cm.
- Carefully remove all burrs and check for correct cutting.
- Insert the profile of the prepared plank into the profile of the whole one and push it in until it stops. The length of the connection section depends on the parameters of the cut perforated area.
Professionals strongly recommend connecting elements only in this way, and not with end-to-end screws. The fact is that plastics have fairly large coefficients of thermal expansion; during heating/cooling, visible cracks or swelling may appear in the joints.
Step 2. Attach the slats using special wood screws with flat heads, do not tighten them with great force; the slats should be able to shift slightly along the length and compensate for changes in linear dimensions. In the corners, file the elements at 45°.
Using the same algorithm, finish the entire frame prepared for the soffit. Take your time, be careful with each operation. The soffits are located at a high altitude; it is quite difficult to eliminate deficiencies discovered during the operation of the house.
Frame for soffit
Proceed with installation of panels. Elements of the system can be cut with a hacksaw, electric jigsaw, scissors or a grinder with an abrasive disc. The last tool works faster and easier than all the others.
Step 3. Take measurements of the frame width. If the size is the same along the entire length, great, this allows you to prepare all the elements at once, rather than measuring each piece separately.
Important. Remember to leave a gap of approximately one centimeter between the slats and panels to accommodate linear expansions. If work is done in hot weather, then the gap can be reduced slightly; if in cold weather, then it should be increased.
Panel installation diagram
Step 4. Insert the panel into the lock of the far trim strip, located near the facade wall. Then bend the element a little and insert it into the lock of the near bar. Connect the locks. If there is an additional fixation point, then screw the panel to it with a self-tapping screw with a wide head. A sign that the two panels are correctly connected to each other is a click, which indicates that the locks are tightly closed. Install the panels using the same method before turning the soffit.
Step 5. Mount the H-profile connecting strip. If there are different angles on the facade, then the process of fixing the plank becomes somewhat more complicated. This is done as follows.
- Press the bar with a clamp to the intended mounting location. Make sure that its middle is located exactly at the tops of the corners.
- Using a level or ruler, transfer the lines of the walls onto the plank. There should be two lines on its surface, the point of intersection exactly along the axis of symmetry. The angle between the lines will be the same as the angle between the walls.
- Cut out the element in the shape of a triangle, install one end of the strip in its place, and clamp the other with a clamp.
- Apply a level to the inner surfaces of the J-profiles and transfer their extension to the strip.
- Cut off the excess part. Attach the finished plank in the corner of the structure.
Installing the bar. Marking
Fastening the strip in the corner
Thanks to such actions, you will get an exact copy of all the corners, the joint will be smooth. Minor deviations from 45° will not be noticeable.
Step 6. Install the panels in the corner. This is somewhat more difficult than installation on straight sections.
Installation should be performed in this sequence.
- Insert the panel into the lock already assembled, carefully mark two points of contact with the bar.
- Remove the panel, draw a line between the points and cut off the excess.
- Place the prepared panel in place.
Installing panels in the corner
Close the corner all the way. In order to have a herringbone joint in the corner, the second part of the panels should be installed at right angles to the first. One line of eaves is complete, continue installing soffits around the entire perimeter of the building.