How to do a budget bathroom renovation: an affordable option
There are different options for renovating a bathroom. Some of them are especially inexpensive. Let's take a closer look at each stage of the necessary work.
Pipe replacement
If the bathroom is small, then the meterage of the pipeline is insignificant, so you will need few plastic products for water supply and sewerage. Specialists know how many additional products will be needed for connections, transitions, installation of taps, etc., what diameter the main pipes should be, how to stretch them and create conditions for operation. At this stage, saving can backfire. Rather than changing the pipes yourself, it is better to invite an experienced plumber who will properly install the new pipeline system.
USEFUL INFORMATION: How to lay tiles on a wooden floor in a bathroom
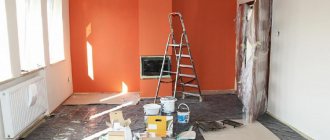
Surface preparation
After removing the old coating, all defects in the walls, ceiling and floor are revealed. The first ones are re-plastered, and the screed on the lower surface is renewed. For these works it is advisable to use cement mortar. It is not as expensive as modern building mixtures with special components. In addition, good quality gray plaster is a strong base for cladding.
Cosmetic finishing
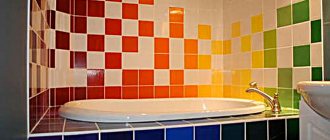
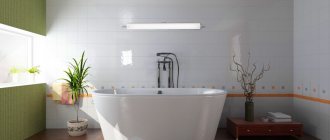
- For a budget option for decorative bathroom finishing, paints made from latex or acrylic are used. They are moisture resistant and have good performance properties. Of course, it is best to cover all surfaces in the bathroom with tiles, but this is an expensive solution. The tiles can be partially applied: make a half-meter edging around the bathtub and sink from white squares, and paint the rest of the walls and ceiling in the color you like;
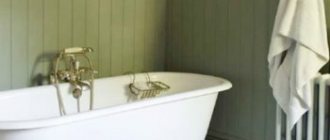
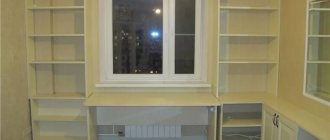
- A good option for the ceiling is a stretch fabric made of synthetic material. It is inexpensive because its area is small and the amount of work for installers is insignificant. Lasts quite a long time. When using it, you can save on restoration of the base. The canvas will hide all visible defects;
- An economical solution may be to decorate the walls and ceiling with plastic panels. But not those that are attached to the sheathing: they eat up part of the space and require additional costs for related parts. It is necessary to use canvases that are glued to a special compound directly to the surface. However, for this it is important to align them as accurately as possible;
- the floor requires special attention, since it is used the most. There is no need to skimp on tiles here. This is the best coating for the lower base in all respects. But based on the overall size of most bathrooms, you won't need much. In addition, matte relief products, which are most suitable for bathrooms, are slightly cheaper than glossy and smooth ones.
USEFUL INFORMATION: Bas-relief, what is it? Bas-relief in apartment decor, on the ceiling and walls
Plumbing
Nowadays, a lot of items for performing hygiene procedures are sold, differing in color, shape, size and materials from which they are made. Naturally, they differ in price. If there is no need for a daily bath, you should think about installing a shower stall. It will save space and money, as it is compact in size and costs less.
If you have a limited budget, you can get by with simple models of sink and toilet if the apartment has a combined bathroom. The latter may have a different mounting method and drainage system design. This affects the price. The functionality and comfort of expensive and cheap items are almost identical, so you shouldn’t spend money on something exclusive.
Floor covering
The finishing option depends on the repair estimate and the condition of the old bathroom flooring. Sometimes just refreshing the appearance of the tiles is enough. To do this, you will need to remove the grout and select a new one that matches the color of the tile.
It is quite simple and cheap to lay linoleum, but this measure will be temporary. An increased level of humidity in the bathroom provokes the development of mold on the linoleum.
Comment! Avoiding negative consequences during budget repairs will allow you to purchase linoleum based on PVC or without a base at all.
When renovating a bathroom, tiles are more practical, even at a budget price. The cladding is carried out without dismantling the old tiles. The screed will require labor and time. To renovate a bathroom floor, choose tiles with a rough texture to avoid slipping and cause injury.
If you have an extremely limited budget, the most economical option would be to purchase a large rubber mat that will maximally cover the free space of the bathroom floor. It can be changed much more often than any stationary coating, and a fresh look for the interior will be ensured at minimal cost.
Floor and ceiling finishing
Tiles and wall panels are two of the most economical options for decorating bathroom walls.
The technology for covering walls with plastic, if given step by step, is as follows.
- The optimal frame for wall panels is pine timber (30 by 30, 25 by 30). To prevent wood from rotting, you need to treat the material with special compounds before installation.
- The frame is attached using self-tapping screws; holes with plastic sleeves are pre-drilled in the concrete.
- Next comes the fastening of the panels; you can use a special stapler or resort to the same self-tapping screws.
Before making inexpensive repairs, it is better to calculate the number of tiles. A tile layout program can help with this. The top row cannot be trimmed; a preliminary calculation will help save on rework.
- Layout is done from the second row; the bottom row will need to be done after the floor is installed.
- Armed with a water level, you need to mark points located at the same height in the corners of the bathroom.
- Then a line is struck as a guide; you can use a chockline.
- The walls are covered with tile adhesive; for this purpose it is convenient to use a notched trowel.
- Next, glue is applied to the tile, and the product is attached to the wall. It is imperative to check the evenness of the installation with a level. The next tile is glued in the same way.
- Spacer crosses must be installed between the tiles. The ideal thickness for the bathroom is 3 mm.
- As soon as the tiles have set, the spacer crosses are removed from the seams, and the surface of the walls is thoroughly cleaned using a natural dry cloth.
Grouting joints
The consistency of the grout should resemble warm butter. To do this, it is pre-mixed with water.
- A soft rubber spatula is best suited for grouting.
- After applying the composition, you need to wait 20 minutes, then treat the seam with your finger (wear gloves). This manipulation will deepen the seam.
- The final stage is wiping the grout; this action should be carried out after an hour. You cannot postpone the procedure until the next day.
Sealing corners
There are several methods, the use of which improves the appearance of joints in the toilet and bathroom.
- The corners are rubbed parallel to the seams. The disadvantage of this technique is the difficulty that self-taught craftsmen encounter when grouting internal corners. The mortar ends up on the tile, the seam looks careless.
- White silicone sealant. Manipulations that are almost identical to grouting are performed. The advantage of sealant is color preservation.
- Plastic corners, they can be external or internal. When choosing the thickness of products, you need to know the exact dimensions of the tiles.
- Combined option. Plastic corners are used for external corners, sealant or grout - for internal ones.
Working with the floor and ceiling is in many ways similar to the manipulations performed when decorating walls. However, there are still some differences.
Floor finishing
Floor tiles are the best choice for those who are interested in the question of how to make renovations beautifully and cheaply.
- The floor, leveled with screed, is covered with tile adhesive. Recommended application area is 0.7-1 sq. m, this is due to the instant drying of most compositions.
- The tiles are laid on the floor, carefully pressed to the floor and tapped with a hammer with a rubber attachment. Direction: to the edges from the center.
- The correct installation is checked with a level before the glue dries.
- Lastly, the cut products are installed - around the pipes, around the perimeter of the room.
- The seams are rubbed down and the flooring is cleaned.
We invite you to familiarize yourself with everything about the dimensions of a toilet with a cistern: standard dimensions, volume, weight and selection criteria
Ceiling finishing
The most budget-friendly ceiling design options are suspended structures and putty. Putty is relevant if the bathroom area leaves much to be desired; the material is applied to a concrete slab. A ceiling made of plasterboard or lining is installed in the same way as a wall.
Preparatory work
Preparatory work includes dismantling old plumbing, removing previous finishing materials, waterproofing, leveling, and laying communications. Depending on the “global” nature of the repair, this list may change.
Dismantling of plumbing
Even if replacing the plumbing isn't in your plans, it's best to temporarily remove the bathtub and sink before committing to a budget renovation yourself. It may also be advisable to remove the door.
Dismantling of coatings
An essential part of preparing a bathroom for renovation is removing old coatings.
- It is convenient to knock down tiles using a hammer drill. You should definitely knock off the plaster if it is coming away from the wall.
- To get rid of the paint you will need a wire brush and a spatula.
- The screed under the tile may need to be replaced if large cracks are present. It is convenient to clean the floor down to the concrete base using a hammer drill or chisel.
We suggest you familiarize yourself with How to paint pipes in the bathroom yourself
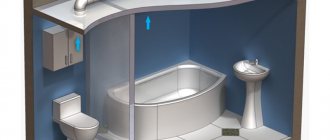
The next stage of work includes waterproofing the floor, installing a leveling screed, and priming.
- The base of the floor is thoroughly dusted, cleaned and primed.
- To create waterproofing, a special film is required. The material is laid on the floor with placement on the walls.
- An alternative to film is to apply mastic using a roller or flat brush. The composition covers not only the floor, but also the lower part of the walls.
- A leveling screed is made on top of the waterproofing.
- For plastering walls, a special composition is prepared - 1 part cement (M400 and above), 4 parts quartz sand (sifted).
- Before plastering, perforated strips - beacons - are placed on the walls. They are mounted on tile adhesive, wood plugs or cement-sand mortar.
- You can abandon plaster in favor of finishing with plasterboard, not forgetting about treatment with waterproofing mastic. Also, the walls under the sheathing should be treated with an antifungal agent.
- To attach moisture-resistant drywall, special glue (for example, Perlflix) or a metal profile is used.
Replacing pipes is a manipulation that follows the dismantling of the old coating. You will have to decide for yourself what to do if the goal is to make repairs in a small room quickly, to change or not to change the pipes. Leaking old communications will make new repairs necessary.
In addition to replacing pipes, it is worth installing new electrical wiring. It is necessary to determine a place for electrical appliances, provide the required number of sockets, and replace the switch and wires.