Help the site, share with friends:
Each of us wants to create a warm and cozy stop in our living space.
We devote a large amount of money and time to creating the perfect renovation.
The flooring can act as a decorative element and become a unique highlight of the kitchen space.
Features of self-leveling floor covering
Numerous photos of self-leveling kitchen floors posted online attract the attention of many homeowners who want to transform their interior. To create such a floor covering, a special liquid mass is used, which is evenly distributed on the base, hardens, forming a durable, perfectly flat surface. The working mixture contains:
- resins;
- fillers;
- additives.
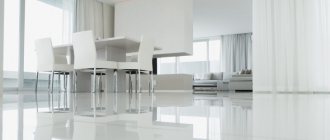
Ideally smooth self-leveling floor for the kitchen
The range of components included in the mass is extensive. With the help of various fillers and additives, properties are imparted that correspond to the purpose of the floors and the characteristics of use. Coloring pigments are added to the compositions, allowing you to create any decor and realize the designer’s creative ideas. Photos of self-leveling floors in the kitchen posted on the Internet can convince you of the variety of these coatings.
The thickness of the layer is selected depending on the type of coating and the degree of load. It can range from 1 to 7 millimeters. Using this technology, you can make a rough self-leveling floor in the kitchen and use it as an ideal base for the finishing coating. But more often these coatings are fine. High aesthetic indicators allow you to create an impeccable interior.
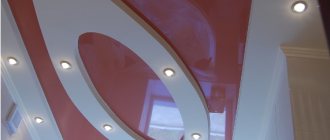
Modern design options
Today, you can make a self-leveling floor in the kitchen in various variations. In most cases, these are plants, flowers, abstraction, monochromatic colors. This type of flooring has no equal.
Floor coverings made using laminate cannot withstand excessive humidity and strong mechanical stress. The drawing is quite often presented in the form of a solid tree.
Decorating the floor with linoleum cannot solve the problem. Decorative elements of the canvas are presented in the form of complex geometric shapes, which become boring over time.
Self-leveling flooring has no analogues in the field of building materials. He is able to create an unsurpassed design in the kitchen.
- Kitchen in oriental style - 105 photos of design ideas. All the subtleties of style combination.
- Ivory kitchen - a gentle and cozy color in the kitchen interior (80 photos)
- Chalet-style kitchen - how to create a stylish and modern design (89 photos)
Advantages of self-leveling floor
The rapidly growing popularity of self-leveling coatings is due to several specific properties:
- solidity;
- environmental friendliness;
- resistance to external influences;
- antistatic;
- strength;
- durability;
- variability;
- ideal aesthetic indicators;
- versatility.
Self-leveling flooring for the kitchen is an ideal option. The mass forms a solid coating without seams or joints, eliminating the possibility of accumulation of dust and dirt, simplifying the cleaning process. These coatings do not emit harmful components into the air and are absolutely safe for people and pets.
The self-leveling floor forms a solid covering without seams or joints
The kitchen belongs to the category of premises with difficult operating conditions. The floor covering must maintain its quality when exposed to moisture and chemicals, hot water, grease, etc. Having installed a self-leveling floor in the kitchen, you don’t have to worry about premature damage to the coating. The material is not afraid of moisture, household chemicals, and high temperatures.
The coating does not create static electricity. Consequently, dust and dirt do not accumulate on the floor, and it is not difficult to keep the kitchen clean. You can place heavy furniture on the floor without fear of damage or dents. The material is able to withstand increased loads.
You can choose any decor for these coverings. There are many photos of self-leveling floors for the kitchen posted on specialized websites; it is possible to choose the optimal design. You can create decor according to an exclusive project, giving the interior an individual character.
The self-leveling floor for the kitchen can withstand increased loads
The self-leveling floor has excellent aesthetic characteristics. This coating can transform a room, make it stylish, fashionable, and extraordinary. If you want to provide the interior with maximum attractiveness, you can choose 3D self-leveling floors for your kitchen in a theme that matches your design style and personal preferences.
The advantages of coatings include versatility. You can create self-leveling floors on different types of bases.
Installing self-leveling floor
Making 3D floors in the kitchen with your own hands is quite simple.
Making 3D floors in the kitchen with your own hands is quite simple. To do this, you need to adhere to a certain cycle of work.
Important: self-leveling floors can be installed on any base with your own hands. This could be a concrete floor, tiles, or even wood flooring. The main thing is that the evenness of the floor is not in doubt. The maximum permissible level of differences on the floor is 4 mm. If distortions are observed to a greater extent, then you will first have to completely dismantle the old coating and fill the screed with a self-leveling mixture.
Preparing the base
Before you fill a 3D floor with your own hands, you need to prepare a base for it.
Before you fill a 3D floor with your own hands, you need to prepare a base for it. It is better to go through all areas of the floor in advance and eliminate any shortcomings. So, if the floors will be poured onto the tiles, then it is necessary to check each tile for solidity. All loose elements of the tiles are removed, and the gaps are closed with putty. In this case, you need to seal all the cracks and cracks in the floor. The tiles must be thoroughly washed and degreased.
If you are pouring 3D floors onto a wooden floor, then all the old boards also need to be replaced, all cracks must be closed with wooden chips or a mixture of sawdust and glue. In addition, you will have to thoroughly vacuum the floor, remove old pieces of paint, varnish and grease. Wash and dry the floor. For a concrete base, a technique must be used to clean and seal all cracks.
After cleaning work, the base under the 3D floor must be primed with a special mixture and wait for it to dry completely. It is better to prime floors with epoxy primer in a well-ventilated area. It is advisable to apply the mixture 2-3 times with breaks to allow the previous layer to dry. Within a day after priming, you can begin further work.
Important: the moisture level of a wooden covering for pouring a self-leveling floor should be no more than 10%, for a concrete base - no more than 4%. And if the screed was poured recently, then at least 28 days must pass from the date of pouring until the installation of the self-leveling floor.
After priming, paste the selected image onto the floor, carefully leveling it.
How to make a plasterboard ceiling with lighting with your own hands in the kitchen
Floor installation 3d
When the base is completely ready, you can continue installing self-leveling floors.
When the base is completely ready, you can continue installing self-leveling floors. First, mix the mixture. The proportions specified by the manufacturer must be observed. For mixing the mixture for one room, a container of 25 liters is quite suitable. The mixture is prepared using a construction mixer. You need to stir the mixture until there are no bubbles in it.
The readiness of the composition is checked in this way:
You need to take a small ring with a diameter of 5 cm and a height of 4-5 cm. This could be a deodorant cap with a cut off bottom. Place the ring on a flat glass and pour the 3D mixture into it. Ideally, the ring should rise slightly, and the liquid should spread in a diameter of 16-18 cm and stop. This is considered the optimal state of slurry for floor grouting. If the diameter of the spread liquid is too small, then the mixture requires water. If the diameter is large, then it is necessary to add powder to the mixture.
Important: to install a 3D floor with your own hands, the temperature in the kitchen should be in the range of +15-+25 degrees, and the humidity should not be higher than 70%.
Types of bulk materials, their features
There are photos of self-leveling kitchen floors made from different materials online. The work uses several types of mixtures that differ in composition and technological characteristics. The working mass can be:
- methyl methacrylate;
- epoxy;
- polyurethane;
- cement-acrylic.
Methyl methacrylate coating has increased resistance to external influences. The material is often used to decorate open areas, as it is not afraid of temperature changes and sunlight. But it can also be used indoors. For the most part, methyl methacrylate is used for industrial premises and warehouses.
Methyl methacrylate coating has increased resistance to external influences
Epoxy resin-based materials are often used in home interiors. The technology for pouring such a floor is complex, since 2 components are involved in the work. It is important to accurately observe the ratio of epoxy base and hardener to obtain a high-quality result. But these coatings have ideal aesthetic characteristics and allow you to create any decor, which ensures their high popularity. On the Internet there are numerous photos of self-leveling kitchen floors made from epoxy materials.
Epoxy flooring allows you to create any decor
Polyurethane coatings are also created from 2 components. These materials also provide complete freedom in choosing decor and have increased wear resistance. A special feature of polyurethane flooring is its minimal weight. This coating puts virtually no load on the base or load-bearing elements of the building.
Polyurethane coating has minimal weight
The composition of cement and polymers was originally created for the design of industrial premises. This coating can be used in extreme conditions and is resistant to any impact. In home interiors, the material is used to create a subfloor on which the finishing decorative coating will be laid.
Cement-acrylic self-leveling floor is resistant to any impact
Types of self-leveling floors
Based on the type of material used for the polymer composition, self-leveling floors are divided into polyurethane and epoxy.
Based on the type of material used for the polymer composition, self-leveling floors are distinguished into:
- Polyurethane. The two-component flooring contains a water dispersion and polyurethane. During the curing process, water molecules evaporate, causing the polyurethane to harden. As a result, such a floor becomes quite hard, but at the same time has some elasticity. In addition, polyurethane floors do not collect dust and have a high level of glossy shine and smoothness.
- Epoxy floors. Here the mixture contains epoxy resin and aqueous dispersion. Epoxy resins are resistant to moisture, dirt, high mechanical loads and aggressive substances.
Thickness of self-leveling floors, hardening speed
Self-leveling kitchen floors differ not only in the type of material. They also differ in the thickness of the layer and the duration of the hardening period. Coverage can be:
- thin-layer,
- self-leveling,
- highly filled.
Thin-layer options are used in the creation of finishing decorative coatings. Their thickness does not exceed 2 millimeters. The self-leveling floor has a thickness of up to 6 millimeters and can be either basic or decorative. With the help of such a coating, small defects are quickly and efficiently eliminated, resulting in a perfectly flat surface. Highly filled floors are rough, used for leveling and creating a high-quality base for laminate flooring and tiles. Their thickness is 6-7 millimeters.
Self-leveling floor eliminates minor surface defects
The drying time of the coating depends on the thickness and components of the mass. Methyl methacrylate floors have a minimum hardening time, and after an hour you can move freely. There are polymer masses that need 2-8 hours to dry. On average, self-leveling floors become suitable for movement within a day after installation. Cement-polymer mixtures are characterized by prolonged hardening, which require more than 2 days for pre-drying.
The cost of self-leveling flooring for a kitchen varies widely. There are many factors that directly influence it. This makes coverage affordable to consumers at different income levels.
Factors influencing the cost of self-leveling flooring
Every owner who wants to use such coatings in the interior is interested in what affects the cost of a self-leveling floor in the kitchen. The fundamental factors in determining the total cost are:
- type of material;
- layer thickness;
- floor area;
- coating structure;
- prices for work.
The most expensive material for creating self-leveling floors are mixtures based on epoxy resin. But this option is optimal for home interiors. Epoxy coatings fully comply with sanitary and hygienic requirements and have increased wear resistance. An important advantage is the impeccable aesthetic indicators, which can be assessed in the photo of self-leveling floors in the kitchen.
Epoxy composition is optimal for home interiors
The material consumption depends on the area of the room and the thickness of the layer, which is an important factor in the amount of costs. Costs also depend on the structure of the coating. Rough and finished homogeneous floors will cost less than three-layer options consisting of a base, decor and protection.
Few apartment and house owners decide to do this work themselves. Most homeowners rightfully prefer professional services. Tariffs for creating coatings can vary greatly from company to company. These materials are laid on various types of surfaces and easily eliminate small defects. But if the condition of the base is poor, preliminary preparation and leveling will be required, which also needs to be taken into account when calculating the cost of a self-leveling floor in the kitchen.
Before laying the self-leveling floor, the surface is leveled
Preparing the floor for work
If you don’t have the funds for a full-fledged repair, instead of expensive specialists, you can easily do the necessary work yourself.
Let's see what problems may stand in your way to a comfortable life built with your own hands:
- When carrying out renovations in a residential area, the flooring will have to be poured in several stages. In addition, household furniture and appliances will need to be constantly moved.
- Thanks to Soviet builders, the current state of the floors leaves much to be desired. Since they put everything there, now it is far from in its best shape. Therefore, we get rid of the old coating completely.
- When dismantling an outdated coating, a transportation problem will arise for the upper floors if there are no freight elevators. Nowadays this is rare.
- After dismantling, carefully mark the vacated space or do a wet cleaning.
- Then measure the floor thickness and total area. For a liquid product you will need a layer of no more than 0.5 cm. It is worth taking into account technical irregularities of a couple of degrees.
- To avoid chips and cracks from mechanical impact, it is recommended to fill with a thickness of 250-350 mm.
Read on the topic: Choosing moisture-resistant and waterproof laminate - general information, types and differences
Worth remembering! Purchasing a couple of bags of solution more than necessary allows for adjustments and additions during pouring.
Let's make an inventory list before uploading:
- Bags of solution, plus a few extra pieces;
- Primer, preferably universal;
- A couple of large buckets;
- Perforator with nozzle.
Design options for kitchen self-leveling floors
An important role in the popularity of self-leveling floors is played by their attractiveness and an unlimited number of decorative options. Coloring pigments can be added to the composition of the material; it is possible to color finished coatings. There are no restrictions in the choice of shades or themes; the choice depends on the specifics of the interior and personal tastes. 3D self-leveling floors create a special atmosphere in the kitchen. Using this technique, amazing underwater, seascapes, and flower arrangements are created.
Extensive possibilities in decorating coatings provide the opportunity to:
- give the interior a certain character;
- emphasize the overall style;
- make a successful correction.
Self-leveling flooring for the kitchen will highlight the overall style
Floors are the most important background element. With the right choice of coating shade, you can maximally emphasize the advantages of a furniture set and fabric decor. Self-leveling floors in the kitchen can be matte or glossy. If you want to provide a classic design with aristocracy and elegance, coatings in muted, calm colors are used. Against this background, wooden furniture sets with “wood-like” facades look advantageous. Modern styles often use glossy floors.
These coatings can be used to add definition to a specific style. In numerous photos of self-leveling flooring in the kitchen you can see options for all popular trends. The specifics of the installation technology and coating structure make it possible to create ethnic ornaments, romantic flower arrangements, futuristic abstraction, etc.
Self-leveling floors in the kitchen can be matte or glossy
Floor decoration can help in beneficial interior correction. For example, in a setting overloaded with small decorative elements, a monochromatic coating will become a balancing element, eliminating excessive variegation. In a faceless, boring interior, a floor decorated with interesting patterns and drawings will become the main accent. Examples of successful correction can be seen in the photo of self-leveling floors for the kitchen.
What you need to know about self-leveling floors
Self-leveling floor is a type of screed made from a special self-leveling mixture. The difference from traditional cement-sand screed is the minimum possible layer of 3.5 mm.
Self-leveling glossy floor for the kitchen
Self-leveling floors are produced in the form of dry ready-mixes, which are mixed with water before use. The composition is based on cement and sand. To improve the properties of the coating, polymers are added to the mixture. Depending on what material is added to the dry mixture, self-leveling floors come in the following types:
- Cement-acrylic. It has the properties of a cement screed.
- Polyurethane. It is impact resistant. Most often used in household work.
- Epoxy. It is resistant to abrasion, but chips on impact.
- Epoxy-polyurethane. Durable material, resistant to shock, abrasion and vibration.
- Methyl methacrylate. It is characterized by high hardening speed and resistance to negative temperatures. Used in industrial premises.
Pouring a cement-acrylic mixture
According to their intended purpose, self-leveling floors come in two types:
- A rough base, on top of which a finishing coating (laminate, tile, linoleum) made of cement-acrylic mixtures is laid.
- Independent floor covering made from polymer mixtures.
Advantages
The self-leveling floor is ideal for kitchen conditions. It has qualities that meet special operating conditions:
- Moisture resistance.
- High strength.
- There are no seam joints where dirt accumulates. The result is hygiene and ease of cleaning.
- Fire safety, resistance to high temperatures.
- Does not react with chemicals, allows the use of household chemicals.
- Wide design possibilities. 3D floors allow you to create both plain coverings and surfaces with images and textures.
- Simplicity and speed of installation.
The disadvantage is the difficulty of dismantling, and due to the wide choice of designs, it is difficult to choose in favor of any option.
Installation features
The self-leveling floor in the kitchen is made in two layers: the first is leveling, the second is decorative. For the first thick layer, a cement-acrylic or polyurethane mixture is used, and a thin decorative layer is made from polymer mixtures with a varnish finish. Before applying the varnish coating, the floor surface can be decorated.
Structure of decorative self-leveling floor
The structure of a decorative self-leveling floor consists of 4 layers:
- Leveling screed made of cement-acrylic mixture.
- Decorative layer (drawing, paint, film with a printed design).
- Transparent polymer.
- Varnish.
The pouring work is carried out using a standard set of materials and tools for self-leveling floors:
- Dry mixture.
- Universal primer.
- Damper tape for expansion gap around the perimeter.
- Moisture meter;
- Laser or hydro level.
- Plastic containers (buckets) – at least 2 pcs.
- Drill, mixer.
- Roller for applying primer and varnish.
- Needle roller to remove bubbles.
- Squeegee for distributing and leveling the liquid mixture.
- Pin beacons.
- Studded shoe attachments (“crampons”) for walking on a flooded surface.
Tools for pouring self-leveling mixture
Work is performed with an assistant. The mixture sets quickly, so the floor is poured in one go, so that there is no layering of fresh mortar on top of the dried one. To do this, ensure continuous preparation of the mixture: after kneading the first bucket, one master pours the solution, and at this time a partner prepares the next batch.
Do-it-yourself installation of a self-leveling floor in an apartment consists of the following stages:
- Preparing the base. Clear the floor from the covering to the concrete base, clean it of debris and dust. Cracks are sealed, protrusions are combed off.
Important! You should measure the difference in the base plane with a level. If there is a slope, perform a rough cement-sand screed.
Leveling the mixture
- Padding. In order not to make a mistake in choosing a primer, it is better to take a universal one.
- Attaching the damper tape around the perimeter.
- Display of beacons. The pins are set so that the layer thickness is within 1.5-5 mm. The minimum and maximum thickness of the self-leveling floor is indicated on the packaging.
- Mixing the solution. The proportions of dry mixture and water are indicated on the packaging. Water is poured into the container, then the mixture is poured. Mixing is carried out until the lumps disappear. After mixing, the working time until the solution sets is about 30 minutes.
- The mixture is poured in sections with a new portion entering the previously filled area. As the pour progresses, the layer is leveled and distributed with a spatula or comb squeegee. The thickness of the layer is controlled by beacons.
- After pouring the floor, roll the screed with a needle roller. The procedure for removing bubbles is carried out until the mixture begins to noticeably thicken, and the marks from the roller after rolling begin to heal more slowly.
After decoration, a transparent polymer is applied. It is leveled with a spatula and rolled with a roller. Finally, the surface is coated with glossy or matte varnish.
Self-leveling coatings with 3D effect
Many consumers consider 3D self-leveling floors in the kitchen to be an invention of today. In fact, the history of this technology goes back more than three decades. It all started with creating three-dimensional images on asphalt. This technique was invented by Italian artists. The expressiveness of three-dimensional drawings attracted the attention of designers, who began to introduce elements everywhere into the design of fashionable hotels and respectable offices.
There are two ways to create self-leveling floors with a 3D effect. The image can be manually applied to the base layer with paints. To add dimension, a clear varnish is applied to the base and covers the design. More often, a different method is used in interiors. In it, an image is printed onto banner material or vinyl film. Varnishes are applied to it, providing a 3D effect. This technique for creating self-leveling floors for the kitchen:
- reduces the amount of expenses;
- expands image selection options;
- ensures quick installation.
Self-leveling floors with 3D effect
Printing images costs less than hand-painted art. Modern technologies provide high transfer accuracy, brightness, saturation, and do not limit the choice of images. The realism of such images is reflected in photos of self-leveling floors in the kitchen. Vinyl and banner fabric are highly durable and have a long service life. This method can be used to decorate floors and walls. The image for the self-leveling floor is duplicated, creating the same accent on the wall.
The disadvantage of floors with 3D effects is the high cost. If you need to save costs on interior decoration, you should give preference to matte finishes with a pattern. They are cheaper and have increased abrasion resistance. It is enough to look at photos of self-leveling floors in a kitchen with this design to be convinced of their attractiveness and respectability.
We prime the self-leveling floor in the kitchen
After thorough cleaning, it is time to move on to priming the resulting pouring base. The application process is very simple and can be done with a brush or roller. In the heat, the primer will need no more than 20 minutes to dry completely.
Fill
Before starting work, place all the bags near the buckets and open them. We do this so that we don’t have to run around in turmoil from corner to corner, but calmly carry out the installation of self-leveling floors for the kitchen in one place.
- After pouring the coating, cover the product with film to avoid cracks. You should carefully monitor the readiness of the floor, as drying occurs unevenly.
- When stirring the solution, the proportions must be observed. Add 5-7 liters of water to one bag of mixture.
- The coating dries quickly, so it is better to think through the entire process of mixing and applying the material in a short time.
- The liquid mixture spreads over the entire base without any help, filling all the corners and voids. Therefore, there is no need for leveling.
- If the solution is thick and has already hardened, forming irregularities, take sandpaper and clean the desired area.
Worth remembering! After cleaning the surface, inspect the entire area looking for holes and crevices. Carefully seal any gaps you find. Otherwise, when pouring the solution, you will flood the ventilation lines of your neighbors.
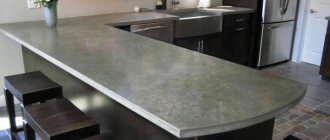
Kitchen countertops
Self-leveling technology is used not only in the design of floors. It is also used for other interior elements. Nowadays, self-leveling countertops for the kitchen are very popular. There are materials that are used to decorate working and dining areas, giving them a majestic, prestigious look and ensuring maximum practicality.
Liquid compositions are used to create monolithic coatings. They are distributed on the surfaces of tables, sinks, and harden, providing a durable, beautiful layer. The self-leveling countertop for the kitchen can be made of acrylic, liquid stone.
Self-leveling countertop for kitchen
Acrylic mixtures are made on the basis of aluminum trihydrate. Fillers using stone chips help create an imitation of natural stone. In liquid stone, more than 4/5 of the composition is granite chips. It is dyed and padded with polyester. This structure:
- gives the coating high strength;
- provides maximum resistance to external influences;
- guarantees complete resemblance to natural materials.
The self-leveling countertop is completely similar to natural materials
Stone countertops have been used in interiors since time immemorial. They are a symbol of respectability, solidity, and high status. Now you can purchase such elements for decoration. But they are expensive and heavy. A self-leveling kitchen countertop eliminates the need for exorbitant expenses. Meanwhile, in terms of aesthetic indicators, it is not inferior to analogues made from natural stone. There is also no need to replace furniture; the material can be distributed on any type of surface: wood, chipboard, MDF, laminated chipboard. A wide variety of decor and a wide range of shades allow you to find the ideal option for any kitchen.