To purchase a ready-made countertop for your kitchen that will fully meet your needs in terms of aesthetics, reliability and functionality, you need to prepare a considerable amount of money. It is much cheaper to make it yourself, especially since it is quite possible to do it at home. This idea can be realized using wood, chipboard, liquid stone or concrete. Among these options, perhaps the most interesting is a concrete countertop, due to the availability of the material and the relative ease of working with it. Knowing the basics of concreting, you can not only make a new work surface in the kitchen, but also restore the old one, which will make it possible to save even more.
Content
- Features of using concrete for kitchen furniture
- Manufacturing of monolithic concrete countertops
- Preparation of materials
- Product drawing
- Creating formwork
- Installation of reinforcing frame
- Pouring concrete
- Surface treatment
- Necessary materials
- Surface preparation
- Applying concrete mixture
- Concrete grinding
- Waterproofing and varnishing
Features of using concrete for kitchen furniture ↑
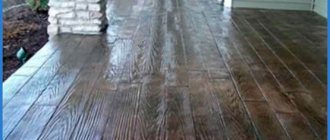
Concrete in its structure is a hard and durable material that can withstand high temperatures. In this regard, it is practically not inferior to granite, although it costs an order of magnitude cheaper. However, the concrete surface has one feature that must be taken into account when making a kitchen countertop. The fact is that concrete consists of pores that can become clogged with various organic substances, which complicates kitchen maintenance. In addition, this material must be protected from acid-containing products, since they can destroy calcium, which is the main binding element in concrete.
Concrete countertop in the kitchen
Note! Even a drop of lemon juice can have a negative effect on a concrete surface, leaving behind a stain.
This drawback is easily eliminated with the help of a protective polymer layer, which is applied to the concrete after it hardens. A concrete countertop with such protection is easy to clean and retains its appearance for a long period. However, it is not recommended to use such a surface as a cutting board or place a hot frying pan on it, since, unlike concrete, the polymer coating is less resistant to such loads.
A concrete countertop without a polymer coating can be used in a living room, bedroom or office where there are no strict operational requirements
Nuances of use
A tabletop made of epoxy resin, made by hand, has its own characteristics in operation. Firstly, the material tends to turn yellow from sunlight, and sometimes from heat. If you plan to place a table in a southern room or kitchen, as well as in a poorly protected garden gazebo, buy a base with a UV filter.
Secondly, the cold sometimes causes flakes or grains to form on the countertop. You can return it to its original appearance by heating it to 40-60 degrees.
Thirdly, epoxy resin is not very suitable for countertops used in kitchen conditions, since it can emit toxins when heated. If you want to place such a table in the kitchen, cover the surface with a protective transparent varnish. Best of all - designed for yachts.
Manufacturing a monolithic concrete countertop ↑
The production of concrete furniture is based on standard technology that is used in construction. To make a concrete countertop with your own hands, you need to complete several steps, each of which is important in its own way.
Preparation of materials ↑
Since the kitchen countertop in our case is made of concrete, we need to prepare the main components for its production:
- cement;
- sand (preferably river);
- crushed stone or marble chips;
- water.
Advice! To make the countertop look like marble, granite, or have any other shade other than gray, a special pigment (color) is added to the mixture, which can be purchased at any hardware store.
Concrete dye
To make the formwork you will need a wooden beam 50x30 mm and moisture-resistant plywood 12 mm thick. As a base, instead of plywood, you can use a sheet of laminated chipboard of appropriate thickness. The main thing is that the base is perfectly flat and does not succumb to deformation under the load of the slab.
Considering that we will be making the tabletop ourselves, we will need the following set of tools:
- shovel;
- bucket or other container;
- construction mixer or concrete mixer;
- Master OK;
- jigsaw;
- screwdriver;
- sander;
- tape measure, level, pencil.
Product drawing ↑
The importance of a high-quality sketch is difficult to overestimate. The correct drawing greatly simplifies the work, but the wrong one adds headaches to the process of installing the countertop. It is very important to accurately measure the parameters of the kitchen, the location of cabinets and plumbing fixtures. If it is necessary to place a sink or hob, then the space for their installation must be calculated down to the millimeter.
Example drawing of a concrete countertop
Advice! If the overall structure has significant dimensions, then it is better to divide it into several parts to simplify the process of installing the slab.
Creating formwork ↑
We lay a sheet of plywood or chipboard on a flat surface, after which we transfer the previously prepared drawing using a ruler and pencil. On each line we install a wooden beam 50x30 mm, so that in the end the thickness of our tabletop is 50 mm. It is this parameter that is considered optimal for a concrete product: reducing the thickness will make the structure fragile, increasing it will make it too heavy.
The fastening of the formwork walls must be strong enough to withstand the load created by the concrete during its curing. It is better to connect the joints of two walls using corners or long screws (from 60 mm).
The location of the sink depends on the type and size of the plumbing fixture. There are two types of sinks: built-in and overhead. The second option has a horizontal side about 30 mm wide, which must be taken into account when drawing up the drawing.
Advice! If you decide to make a kitchen countertop from concrete, then it is better to use an overhead sink. Firstly, built-in models have a landing chamfer, which is not so easy to make. Secondly, the presence of a side allows for a small error when creating a hole for the sink.
It is also necessary to provide a hole for the mixer. To do this, you can use a plastic pipe with a diameter of 35 mm (the standard size of the mixer mounting pipe).
Formwork for pouring a concrete countertop
Installation of reinforcing frame ↑
The frame is a steel mesh with a cell size of 25x25 mm. This structure must be placed inside the formwork so that it is at a distance of 25 mm from the plywood and walls.
Before installing the reinforcing frame, a polyethylene film is laid on the base. Its edges need to be placed on the side boards. At the same time, it is very important that the film lays down without folds, if you do not want to observe their imprint on the concrete slab.
Increasing load-bearing capacity with steel frame
Pouring concrete ↑
Concrete for making countertops with your own hands is made according to the classic recipe:
- 1 share of cement;
- 2 shares of sand;
- 4 shares of filler;
- 0.5 parts water.
At the first stage, cement is mixed with water until a homogeneous mass is obtained, after which the remaining ingredients are added to the mixture. The concrete preparation process itself must be performed at low speeds, thoroughly mixing the solution.
Important! Do not increase the amount of water in order to prepare the mixture faster. Excessive moisture content in the solution will cause many pores to appear after it dries.
After pouring and evenly distributing concrete over the entire area of the formwork, it is covered with film and left in this state for a day. After 24 hours, the film is removed and a wet cloth is placed in its place to prevent cracks from occurring. After 48 hours the formwork can be dismantled.
Pouring concrete solution
Surface treatment ↑
The kitchen countertop must be perfectly smooth, so the front side is sanded. For such purposes, it is better to use a sanding machine, since manual surface treatment with sandpaper will take a lot of time and effort.
First, the slab is sanded using a coarse-grained wheel. After obtaining a smooth surface, processing is carried out with fine-grained sandpaper. Despite the fact that the polished concrete countertop already looks great, it still needs to be sealed with water-repellent polymer impregnation.
The last stage is grinding with a felt wheel using a special paste, after which the slab acquires “marble” characteristics.
Grinding a concrete slab for the kitchen
Preparation of material
Epoxy resin can be combined with various materials, since there are no special requirements for their physical properties. Only the use of powdery and liquid substances that can form suspensions is not allowed. Usually the tabletop is decorated with wood, metal or plastic. A kitchen countertop should not only be beautiful, but also environmentally friendly, so wood is the most suitable option.
Not everyone can choose the right wood. If the step-by-step instructions determine the sequence of actions, starting with the preparation of the epoxy mixture, then the preparatory work, as a rule, is rarely considered. However, this stage should be given due attention.
It is necessary to understand that a bright wood pattern with a clearly defined outline of the fibers will look more interesting under a layer of transparent resin.
At the same time, the wood must be dry, since moisture will form small bubbles in the area of contact with the epoxy, which will significantly affect the appearance of the design. The ideal option is a slab, which is a longitudinal cut of a tree trunk of arbitrary thickness. To preserve the natural picture, the saw cut is not processed or trimmed. The presence of bark or knots will only add originality to the picture.
Insufficiently dried wood will inevitably lead to cracking of the tabletop or its unpredictable warping in the future.
After selecting the wood, you need to plan how it will be laid out inside the future slab. One option is to imitate a river. To do this, two boards are laid at the base, and a space is left between them, which will subsequently be filled with tinted resin. The planks are adjusted to each other or laid on the slab in a chaotic manner. Interesting options are obtained by using round dies formed by cross-cutting the trunk. If desired, the boards can be polished, trimmed and compared edges, and made into shapes using a router. In this regard, there are no clear instructions, because everything depends on capabilities and imagination.
The next step is very important. Wooden elements need to be treated. If the boards are processed, they should be sanded and dust particles should be thoroughly swept away. But in the case when the bark is left, its integrity will have to be ensured. Pay attention to the condition of knots and wormholes. Pieces of wood that have begun to rot should be removed immediately. The relief is cleaned with a brush.
Expert opinion
Oleg Vasiliev
Master of making furniture and interior items from epoxy resin. She creates unique items to order in her own production.
Ask a question to the master
You cannot do without a sufficiently powerful vacuum cleaner or blowing with compressed air. Tree bark itself is a rather fragile and non-solid material. At the same time, it is very porous and when left on a slab as a decorative element, it almost completely has to be impregnated with epoxy resin. Otherwise, cracking from the main mass is inevitable.
Treatment with stain helps to emphasize the design. The fiber structure becomes more contrasting. As an option, burning wood with a blowtorch is considered. To prevent remaining small particles of chips and dust from getting into the resin, each element is coated with a layer of primer. In order to save material, it is permissible to prime with a thin layer of epoxy resin, but you need to prepare just enough of it to cover all the elements. It is still too early to prepare the main composition.
Useful to know > How epoxy resin figures are made, step-by-step master class
If there is a complex terrain, you will have to do some more preparatory work. All cavities, pores and irregularities are filled with liquid resin. The filling areas are heated to allow air to escape from the cavities. If this procedure is neglected, then when pouring the base layer, an air bubble may form, and getting rid of it will be much more difficult.
After the cavities are filled, the surface is sanded again and the element is coated with a thin layer of resin. Any additional manipulation increases the production time by several hours. Manufacturing requires planning according to your schedule, as it may take several weeks for one countertop.
Restoring an old countertop using concrete ↑
Concrete can be used not only for the manufacture of a monolithic slab. With its help, it is quite possible to restore an old surface. Moreover, the costs in this case will be much less. Below we will look at how to restore an old kitchen countertop with your own hands.
Required materials ↑
Since a very thick layer is not required in this case, instead of the usual mortar we will use a concrete mixture to screed the floor. For work we will need the following materials:
- concrete mixture for screed (finish);
- acrylic sealant;
- concrete varnish;
- container for preparing the mixture;
- 2 spatulas (20 mm and 10 mm);
- sandpaper;
- industrial mixer;
- Sander.
Note! The amount of concrete mixture must be determined based on the coverage area. Typically, material consumption is indicated on the packaging and averages 1.2-1.5 kg per 1 m² with a layer thickness of 1 mm.
Cement-based floor leveling mixtures
Surface preparation ↑
Kitchen countertops are often made of MDF, which can develop scratches, chips, temperature defects and grease stains during use. Before applying concrete, the surface must be cleaned of all contaminants. Pay special attention to any remaining fat - you can remove it using kitchen detergents. If there is silicone sealant on the surface, then it should also be removed, since concrete has poor adhesion to such materials.
Once the surface is completely clean, it should be sanded with 25-H or 20-H coarse sandpaper. The purpose of this process is to improve the adhesion of the concrete to the old surface by creating multiple scratches. After sanding, the countertop should be washed and allowed to dry thoroughly.
Preparing the surface for concreting
Applying concrete mixture ↑
The technology for making concrete mixture can be read on the packaging. Usually it is diluted with water in a ratio of 2 to 1. The main thing is that the consistency is not too liquid or thick, since in this case the process of applying the solution to the stove will become more complicated.
Advice! First, prepare a small portion of the mixture to determine the amount of water to obtain the optimal viscosity. In the future, strictly observe this proportion. Even minor discrepancies can affect the shade of dried concrete.
Concrete is applied to the surface of the countertop using a wide spatula, while the ends are treated with a narrow spatula. Spread the mixture over the surface using slow and smooth movements to reduce the chance of bubbles forming. The thickness of the applied layer should not be large - 1-2 mm is enough.
Distributing the concrete mixture over the countertop
Grinding concrete ↑
After the layer has completely dried (about 24 hours), the concrete countertop is sanded using coarse sandpaper. Pay special attention to the smoothness of the surface - no unevenness should be felt when moving your hand.
Note! Grinding concrete is quite a dirty job. You need to be prepared for the fact that dust will be everywhere in the kitchen. Therefore, it is better not to do such work without a painting mask.
To make a reliable kitchen countertop with your own hands, you need to apply 3-4 layers of concrete, each of which is sanded after drying. If coarse-grained sandpaper is used to process the first layers, then the last layer, in addition to roughing, is subjected to finishing sanding using fine-grained sandpaper.
Polished surface of concrete countertop
Waterproofing and varnishing ↑
To protect concrete from moisture, a special acrylic-based sealant liquid is used. It is applied with a regular paint brush and, after drying, creates a reliable waterproofing layer. This material absorbs very quickly and dries completely within a day, after which the second and final layer of sealant can be applied.
To ensure that the countertop has a glossy finish, after waterproofing, a layer of concrete varnish is applied, which takes from 4 to 8 hours to dry, depending on the temperature in the room. After the varnish has dried, the slab is polished using fine-grained M14 sandpaper.
DIY concrete countertop for the kitchen
In conclusion, we would like to add that although the manufacturing technology of such a countertop is not particularly complicated, to implement it you must have skills in working with concrete. Therefore, in the absence of such construction experience, it is better to use professional help.
Table top mold
You will need it if you want to make it completely out of epoxy, without using anything as a supporting surface. For the form, you can take glass of the required size. It is thoroughly washed, wiped dry and degreased with acetone. Then the surface is rubbed with wax mastic, which after a third of an hour is polished with a dry rag. The sides can be made of aluminum corners; if you want perfectly smooth edges of the tabletop, buy polished ones. The inner surface is treated with a mixture of turpentine and paraffin. They are attached to the glass with window putty.
All of these procedures are required to ensure that the epoxy resin for the countertop does not stick to the mold, and the finished product is easily removed from it. However, if you intend to insert the surface into a “frame”, you do not need to worry about the smoothness of the cuts. in this case, the sides can be assembled from any available material and sandwiched with polyethylene or rubber - epoxy will not stick to them.
Otherwise, everything is simple: prepare the solution, bring it to the desired consistency and pour it. To obtain a varied structure, you can tint the resin with water-insoluble dyes or add inclusions to it - small pebbles, fragments of colored glass, etc.