The space under the roof in each private house is used differently. Some users prefer to store memorabilia there or arrange dressing rooms, while for others it is a full-fledged living room in the attic, which is commonly called an attic. The history of attic floors goes back hundreds of years. Many buildings are built with a residential roof space, as this is economically beneficial. After all, it is enough just to increase the angles of inclination of the slopes and their height, and due to this there is no need to build a full-fledged second floor, which would require a lot of effort and additional expenditure of funds.
Of course, attics have not only financial advantages over houses with low attics. Another advantage is that the volume of living space increases noticeably; in the presence of attic windows and small balconies, it is possible to achieve an attractive appearance of the building; the percentage of heat loss through the roof is reduced, due to which heating costs will be noticeably reduced and much more. It is also worth noting that it is possible to complete the attic even in houses where this floor was not originally planned and you will not need to hire heavy equipment or professional builders; all the work can be done even with your own hands. We can say that the advantages of a residential building with an attic are obvious, but we should talk in more detail about what options for finishing the attic exist.
Features of the room
The peculiarity of the attic premises is that its walls repeat the configuration of the roof of the building. In this case, three options are possible:
- Triangular roof
The least favorable option, in which you can stand at full height only on part of the room area.
- Part of the walls is a continuation of the walls of the previous (first) floor
The option is good for life, but offers little in terms of savings during the construction phase.
- Reasonable compromise
In this example, a “broken roof” is used, the lower part of which is inclined by 60-70°, and the upper part by 15-30°. This solution saves on reducing the vertical walls of the building and ensures comfortable use of the attic area. In private houses built in the 0s and 10s of the 21st century, the creation of an attic is provided for at the design stage and the roof is given the appropriate shape. At the same time, having completed work on the first residential floor, they continue to complete the house as necessary. It is advisable to immediately provide windows for lighting the future living space. They can be placed in gables. Here, a conventional design is used, or special “dormer” windows are cut into the inclined surfaces of the roof. The latter is more difficult and more expensive. In case of a break between the commissioning of the first floor and the equipment of the space under the roof, it is advisable to finish the attic walls with inexpensive plasterboard.
Selection of finishing material
The interior decoration of the attic is made from a variety of materials. Here, as they say, “Options are possible.” Let's look at the main ones:
- Lining is a thin, 8-10 mm thick board, with a working part width of 95-96 mm, with a groove on one side and a tenon on the other; Depending on the quality of the wood, classes Extra, A, B and C are distinguished. Extra and A have a surface free of visible defects. Class “B” allows “live”, i.e., knots that do not fall out. Possible chips and dents. The size of the listed defects should not be more than 3 cm per 60 cm linear meter. Class "C" is often an outright marriage. Its use is limited to utility rooms.
- Imitation of timber - edged board, the front part of which has the profile of a timber. Its width is greater than that of the lining and starts from 145 mm. Thickness – at least 18 mm. The boards are connected to each other using a “groove-tenon” connection. In terms of quality, they are classified as “Extra”, A, B, C, as well as mixed AB and BC. All classes of imitation timber are produced using the same technology. Sorting is carried out only after the complete completion of the technological process.
Important! Lining and imitation timber are made from both deciduous trees, such as linden, and coniferous trees, such as spruce and pine. Both deciduous and coniferous wood are used in the decoration of attics. You just have to take into account the rule: the less resin in the tree, the more suitable it is for a sauna and swimming pool. And vice versa, resinous conifers for the interiors of rooms without high humidity.
- Plywood is a multilayer material obtained by gluing 3 or more layers of veneer. The number of layers is assumed to be odd to ensure the same direction of the fibers in the outer layers. General purpose plywood is produced in accordance with GOST 3916.1-96 and GOST 3916.2-96, where the first refers to plywood with outer layers of hardwood veneer, and the second - from coniferous.
Important! Before being used in attic construction, all wood materials, including general-purpose plywood, must undergo double impregnation with an antiseptic or fire-bioprotective compounds that protect the wood from damage and fire.
Advice! Do not place undue reliance on the ability of wood treated with fire retardant to resist fire! The ability to resist fire appears, but is extremely limited.
- OSB, MDF, chipboard - various types of particle boards:
- OSB (OSB) - oriented strand board - a multi-layer “pie” of wood chips, with the addition of boric acid and synthetic wax, glued with various resins;
- MDF - from the English “M” - “Medium”, “D” - “Density”, “F” - “Fibreboard”, which can be translated as “medium density wood fiber boards”; made from wood waste, including bark; by preliminary grinding, subsequent cooking and pressing with the addition of lignin, if necessary;
- Chipboard - more correctly written chipboard - a material made from wood chips impregnated with urea-formaldehyde resins, phenolic or melamine binders, followed by hot pressing and sanding.
Reminder! Pressed slabs are not treated with fire-bioprotective compounds.
- Drywall is a material that is a sheet 6–12.5 mm thick and consists of two layers of cardboard with hardened gypsum dough between them. The composition of gypsum includes various fillers and additives in order to increase the consumer properties of the material.
- PVC panels are sheet plastic material for finishing walls and ceilings indoors. Made from polyvinyl chloride with various additives.
Finishing technology
Finishing the attic floor with plasterboard, imitation timber, wood chip boards or PVC panels includes a number of stages and begins with drawing up a project for the reconstruction of the attic space. It is necessary to take measurements of the existing attic and draw sketches from them, from which the layout of the future attic will become clear. Here the location of the stairs, windows and partitions is determined if it is planned to separate several rooms from the attic volume. Next, they move on to drawing up a design project. When reconstructing “with your own hands”, you don’t have to go into excessive detail, but it is necessary to decide on the basic materials, their types and quantities. Based on the results, a list of materials to be purchased is compiled. At this stage, it would not be superfluous to think about possible replacements of the original sizes and sections of the molded timber required for constructing the attic frame with those currently available for sale. Stage 1 of preparation of materials ends with the purchase, delivery and storage. It may also include the treatment of timber with fire-bioprotective impregnations, performed twice with mandatory complete drying after each application.
Let's move on to stage 2 - preparing the attic and marking it. It is better to do this work together. It's faster that way. Based on the sketches, the installation locations of the main frame racks are determined. Their sizes are specified. An opening for the stairs is drawn on the attic floor.
Important! The opening for the flight of stairs should not cross the load-bearing beams of the interfloor floor. If it is impossible to avoid removing part of such a beam, it is necessary to provide for modification of the floor so that the load acting on the removed part is distributed to other structural elements.
Stage 3 - assembling the frame for the walls and ceiling will require the performer to have basic woodworking skills. The tools you will need are a screwdriver, a drill, a hacksaw, a hammer, a carpenter's hatchet, and chisels. Having a miter saw is helpful. The frame is assembled using nails and screws, using metal fasteners such as corners. The attic frame elements are connected to the roof frame. Thus, the roof rafter, being connected to the attic ceiling rafter, forms a truss, the load-bearing capacity of which is higher than the sum of the similar indicators of these rafters in an unconnected state. After installing the racks and rafters of the attic frame, they are connected to each other by crossbars - horizontal beams, as well as by jibs - beams running from rack to rack at an angle, forming stiffening elements - triangles - in the frame.
Stage 4 - frame sheathing includes insulation of the attic. The choice of insulation is a task whose solution is trivial, so we will focus on only two options: the traditional one - insulation with basalt insulation and the relatively innovative one - sprayed polyurethane foam. The first is budgetary - the work is done independently. The total thickness of insulation layers for central Russia is recommended to be at least 200 mm. Since the insulation is made up of rectangular slabs 50–100 mm thick, it is laid in 4–2 layers.
Important! The joints in the layers must not match! Before installation and after installation, do not forget to install vapor barrier membranes. We pay attention to which side of the membrane will face the insulation. Usually this is the smooth glossy side, but exceptions are possible. Therefore, we check according to the instructions included with each roll of membrane. The distance between the vapor barrier and the insulation is 20 mm.
Insulation with sprayed polyurethane foam is more expensive than that discussed above. Performing it requires special equipment and skills. Therefore, you will have to invite professionals. But this method insulates the premises without leaving cold bridges. It is believed that 100 mm is sufficient for the Russian climate. When concluding a contract, the customer should request that closed-cell polyurethane foam be sprayed, since this insulates better.
Upon completion of laying the insulation into the walls and ceiling of the attic, we install the electrical wiring. We place the wires in pipes (metal or plastic) or in a plastic corrugation. The placement of lamps, switches and sockets is determined in advance
Stage 5 - finishing the gables. Even if skylights are installed in the roof, windows of a conventional design are placed in the gables. Often they repeat the shape of the pediment itself. The outer side of the gable wall around the window is finished by analogy with the wall of the first floor, or an original finish is invented. It all depends on the preferences of the home owner. Finishing the inside of the wall is a task solved by the designer in conjunction with finishing the remaining walls and ceiling of the attic.
Stage 6 - finishing with plasterboard. The inside of the attic walls and the ceiling are covered with sheet material, such as plasterboard. The technology for installing drywall is well known. Therefore, we will focus on the details:
- drywall will not crack if it is attached not to wooden parts, which will change dimensions over time, but to metal profiles specially designed for installation;
- Sound insulation will be better and the wall will be stronger if you install plasterboard sheets in 2 layers;
- In bathrooms and on the ceilings of living rooms, special moisture-resistant plasterboard is used.
DIY attic interior decoration
Before proceeding directly to finishing, it is necessary to perform some preparatory work. If you plan to build another living space in the attic, then all surfaces must be insulated. The choice of technology for carrying out thermal insulation work depends entirely on the material that was used during the construction of the house.
The attic is characterized by its simplicity and sloping roof. Here you need to install high-quality double-glazed windows. To reduce moisture levels, it is recommended to regularly ventilate the room.
Also, skylights are an integral part of the exclusive interior of the attic. Load-bearing beams can be used as decorative elements, provided they are positioned correctly.
The arrangement of the attic is most often carried out in houses with a sloping roof. One of the slopes is steep, and the second is more gentle. You can make an attic out of an attic only by raising the room slightly in height.
Before final finishing, it is necessary to insulate the walls and gables. If these elements have already been insulated during the construction of the house and its exterior decoration, then this stage should be skipped.
The following materials have excellent thermal insulation characteristics: lining, fiberboard, plasterboard and OSB. If you are installing a kitchen or bathroom in the attic, you need to properly prepare the floor. The more airtight it turns out, the better. To do this, it will be necessary to create a special design. This is easy to do with your own hands.
First of all, a waterproofing mixture must be applied to the floor surface. Insulating tape is laid at the joints. Next, the entire floor surface is primed. The primer is also applied to joints and corners coated with sealant. After the sealing of the floor is completed, you can begin laying OSB and finishing material.
Insulation of the attic with extruded polystyrene foam
Insulating the attic with mineral wool
Frame installation.
A simple wooden structure can act as a frame. For large areas, it is recommended to give preference to metal. To build the frame you will need the following equipment:
- Screwdriver.
- Self-tapping screws.
- Suspensions.
- Glue.
- Drill.
In the case of a metal frame, you may also need a grinder and a tape measure. First of all, you need to do the marking. Next, the guides are secured around the entire perimeter of the room. The next stage is the installation of vertical profiles. They should be at the same distance from each other (approximately 60 cm). The profiles are attached to the base with self-tapping screws.
If the choice was made in favor of a wooden frame, then the beams used must be thoroughly dried. If there are traces of mold or blackness on them, then such elements are not suitable. The service life of the slats can be increased by treating them with a protective compound. The beams, just like the profiles, are fastened with self-tapping screws. If everything was done correctly, the frame will be reliable and durable.
Metal carcass
Installation of wooden sheathing
This is a very important stage. The attic needs protection from moisture and drafts. Waterproofing material is sold in rolls. Cut pieces of the required size are attached to the base with a stapler or wooden blocks.
Each subsequent canvas must be laid overlapping the previous one. This approach will increase the degree of sealing of the entire structure. In addition to protecting against moisture, waterproofing material also improves sound insulation characteristics.
The most popular insulation material is mineral wool. It is produced in the form of rolls or mats. This is a completely affordable material that even a person without any specific construction skills can use. Mineral wool is placed between the frame elements. The layer density should be as high as possible. Fixation is carried out with glue or liquid nails. It is also worth making sure that the insulation does not interfere with normal air circulation.
Facing.
You should choose finishing materials for the attic with special attention.
In the attic you can set up a gym, a billiard room, an office, a bathroom, a bedroom, a guest room, etc. Finishing materials will help bring your design ideas to life, among which the most popular are wooden panels and plasterboard.
The use of wooden lining allows you to create eco-friendly interiors in the classic Russian style. There is no need to cover the entire room. It is enough to cover only the ceiling and walls. Drywall is used less frequently for attic cladding. It is more relevant when it is necessary to erect partitions. After installing the slabs, they need to be wallpapered or painted. In any case, each type of finish has its own characteristics.
Billiard room
a guest room
Personal Area
Gym
Before proceeding with the interior decoration of the attic space, it is necessary to carry out a certain number of preparatory works. To create a functional living space under the very roof of the house, it is necessary to carry out additional insulation of all surfaces. The technology for carrying out thermal insulation work largely depends on what insulation options were used during construction.
We suggest you read: Where on the site is it better to place a bathhouse?
The attic is a fairly spacious room with a sloping roof, in which it is necessary to install modern double-glazed windows. Regular ventilation of rooms will help maintain the required level of moisture.
In addition, skylights in the attic floor will help create an exclusive interior design. Well-placed load-bearing beams of the structure can become an excellent decorative element. The photo shows design options for the rooms on the top floor.
Most often, attics are installed in those houses where the roof is sloping. One roof slope is made steep, and the second flat. In order to turn an ordinary attic into a functional attic, it should be slightly raised in height, along the entire perimeter of the house.
When preparing the attic space for final finishing, it is necessary to carry out work on insulating the gables and walls. This should be done only if their insulation was not provided for at the stage of exterior finishing of the house.
It should be noted that many finishing materials have excellent thermal insulation characteristics. These include lining, OSB boards, plasterboard or fiberboard. If you plan to arrange a kitchen or bathroom under the roof, then it is worth allocating additional time for preliminary preparation of the floor. It is better to make the floor completely sealed. To do this, you create a simple building structure with your own hands.
First of all, the entire floor surface is treated with a special waterproofing mixture. After this, insulating tape is glued to the joints. Subsequently, a primer mixture is applied to the entire surface of the floor, including corners and joints coated with sealant. OSB boards and the material selected for finishing can be placed on a completely sealed and level base.
Frame installation
To decorate a small attic space, you can create a wooden structure. If the area under the roof is large, then a metal structure will be needed. To build a frame with your own hands you will need:
- screwdriver or drill;
- pendants;
- self-tapping screws;
- glue for insulation.
If a metal frame is provided, then first of all, markings are carried out, then guides are firmly fixed along the perimeter of the entire floor. Vertical profiles are installed at a distance of 60 cm from each other. They are attached to the base using self-tapping screws.
If the frame is wooden, then the wooden beams must be dried before work. There should be no blue, black or mold marks on the slats. To increase the service life, the wooden material is treated with a special protective agent. Wooden beams are attached using self-tapping screws in a similar way. A correctly installed frame with your own hands will allow the structure to become as strong and reliable as possible.
Before you start decorating the attic space with finishing materials or OSB, the interior rooms need to be insulated and protected from drafts and moisture. Material for waterproofing houses is produced in rolls, which need to be cut into pieces of the required size. To secure the waterproofing, you can use a construction stapler or ordinary wooden planks.
The canvases are secured with a slight overlap - this allows you to create an absolute tightness of the structure. Waterproofing will not only protect the premises under the roof from moisture, but will also create additional noise and sound insulation.
Mineral wool is most often used as insulation. Insulation can be found in mats and rolls. Available and inexpensive material will not cause any problems even if you insulate the house yourself. Mineral wool is laid out in a dense layer between the frame parts. The insulation is attached using liquid nails, glue or wooden slats. The insulation should be laid in such a way that there is room for full air circulation.
Facing
Arranging an attic requires a special approach to the selection of finishing materials and original design solutions. In the photo, decorators offer various options for decorating the attic space.
On the top floor of the house you can create a wonderful guest room, a billiard room, a mini gym, a personal office and even a bedroom with a small bathroom. To implement a design idea, you can use various finishing materials, but the most popular are plasterboard, wood and OSB board finishing.
Decorating with wooden clapboard will create a wonderful, environmentally friendly interior in a rustic style. It is not necessary to cover the entire room with wood; it is enough to decorate only the walls or ceiling. Decoration with OSB boards or plasterboard is used less frequently; this building material is more suitable for creating interior partitions.
Billiard room
Ideas and design options
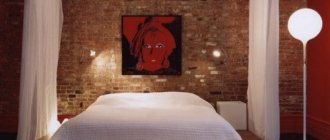
The slanted walls of the attic, the view of the sky through the windows located in the roofs, the landscapes that seem to enter the room through the gable windows - this creates charm. It is not for nothing that so many artists began their path to fame in the attics of Montmartre. The photos below will help you, inspired by ideas, to create your own “space under the roof” design
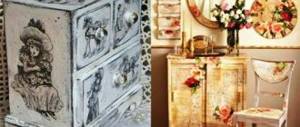
Photos of attic finishing options
The attic can have different types. The simplest one to arrange is the attic roof; sometimes it is quite difficult to make, but the compensation will be the space under the roof.
Gable roof
A gable roof is a completely different project. Here, pillars play a huge role - fragments of the “supporting” structure of the roof. If there are no racks, the roof slope reaches the floor, and the usable area is significantly reduced. When the racks are included in the project, their height reaches 2 meters, the attic significantly gains functionality.
Photo. Interior decoration of a wood-clad attic with a gable roof and 80 cm high posts
The most difficult thing is to design a hipped attic. The more kinks in the roof, the more difficult it is to arrange the interior ergonomically.
Attic without racks
If the attic is devoid of studs, only 65% of its area is available for arrangement. This is a high area where a person can walk.
Photo. The bed is located under the roof slope, saving space
If the roof is not supported by a rack, you need to think about how to create convenient storage space in the corners of the slopes. This way you can get voluminous space for storing seasonal clothes, bed linen, and towels. Furniture will have to be custom-made to the exact size of the space to be used.
Under the bevels you can place:
- rack;
- long shelves;
- bookshelf;
- sofas, beds - but you need to step back a little so as not to hit your head on the ceiling.
A height of 80-120 cm means that there is a small wall under the roof. An inconspicuous low wall significantly improves the functionality of the attic space. Slope can be used in different ways:
- put a bed, sofa;
- put a desk, dressing table;
- equip a bathroom with a bathtub and toilet;
- set up a small kitchen.
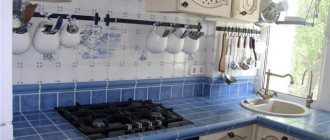
In the case of a bathroom, you need to check whether the toilet can be used freely. They rarely make a kitchen in the attic, but if you like this idea, this space can be successfully used. A wall jamb measuring 120 cm is suitable for installing a floor-mounted kitchen cabinet. In an attic kitchen you will have to give up hanging cabinets; you can complement the kitchen set with open shelves; such trends in the kitchen are popular in 2020.
A height of 140-150 cm is most optimal. At a distance of 50 cm from the bevel, a person can move freely without tilting his head. Here you can place:
- comfortable seating area,
- dining table with chairs,
- bed with a high frame.
If a child's room is located here, you can create an excellent place for play in a low area. This attic is a real treasure, it combines interesting architecture with a solid dose of ergonomics.
Apartments on the top floor are the dream of many. The attic helps to create a unique atmosphere with an elegant design. Skillful finishing will allow you to maximize the potential of the attic!
Examples of decorating an attic room using various materials.
- How to transform a garden plot
- Bathhouse in a modern project
- Country house in minimalist style