Useful tips
If you want to decorate your interior, start with a simple craft, such as a vase, which can be made from old plastic or glass bottles
using paper, twigs, tubes,
newspapers and magazines
, and many other materials.
There are a huge number of master classes on making vases with your own hands.
Some of the most interesting
and at the same time quite simple vases you can find here.
DIY paper vase. Kaleidoscope of flowers.
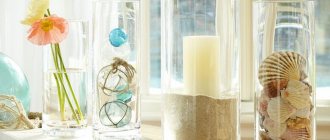
An ordinary glass jar or bottle can be turned into a colorful vase. To do this, you just need to cover the container with small pieces of corrugated paper of different colors.
It is better to use a container made of transparent glass, and for gluing the paper you can use either a special glue for decoupage or regular PVA glue, which must be diluted with water in a 1:1 ratio.
How to make a vase from paper. Colored stripes.
You can use corrugated paper to cover glassware with stripes.
You will need:
- glass container
- corrugated paper in several colors
- glue
- scissors
* First you need to choose a suitable range of colors for the vase - these can be only cool colors or only warm ones. Or you can choose colors that symbolize something, for example, a flag.
1. Prepare corrugated paper and cut it into strips.
* Stripes can be of different widths.
2. Apply glue to the bottle in the place where the new strip will be.
* When gluing, make sure that the strips of paper overlap each other slightly.
* You can glue buttons, rhinestones, etc. on top of the strips.
DIY bottle vase. Decorate with thread.
A very beautiful vase can be made using a bottle and colored yarn.
You will need:
- yarn (ribbons)
- decoupage glue (or PVA glue)
- bottle
- scissors
* To ensure that the thread sticks well to the bottle, use decoupage glue (you can replace it with PVA glue).
* Considering the fact that the glue dries quickly, it is better to apply it to a small area of the bottle's surface.
* The thread must be wound tightly, and it is advisable that there is no gap between the threads.
* You can decorate the bottle with one yarn, or you can use yarn of several colors.
* Threads can also be replaced with colored ribbons.
It is worth noting that the ribbons can be glued to a regular tin can, and you will get a beautiful, elegant vase.
* You can decorate containers of any shape in this way.
Here is another option, only rope is used instead of threads:
Selection “Do-it-yourself floor vase: secrets, techniques and unexpected solutions”
What makes our home truly cozy? Of course, nice and stylish little things! Floor vases can become an important element that complements the design of your apartment or house.
And here's good news for you: you don't have to spend a lot of money on expensive designer new items. Floor vases can be made with your own hands, and from fairly ordinary raw materials! Today you will learn how to make a beautiful floor vase from waste material with your own hands, easily and efficiently.
Ready to create? Then let's go!
Sometimes you can create the most unusual things from the simplest materials. Look at this vase, would you think that the basis for it was the familiar three-liter jars? That's the same!
Admit it, did you want one for yourself? Then take out your reserves of creative energy from your pockets and go ahead!
Let's create the base of our vase. To do this, take two jars, fasten the bottoms with silicone glue, and glue an upside-down saucer to the neck of one of the jars. It will serve as a stable leg for the future masterpiece.
Then we cut off a plastic container from canned food and attach it to the neck of the top can with glue. Let it dry overnight.
During this period, we can soak pre-shredded cardboard egg trays in water until completely limp. After this, the cardboard should be squeezed out thoroughly and mixed with PVA glue until a homogeneous mass is obtained. Apply the slurry to the base of our vase in an even layer. Leave for two days.
After the workpiece is completely dry, level the texture with alabaster.
In this form, the vase is completely ready for the final stage of finishing - decoration. Use your own imagination or the tips we will give below.
Another chic option for waste-free use of garbage. Don't throw away plastic bottles, you can use them to create real masterpieces for your home!
A floor vase from plastic bottles can be made in different styles. For example, a regular five-liter bottle with a cut-off neck, wrapped in thin birch bark, can be an excellent option.
Idea: “Dress” a plastic bottle in a stylish “sweater”, crocheted or knitted. This know-how will pleasantly surprise guests and fill your home with comfort and warmth.
DIY vase (master class)
You can very easily make an original vase from a jar. You just need clothespins and the tin itself.
In addition to the fact that such a vase looks beautiful, you can also put a small glass of water in it, and put small forest flowers in it.
* It is better not to pour water into the jar itself.
*You can add a flower or a heart made of colored cardboard to decorate the craft.
Vase made of metal pipe: master class
How to make a unique vase from metal pieces? If there are any profile metal pieces left, they need to be cut off exactly along the edge. This pipe will become the basis for a durable product. Take toilet paper or paper towels and cover the entire diameter of the pipe; no empty spaces should be visible. You can create small folds in parallel. Next, dark paint is required; the pipe is painted with it. The paint is applied in two layers, the second layer is applied after the previous one has dried.
Instead of black paint, you can use dark blue, deep turquoise, blue, or purple. But in this case, you will need to make more layers to complete the coloring. Each layer will saturate the previous one. It is important that the metal pipe is not visible behind layers of paint.
Next, the floor vase is decorated with beads, seed beads, and beautiful buttons. The bottom of the vase can be made in an interesting way - using polyurethane foam and profile pieces or a solid piece of metal base. The floor vase is placed on a stand, and the gap between the bottom and the product is sealed with foam. When the foam dries well, you can decorate the product. Spray paint is often used for this - this way the PVC craft will be beautiful and unusual and will decorate any room. In addition, PVC allows the product to be durable. Due to the fact that the bottom is fixed using foam, you don’t have to worry about it being damaged during transportation.
How to create a beautiful vase from a cardboard tube
If you have a thick cardboard tube, you can also make a beautiful product out of it that will become the highlight of the room. You will need the following materials and tools: glue (any kind, but it’s better to use PVA), masking tape (it is used to connect cardboard pieces together, and also to hide the joints of pipe pieces). Any type of fabric can be used for decoration. In addition, you will need paint - bronze or gold (and in general this is optional, depending on the previously invented option).
You will also need materials to further decorate the vase. A cardboard tube can be decorated with small or large beads, different sizes and colors of beads, beautiful buttons, and sequins. The cardboard pipe is cut into three equal parts (the work is performed in the same way as a plastic pipe). Then, using wire or gluing with glue, the pieces are connected. After that, the cardboard base is impregnated with glue and wrapped with masking tape on top. Then you need to wait for the finished product to dry completely. This will take a day.
After 24 hours, you can begin decorating the dried product. The top of the pipe can be covered with a pre-selected fabric. Measure a piece of fabric to fit the size of the pipe, saturate the fabric with glue, and then wrap the vase, creating light folds. Next, you need to wait again until the vase is completely dry. After which you can begin painting with gold or bronze paint. In addition to regular acrylic paints, you can use spray paint. When the bronze layer of paint has dried, a layer of gold paint is applied on top.
Thanks to these techniques, the product will shimmer and sparkle beautifully. At the end, you can add a couple of beads, buttons, and other decorative details.
How to make a vase from twigs yourself
You will need:
- a small saw (optional, since the branches can simply be broken)
- bag fabric
- flat capacity
- twigs (preferably straight)
- jute thread
- superglue (it is advisable to use a glue gun with hot glue)
1. Collect several straight branches and break or cut them into more or less even pieces. It is desirable that these parts are slightly higher than the container itself.
2. Prepare a thread approximately 1.5 meters long and, starting from the middle of this length, begin connecting all the branches. After adding a new branch, tie a simple knot. As you can see from the image, two parts of the thread are used (top and bottom).
3. Continue tying branches until you have a long row of them. After this, carefully wrap your stick “mat” around the container to test the length and add or subtract branch(s) if desired.
4. Prepare a container and wrap it in bag cloth. Fold the fabric at the top and bottom and secure it with glue or thread. There is no need to try to wrap it neatly, since you will still cover the container with a “mat” of branches on top.
* If you want to plant a flower in such a vase, it is better to make several holes at the bottom of the container.
5. All that remains is to wrap the vase with branches and tie the thread.
You can place several small stones at the bottom of the vase to make it more stable.
How to create a floor vase with your own hands
Before you start creating a floor vase with your own hands from scrap materials, you should take a closer look at the surrounding interior and try to make it in exactly the same style.
After all, if this item fits harmoniously into the overall decor of the room, then it will sparkle with completely new colors, and the vase itself will not seem like some kind of foreign body.
So, for example, for a room designed in a modern high-tech style, it is better to use an unusual style with a minimum number of colors and additional decorative elements.
For rooms in a classic style, strict shapes and similar shades are suitable; avant-garde design will originally complement a product with many curves and bright colors.
Very often it is enough to simply change the design of an old vase, slightly change its decor and color - and this object will decorate the surrounding space in a completely new way.
In this case, you should show your imagination as much as possible and not be afraid to realize even the most daring ideas.
Of course, for this you will need to find an old object and it is desirable that it has a smooth surface.
Paints, coins, broken glass - in general, everything that can be nearby will help you change the image of an old vase.
The main thing here is not to be afraid to experiment, because even the most unusual idea can help change an old object beyond recognition.
Some examples of the design of old vases can be seen in the photos above.
Well, if you want to do something completely unusual and original with your own hands, then it is recommended to take a master class and start turning all your ideas and ideas into reality.
Probably everyone will find a lot of old and unnecessary newspapers in their closet.
It is from this waste material that you can very easily make an original floor vase with your own hands, as shown in the photo below.
You will definitely need a lot of old newspapers, as well as glue for paper, it is better if it is PVA, as well as a lid from a saucepan.
Such a decorative vase made from newspaper tubes, even though it takes only a few hours to create, will become a real decoration of the surrounding space.
First you need to prepare a sufficient number of newspaper tubes. The bottom can be made of cardboard, or you can weave it yourself from newspaper tubes.
To do this, you should collect four bundles so that each of them has four bundles.
The photo below shows how to do this.
To do this, strands of newspaper tubes remaining from the bottom are bent upward and braided in a circle with another strand so that the leg is completely formed.
Now you need to insert the lid from the pan between the formed posts and continue weaving. After about ten rows, you should begin narrowing the neck.
At the final stage, it is necessary to carefully form the neck itself.
After the vase from newspaper tubes is completely formed, it must be covered with glue and clear varnish and allowed to dry. Next, you should carefully cut off the protruding remnants of newspapers.
To give a more original look to the finished product, you can make decor from any available materials. You can also use artificial flowers and dry branches for this.
This composition, complemented by artificial flowers, will give the floor vase a unique appearance.
The video below shows a master class on making a vase from newspaper tubes.
In the video above you can see a kind of master class that will simplify the assembly of a product from newspaper tubes with your own hands.
It should be noted that in exactly the same way you can make a floor vase from many other materials. So, dry branches, vines, rattan, and so on are perfect for this.
DIY glass vase
You will need:
- glass jar
- braid with sequins
- Super glue
- scissors
- ribbon
1. Start applying a little glue to the jar and sticking the tape on little by little. This must be done from below. Since the glue dries quickly, it should be applied to a small area of the container.
2. Continue wrapping the ribbon around the can. The layers of sequin braid should touch each other slightly.
3. Tie a ribbon for beauty and you have a beautiful vase ready.
* Instead of tape, you can paint the top of the jar (not covered with tape).
* Fresh flowers will be the finishing touch to your craft.
DIY winter vase
You will need:
- a bottle of wine
- spray primer
- salt
- sticky aerosol
1. Apply a spray primer to the bottle (it is better to do this outdoors, on a balcony or in a well-ventilated area).
2. Pour coarse salt onto previously laid paper (newspaper).
3. Apply sticky spray to the bottle.
4. Place the bottle on the salt and start rolling it so that the salt sticks to the surface of the bottle. You have a vase covered with snow.
* For beauty, add a few twigs (natural or artificial) to the vase and you have a beautiful decoration for the holiday.
* You can make a couple more vases in a similar way, place them on a tray, add a candle and sprinkle salt around the bottles (fallen snow) - a beautiful decorative composition.
Where to place decorative branches in a floor vase
It is believed that residents of Scandinavian countries were the first to use dry branches to decorate their homes.
Natural eco-friendly material and homemade decor are completely in the style of the hygge and lagom philosophy of life. Later, Americans joined the trend, seeing how beautiful compositions made from branches look both in large-scale lofts and in modest apartments located in condominiums. Important: wooden decor in a vase can be selected for any interior style. The main thing is that such an element harmoniously complements the overall concept without overloading it.
Not only designers, but also psychologists recommend decorating a house with branches. Such decor in a floor vase becomes a symbol of real wood, nature, and the peace that you can feel while being in nature. An eco-friendly decoration can be placed near your workplace, bed or sofa, even in the kitchen (away from the fire, of course).
You can always buy jewelry in a specialized store or order it from a decorator. But it will be much more pleasant to create it yourself, filling the composition with a piece of your soul. Then, looking at it, you will be saturated with positive energy and, perhaps, remember under what circumstances the composition was created.
The first thing you need to do is find a suitable vase: it must be stable, match the interior in color, size, and suit the place you have chosen. It is better to choose vases with a wide neck - this way there are more opportunities for experimenting with different sticks and their combinations. Even pots intended for indoor trees or large plants can be used as a vase, but then you will also have to take care of securing the composition in them.
Then it’s a matter of finding materials and ideas for decoration. Here are a few options that are easy to do yourself:
- For a minimalist interior, use natural wood without additional processing, or cover it with plain paint. Branches with leaves or small flowers, weeping willow, natural birch with buds, etc. will look great.
- In a high-tech interior or other design with bright color accents, you can paint the branches with any thick-textured paints and coat them with moisture-resistant varnish. This will create an additional accent and bright mood in the room.
- The wooden composition can be used as a base for a lamp. Of course, it’s better not to take risks with candles or other sources of open fire. But if you decorate the massive branches with a garland of multi-colored lanterns or large light bulbs, you will get a very atmospheric kind of floor lamp, which will add special coziness to the room.
- Decor in a floor vase can have a practical purpose. For example, serve as a hanger or a place to store keys - depending on the size and durability of the composition.
- By placing several vases with a dense set of branches, you can create something like a natural screen. It, in turn, can be beautifully decorated with light bulbs, flowers, balls, or painted with paints.
- Regardless of the size of the branches, they can be complemented with bright decor, permanent or seasonal. Insert several flower branches from your favorite decor store into the vase, use sewing accessories - ribbons, threads, rhinestones, buttons; use Christmas tree decorations or paper valentines, small soft toys.
Note! Even if you plan to leave the branches undecorated, they need to be well dried and carefully processed before placing them in the interior. These procedures will take a little time, but will help protect you from pests and natural damage to wood.
Creating such decor is a huge field for creative ideas and non-standard implementation of them. Decorative branches in a floor vase are not only a completely eco-friendly decoration, but also quite inexpensive.
DIY decorative vase
This example uses bamboo shaped straws, but you can use any shape of plastic straws.
It is desirable that the tubes be dense.
DIY floor vase
It is not easy to make such a vase, but after painstaking work the result is surprising. In addition, you will save a lot of money by spending only a few hours.
All you need is newspaper or an old/unwanted magazine, glue and a pot lid.
Video technology for weaving paper tubes
1. Prepare sheets of newspaper and make ropes out of them. Just roll the sheet into a tube diagonally.
2. To make the bottom you will need cardboard. This is the simplest option, but if you want to make the bottom more complex, you can also weave it from newspaper tubes.
We weave the bottom of the vase:
- make 4 bundles of 4 bundles each
- fold all the bundles crosswise
— in turn, “launch” each tourniquet in a circle so that it wraps around the rest of the tourniquets
- the first 3 rows are woven in a similar way. After this, the four strands need to be divided in pairs and weave 3 more rows in the already familiar way - you should already have 6 rows of weaving
- wrap each bundle separately to get a bottom like this:
3. Weave the walls of the floor vase:
- protruding paper tubes need to be folded up
- start braiding each tube - you should have a vase leg formed
- prepare a pan lid or any other disc-shaped object wider than the bottom of the vase
- insert the cap between the paper tube drains
* The lower the lid, the wider the vase will be.
- using the already familiar technique, you need to weave 10 more rows
- now you need to start bringing the edges of the strands-stands closer together - preparing the neck of the vase
— the neck of the vase needs to be braided until you reach the stage when you need to braid two stand strands, instead of one
- now spread the strands apart again and start weaving the rim of the vase
- take turns bending one post after another
- when you reach the 5th post, go back to the first and bend its tail under the 5th post, and then fix the 4th.
* Using the same pattern, fold the 2nd post over the 7th and cover the 6th, the 3rd under the 8th and so on.
* In each binding you will have “windows” - you need to insert one stand into them until you have something similar to a braid.
4. Cut off the pieces of paper tubes that stick out and that's it.
5. All that remains is to cover the vase with PVA glue and, if you wish, paint.
How vases are used in landscape design
Each type of decorative vessel is designed for a specific landscape style. If this is not taken into account, then even the most luxurious vase will look like an alien element on the site.
Classic styles
British vases are advantageous to use in gardens of regular and landscape styles, and Mediterranean landscapes.
A Mediterranean-style garden involves the creation of areas closed from prying eyes. And a British vase on a pedestal will fit perfectly into this landscape
Tips for placing British vases:
- A vase on a low leg with a wide bowl is placed like a solitaire in a secret corner of the garden (preferably on a pedestal), at the intersection of paths or near a garden bench.
- If the leg is high and the bowl is of small diameter, then they can be placed opposite each other, connecting a certain area together. For example, the beginning and end of the central track. This technique is called “alleyno”. Most appropriate in a large area, not cluttered with small sculptural forms and structures.
- Several tall bowls can be placed in a circle, thus highlighting the front part of the site, in the center of which there can be a fountain, gazebo or swing.
- In a line along the hedge. A special effect is achieved by combining white or gray bowls filled with bright plants (petunias, marigolds) with a green hedge background. The ground under the vases is sprinkled with pebbles.
By the way, please note that in winter British vases filled with pine branches look luxurious. This is relevant for our snowy country.
Installing British bowls on legs opposite each other in the corners of a certain area unifies the space, giving the landscape completeness
Oriental and Italian gardens
Vases-vessels fit well into the interior of the Italian garden, from which they originated. But it should be taken into account that today the Italian style adheres to strict symmetry and geometricity, which was not the case in the era of the ancient Greeks. Therefore, vases in Italy are placed in pairs, for example, at the entrance to the gazebo, near the fountain, on the steps of the terrace.
Where to place a vase in the eastern garden:
- At the entrance to the garden (necessarily with flowers, since the entrance symbolizes the gate to heaven).
- If paths in the garden divide the area into squares, then the vessel is placed in the center of 2-3 squares located far from each other.
- Along the shoreline of a stream or fountain flowing into a pond.
- On both sides of the wall fountain.
Eastern styles also use vessel vases, since the shape of the Greek vase is very similar to the Chinese one. But if in Italy restrained natural tones (gray, white, brick) are welcomed, then the East gravitates towards brightness. Vessels can be decorated with mosaics, painted in three or more colors, creating fancy patterns.
A bowl filled with colored pebbles in a Muslim garden can become the center of a courtyard, emphasizing the symmetry and severity of the composition’s forms.
Modern + industrial styles
Modern styles use vases invented exclusively in the 20th century (not earlier!).
High-tech can be filled with a huge number of cubes, pyramids and other original shapes of vessels. The main thing is that they are all created from the same material.
The solidity of the concrete pedestal, strict geometric lines and a minimum of plants in the bowl are all signs of a modern high-tech vase
For minimalism, 2-3 original vases, arranged in a certain rhythm, are enough. And if the vessel is of impressive size, then no more than one. The composition is usually placed on the lawn, and a single copy is placed in front of the house or at the beginning of the front path.
Recent Entries
English varieties of roses with strong resistance to powdery mildew and black spot From Gagarin to Jackie Chan: Varieties of garden flowers named after famous people 7 varieties of unpretentious barberry that can be planted in any soil
In the industrial style, the vase is used as a solitaire. It is placed so that it is possible to view not only from all sides of the site, but also from the windows of the house. At the same time, the design of the vessel should be extremely unusual, and the material should be wire, metal (can be rusty). A low vase is placed on a brick pedestal.
Eclectic and country
It is rare that an owner maintains a landscape in a strict style. Usually in private courtyards there is a mixture of styles (eclecticism). And in such a landscape, you can use any type of vase, if it is in harmony with the rest of the decor of a particular area, or you can create something original with your own hands.
By the way, homemade vases are also very appropriate in rustic styles, where the entire landscape emphasizes the owner’s imagination and is not limited by stylistic traditions. It is in these gardens that inexpensive plastic vases, vessels hollowed out of wood, and wicker bowls “take root” best. They are not used empty, but filled with fresh flowers, driftwood, reeds, etc. However, this decor will have to be removed for the winter, since wood and plastic are not frost-resistant, and will burst or twist due to temperature changes.
In rustic gardens, vases are placed in a chaotic manner, filled with many bright flowers, planted in several tiers
In rustic styles, vases are always part of the composition, mixed with flowers and decorative shrubs, animal figures or fairy-tale characters. They help create a multi-tiered flower bed, while the pedestal is often hidden in low-growing plants. Therefore, the decor of vases can be very modest; wood and concrete are not painted, but their natural texture is preserved.