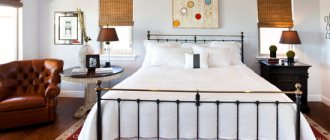
Hi all! When our family faced the question of needing a crib for a child (2 years old), my wife immediately took me to a local store to show me what she liked. It’s clear that she liked the “house bed”, which cost 12,000 rubles in the store. Without a mattress, just behind the frame..
Restraining myself from exclaiming, “What is there to give so much money for?!”, I went home in thought. And a plan formed in my head: “I’ll make a crib house with my own hands!” What’s so complicated about that?”
Let me tell you and show you what I had to face, how much money I spent and what happened in the end.
Glue the legs
1. From 19 mm boards, cut six blanks measuring 73x1057 mm for headboard legs A, six - measuring 73x981 mm for footboard legs B and six - measuring 73x981 mm for fence legs C. Then group three blanks for each leg, placing the best sides on the outside. Mark the pieces of each group for later assembly and take a center board from each group.
Plan all the central boards to the thickness of the plywood from which the parts from H to M will be made. Then install a set-up groove disk in the saw machine and make cutouts in the central boards (Fig. 1). Note. Please note that the central board of one leg for fence C has a 51 mm wide cutout at the top, but it is missing on the other.
2. Glue the parts of the legs and compress them with clamps. Spread a thin layer of glue evenly over the center boards only, without applying too much so that the excess squeezed out does not have to be removed from the nests. How to align the ends and edges is described in the “Advice from the Expert”.
When the glue has dried, remove the clamps. Remove dried glue from the nests with a chisel and scrape off the edges with a scraper. Then use a planer to remove about 1.5mm of the nested edges and planer the opposite edges to give the legs their final width. Finally, saw off the bottom ends of the legs first at a right angle, 152mm from the bottom socket (Fig. 1), and then saw off the top end of each leg to the final length.
3. Place the legs in pairs with nests facing each other in the order shown in Fig. 2.11 Mark those edges on which there should be narrowings. Mark the narrowings, file them with a band saw and sand them smooth.
4. At the upper ends of the legs of the headboard A, make bevels at an angle of 10° (Fig. 2). Then mill 3mm curves on all legs in the indicated places.
Note on the legs A, B, C the centers of the holes for installing threaded bushings (Fig. 2). Insert; Insert a 10mm center point drill bit into the drill punk chuck and make the holes.
Tip: How to align parts when gluing legs
Making each leg A, B, C from three boards glued together, it is difficult to keep them in the required position, since when the clamps are tightened they begin to move. To avoid this, cut the pieces with an allowance to the length (For this project we added an extra 25mm at each end of the board.)
Then apply glue, stack the pieces and fasten them with a pair of thin nails, driving them in at the ends, which will then be sawed off. (If you don't have a pneumatic nailer, stack the boards and drill pilot holes for the finishing nails before applying the glue. Then apply the glue and hammer the nails in.) Make sure there are no nails in the cut line, and clamp the joint together as usual. Once the glue has dried, file the pieces to their final length.
6. Mark the centers of the 6mm holes with and without counterbore on legs A; B, C (Fig. 2). Make counterbores and holes using a drill press.
7. Finish sand the legs A, B, C. Then use a hex wrench to screw the threaded bushings into the 10mm holes.
Important points before assembling the house bed
Before starting to assemble the bed, parents need to decide in advance whether the bed will have drawers or whether it will be without them. Some parents prefer the space under the bed to be free, while others prefer to make the furniture as functional and spacious as possible. Therefore, such parents give their preference to a house bed with built-in drawers.
Before assembling furniture, you need to decide on the choice of drawers built into the future furniture. Drawers can be of two types: on wheels or on guides. It is recommended to make drawers on guides, as this is a more advantageous option, the floor will not deteriorate and the structure will be more durable. Also, you should decide how many drawers will be installed at the bottom of the house bed.
Parents should also make a choice on a specific furniture design for the child. You will first need to decide on the choice of shape for the place to sleep. If you have a small child, it is recommended to make low single-tier beds. If you have more than one child, then it is better to make two floors in houses with stairs.
Worth remembering! Such furniture should be absolutely safe for your child. In order for the crib to be more stable, it is necessary to make the sleeping place without legs so that it is on the floor. Having made this choice, you can rest assured that such furniture will withstand any weight. The advantage is that the child will not fall from a low crib.
Make finials and fillets for the crib
1. Cut four 248 x 1553 mm pieces of 19mm particle board to make a mold for gluing the top of the headboard D. Then mark the top arc on one of these pieces (Fig. 3, Photo A). Cut out the arc with a bandsaw and sand along the contour. Using this piece as a template,
Mark the arcs on the remaining pieces and cut them out, leaving a small allowance on the outside. Clamp these pieces to the first template piece one at a time, aligning the ends and straight edge to remove the allowances with a router with a copy cutter. Place all four pieces together to assemble the shape. Mark the center line on the form, as well as the lines for the ends of part M and the cutting lines for part D.
2. To glue the top of the headboard D, spread the thickness of the board and cut three planks measuring 6x73x1525 mm. Place marks on the edges of the planks in the middle of their length. Apply glue and stack the planks on top of the mold, aligning them in the center. Moving from the center to the edges, press the strips with clamps to the form, adjusting their position so that the edges are aligned.
3. After the glue has dried thoroughly, remove the headboard finial D from the mold and transfer the center line from the edges to the underside. Scrape off any excess glue and file one edge smooth. Then use a thickness planer to sharpen the top to the final width. Fix the part again with clamps on the form, aligning it in the center.
Transfer the length marks from the mold to the part, remove the part and file all the ends to the final length. Cut out the foot top E and the end tops F to the specified dimensions.
4. Mark the borders of the top roundings with a radius of 12 mm along the ends of the headboard and footboard 1), E (Fig. 4 and 5), and shape them using a grinder. Do not fillet the ends of the end caps F. Then insert a 12mm fillet bit into the collet of the router mounted in the table. With the top of the headboard on the edge, mill roundings along the upper edges (Fig. 4a). Then fillet the top of the foot and end finials, placing them upside down on the router table.
5. Mill roundings with a radius of 3 mm from the bottom along the tops of the headboard and footboard D, E, holding the router in your hands. Then remove the router bit and place it on the router table. With the headboard top on the edge, make 3mm fillets along the bottom edges. After this, mill the roundings on the foot and end caps, placing them on the table with the underside.
6. Drill holes with countersinks at the ends of the headboard top D (Fig. 4). Finish sand the part.
7. To make fillets G, plan a board measuring 152*1525 mm to a thickness of 13 mm and align both edges by jointing. With a shaped cutter installed in the router table, form fillets with a radius of 10 mm along both edges in several passes. Then use a saw to cut a 13mm wide strip from each edge. After sharpening the edges again, rout the fillets and saw off until you have five blanks for the fillets. Finish sand all the workpieces.
Cut out the beams and panels
1. From 19 mm plywood, cut out the lower crossbars H, I, upper crossbars, K and drawers L of the indicated sizes, and make the blank for the upper crossbar of the headboard M 12 mm wider.
2. Re-take the mold that was used to glue the top of the headboard D. Align the top crossbar of the headboard M with the bottom edge of the mold and between the lines indicating the length of the headboard. Transfer the outline of the arc onto the workpiece and cut it out with a band saw, leaving an allowance of about 3 mm outside the line. Then use a router with a copy bit to process the part to its final shape (photo B), and sand all the crossbars smooth.
H. From 6 mm plywood, cut four blanks for the N end panels with allowances of about 25 mm in length and width. Then cut two pressure boards of the same size from 19mm particle board to glue the panels together. Glue the plywood blanks in pairs, placing their best sides on the outside, place them between the pressure boards and compress them with clamps. Once the glue has dried, saw the panels to their final dimensions, being careful to keep them square. Remove all traces of glue and give the panels a final sanding.
Profiles and strips
According to the indicated dimensions, cut out the O, P, C linings for the lower crossbars and drawers. Then mill the parts (Fig. 6, step 1 and 2).
2 Cut out grooves R, S for slats and panels, side trims T and handrail U of the specified dimensions. Select the tongues and mill the parts (Fig. 7, step 1-7).
3 Plane the workpieces to a thickness of 10 mm, adjusting them to the width of the tongues in the grooves R for the strips. Then cut out the long, short and end strips V, W, X, as well as blanks for the Y liners. Plan the material according to the width of the tongues in the grooves S for the panels and cut out the blank for the Z spacers.
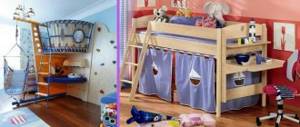
Types of children's beds
Choosing a children's bed in favor of a special design poses a difficult task for parents. Different bed models are classified according to functionality and dimensions:
- cradle cot for newborn children, size 90 x 45 cm;
- standard playpen size 120 x 60 cm;
- cot for preschoolers with drawers measuring 140 x 70 cm;
- transformable bed size after transformation 190 x 80 cm;
- bunk bed with drawers and ladder;
- non-standard cribs in the form of a sports facility.
Cradles and cots in the form of a playpen are designed for children from birth to three years. Using the diagrams presented on the Internet, you can make any model or in accordance with your own design. A crib painted white can be decorated using decoupage techniques and a removable canopy made of harmoniously selected fabric.
A crib for children from 3 years to primary school age will provide comfort during sleep and rest. Spacious cabinets with pull-out mechanisms allow you to store
Kids' things. Thanks to its simple design, it can be made in a few days. The presented model does not require additional decor. Unpainted wood looks natural and natural. Bright pillows and soft toys will help add bright colors.
A transforming bed will help out in situations where you need to save space. A transforming version of a sleeping place for a child can be bought in a store or created with your own hands according to drawings. Bunk beds also allow you to save space in a children's room.
The top tier of the crib must be equipped with protective railings.
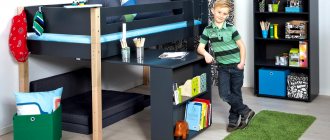
Beds of unusual shapes
Children are especially delighted with cribs of unusual shapes.
It is a mistake to think that you cannot make an amazing sleeping place yourself. Using the drawings, you can make cribs of a wide variety of shapes. Men who love working with wood can try their hand at making a machine bed.
By building a bed in the shape of a sports facility, you can combine play and sleeping space into one. Active children will appreciate a crib with a slide or a fairytale house. After studying the complex design, you can make such a model yourself. To complement the sleeping area, use additional drawers and compartments for storing children's things.
Assembling the headboard and footboard
1. Glue the overlays O to the lower edges of the lower crossbars H, securing the parts with clamps. Place the pads in the center with a 25 mm indentation from the ends of the crossbars (Fig. 4, 5 and 8). Align the pads and crossbars flush on the inside (Fig. 4a).
2. Glue the grooves R to the upper edges of the lower crossbars H and the lower edges of the upper crossbars of the headboard and footboard M, J, aligning them in the center with a distance of 25 mm from the ends of the crossbars. Finish sand the bottom O-plates and grooves. Set one assembled H/O/R bar aside.
3. Glue the headboard by inserting the ends of the lower and upper crossbars H, Mb into the nest of the legs A (Fig. 4). Then, gluing the ends of the lower and upper crossbars H, J into the sockets of the legs B, glue the footboard (Fig. 5), controlling the squareness of the assembly. Then drill holes into the crossbars through the 6mm holes in the legs.
4. Glue the headboard finial D to the top rail M and the legs A, aligning in the center so that the ends of the finial extend evenly beyond the outer edges of the legs. Drill pilot holes in the legs through the holes in the top and screw in the screws. Attach a plug drill to the chuck of the drilling machine, make four plugs and glue them into the counterbores, orienting them according to the direction of the fibers flying in. Once the glue is dry, sand the plugs flush with the surface.
5. Glue the top of the footboard E to the top crossbar J and legs B, securing with clamps. Align the pommel with the center of the crossbar so that the ends fly evenly beyond the outer fans of the legs.
6. To install fillets at the bottom of the curved headboard finial D (Figures 4 and 4a), first saw a 10° bevel at one end of two pieces G. Then mark the final length of each fillet (Photos C and D). To press the fillets to the concave surface, place short pieces of a wooden dowel rod with a diameter of 19 mm under the jaw of the clamps. Now file the ends of the fillets at an angle of 10 C according to the marks made. Glue the parts in place and secure with clamps. Take two more fillet blanks, adjust them to the length between the legs of the footboard B (Fig. 5), glue them in place and fix them. Finish sand the finials and fillets of the headboard and footboard.
7. Before installing long planks V in the headboard, make sure that their length is 1.5-2 mm less than the distance between the bottom of the tongues in the upper and lower grooves R. Then, using pieces of masking tape, mark the centers at both ends of one plank and the middle of each groove . From the blanks for the Y spacer inserts, saw off 28 pieces 57 mm long. Now, starting from the middle, insert the liners and strips (photo E).
After measuring the distances, saw off the last four liners for installation between the outer slats and legs A. In the same sequence, install the slats at the foot. Note: If you do not have enough space to tilt the slats and insert them into the tongues, install the last two slats at the legs, and then insert the last six inserts.
Assemble the fence
1. Take the handrail blank U. From the blank for liners Y0, saw off a 35 mm long piece and glue it into the tongue of the handrail flush with the end (Fig. 8a). Mark the curves and cutouts to form the shoulders. Cut out the curves with a bandsaw and sand them down, then cut out the notches on the corners. Mill 3mm fillets.
2. Take the previously assembled lower H/O/R guard rail. Then select the slots in the U handrail and the bottom rail (Fig. 8 and 8b).
H. To align the U handrail and the H/O/R bottom rail when assembling the fence, cut two spacers 246 mm long. Then glue the end post X into the handrail and bottom rail sockets (photo F). After this, glue legs C into place (photo G).
4. Saw off only one segment from the blank for liners Y, matching its length to the distance between leg C and the outer stand X (Fig. 8). Glue it into the tongue of groove R and secure with clamps. Then saw off 11 spacer inserts 57 mm long. Install the inserts and short slats W in the same way as in the headboard. (Insert the last two strips, then add the last six inserts and adjust the length of the last two.)
Assemble a pair of end walls
1. Glue the pads P to the lower edge of the lower crossbars 1, aligning the ends and inner sides (Fig. 9 and 9a). Glue grooves S to the top edge of the bottom bars and the bottom edge of the top bars K.
2. From the blank for liners Z, saw off eight pieces 67 mm long and glue them into the tongues of the grooves S flush with the ends. Next, insert a 10mm center point drill bit into the drill chuck and make holes for the cross nuts in the bottom edges of the top and bottom crossbars I/P/S/Z, K/S/Z (Figures 9 and 9a).
3. Glue the tops F to the top crossbars K with the indentation outward (Fig. 9a) and aligning the highlanders. Then cut two pieces of the same length as the top crossbars from the fillet blank G, glue them in place and secure. Once the glue has dried, give the assembled top and bottom rails a final sanding.
4. Glue the side trims T to the N panels, aligning them at the middle of the height (Fig. 9). After the glue has dried, finally sand the pads and assemble the end walls (photo H).
5. To make 7mm bolt holes intersecting the holes in the bottom crossbars I, make a jig guide (Fig. 10). Next, drill holes in both ends of the bottom rails (Photo I). The same holes for bolts in the upper crossbars K will be made later.
Assembling the crib
We assemble the two halves of the crib and then connect them with crossbars.
The most difficult connection is for the ridge parts on the roof. To prevent the roof from shaking, you need to connect the ridge parts through a tongue and groove, coat them with PVA glue and tighten them with screws. But to make a tongue and groove you will need a router.
Temporary roof support for drilling holes.
Sanding all parts with fine sandpaper. All sharp corners have been removed.
Fastening the pipe and disassembling it for varnishing the parts.
Please note that when planning the size of the door, you need to make room for the hinges.
Slat bottom from IKEA. To secure it, 14 dowels were drilled and glued. To prevent the slats fastened with tape from moving back and forth when the child jumps, they are tightened.
To increase rigidity, add corners.
The result was a playpen bed. When the child grows up, the side bars can be replaced with low sides or removed altogether. The entire job took approximately 40 hours.
If you earn a lot, it will certainly be cheaper to buy a factory crib. But if you want to give a nice gift to your child for many years, save money and please your wife, you should definitely make it yourself. And with a good tool, the process will also be enjoyable.
Gluing the drawers
1. Glue the pads Q to the edges of the desks L, aligning the ends and inner sides (Fig. 11 and 11a). Then, using a 10mm center point drill bit in the drill chuck, make holes for the cross nuts at both ends of the drawer frame, top and bottom.
2. While fixing the drill jig on the ends of drawer L, align its bottom edge with the top of the bottom trim Q. Then drill the bottom bolt holes in the ends of both drawers. The top holes will be made later.
3. Cut out the support strips LL and cross strips BB of the specified sizes. Glue the support strips to the frames, aligning them from the bottom (Fig. 11 and 11a). Then drill pilot holes in the indicated places and screw in the screws. Make 10mm holes in the support bars for the cross nuts. Finish sand the Q pads, support bars and cross bars.
Assemble a baby crib
1. To assemble the smallest version of the bed, insert the cross nuts into the holes on the lower edges of the lower crossbars I (Fig. 12). Pass bolts 120 mm long through the lower internal holes of the headboard and footboard legs L, B into the holes at the ends of the lower crossbars and screw them into the cross nuts (Fig. 12a). How to hold the cross nut in place during assembly is described in the "Foreman's Tip".
2. Align the end walls so that the upper and lower crossbars I, K are parallel to the edges of the legs A, B, and fix their position. Mark the centers of the top bolt holes on the ends of the top crossbars K (photo J). Then move the end walls away from the legs, tilting them to the sides, drill holes in the crossbars to a diameter of 7 mm and a depth of 70 mm. Now insert the cross nuts into the holes of the top crossbars and connect the crossbars to the legs using bolts. Insert 50mm bolts with decorative nuts into the two free outer holes at the bottom of each leg (Fig. 12).
3. Turn the arms of the adjustable mattress frame to the upper position, lower the frame into the crib and secure it at the selected height with hex head bolts, threading them through the holes in the arms and screwing them into the threaded bushings installed in legs A, B. Place the mattress on top of the frame.
Why do you need to make your own bed for your child?
The photo of how to make a crib shows that creating a sleeping place for a baby yourself is not as difficult as it seems at first.
The reasons that may prompt you to try to make a crib with your own hands can be different:
- the desire to combine the preferred material and the desired shape in a product;
- the desire to save money on buying a store-bought option;
- penchant for exclusive handmade things;
- thirst for something original, some unusual model.
In addition, a self-made children's bed has the following advantages:
- uniqueness;
- practicality;
- functionality;
- efficiency.
Assembling a bed for a teenager
1. Remove the child's mattress. After unscrewing the bolts, remove the grille. Next, remove the bolts and cross nuts connecting the end foams to the headboard and railing. Take the L/Q drawers and footboard you made earlier. Insert the cross nuts from the bottom into the drawer holes and attach the headboard and footboard with bolts through the lower outer holes of the legs (Fig. 14).
2 Align the L/Q drawers parallel to the edges of the legs and secure their position. Then, through the holes located next to and above the bolts, drill 6mm holes in the support bars AA and drawers I.. Separate the bed parts. Drill holes in the drawers to a diameter of 7 mm and a depth of 70 mm. Now reassemble the four parts using bolts and cross nuts. Insert bolts into the free holes of the legs and screw in decorative nuts.
3. Place the BB cross bars on top of the AL support bars (Fig. 14) and secure. Drill pilot holes and secure the cross bars with screws. Then place a spring mattress on top and lie down for a few minutes to evaluate the comfort. You deserve it!
A BABY'S CRIB SHOULD BE SAFE
A crib has long been considered one of the best gifts for a newborn. Check out the ten must-haves that make it safe.
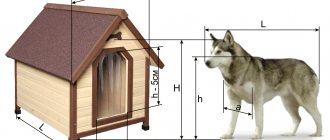
Before developing your own design, making changes to an existing project, or even choosing a crib in a store, we advise you to remember a few important requirements. The American Consumer Product Safety Commission defines a standard children's bed with internal dimensions of 1320 (±16) x 710 (±16) mm as a place to sleep indoors or near the home. A complete list of requirements would take up too many pages, so we will point out the 10 main ones that are especially important for the safety of the baby.
1. The height of corner posts or legs above the top rails or handrails must be less than 2 mm or more than 400 mm.
2. The distance from the top of fixed top or height-adjustable crossbars and guards to the top of the mattress frame set in the lower position must be at least 660 mm.
3. The distance from the top of fixed top or height-adjustable crossbars and railings to the top of the mattress frame, installed in the upper position, must be at least 230 mm
4. The distance between adjacent parts, such as planks, rods, posts or legs, should not be more than 60 mm
5. Locking devices for height-adjustable bars and barriers must be released or released using two movements or a force of at least 5 kg.
6. It is not allowed to use screws to connect parts that are separated during normal disassembly of the structure.
7. Horizontal projections with a height of more than 10 mm are not allowed on the inside of the fences at a height of less than 500 mm from the top of the mattress lattice.
8. Gaps are not allowed between the upper side of the mattress lattice and the drawers or lower crossbars of the end and longitudinal walls.
9.Decorative cutouts in the panels create a risk of pinching the neck or head, so they should not be used in children's beds.
10. The mattress must be tightly inserted between the walls without visible gaps to prevent pinching of any parts of the child’s body.
Method of building a crib
Making the basic elements
Design option with blind backrests assembled
Solid wood cribs for newborns are usually made quite compact. The optimal dimensions of the product will be as follows:
| Parameter | Value, mm |
| Mattress size | 1200 x 600 |
| Length | 1250 – 1300 |
| Crib width | 650 – 700 |
| Side height (from floor) | 900 |
| Back height (from floor) | 1100 |
Note! Small deviations from these dimensions are possible, but you should not make the crib too large or too small.
Drawing with dimensions - another option
For the frame we make the following details:
- We assemble the frame for the mattress from thick wooden beams, previously leveled on a planing machine and sanded with emery. The dimensions of the frame must correspond to the dimensions of the mattress - then there will be no gaps between the sides of the crib and the sleeping area.
- As supports for the mattress we use six wooden slats 20x20 mm or several boards with a thickness of 20 mm or more. We fasten them into the holes made in the frame using a tenon, if necessary, fixing them with self-tapping screws from the outside.
Advice! We make the hole in the frame slightly smaller than the diameter of the tenon cut at the end of the slats or boards - then the fixation will be more reliable. To secure the structure, we use wood glue, and clamp the parts themselves with clamps.
- From the same bars we make the frame of the headboard. In this case, we first cut out two vertical posts with a height of 110 mm, and then connect them with crossbars mounted on a tenon and fixed with wood glue. We place the upper crossbar at the ends of the supports, and the lower one at a level from 300 to 500 mm from the floor.
- The filling of the backs can be made from either plywood or round wooden rods. The first option is easier to implement, but a crib with openwork backs looks much more attractive.
Board drawing
- In addition to all the listed parts, we will need the far and near sides. We assemble them according to the same principle as other elements, but for the frame we use thinner slats, and we make the filling from round wooden planks, which we fix in the holes of the side frame with glue.
- For the convenience of caring for a child in a crib, we make the far side so that its upper edge is at a height of 900 mm from the floor. The near side can be lowered by approximately 150 mm.
After making the blanks and completing the gluing, carefully sand all the parts again. All we have to do is assemble the structure and decorate it with our own hands.
Scheme with more complex details and carved inserts
Assembling the crib
If you performed all the operations described in the previous section yourself, then you will not need instructions for assembling the crib - you will already understand perfectly where each part is installed.
So below we will limit ourselves to only general recommendations:
- First, we install the frame for the mattress on the backrests. To do this, we attach metal corners to the frame of the side parts, on which we place the lower support part on top.
Advice! For more reliable fixation, it is worth additionally securing the frame with through screws, screwed through the crossbars in the backrests.
Photo of the backrests with a frame installed under the mattress
- Then we install the far side. It can also be secured with self-tapping screws, but if you want the structure to contain a minimum of cracks, then you should first make nests in the backs for the tenons on the side cross members.
- It is best to make the near side folding. To do this, we install two furniture hinges on the mattress frame, to which we attach the side frame.
- We fix the side in the closed position with two latches, which we fix on the outside of the crib.
Installing a folding side allows you to connect a baby crib with a parent's one
Do-it-yourself baby crib for growth - drawings
TOOLS FOR CRAFTSMAN AND CRAFTSMAN, AND HOUSEHOLD GOODS VERY CHEAP. FREE SHIPPING. THERE ARE REVIEWS.
Below are other entries on the topic “How to do it yourself - for a homeowner!”
- Do-it-yourself crib-car (+photo) How to make a crib car Very…
- Do-it-yourself stand for vertical storage of tools (+ drawings) Vertical storage of tools in the workshop…
- Do-it-yourself crib - how to make it, photos and drawings How to make a crib with your own...
- Stable folding trestles for the workshop with your own hands - photo and drawing Folding trestles for the workshop with your own...
- DIY hose hanger with shelf How to make a useful hanger for…
- DIY night light made from a sea shell DIY night light in a shell With…
- Very beautiful do-it-yourself wooden bracelets (photo) Elegant DIY BRACELETS without a machine...
Subscribe to updates in our groups and share.
Let's be friends!
With your own hands > Furniture > Beautiful baby crib made of wood with your own hands - photos and drawings
UPDATE after half a year of using the crib
So guys, hello everyone! About half a year has passed since I started using the crib. I report - everything is great! The crib is strong, the child is happy. We can fit three of us into it without any problems (two adults + a child) – no problems.
Now I have a 3-year-old child, a boy. He is not yet accustomed to sleeping in his own separate room, but more and more often he himself asks to sleep in “his own crib with a chimney.” So you can safely, after 2 years, already think about a full-fledged bed for your child. By the way, by painting the crib white, I made it universal - it would also be suitable for a girl.
This is what it looks like now:
My crib drawings with all the diagrams and dimensions (links above) have already been downloaded by many people! But unfortunately they do not share their successes. I kindly ask everyone who will make a bed in the form of a house - leave a review here in the comments, post photos of your beds. It is very interesting to me!