What is a busy board
Business boards are a stand on which various buttons, latches, zippers, laces, various things, abacus, switches and other items are placed. The educational board is complemented by toys and parts that differ in shape, color and texture. All elements are securely fastened so that the baby is safe while playing.
Busy boards are also called Montessori boards, because its method of developing children is aimed at the fact that the best teacher for a child is himself. The best objects for understanding the world around us are household and everyday items.
Busy boards can be purchased in a store, ordered from those who make them, or made with your own hands. This type of stand is very popular, and there are many reasons for this.
What are the benefits of a development board for children?
The business board allows you to implement several functions at once:
- develops;
- teaches;
- educates.
A homemade board helps develop children's intelligence, imagination and fine motor skills.
For preschool children, activities related to the development of fine motor skills play an important role. Nerve endings located on the fingertips transmit the sensations received to the baby’s brain. A child with developed fine motor skills is ahead of his peers in speech and intelligence.
Correctly made educational boards for children with your own hands, which are thought out to the smallest detail even during their creation, are equipped with many small elements that you can not only touch, but also do certain manipulations with:
- press the switch button;
- insert the plug into the socket;
- press buttons;
- open and close the latch;
- tie shoelaces;
- fasten zippers and much more.
Such actions not only train fine motor skills, but also teach the child how to properly handle analog things in everyday life.
The benefits of educational boards for children
The name of such devices for kids speaks for itself. But not all adults realize what this “development” consists of. It turns out that in addition to the fact that the child gains access to objects that interested him so much, but were previously prohibited, his independent study of such “smart” toys allows him to:
- Develop fine motor skills. Many small objects are attached to the Busy Board, the principle of operation of which is based on the painstaking work of the baby’s fingers. Despite the fact that at first it will be difficult for him to exactly repeat all the actions that adults can do so easily, through trial and error he will certainly sooner or later master them on his own;
- Instill perseverance in your child. With a developmental panel on which everything that was previously forbidden for the baby to touch will be fixed, he will be happy to play much longer than with his favorite toys;
- Teach your child to distinguish colors. To do this, it is necessary to make the development board colorful, diluting the restrained colors of household items with attached colored ribbons, bright lightning, shiny beads;
- Help your child understand the essence of cause and effect relationships. While playing with the Busy Board, your child will definitely note that the door handle must first be pressed and then turned, or, for example, in order to move the door latch, it must first be lifted;
- Develop your child's imagination and imagination. When the baby learns the principle of operation of all the objects attached to the developmental panel, he will begin to look for new uses for them. For example, tying other objects to the laces or choosing holes suitable for the key.
In addition, the busy board will improve the baby’s coordination and also teach him to find a way out of any situation. Moreover, unlike toys, it does not take up much space.
At what age can a child start playing with a busy board?
The educational board is suitable for use by children from 10 months to 2 years. You can make a busy board with your own hands for an older child, but its design and set of elements on the stand should be more complicated.
For a child under one year old, it is best to use non-traumatic elements when making a development board: lacing, Velcro, fabric windows and tapes.
The younger the child, the more beneficial it is for him to start playing with something that parents do not even allow him to touch in everyday life. The child will quickly understand the principle of operation of such objects with minimal risk than when playing with real things. In addition to safety for the baby, a busy board helps protect parental nerves from constant prohibitions.
How to make a busy board for a child with your own hands
A do-it-yourself business board will not only help you save money on buying a stand, but also remove many unnecessary things from storage areas. Making a toy will take very little time, but will bring great joy to the child.
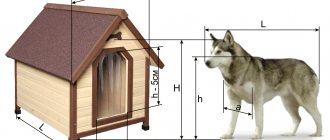
When making a business board with your own hands, first of all, its size is calculated. It depends on the amount of free space in the room where the development board will be located. The size of the toy is also affected by the age of the child. So, for a baby who can only crawl, a small board with several elements attached to it will be enough. For an older child, a larger stand is needed, which can not only be secured, but also made so that the child can move it.
For a child from 6 to 12 months, the optimal size of a development board is from 30x30 to 50x70 cm. For a baby over a year old, a larger size board is made, but it is taken into account that he will be able to reach the necessary thing while being in one place. The optimal size of the stand for this age is up to 1 m2.
Busy boards are best made from boards or thick plywood. The thickness of the board should be at least 1 cm. The blank for the future toy does not need to be painted, just go over it with sandpaper so that the baby cannot get a splinter into himself. Self-tapping screws and glue are suitable as fastening elements.
You can choose the following items to attach to the bodyboard:
- switch;
- abacus;
- small keyboard for computer;
- calculator;
- watch;
- small castle;
- small doors on awnings, made by yourself;
- door chain;
- rotary toggle switch;
- mirror made of plastic;
- compass;
- latch;
- battery operated doorbell;
- bell;
- pieces of fabric, foil or oilcloth;
- old children's shoes with laces;
- socket with plug;
- furniture wheel;
- numbers for the door;
- large suckers;
- lightning;
- Velcro;
- circle from a rotary telephone;
- door handles;
- faucet equipped with a valve.
A busy board, a photo of which will also help you choose a suitable idea, should interest the child as much as possible. To do this, there should be as many items on the stand as possible, with each of them performing some function. Details cut from felt will help complete the composition: numbers, figures of cartoon characters, letters. When choosing what to attach to a development board, it is worth considering whether it is made for a boy or a girl.
It is important to exclude items that could injure the baby, those made from toxic materials, too small and not securely fastened as filling for the bodyboard.
After preparing the board for the future stand, you need to lay out all the selected elements on it. Lighter things are fixed to the board with glue, the rest are screwed with self-tapping screws.
How to make a busy board with your own hands: step-by-step instructions
You can not only buy educational boards in the store, but also make them yourself. To do this, you do not need to buy expensive parts and elements, because most of the necessary little things are found in every house or apartment. But a hand-made board will definitely be exclusive, original and in a single copy.
The main advantage of making such an educational toy yourself is that parents take into account the interests of the baby. If your child likes animals, add pictures of cats, dogs, rabbits or other pets. Those. Mom and dad will make a product that their son or daughter will definitely like.
How to make a wooden one yourself: master class
Before you get started, you will need the following parts and tools to create a wooden development board:
- a board of a certain size and shape (square, rectangular or round). You can use thick plywood, at least one centimeter thick;
- screwdriver, hammer, screws, nails, screwdriver, scissors, construction glue;
- office supplies: ruler, pencil, paints or markers, eraser, PVA glue;
- varnish to fix the design after the busy board is painted by hand;
- details and elements that will be placed on the surface (here everything depends on the imagination of the parents, the preferences of the baby and his age).
After preparing all the necessary tools and elements, you can proceed directly to creating a development board.
- Draw a sketch on a piece of paper. This does not require any special artistic skills; it is enough to schematically depict where each detail will be located on the surface.
- On the board, use a simple pencil to mark the location of all the elements to be sure that all planned items will fit on the future business board.
- We paint the surface and individual details, if necessary.
If you want, you can leave the board a natural color or simply stick on bright pictures of your child’s favorite characters.
If you decide to place wooden elements on a busy board, they can be painted in different colors
- After the paint has dried, it is necessary to cover the drawings or the entire surface with colorless varnish. Leave until completely dry.
- Now you can fix all the necessary elements on the board. They need to be screwed using self-tapping screws and a screwdriver or glued.
All parts on the bodyboard must be securely screwed or glued
- The business board is ready. Before giving it to your child, double check that all parts are securely screwed on.
Video: an easy way to make a wooden product using the Montessori technique
Soft bodyboard for little ones
For babies, mothers can sew a soft product on their own. To do this, she will need the following materials:
- textile. It is best to use felt for the base, but the elements need to be selected from different textures. So, with the help of tactile sensations, the baby will develop fine motor skills;
- buttons of different sizes;
- ribbons;
- loops, hooks, buttons;
- Velcro;
- fabric appliqués;
- small textile figures: animals, people, fruits. vegetables, etc.;
- threads, needles;
- gun and hot glue.
If a woman knows how to sew on a sewing machine, it will be much easier to make the product, but manually sewing all the parts will not be difficult, but will take more time. Mom herself decides what shape the bodyboard will be. Soft books, including folding ones, are very popular, but if a woman cannot sew such a model on her own, you can take a piece of fabric and sew different elements onto it. It all depends on the abilities and skills of the manufacturer.
A soft bodyboard can be not only in the shape of a book, but also in the form of a canvas of different sizes
Video: how to sew a fun educational book yourself
What is better to choose when making a bodyboard for a boy?
If you are making a business board for a boy with your own hands, then you should take into account that there should be as many elements as possible that can be screwed, unscrewed, assembled or disassembled. Large bolts with nuts, latches, sockets, chains, and springs are suitable for this.
Boys' educational boards will be more original with a fixed children's steering wheel, a watch dial, a water tap, a compass, and a telephone dial. If possible, you can add working light bulbs, the operation of which depends on batteries.
If doors are made on sheds, then each of them should be equipped with a small padlock with a key that will lock it. You can also choose a single boyish theme for the bodyboard, for example, automobile or marine.
Busy board ideas for boys
How to make a business board for a boy with your own hands?
First, decide on a general theme with the theme of the board. For boys this could be:
- Marine theme.
- Auto repair shop.
- Locksmith.
- Automotive topics and others
Boys like to twist nuts and screws, open and close locks, latches, and latches. Be sure to install an outlet and a switch on the board.
All children, without exception, like to play with a handset or a disk from an old telephone. Install a bicycle bell, a toy steering wheel, attach doors with latches - all this will bring your son into unforgettable delight.
You can add a bodyboard with a piece of wire, rope, lace, attach a zipper, hooks, a battery-powered lamp or a flashlight.
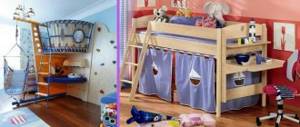
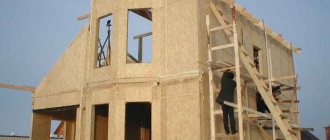
The busy board can be designed not only in the format of a board, but also in the form of a house or cube. If you decide to make a baby board house for a boy with your own hands, you can be sure that this will be your baby’s favorite toy.
Use children's abacus, string with clothespins, puzzles, Velcro, fasteners, hand massagers for decoration - these are exactly the items that we have to deal with in life, and your baby will appreciate them.
The main thing you should pay attention to when choosing elements is their safety. Under no circumstances should the child get injured while playing.
First of all, focus on the tastes and preferences of your baby and then you will be able to entice him for a long time with an educational and, at the same time, safe and healthy game.
What is better to choose when making a bodyboard for a girl?
First of all, a do-it-yourself bodyboard for a girl will differ in the chosen shades. Pink, light green, light purple or gold are suitable as primary colors. The base of the stand or most of the elements are painted in the selected color. Stickers or drawings with princesses, fairies and dolls are also suitable for decoration.
A small mirror, a calculator, an abacus, various buttons, buttons, a watch dial, and lacing would ideally fit as a filler for a girl's development board. At the same time, you can add details that are interesting to all children without exception: socket, switch, latch, bell. An unusual idea is a clothesline on which clothespins will hang.
Busy board ideas for girls
Decorating a busy board
To make your toy unique and as entertaining as possible, use a few ideas:
- Make a business board with your own hands in an unusual shape, for example, round, in the shape of a house, car or tree. More interesting are those stands that have a lot of different doors and windows.
- If you have the ability to draw, a blank for a stand can easily be turned into a real masterpiece, for example, a forest or a pond filled with inhabitants.
- The uniform theme of the development board will make it special, for example, in a retro style.
Each parent can add whatever they want to their business board.
Safety regulations
In order for a homemade board to bring only joy to your child, you need to consider the following points:
- The board must be secured in such a way that the child cannot drop it on himself.
- When using any base for a stand, it must first be treated well.
- The corners of the development board and those places where the baby can get hurt should be covered with any soft material.
- Before each game, the reliability of fastening of all elements of the bodyboard is checked.
- Removable parts are secured to the board with laces or chains.
- If there are luminous elements, then they should only be powered by batteries, and not by electric current. The batteries must be well hidden so that the baby cannot get them.
A busy board is a toy that a child really needs, since with its help the baby will not only occupy himself for a while, but will also increase the level of his knowledge, and also develop logic and motor skills.
Developmental board (motor skills for babies and dads)
If your house has a pantry or mezzanine filled with all sorts of unnecessary things that can be turned, twisted and clicked, do not keep this stuff under lock and key, but screw it together with the locks to a busyboard or development board. What it is is difficult to explain, easier to show.
No drawings or diagrams. Any board or old cabinet door will do as a base. We didn't have either, so we bought a regular pine board from OBI and sawed it into several pieces. We bought the hinges there. All this is screwed on with ordinary self-tapping screws. If you have access to a workshop, and dad has time to do carpentry, then you can give the busy board an interesting shape, for example, a house. Paint it in different colors and varnish it. Using our development board as an example, I’ll tell you what elements can be placed and why they are interesting.
On the top left door in the corner there is a regular wheel from a floor box. A simple but very popular element for the game. So if you have a lot of them and different sizes, screw them all. Below is a yo-yo, you can smoke it with your finger and wind the chain, which you immediately want to pull and unwind everything back. A little lower is the solar battery from the country lamp. They are sold in all country stores, but we bought them in Auchan for 36 rubles. The point is that when light falls on the surface, the bulb does not light up. But as soon as you close the solar battery with your hand, the diode immediately lights up. To remove the diode near the battery, the flashlight had to be disassembled.
Then there are all kinds of locks, latches and even a suitcase lock, then whoever finds something - use everything. The simpler the lock, the better. For example, we were unable to find a lock with a key that a child could easily turn. They hung it just as an example. On the top right door there is a postal lock with a key on a cord. There are no problems with it, the mechanism turns easily. Nearby is the switch for the lamp (Auchan, 19 rubles). It’s not connected anywhere yet, just click. Next comes a masterpiece of my husband’s creativity - a torn-up dynamo flashlight from Ikea. He looked like this:
The principle of operation is simple: turn the handle, the dynamo generates electric current, the light bulbs glow, and the child develops happiness. A little to the right is a rope switch, which is also not connected to anything yet. My husband promised something spinning. At the very bottom is a homemade abacus made from beads strung on a metal chain. Simple but exciting. That's it for now, but there's still room. We'll soon go to grandpa's closet. There will definitely be something to profit from there. Oh yes! When all the locks are open, the doors can be opened. And according to the idea, there should be something there that makes you want to learn how to open all these locks. There's nothing there yet, I just put the books down.
What do you think can be placed inside? My husband prudently left a gap of 1 cm so that even something bulky could fit in there. But what?
Share your experience. What in the house haunts your little ones, what he definitely wants to open or unscrew: let's turn it into a game!