What is the secret of popularity?
Chipboard sheets have many good consumer qualities:
- Cheap compared to plywood, and even more so wood;
- excellent qualities for leveling the floor under a decorative coating;
- poor thermal conductivity, so chipboard serves as a good insulation material;
- ease of installation.
However, there are some restrictions on use, including:
- the material is afraid of dampness and requires a certain air humidity and temperature;
- not always suitable for design solutions due to low external characteristics;
- contains harmful substances (formaldehyde, melamine and others);
- does not hold screws and nails again.
Taking into account all these characteristics, we determine what types of work we perform with this material. For inexpensive renovations in a house or country house, the slab is quite suitable; in addition, these slabs fit perfectly onto existing floors.
Basically, chipboards are used as insulation and soundproofing material, as well as as a base for a decorative finishing coating.
Information: Particle boards are produced by pressing wood shavings using resins as a binding component. Based on the content of harmful resins, slabs are classified into different hazard classes. The use of new technologies has brought the slabs to a Super class level that is safe according to sanitary standards. When constructing the floor, slabs of medium safety classes E1 and E2 are usually used.
How to use tongue and groove slabs
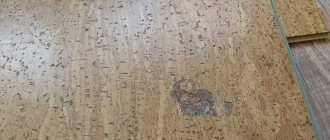
The chipboard board with the prefix “moisture resistant” is designed for use not only in dry, but also in wet rooms. Increased resistance to water absorption is achieved by impregnating the raw materials with water-repellent agents, which is why the compressed chips receive such an unusual greenish tint.
The list of applications for moisture-resistant tongue and groove sheets looks something like this:
Prefabricated subfloors
Bases for roll floor coverings and heated film floors are made. Before laying, logs are installed under the slabs, a concrete screed is made, or a dry layer of expanded clay is poured.
Finish floor covering
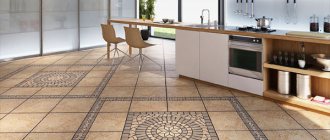
Basically, surface-decorated versions of QuickDeck slabs are used for finishing floors in sports facilities, utility rooms, loggias, and kitchens.
Leveling walls and ceilings for finishing
Most often, this material is used in private homes for lining beam ceilings or internal cladding of frame walls.
Structurally in low-rise construction
In addition to wall cladding, tongue-and-groove chipboard can be used for the construction of interior partitions.
Production of installations
Plates with a QuickDeck connection can be used not only for ceilings, but also for creating three-dimensional interior structures. You can use them to make a niche in the wall, cover communications, build a podium for a bed, kitchen or children's play area.
Building construction
Using chipboard, you can completely form an interfloor floor or make, for example, formwork for a foundation.
Interior arrangement
Grooved sheets are very convenient for arranging retail and warehouse premises - shelves, racks, display cases.
We recommend: ADC (asbestos-cement slabs)
Choosing chipboard
Another positive characteristic of particle boards is their small thickness, which means that the board will not take away excess height from the room during renovation. Therefore, for the floor it is enough to take a single-layer slab with sufficient density from a good manufacturer.
Usually for the floor they take grade 1 sheets, sanded, with a thickness of 12 to 22 mm, size - Euro format. However, there are other types of chipboard (multilayer, three-layer, thickness depends on the number of layers; with varnish coating, veneer and other finishing materials), they are used depending on the task.
How to lay chipboard over wooden floors?
To lay chipboard slabs on the floor over an old wooden floor, you need:
- clear the floor of furniture and inspect it;
- replace rotten, creaking and loose boards;
- treat old boards with antibacterial liquid to prevent fungal diseases of wood;
- cut the chipboard sheets and lay them on the floor, leaving gaps at the walls of at least 1-1.5 cm;
- check the level of the layout of the slabs;
- place chipboard sheets on self-tapping screws and screw them to the wooden floor;
- joints and places where self-tapping screws are buried in the slabs should be puttied, then, after waiting for the putty to dry, pass over the slabs with a grinding machine or sand them by hand;
- lay and secure skirting boards around the perimeter;
- varnish the surface of the chipboard sheets in several layers, this will prevent the material from getting moisture inside and give it a beautiful appearance.
You can also put a finishing floor covering on top of the chipboard on the floor - for example, linoleum, parquet, laminate, etc.
Floors
100 votes
+
Vote for!
—
Vote against!
Quite a lot of the flooring process uses a material such as chipboard. Among its main advantages are strength and low cost. But, nevertheless, the final result of working on the floor depends on the choice of this material. We will talk about the features and characteristics of chipboard further.
Table of contents:
- Chipboard for flooring: properties and characteristics of the material
- Chipboards for flooring: advantages and disadvantages
- Recommendations for choosing chipboard sheets for flooring
- Moisture-resistant tongue-and-groove chipboard for flooring - characteristics
- Laying chipboard floors: how to build a subfloor
- Chipboard flooring: how to arrange a floating floor
- Installing chipboard on a concrete base
Chipboard for flooring: properties and characteristics of the material
Chipboard is a material in the form of chipboard, for the manufacture of which wood chips are used, pressed using the hot method. In addition, chipboard contains an adhesive substance that is not of mineral origin.
In relation to the design features of chipboard it happens:
- one-;
- three-;
- multilayer.
In addition, there are grades A and B, which differ in strength characteristics to bending, deformation, moisture resistance and other technical indicators.
Chipboard also comes in first and second grade. Material belonging to the first grade has practically no defects in the form of cracks, stains, chips, protrusions or depressions. Second-grade material is characterized by the presence of large defects. In addition, there is chipboard without grade, that is, a board on which there are cardinal defects.
In relation to the characteristics of the outer layer of chipboard, it happens:
- with a fine-chip surface, finishing with polymers is possible;
- standard material, finished with veneer;
- Chipboard with a coarse-grained surface is most often used in the construction industry.
In relation to the level of chipboard surface finishing, there are:
- polished;
- unpolished.
In addition, there is a criterion for the distribution of material depending on the content of formaldehyde components in it. In relation to moisture resistance, a distinction is made between slabs that are prone to deformation when exposed to moisture and those that are not prone to deformation.
It is possible to treat the material with special impregnations that improve its fire safety. In relation to density, there are three classes of chipboard:
- high;
- average;
- short.
Depending on the type of chipboard coating, there are:
- laminated;
- extrusion.
The first option involves a material that has been exposed to high temperature and pressure, and a special film material is glued to it. More expensive varieties of such chipboard are coated with a special varnish, which increases its resistance to mechanical damage and moisture. With the help of lamination it is possible to achieve an attractive appearance of the coating. This type of chipboard is widely used in the furniture industry.
The second option is a material in which the wood fibers are located perpendicular to the slab. Thus, this material has reduced strength.
The use of chipboard is primarily associated with the insulation of wooden floors or concrete floors. It is this material that ultimately allows us to obtain a perfectly flat structure with high thermal insulation and sound insulation properties. At the same time, the costs of arranging this coating will be minimal.
Chipboards for flooring: advantages and disadvantages
Let's start characterizing chipboard with its shortcomings, since it doesn't have many of them. First of all, this is the appearance of the material, which, although it is wooden, bears little resemblance to wood. Also, a significant disadvantage of chipboard is the addition of resins to it, which act as a binder for sawdust or other components of the woodworking industry.
Among the advantages of chipboard we highlight:
1. Affordable price for chipboard flooring.
This factor makes this material one of the most popular in both the construction and furniture industries.
2. Ease and simplicity of work.
The material cuts well, is easy to install and does not require special skills to work with it.
3. Environmental safety.
This advantage is relevant if all technological standards and requirements for the quality of the binder were met during the manufacture of chipboard.
4. Excellent performance properties.
The use of chipboard as a base for laying the main floor is characterized by a significant period of use of the material.
5. Multifunctionality.
Ideal for installing parquet or synthetic flooring.
6. High sound and heat insulation properties.
Thanks to this, chipboard is widely used in the manufacture of doors, furniture, flooring and even wall finishing.
Recommendations for choosing chipboard sheets for flooring
Before you read the tips for choosing chipboard, you should consider the classification of this material. Most often, chipboards are divided in relation to their grade:
- Chipboard 1st grade;
- 2 varieties;
- 3 varieties.
Materials of the first, second and third grades differ in relation to strength, evenness, the presence of grinding, defects and other technical indicators. To ensure that the chipboard has a perfectly smooth edge, special equipment is used.
1. Slabs that belong to the first grade are distinguished by the absence of any coating. Their outer side is the same as their filling. However, these boards are covered with a melamine film, which is similar in appearance to plastic. Various pictures or photos are applied to its surface. The cost of laminated chipboard for flooring is much higher than regular one.
2. Chipboards belonging to the second grade have small scratches and chips. Their cost is much lower than that of first grade chipboard. The scope of application of this material is limited to the construction industry. At the same time, this type of chipboard is an excellent option for finishing the floor.
3. Grade 3 chipboard is characterized by low quality and the presence of a fairly large number of defects, especially of mechanical origin, which are located at the end sections of the boards. This type of chipboard is excellent for the construction of elements such as formwork or partition walls.
In order to buy chipboard for the floor, you should contact any hardware store. In addition, an important factor when choosing chipboard is the emission class. Each of the slabs contains formaldehyde resins to some extent. Certain classes have less of this substance, while others have more. This material is capable of evaporating from chipboard when exposed to moisture or elevated temperature. There are two options that describe the amount of formaldehyde in the boards, class E1 and E2.
The first option is safer and is most often used when arranging residential premises. The standard for the production of class E1 boards allows the content of no more than ten grams of formaldehyde per hundred grams of board. These boards are used in the manufacture of furniture intended for children.
The second class, E2, denotes the fact that one hundred grams of slab contains about thirty grams of formaldehyde. A less popular option, which is practically not used in residential areas due to toxicity.
The scope of application of chipboard is most often associated with construction. This material is often used when carrying out interior finishing work, in the process of manufacturing door structures, bases for ceilings or floors.
Moisture-resistant tongue-and-groove chipboard for flooring - characteristics
As mentioned earlier, chipboard is a material that is manufactured using the hot pressing method. That is why chipboard is practically not prone to expansion. To more conveniently connect the slabs to each other, manufacturers make slabs with two grooves and two ridges on them, which ensure the evenness and tightness of their joints.
When installing this type of chipboard, virtually no tools are required, and installation time is significantly reduced. In addition, moisture-resistant chipboard for flooring contains special additives in the form of moisture-resistant polymers. They allow the use of this material in rooms with an average level of moisture, such as a kitchen or balcony.
Among the advantages of shunted chipboard for flooring are:
- ease of installation. which is ensured by the presence of a tongue-and-groove connection;
- the presence of a perfectly flat surface, on which there are no differences, gaps or other defects;
- ease of working with the material;
- Possibility of use in rooms with high humidity levels;
- good performance properties.
It is the locking type of chipboard that allows you to create an excellent floating floor. In addition, using this material it is possible to construct a false floor or a dry prefabricated screed, without the use of mortar or additional building materials.
In relation to the size of chipboards for the floor, slabs of 1.5x4, 1.5x6, 1.5x8 m and so on are distinguished. The thickness of chipboard for the floor is 1, 1.8, 2, 3 cm.
Laying chipboard floors: how to build a subfloor
A rough floor covering is also called a dry screed, since materials containing water are not used in the process of its arrangement. The subfloor is the base on which the main floor covering is installed.
Instructions for leveling chipboard floors:
1. Logs are installed on the concrete base, the interval between which is 300-400 mm, if the sheet thickness is no more than 1.6 cm and 400-600 mm, when installing sheets 2.2 cm thick. Please note that near walls a gap of 20 mm is left. If there is an uneven floor, all gaps should be filled with sand or slag.
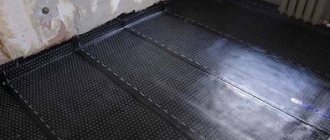
2. If the floor is on the ground floor, then the entire space between the joists is filled with foam or polystyrene foam insulation. Please note that in this case, a vapor barrier is first laid on the concrete base.
3. Using a building level, check the levelness of the base. To ensure that the floor does not creak during its operation, it is necessary to use construction plastic or paper to cover the surface.
4. Start laying chipboard from the wall located in the far corner of the room. Lay the first one and fix it to the floor with self-tapping screws. First, the central part of the sheet is fixed; the installation step of the fasteners is about twenty centimeters. Try to recess the screw heads by at least one millimeter.
5. To seal the edges, coat the tongue-and-groove joints with PVA glue or latex-based construction mastic.
6. Next, the next plate is installed and pressed tightly against the surface of the previous one. To avoid damage to the material, the chipboard comes with bars that are designed to fit it.
7. Then the following bars are installed. They are installed in such a way that the seams between them are located directly on the joists. If the floor of a narrow corridor is being installed, then the frame is positioned perpendicular to the movement.
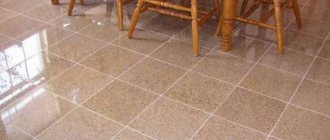
8. When vertical irregularities form, they are ground and cleaned of dust and dirt. Next, the floor is finished, which involves installation work on installing laminate, linoleum, tile or parquet flooring.
Chipboard flooring: how to arrange a floating floor
The arrangement of a floating floor assumes the absence of a rigid connection between the slabs installed on the floor. Thus, an intermediate layer is formed, which allows for thermal and sound insulation of the floor.
The use of this technology is associated with the arrangement of floors that have severe flaws and differences. To install a floating floor made of chipboard, follow these steps:
1. Place a vapor barrier on a concrete base. If the main floor is made of wood, it is best to use glassine.
2. Add filler in the form of dry expanded clay or slag. Align and level it.
3. Install material in the form of construction membrane or paper.
4. Wedges should be installed near the wall, which is the beginning of installation.
5. Start installing the chipboard; during the work, use glue that will help connect the boards together.
6. Make sure there is a one-centimeter gap between the wall and the chipboard.
Installing chipboard on a concrete base
There are two ways to install chipboard on a concrete base:
- installation directly on the floor;
- installation on logs.
The first option seems possible only if the floor made of concrete is perfectly flat and has no horizontal differences.
If there are small irregularities on the floor, then first fill it with a thin screed. You should wait at least 3-4 weeks for the screed to settle. After the concrete becomes strong, the base is cleaned of dust and dirt using a construction vacuum cleaner. Chipboard sheets are cut in relation to the size of the room.
Advice: Before starting installation work, it is recommended to apply drying oil or an antiseptic to the surface of the chipboard sheets, which improves its performance characteristics.
Marking work should be carried out on the base. In accordance with the markings, holes are drilled in the concrete into which the dowels will be installed. Lay the sheet in such a way as to obtain a gap of 15 millimeters. Use dowels to secure the material to a concrete base.
The second option for laying chipboard involves performing the following actions:
1. The choice of chipboard thickness depends on the step with which the logs were installed. Please note that chipboard is a more fragile material than, for example, plywood or wood, so the logs should be located close to each other.
2. Arrangement of the screed is optional when choosing this method. In this case, there is no need to waste time and extra material resources for its manufacture.
3. In order to compensate for the unevenness formed during the installation of the joists, small pieces of plywood or wood are placed under them.
4. First, you should mark the base in relation to the locations of the lags. Lay the logs so that their laying step is the same.
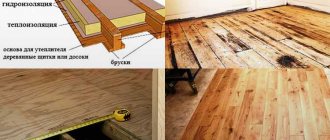
5. Next, insulation is laid in the space between the joists. With the help of anchors, the logs are fixed to the floor.
6. Lay insulation; mineral wool is best. It should fit snugly against the joists. All cracks that have formed between the insulation layer and mineral wool are sealed using polyurethane foam.
7. Next, waterproofing is installed, in the form of foil or oilcloth. A fairly acceptable option would be to use penofol, which will play the role of not only hydro-, but also thermal insulation.
8. Then the direct installation of chipboards is carried out, which are fixed to the floor with nails.
How to lay chipboard on concrete?
Particle boards can be laid directly on a concrete base. Before starting work, the concrete floor should be cleared of debris, leveled, and dried. If the base is uneven, you need to first make a screed and, after waiting for it to dry completely, begin laying the chipboard:
- pre-cut and cut the sheets;
- treat the reverse side with drying oil, preferably in two layers;
- for greater reliability, special mastic or glue is coated under the sheets, on which the slabs are placed;
- they should be placed in the direction from the threshold and the installation should be completed in inconspicuous places, and where the furniture will stand, you can use scraps;
- Having glued the sheets, secure them with self-tapping screws and dowels, starting to drill from the center of the sheet and then securing along the perimeter;
- Recess the heads of the screws into the slab and fill the holes with putty.
Important : a gap of at least a centimeter must be maintained between the wall and the edge of the chipboard sheet.
Floor installation on the balcony
An apartment balcony is the very place where the floor should be resistant to high humidity. Let's look at how to equip it using QuickDeck slabs with a decorative front covering.
As a rule, the floor mark on the balcony needs to be raised to the level of the threshold of the door leading to it. At the same time, its structure should be as light as possible, since the balcony slab is an external structure and cannot be overloaded.
Therefore, a frame floor made of slabs that do not require further finishing, and in this case combines both a rough and a finishing coating at the same time - this is the best option.
Most often, in this case, the floor level is raised due to the height of the sheathing elements, the space between which is filled with mineral wool or loose insulation. A vapor barrier film is laid under and on top of it.
If you don’t need to radically raise the floor, you can take a simpler route - use slab polystyrene foam laid without a frame for the base. How this is done - read below.
We recommend: Drywall (gypsum plasterboard) for finishing